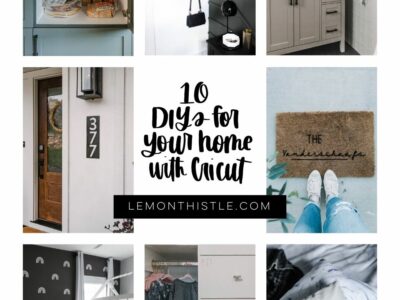
How to upload your own files to Cricut Design Space and demonstrating the different file types you can upload for your Cricut projects.
Today I’m taking on a basic tutorial that I get asked about SO often. How to upload your own design to Cricut Design Space. As a blogger that designs my own files, I do this all the time. And as someone who shares those free designs with the world, I get questions on how to use those free designs with Cricut.
So today, let’s talk through how to cut your own designs on Cricut, the different file types you can upload to Cricut Design Space (.svg .png and .jpg) and some tips for what works best for what.
Plus, I’ll be demonstrating how to change colours of designs, how to add patterns (2 ways) for print then cut, and how to get your picture from paper to vinyl using only your camera phone and the Cricut Design Space software.
If you’re new to uploading your own designs to Cricut, this is a great post to bookmark or pin and come back to when you’re uploading another file to Cricut Design Space.
This post also has a video where I demonstrate all of these – I definitely recommend watching it through to understand the different file types and see what your Cricut can do with your designs, then reading through for specifics if you’re stuck.
If you’re looking for how to get your lettering ready for cut using PHOTOSHOP instead of design space… you can find that in this tutorial here. But you don’t NEED photoshop if you’d rather save those bucks.
There are a TON of screen shots in this post because I’m doing several tutorials in one SO what I’ve done is made them small for ease of reading and if you would like to see it bigger, just click and it will take you to the full image size. Sound good? Good ;)
And before we do that… how about the video?

I pack a lot of information into this video. If you’re wanting to watch a certain part slower, you can always click that gear button and adjust the playback speed.
Where do I insert designs onto my mat in Cricut Design Space?
Before I get into the step by steps of uploading each file type, I wanted to point out the three different ways you can get designs onto your mat in Design Space.
The three different places you can insert designs onto your mat is the ‘Images’ tab, ‘Shapes, and ‘Upload’. Images is where you’ll find everything that is offered by Cricut. There are free images, there are paid images, and there are images that are included in Cricut Access (a subscription service).
I use this most for basic images for party themes (like the train for this party or the paw prints at this party). Shapes is handy, but there’s not a ton to choose from. And upload? That’s what we’re going to concentrate on for this tutorial.
When you click on ‘Upload’, there are two different options. There’s Upload [a cut image] or Pattern Fill. I always prefer to use the upload option… even when I’m going to use whatever that image is for a fill (not a cut outline). I have an example of that in this post/video as well.
What is an SVG?
SVG Images are the easiest type of images to upload into Design Space. If you buy or download a free ‘Cut file’, this is typically what you would be buying (like my SVG mini bundles here).
SVG stands for Scalable Vector Graphic and that means that you can size it (way) up or down without losing quality.
These images also have the most options for customization within the Design Space Software and that is because it imports each cut as a separate piece.
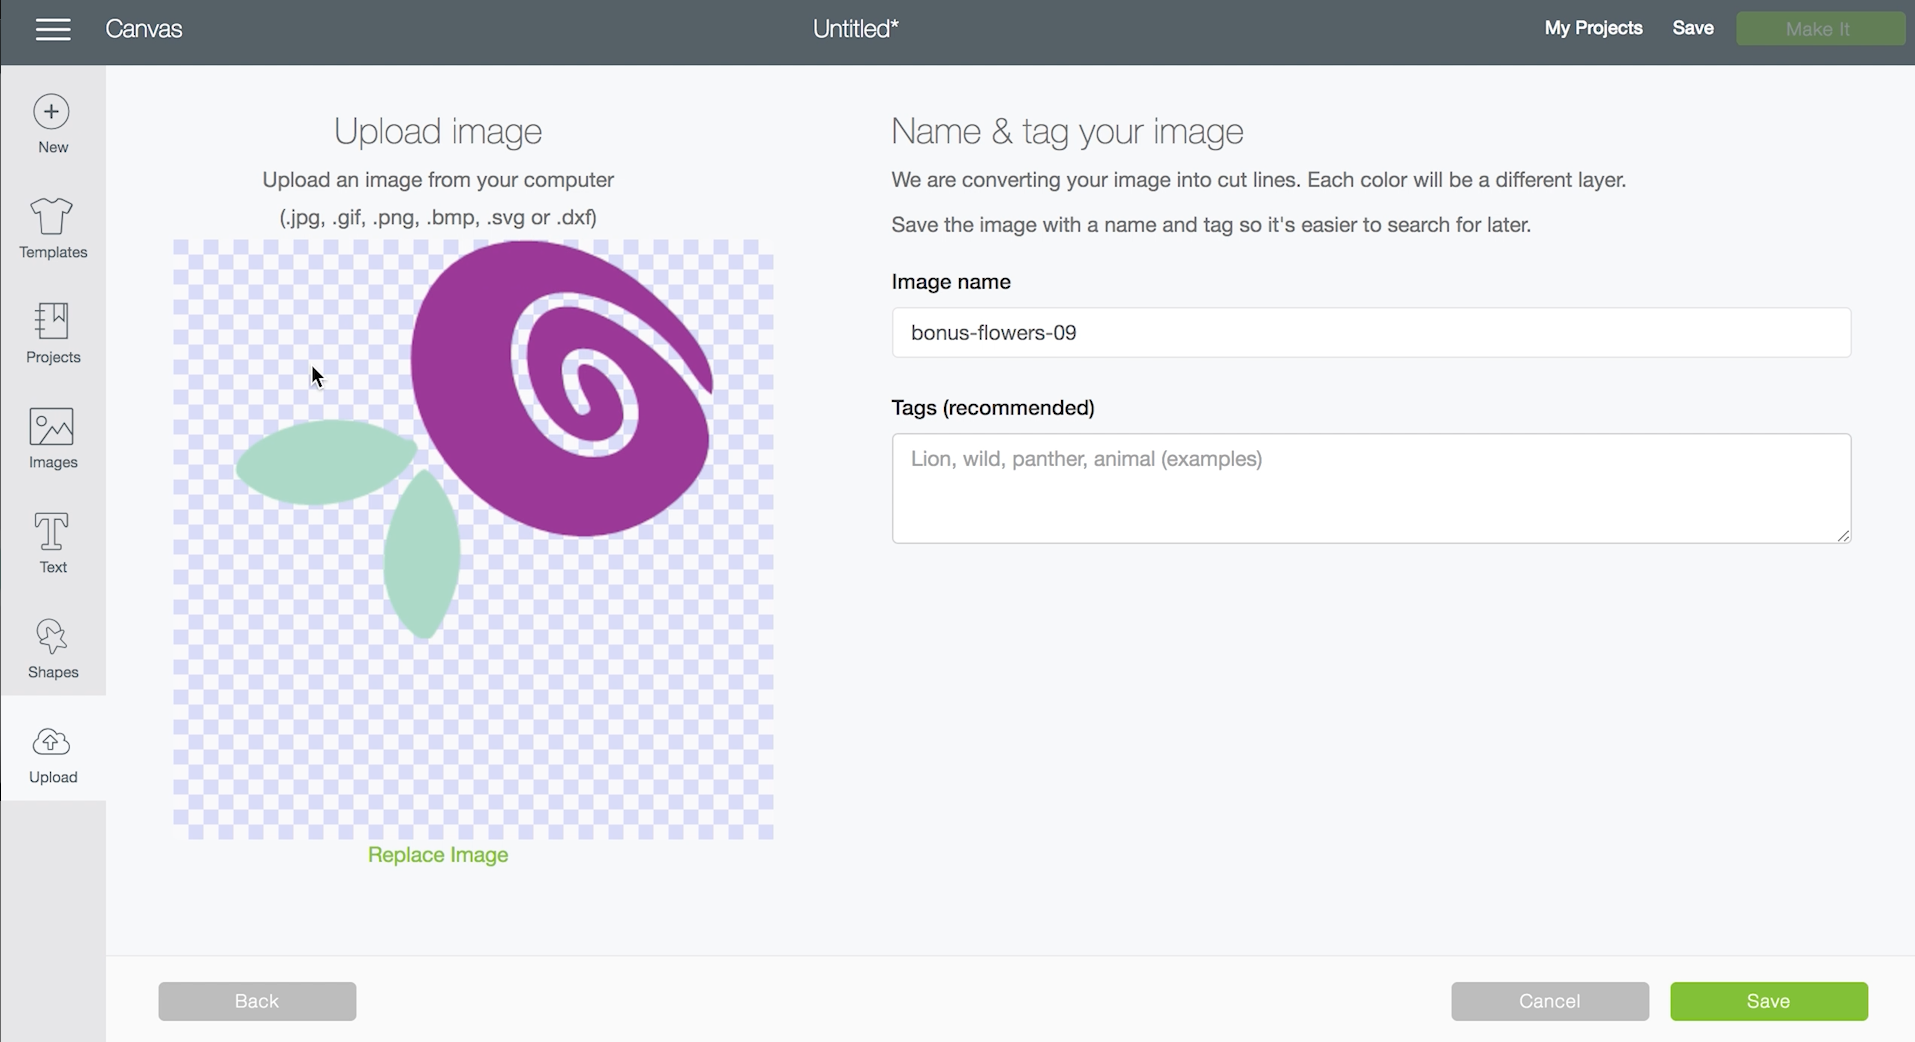
How to IMPORT SVG IMAGES TO DESIGN SPACE
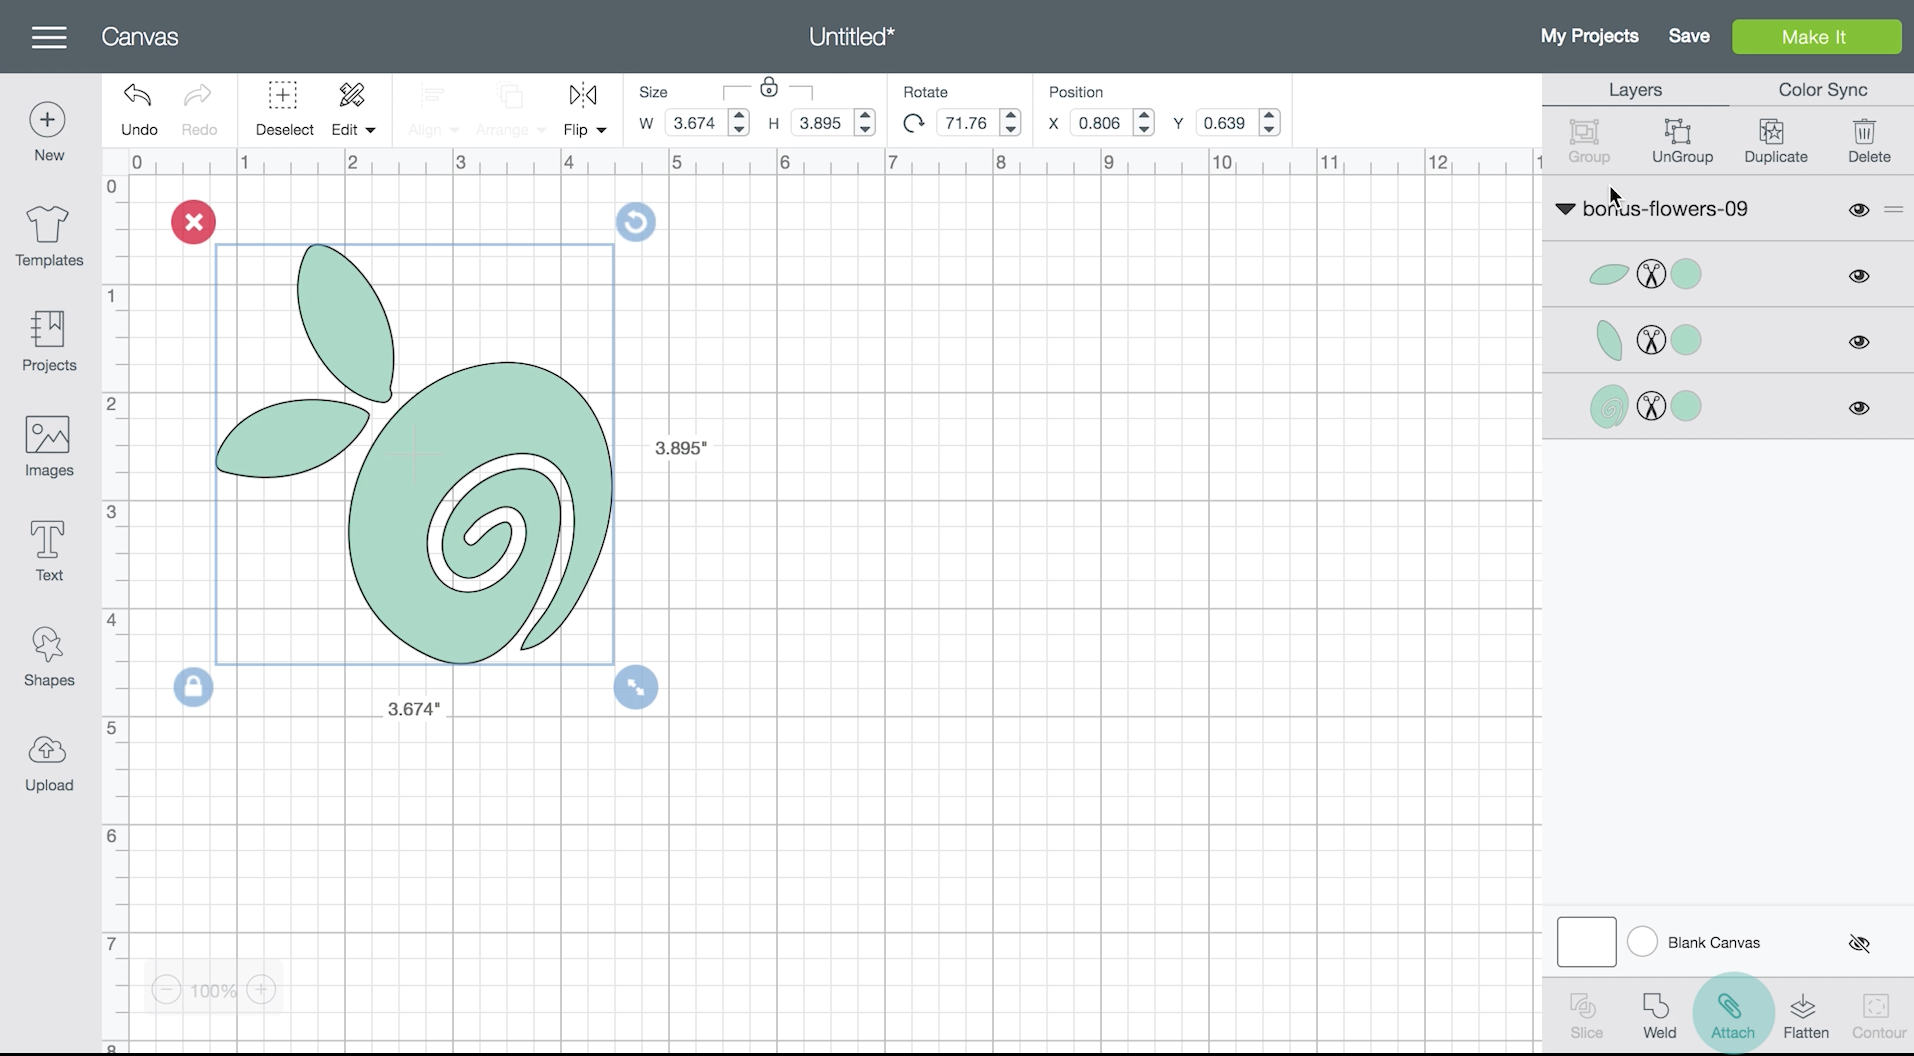
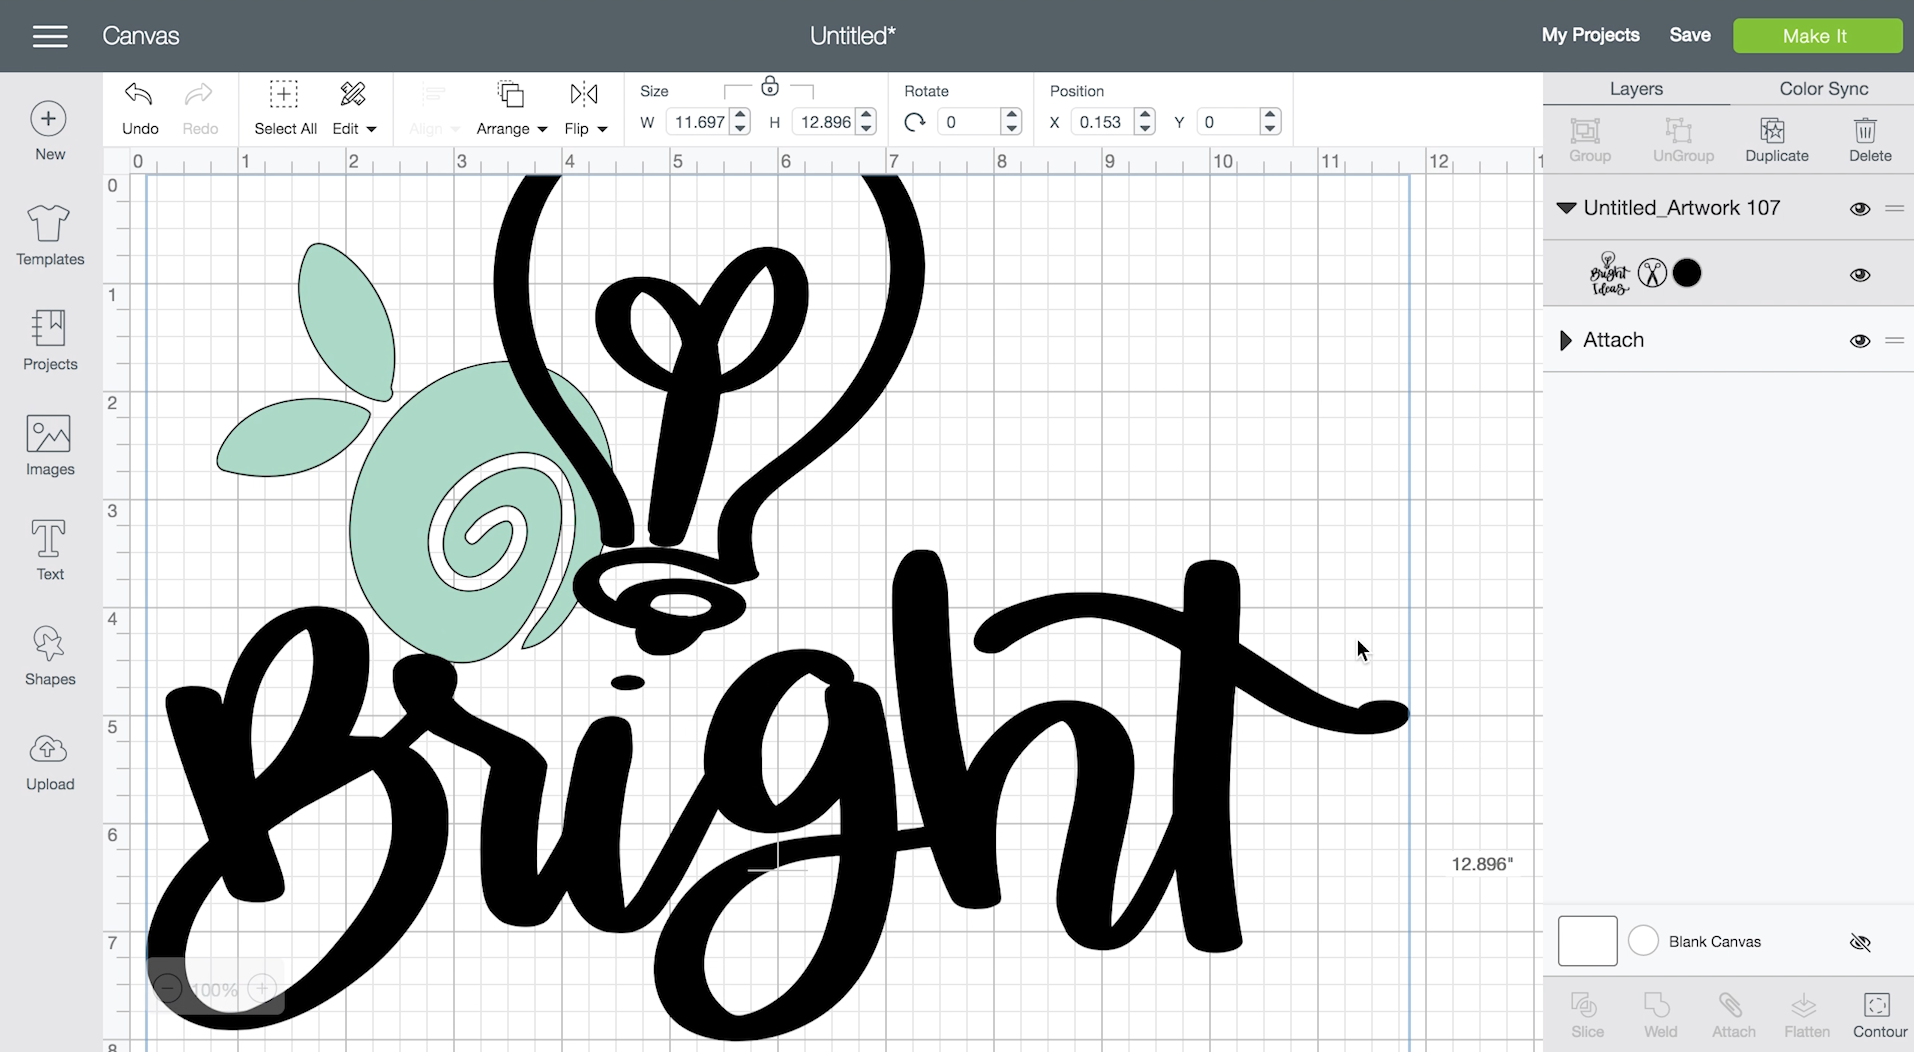
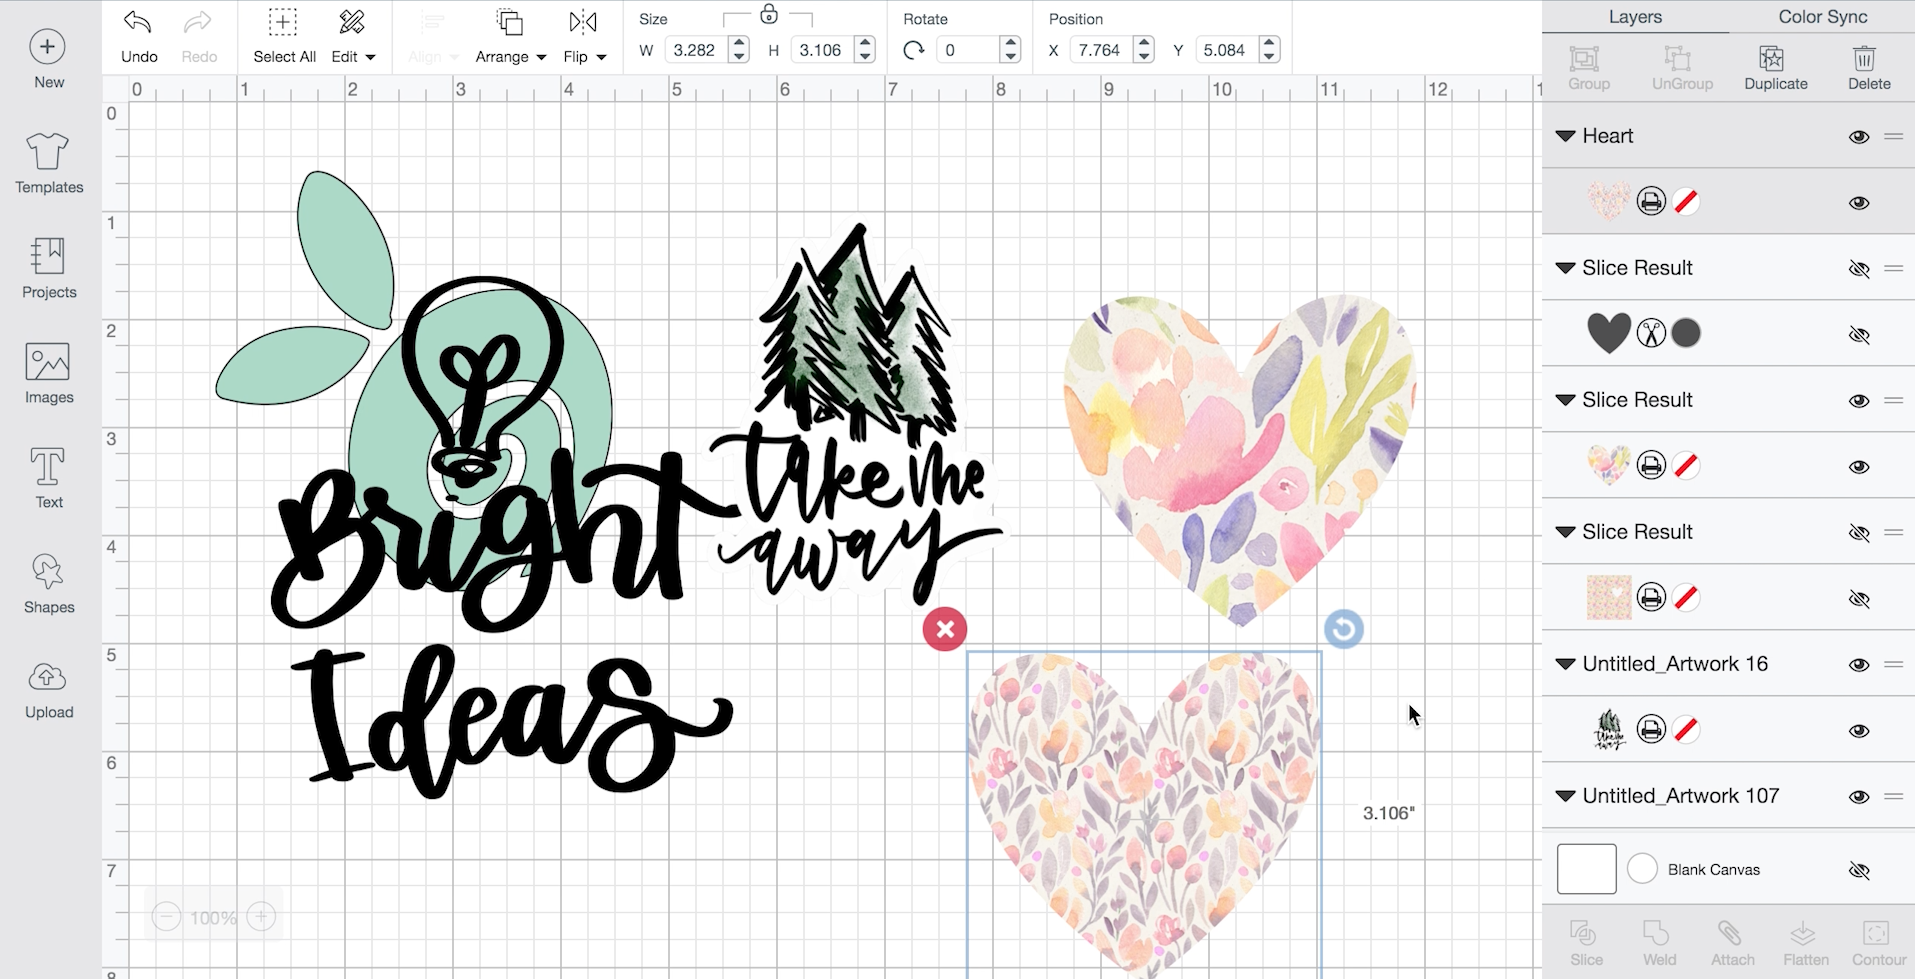
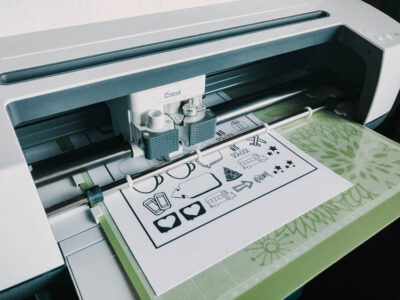
For an example on this one, I used this simple floral graphic that Erin made for the Spring Fresh Cut Bundle (no longer available). I chose this one because it is only three pieces, but if you import a larger file keep in mind that it will look much more overwhelming in the layers tab because there is a layer for each cut made.
To upload any file type, hit that little cloud symbol with the up arrow. Click upload [cut file] and select your file. That will open up a screen where you can name your file and add keywords.

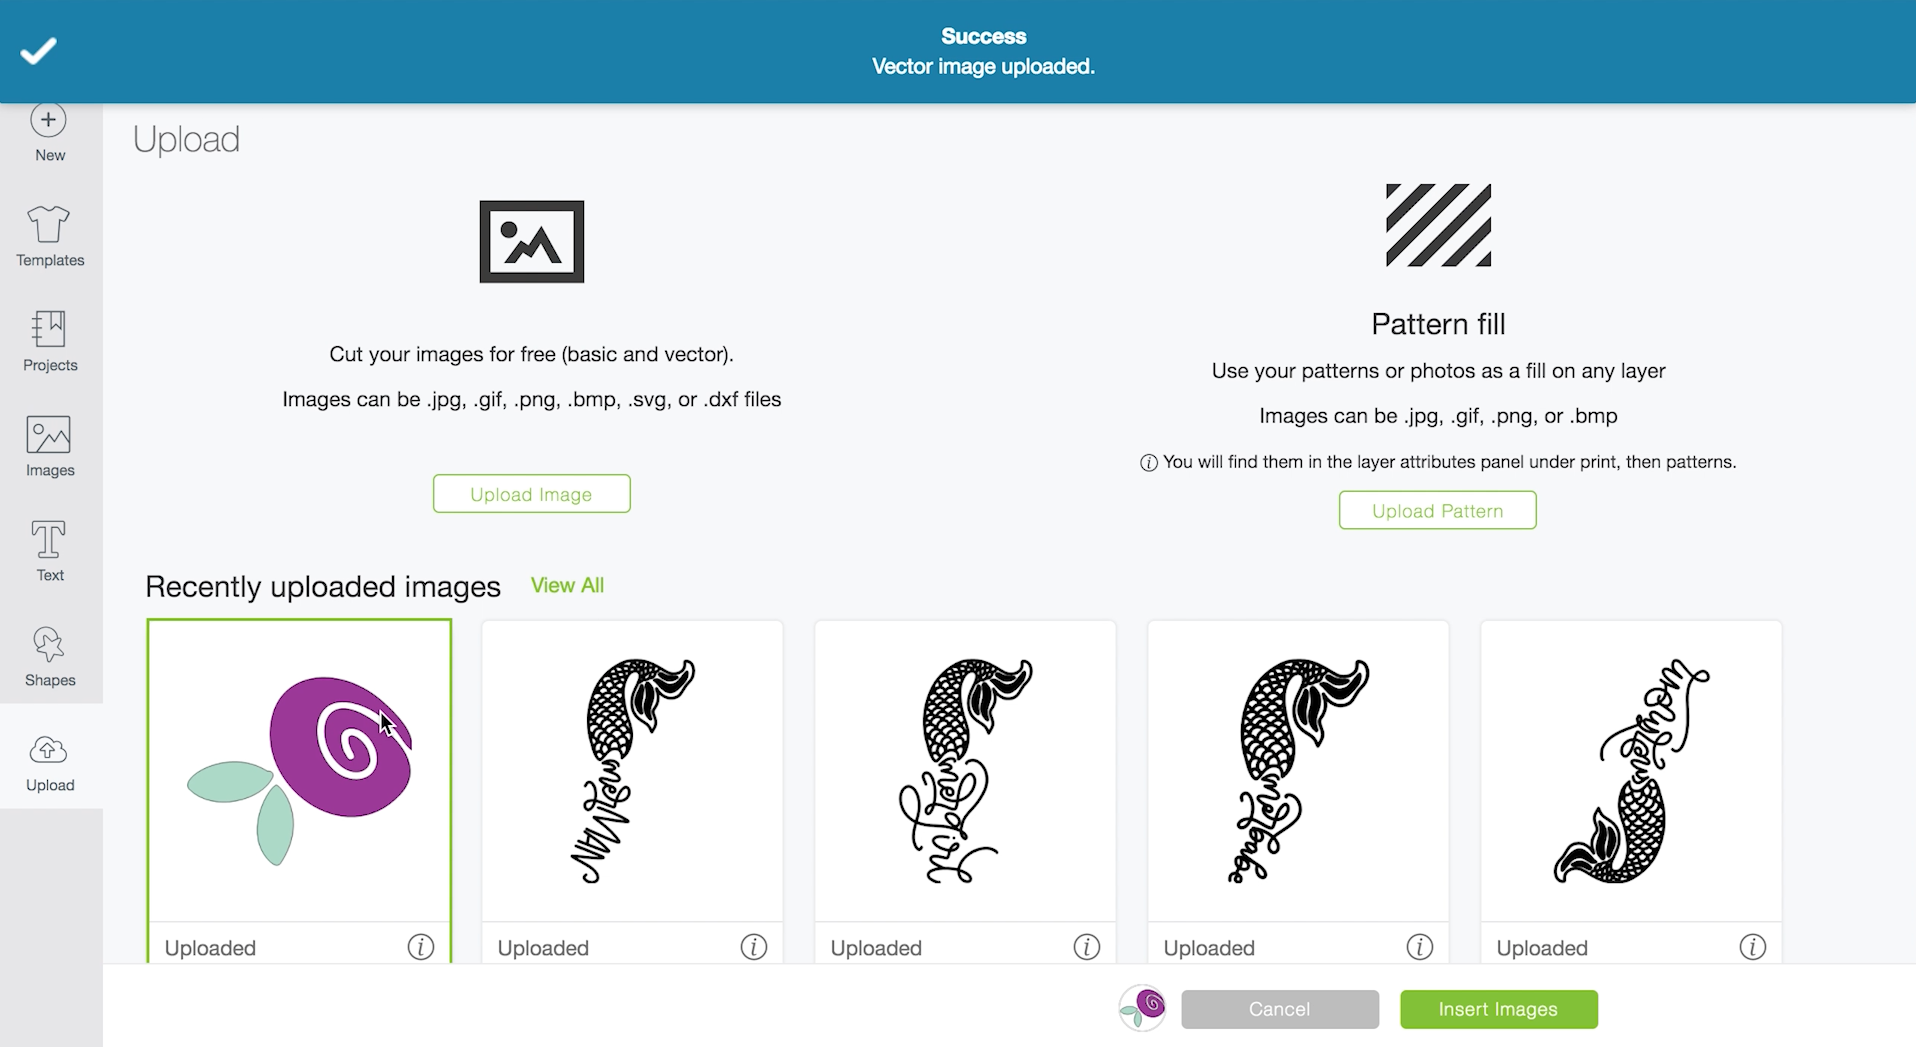
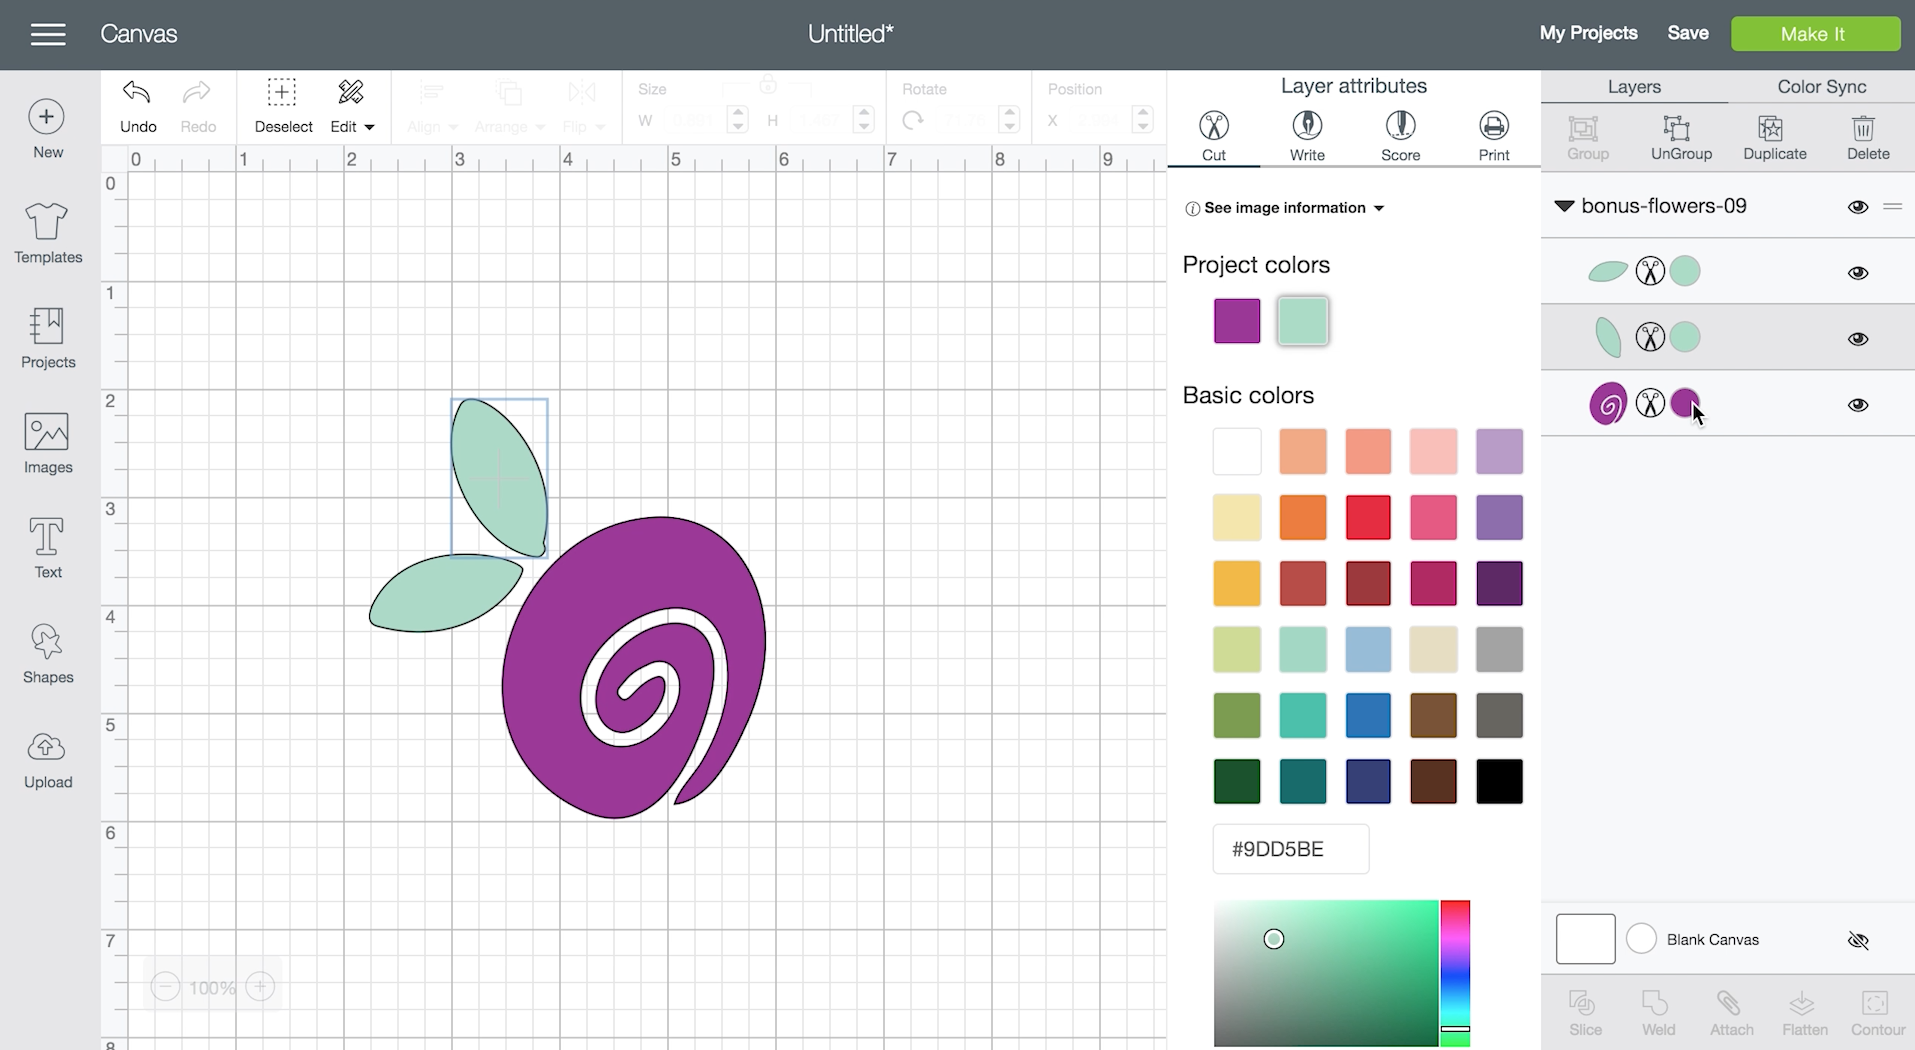
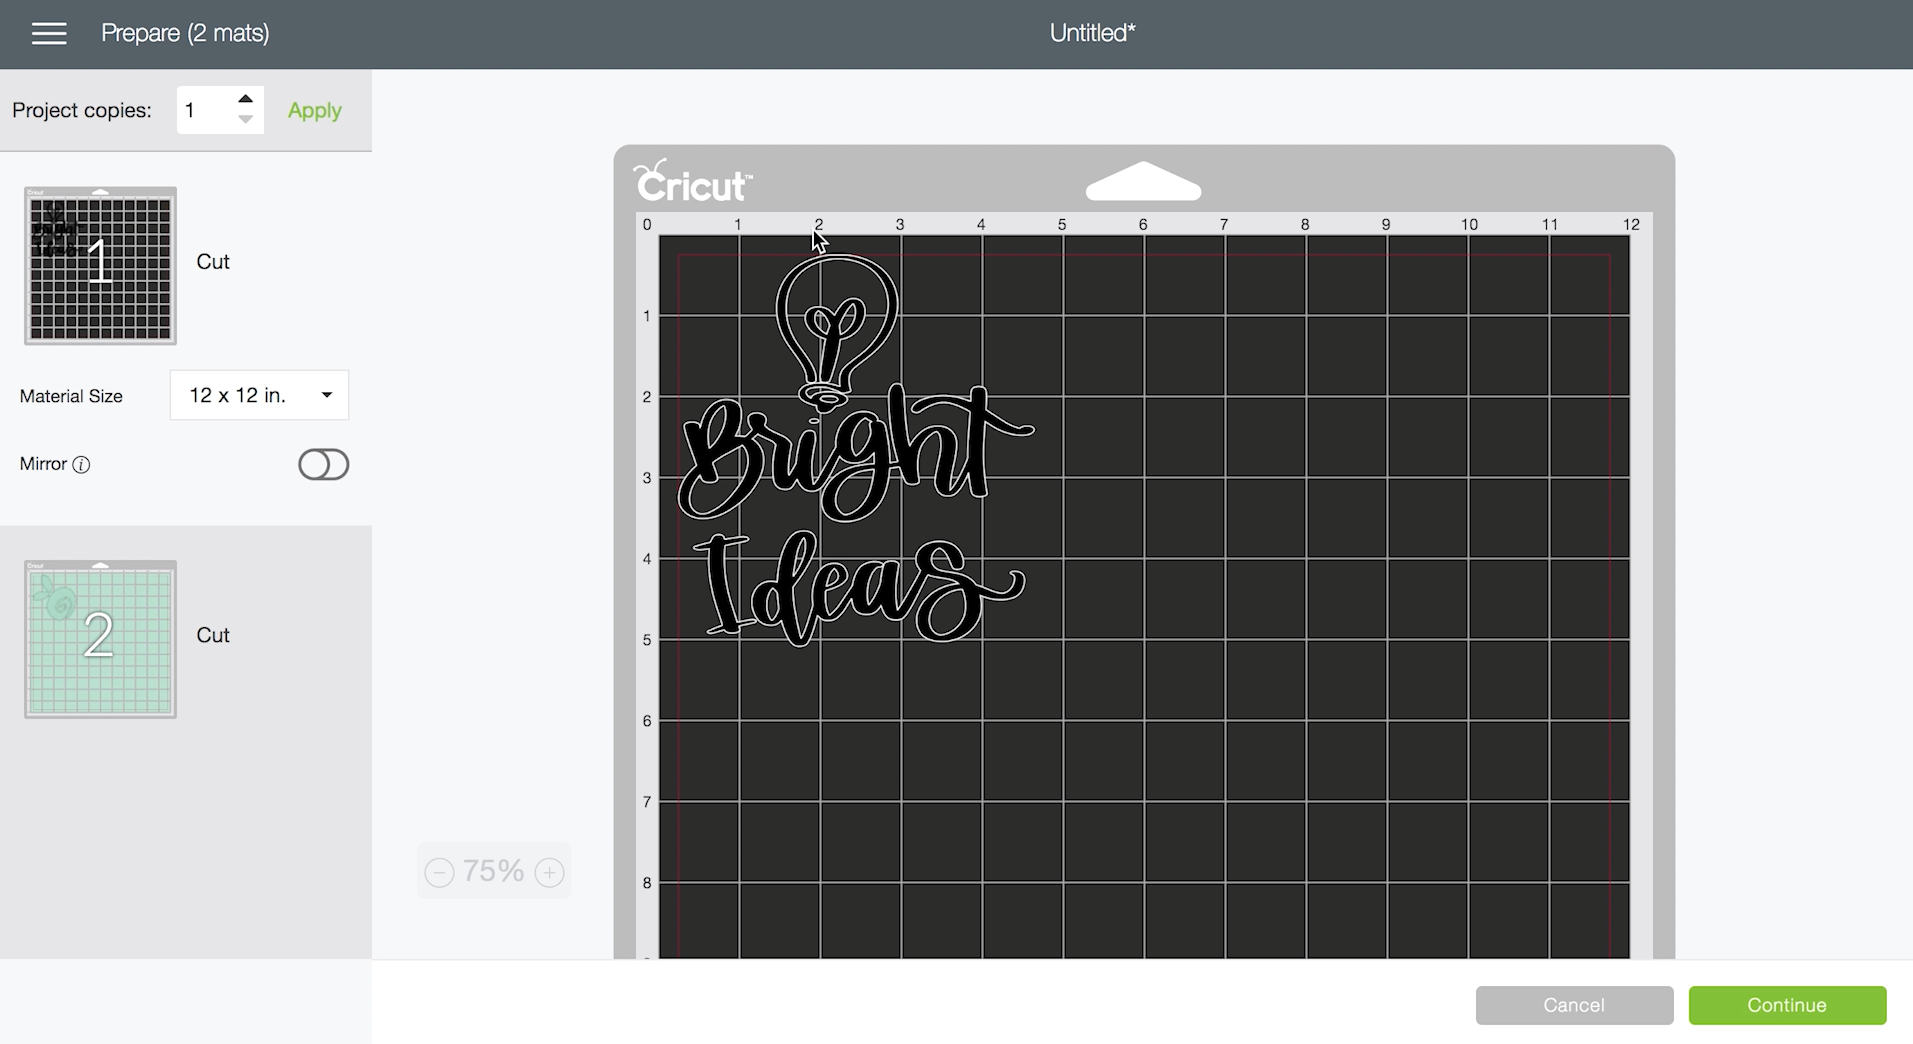
Then you can hit ‘Insert Image’ and it will be inserted onto your canvas. When you click on that design and drag it around, it will seem like one piece. It sticks together after all.
But notice in the layers tab on the right now each piece is a different layer? You can change the colour of each piece and cut them off of different maps. When you have sized it to your preference, hit MAKE IT (top right) and see how the pieces lay out on the mat.
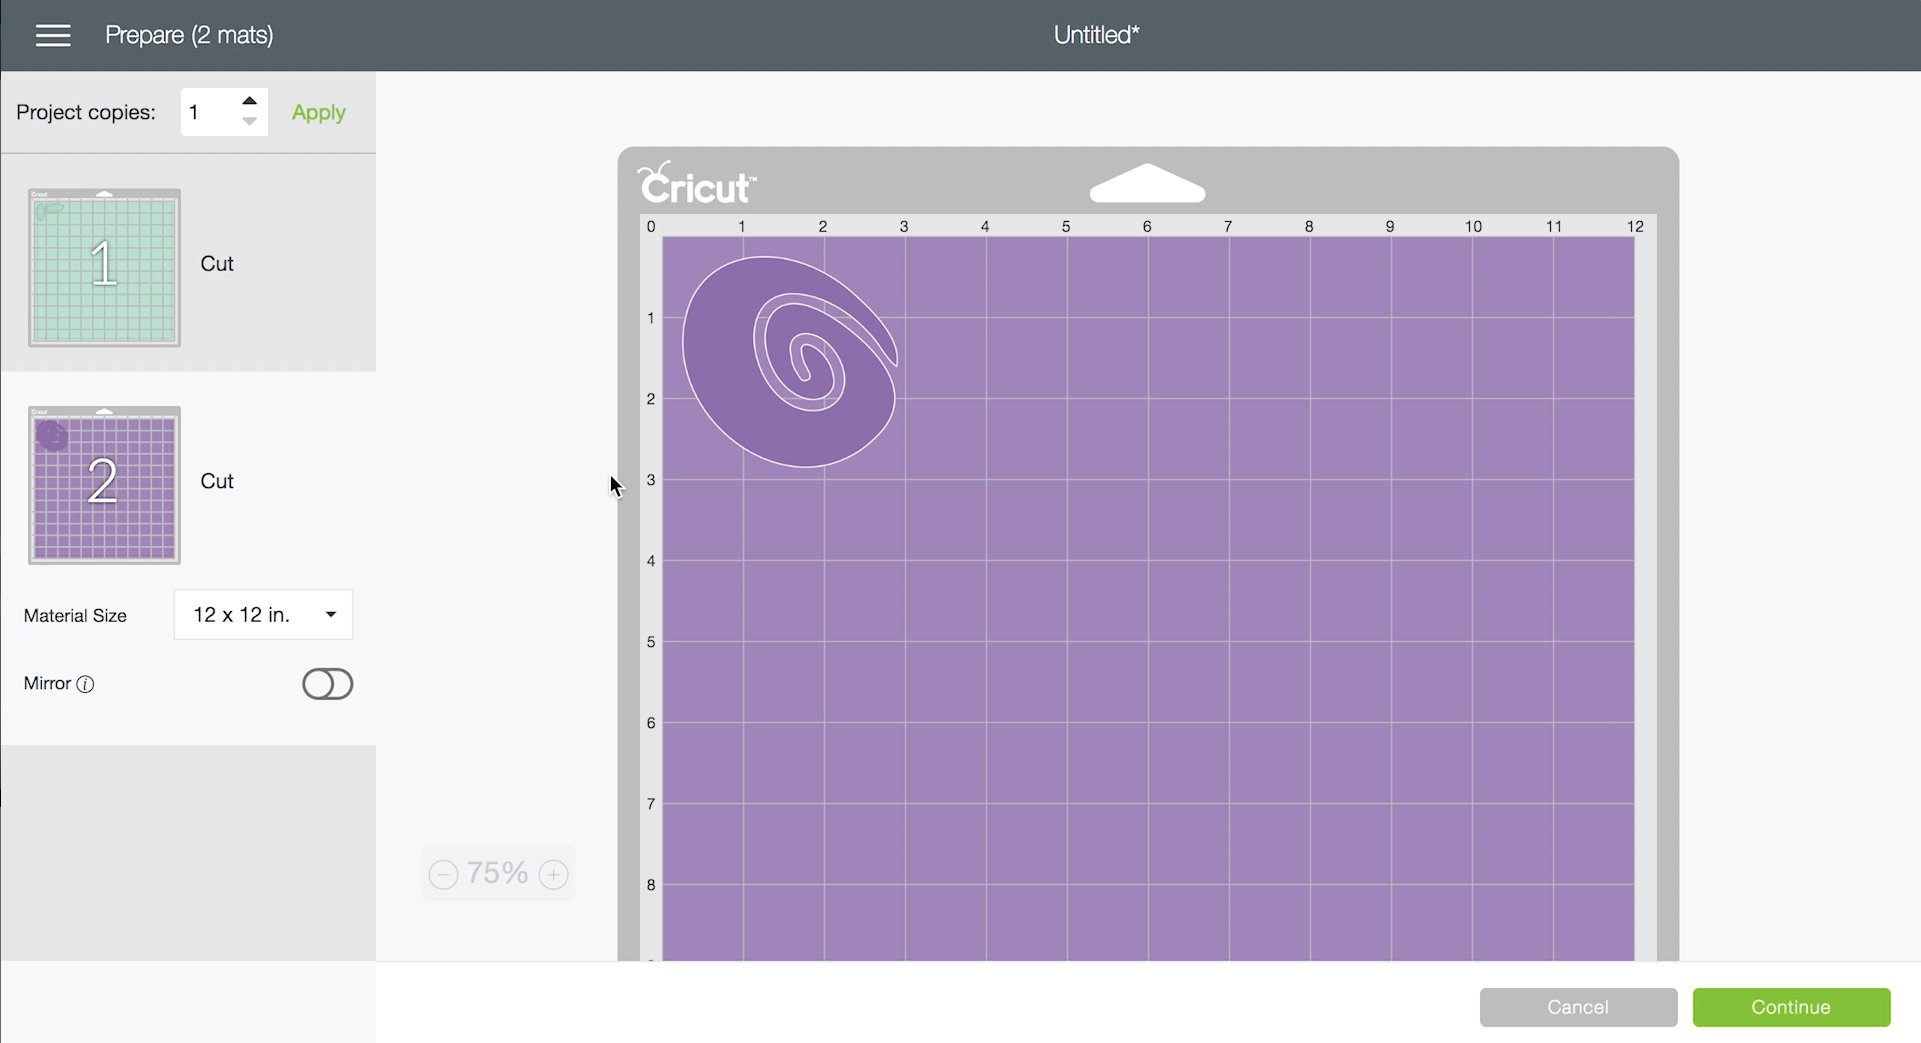
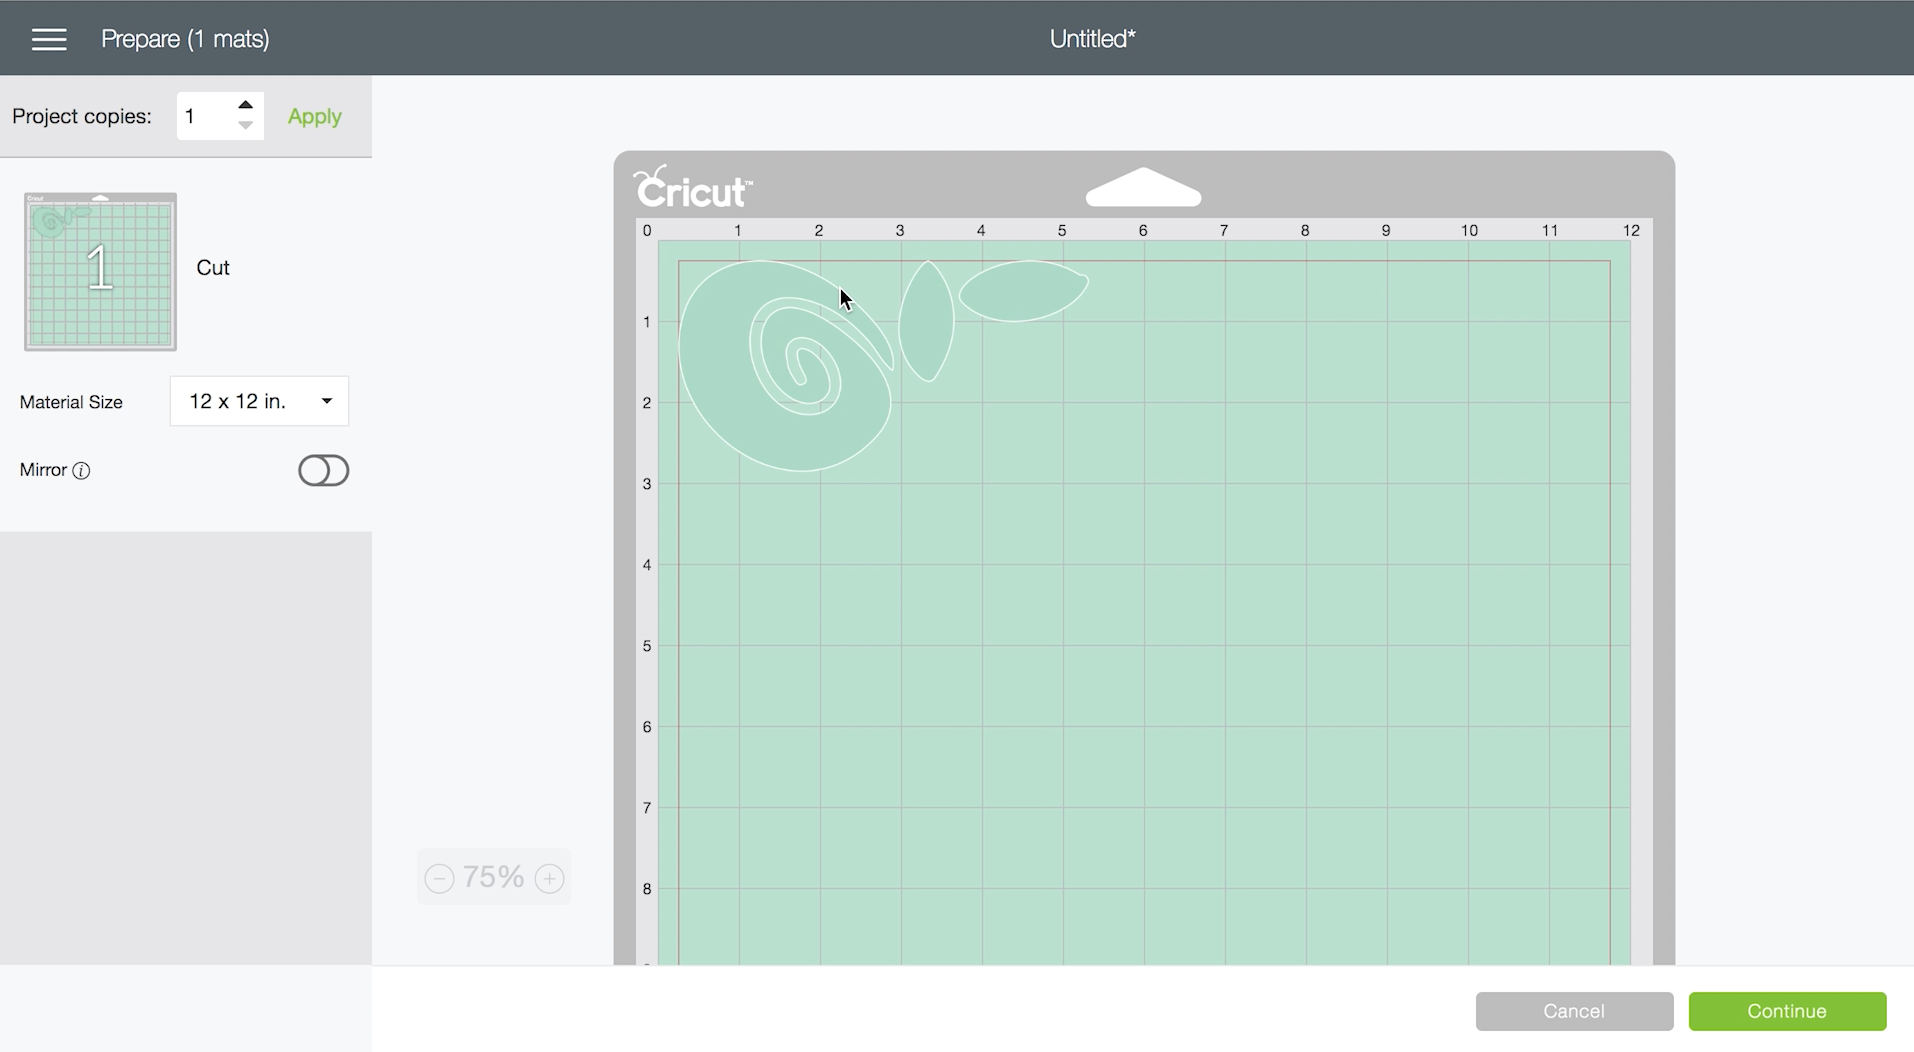
They’re on separate mats! Of course they are, because they’re different colours and you need two different colours of vinyl. If you’re anything like me, you’ll probably go back and make all the pieces one colour and try again. But you’ll find the design is all jumbled.
How to get my design to stay together when cutting on Cricut
Cricut Design Space tries to make the best use of each piece of vinyl by arranging all the different pieces on your mat for you. This might conserve vinyl but it might be a pain in the butt if you’re trying to cut one design with multiple pieces… and now you’ll have to get everything lined up by hand.
So how do we fix it? It’s quite easy! Go back to your canvas and select all the pieces of your design you want organized together. You can do this by holding down CTRL on your keyboard and selecting all the layers on the layer panel OR you can just click and drag your mouse over the design to select it all.
Then click that little Attach (paperclip) button at the bottom of the layers panel (highlighted in blue). This will hold all the piece together without permanently losing the data of them being separate. When you click ‘make it’ you will see that the design holds together this way.
And since they’re just attached, you can detach them at anytime and change the size of one pieces or decide to cut the rose out of purple and the leaves out of green.
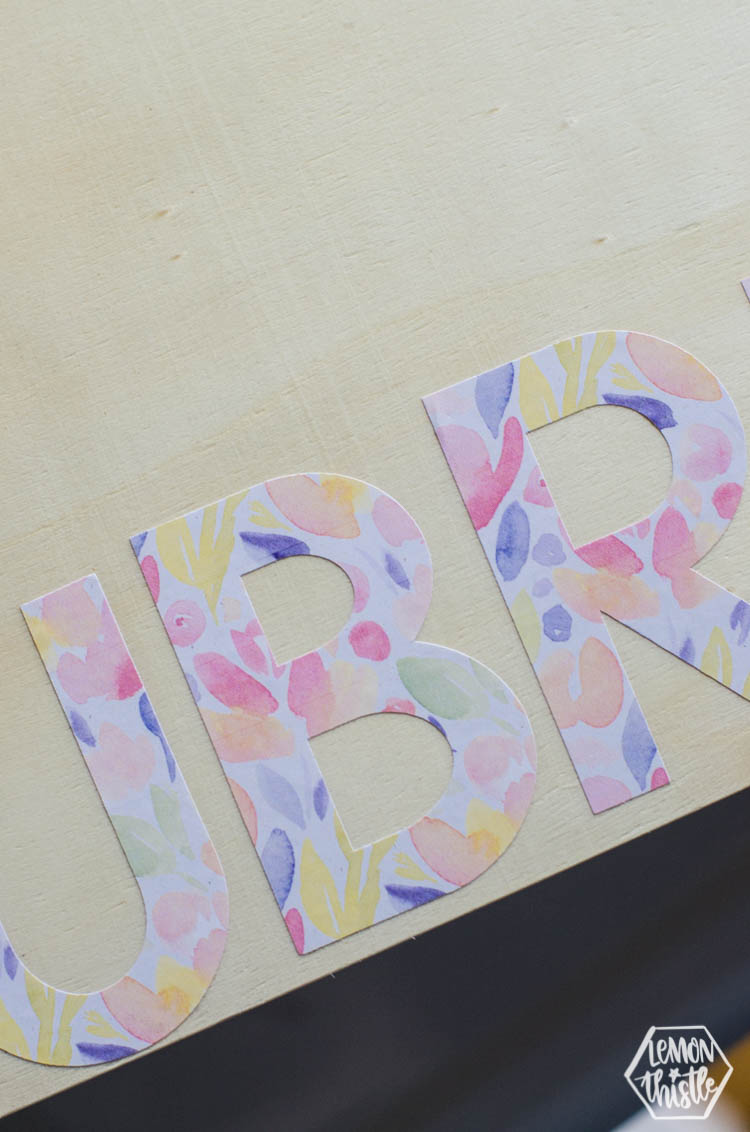
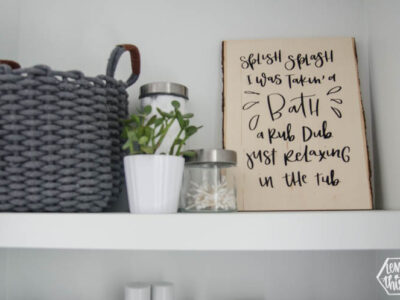
Here’s the shirt I made my daughter using this design:
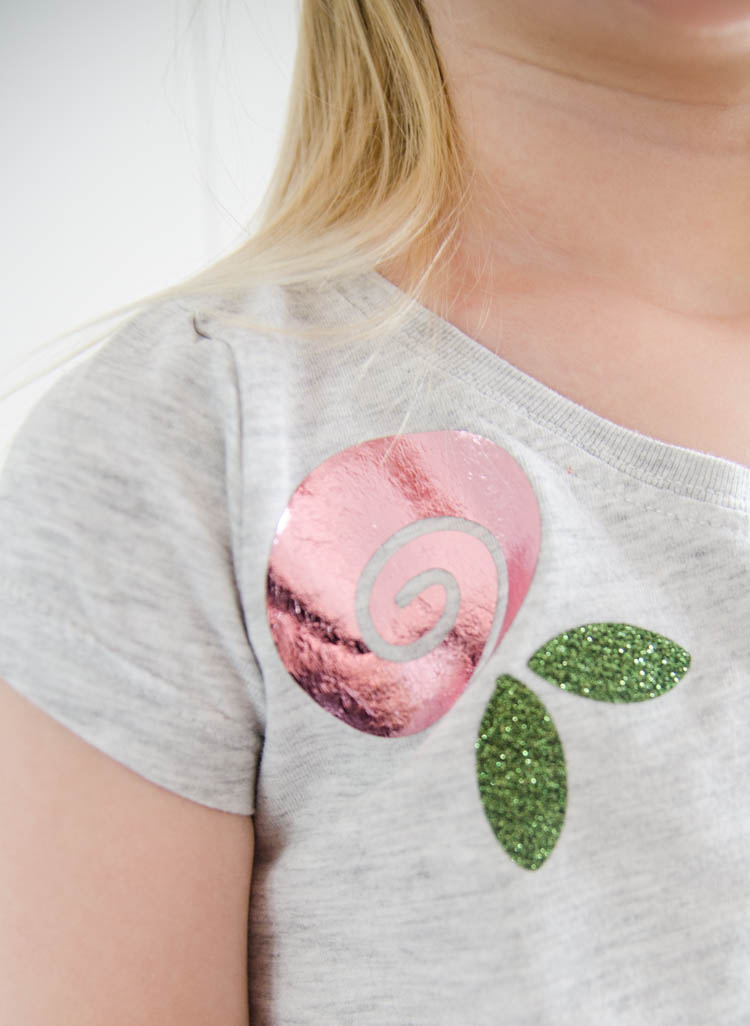
I made this shirt by keeping the rose on a separate mat (I left it purple in Design Space) and selecting the leaves and attaching those two before cutting them. The leaves are made with Cricut Glitter Iron On and the flower is made with Cricut Foil Iron On.
Do my materials need to match my Cricut Design Space Colors?
Okay wait, you left it purple but cut it out in pink?! Yes! The colors in Cricut Design are handy to help you visualize your project and to help organize your layers or designs into different mats, but they don’t need to match what you put on your mat.
In fact, I tend to keep everything black on my canvas and then choose whatever colour I want on my mat- never changing the color of the design on the mat.
But how will Cricut know what you’re cutting to cut it properly?
After you click make it, you will select your material so your Cricut cutting machine knows how much pressure to add to your cut.
What is a PNG image?
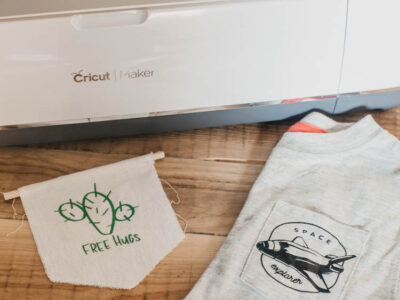
PNG files are my most used file type with Cricut. PNG stands for Portable Network Graphic which is a lossless image compression file type. That means that it has a lot more information than a JPG (for example) and the *biggest* thing to me is that it can have a transparent background… which makes importing and using them for cut really easy. This is the type of file I use the MOST often with Cricut. You can see me use PNGs for these DIY Enneagram T-Shirts and for this birthday cake topper.
PNG images upload as ONE layer and that means that it will stick together and cut exactly as it is imported. What does that mean? You can’t easily change the colour of one piece of the design or rearrange letters of a design once imported. But most of the time… we want it to look like how we imported it, right? So that works best for me.
If you do want to make changes to parts or make one design into layers, get comfortable copying the design and contouring pieces. I contour to make multiple layers in this diy wall hanging tutorial.

I create my PNG images in Photoshop after scanning in lettering (see how I digitize my hand lettering for cut here) or straight off my iPad Pro (Procreate exports in PNG format which is crazy handy) but before I had either of those, I used PicMonkey.com to create my PNG graphics with transparent backgrounds.
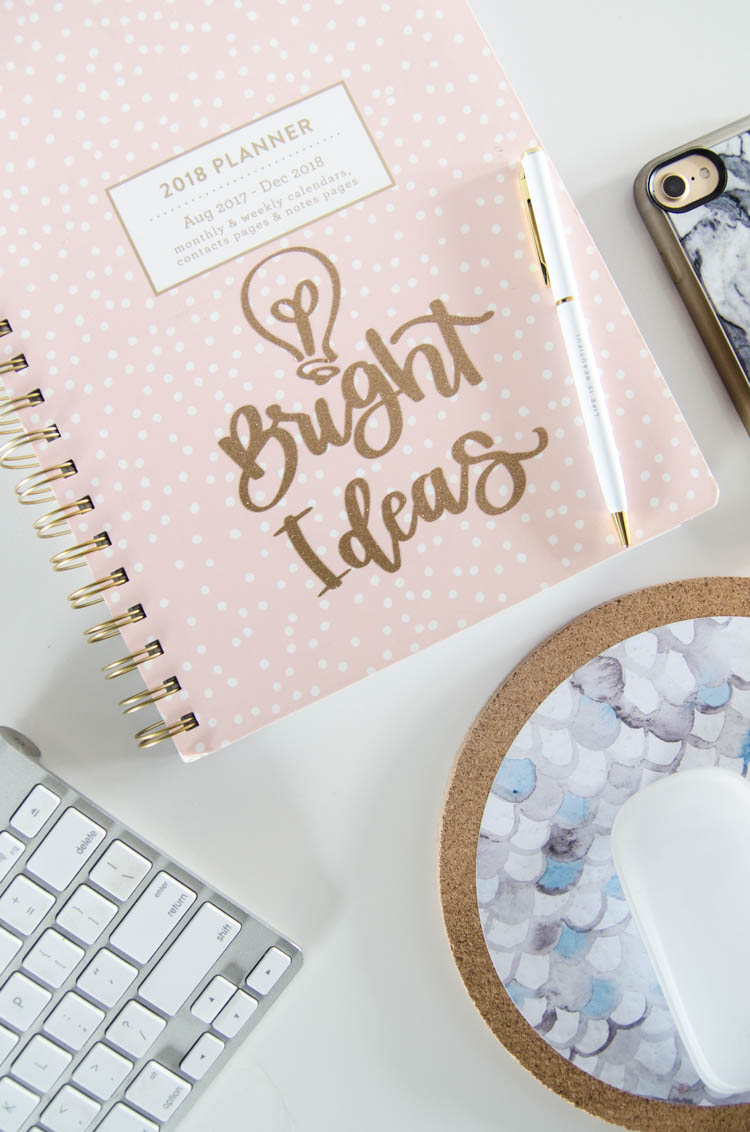
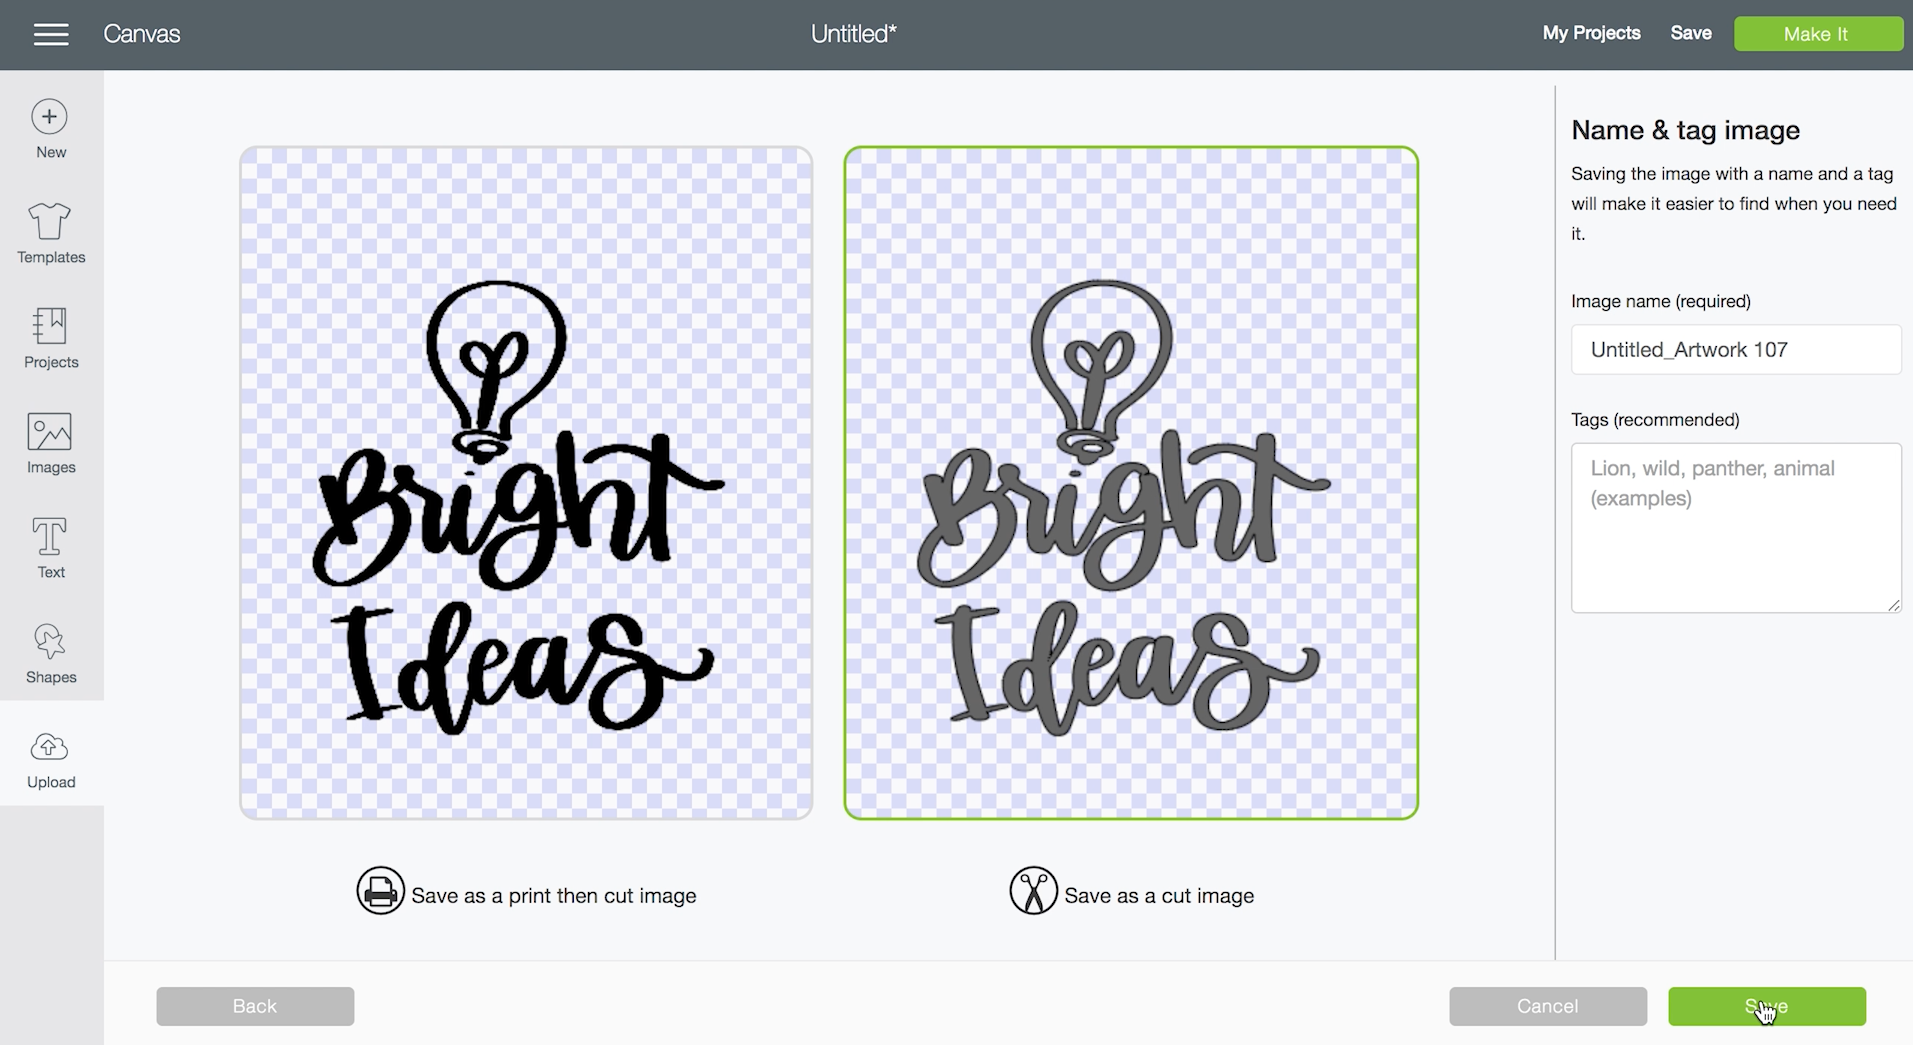
This ‘Bright Ideas’ example I made on my iPad Pro and exported with the transparent background.
HOW TO IMPORT PNG IMAGES TO DESIGN SPACE
To upload a PNG with a transparent background, you click that little ‘Upload’ with the cloud and you will select your file. You will have a few more steps than you did with the SVG to get it to your mat.
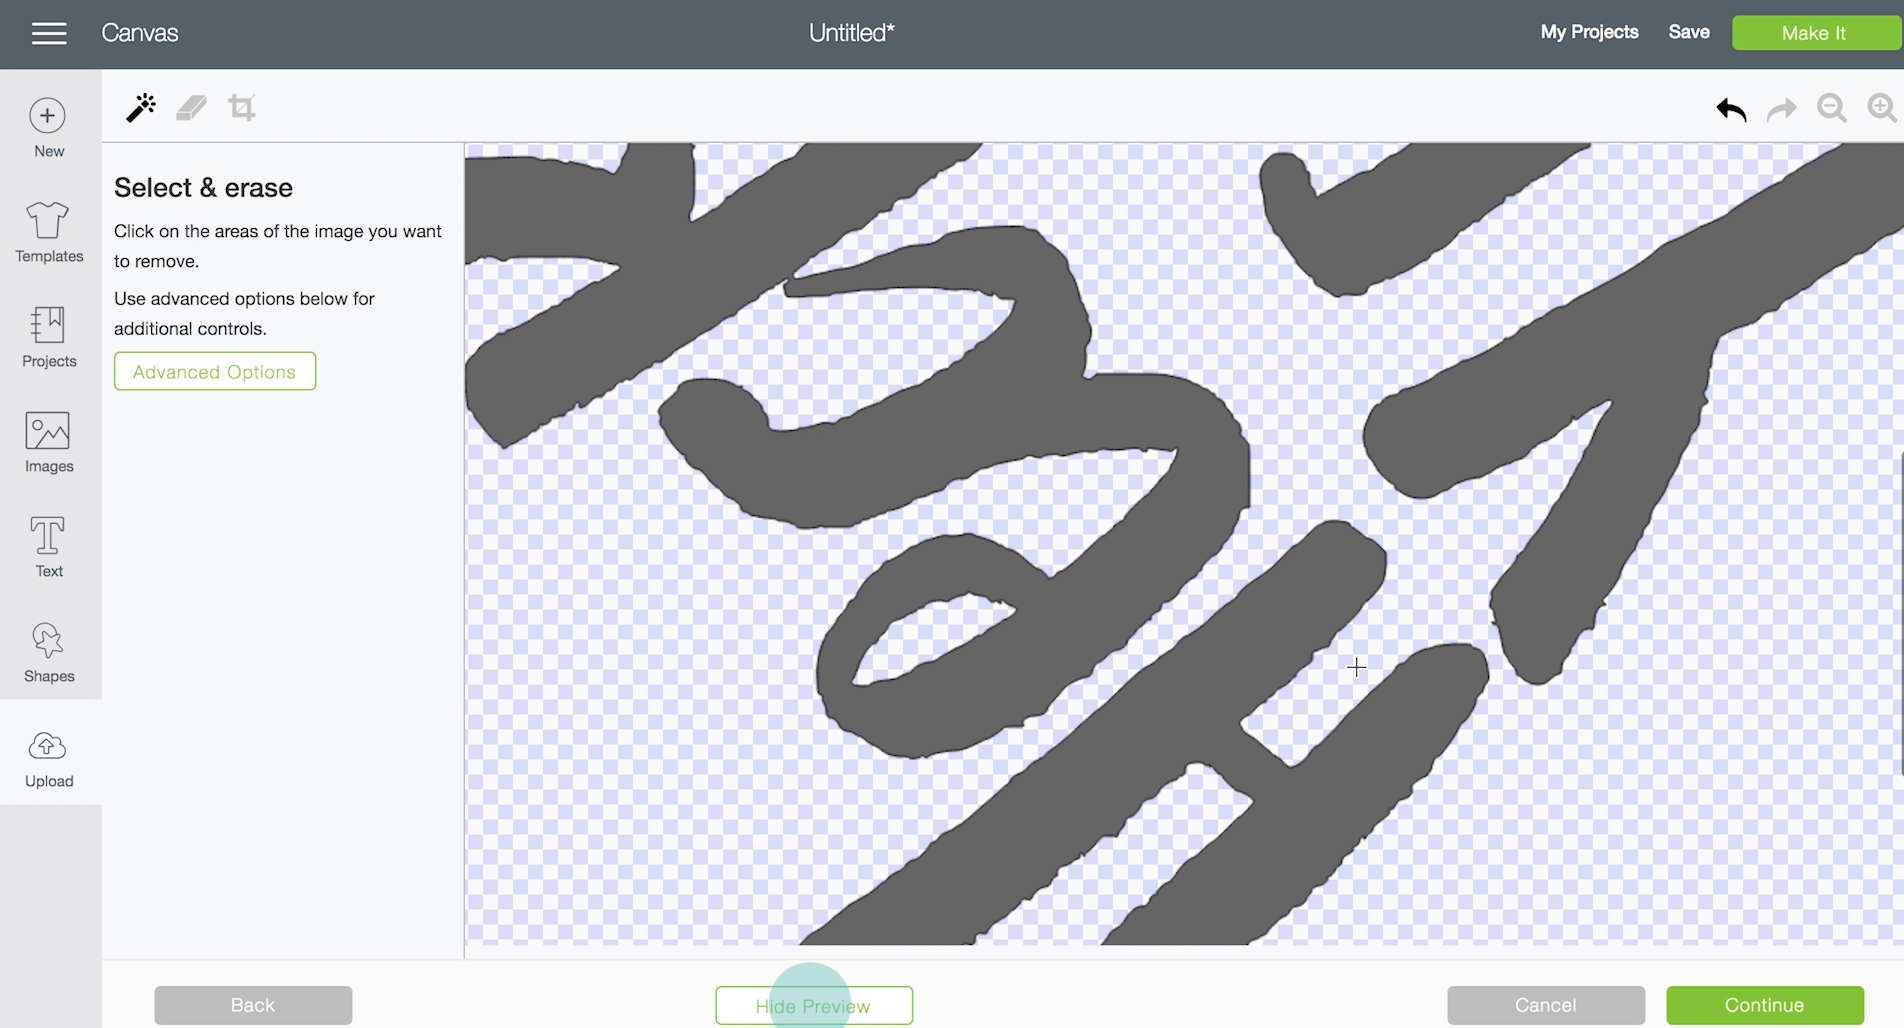
After you select your file, you will be prompted with choosing if it’s a Simple, Moderately Complex, or Complex image. For this simple black/transparent design I choose ‘Simple’.
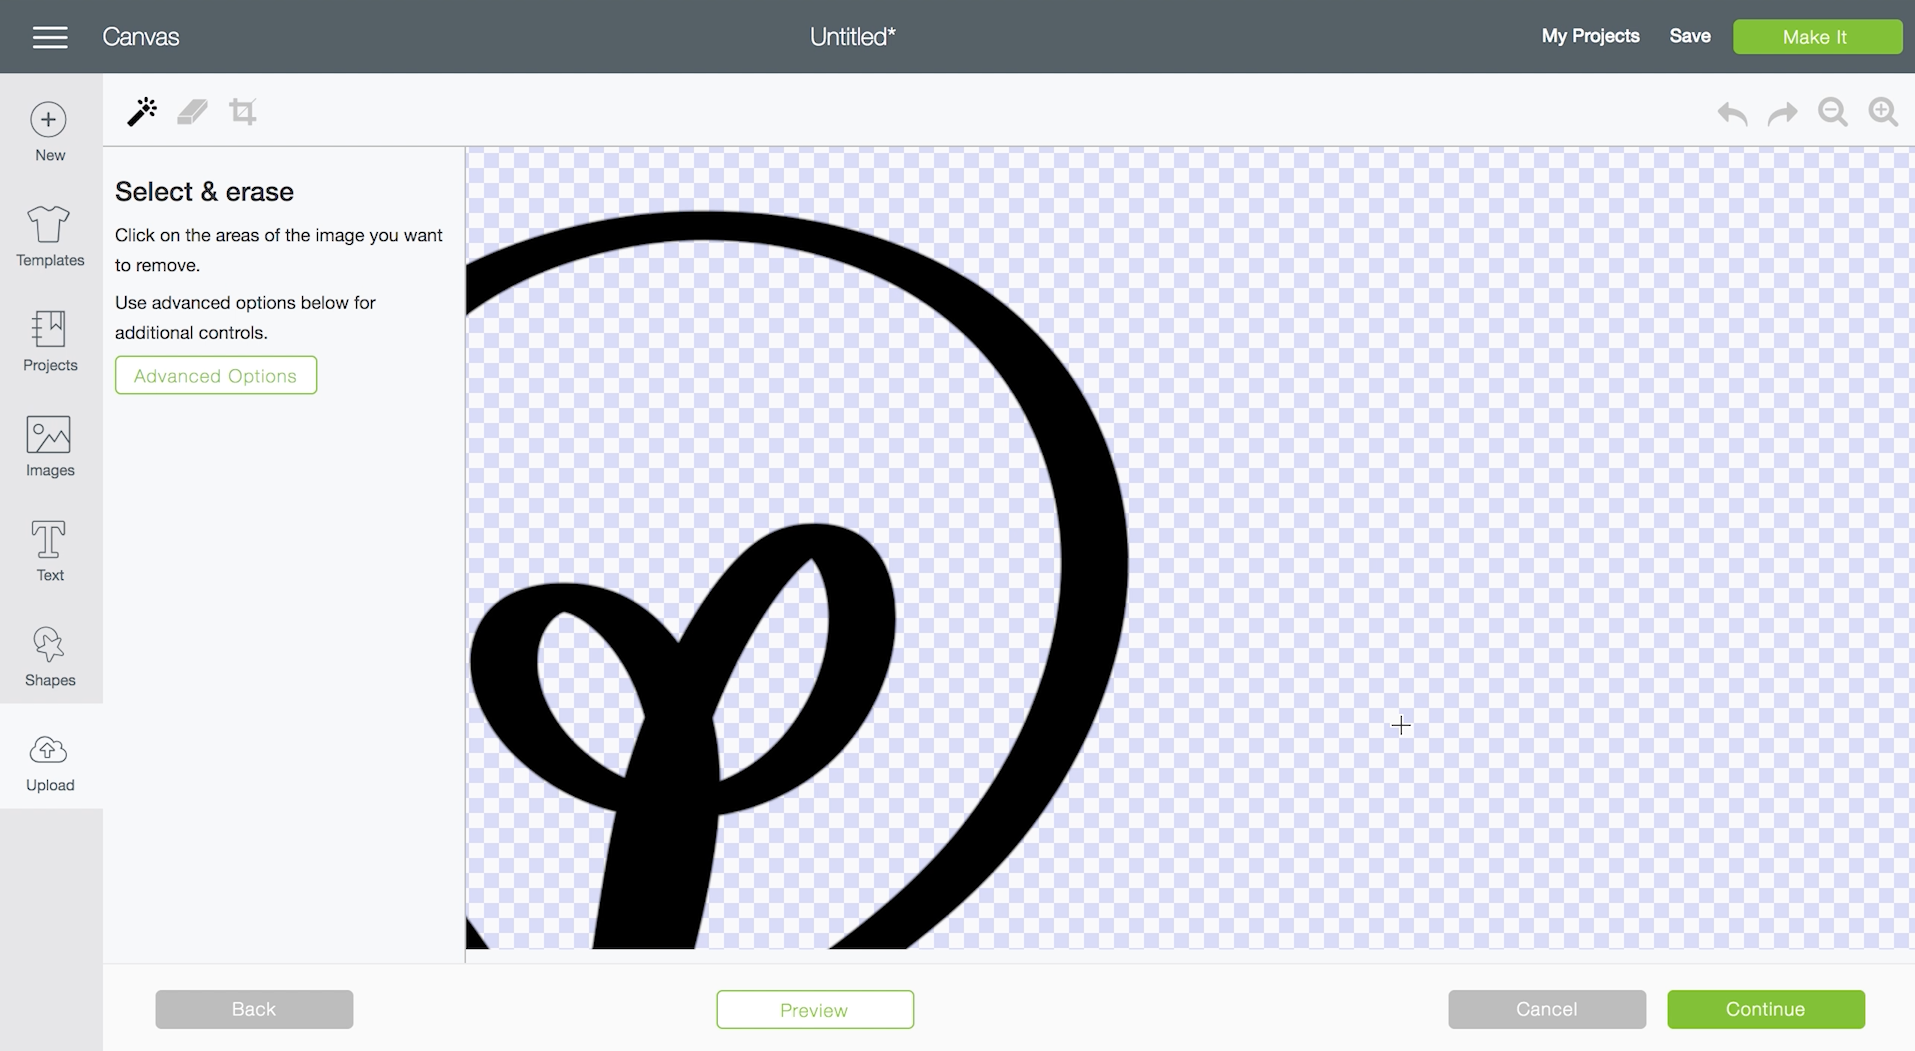
Then, you’ll be brought to a page where you can erase any parts you don’t want. For a file that already has a transparent background and no pieces you do not want… you can skip over this step.
Then, you’ll be prompted to choose either print then cut for your upload or just a cut only image. Choose cut only and your design will be loaded into your uploaded images gallery and can be inserted onto your canvas.
Once it’s on the canvas, you can see that it has a transparent background, you can move it around and resize it just like the SVG but you’ll notice there’s only one layer in the layer panel. This means you can’t select just the lightbulb and make it a different colour to print on a different mat (although you could duplicate it and contour the lines to have the parts separate… here’s a tutorial that uses the contour tool).
When you hit ‘Make It’, you’ll see that because it’s all on one layer, the pieces don’t jump around- easy peasy! This way it will cut all in the exact layout you uploaded it in, making it easy to apply your transfer tape and pop it onto your surface. Here’s the ‘bright ideas’ decal on my day planner.
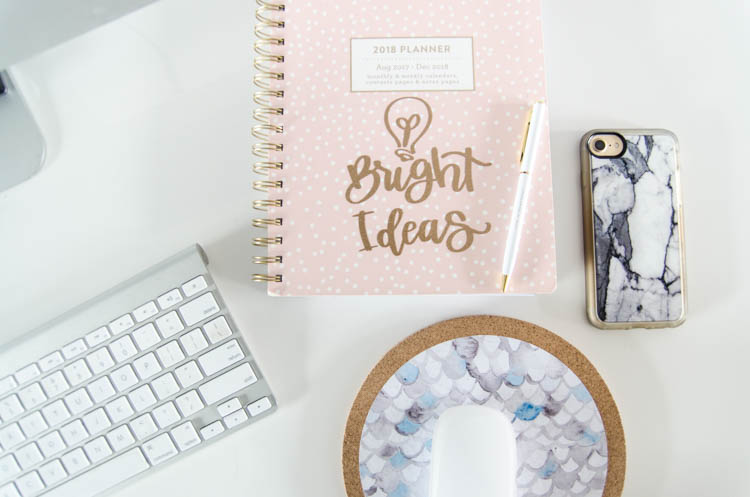
I made this bright ideas sticker using. Expressions Vinyl Smooth Gold Glitter Vinyl and in the video, you’ll see I’m using their paper transfer tape as well.
What is a JPG file for Cricut
JPG is a photographic file type which is named after the group that named the file type (from what I understand). It’s perfect for photos as it handles all the colours beautifully BUT it cannot have a transparent background. This means that you need to make changes when you are uploading the image through the Design Space software. Let’s take a look!
How to IMPORT JPG IMAGES TO DESIGN SPACE
To upload a JPG to Cricut Design Space is very similar to an SVG or PNG, but again there’s an extra step or two.
This example I lettered/illustrated on my iPad Pro again. You’ll see that it has some colour and is not just black and transparent (because it’s a JPG). I made the background a solid grey to make it easy to erase. This is what you will want to do to make it easiest to have a simple selection for a print then cut image.
You can also do a PNG with that white background and export without the grey background if you are working in Procreate. SO when you go to upload it in, it’s the exact same steps.
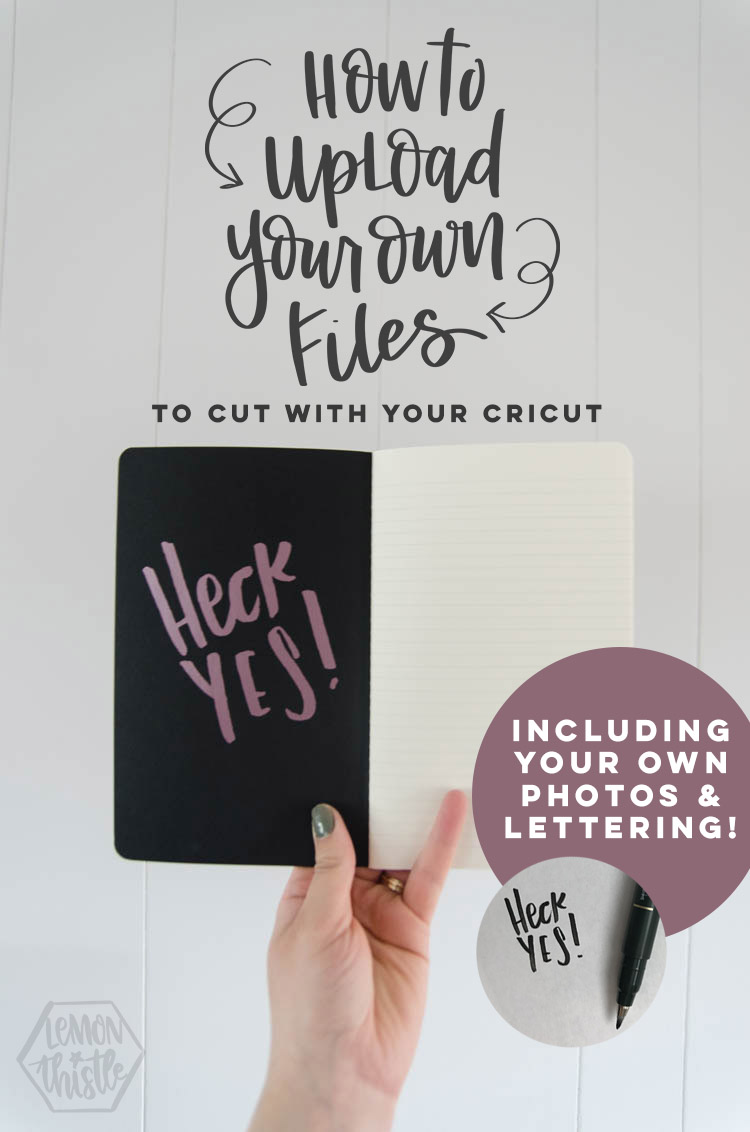
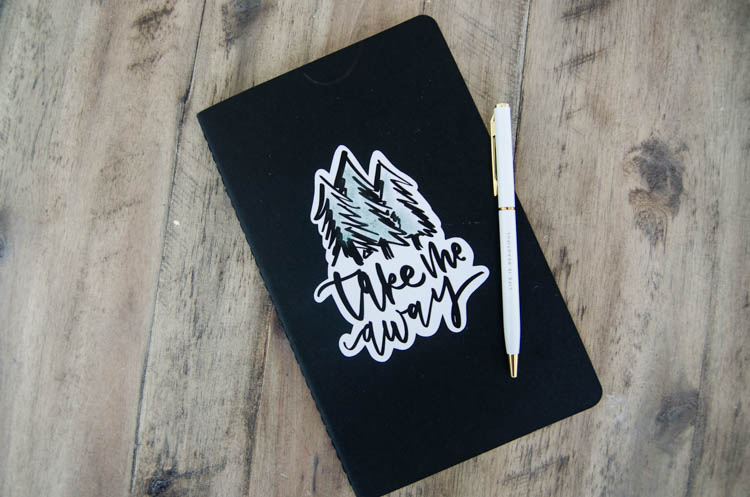
For this example, I want the JPG image to be printed on printable vinyl, then cut out with my Cricut. This will retain that water color look of the trees. If you want to get a .jpg image to cut in Cricut Design Space without printing, see the ‘heck yes’ design example further down in this post.
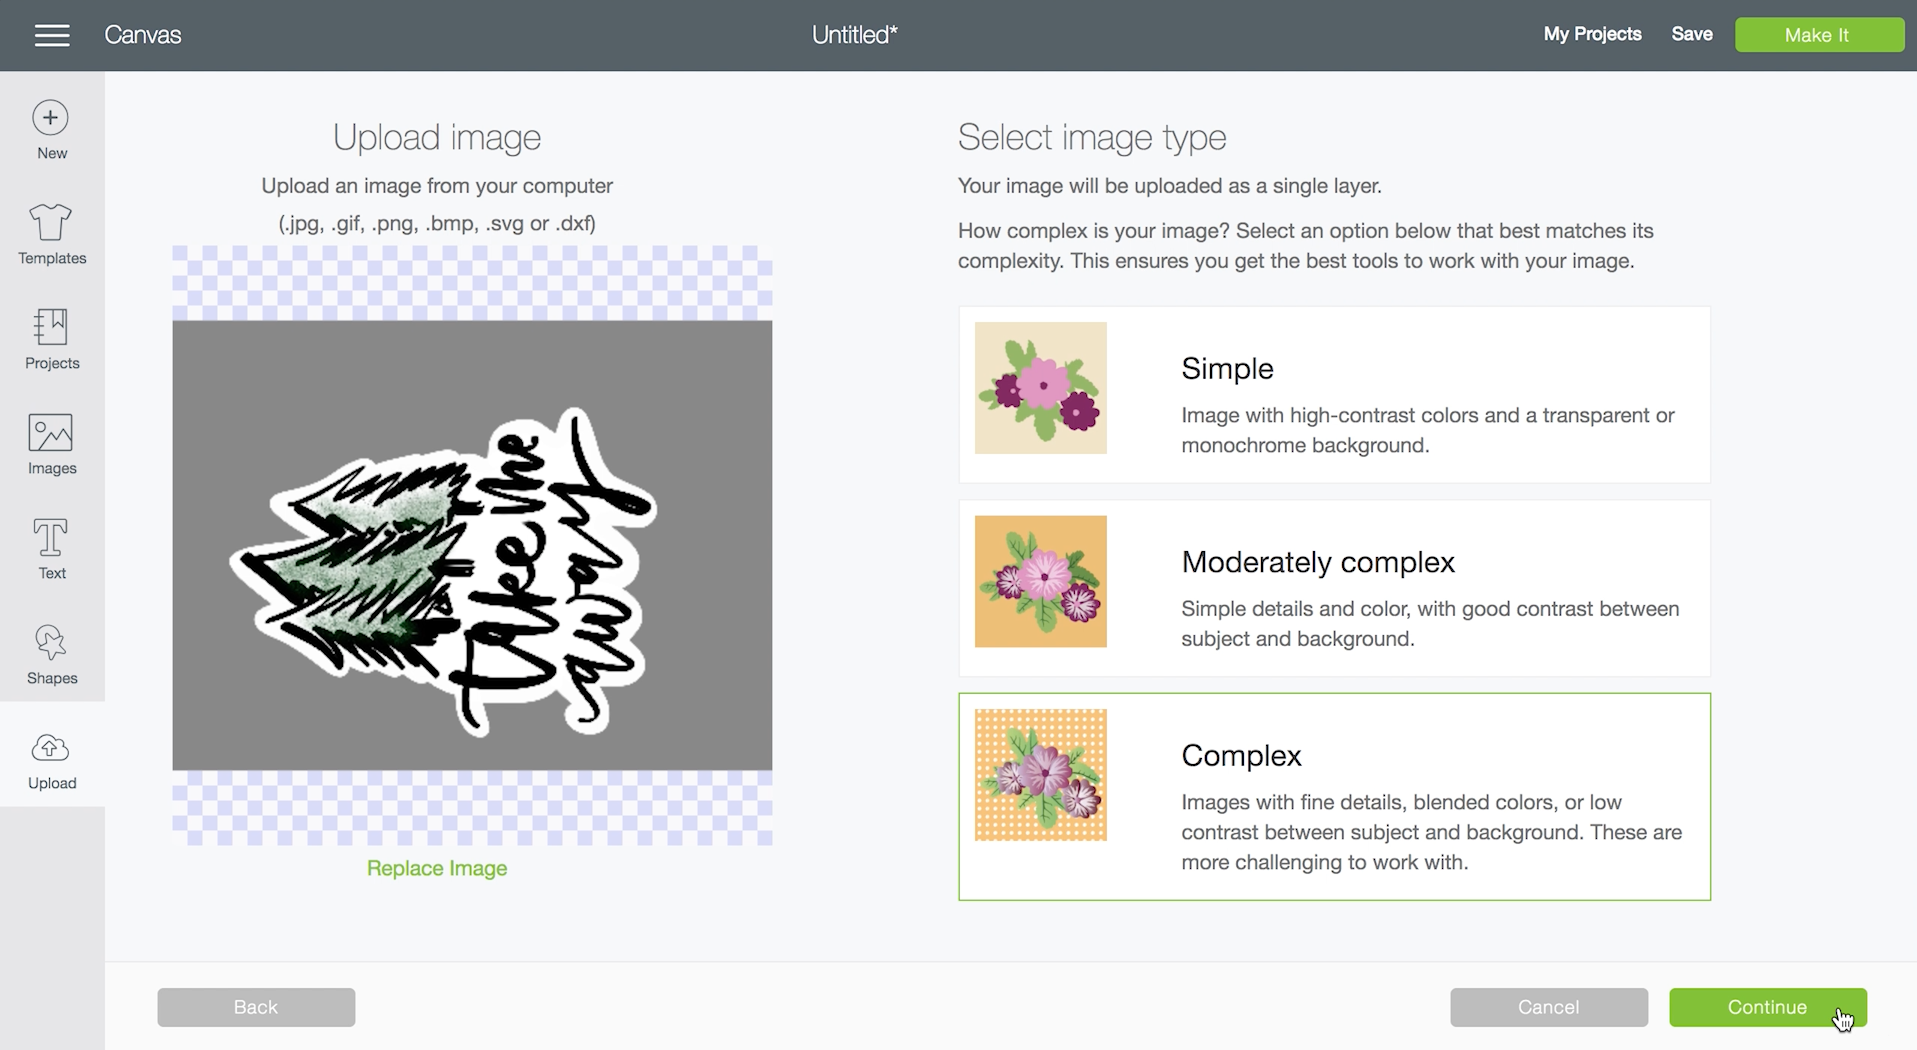
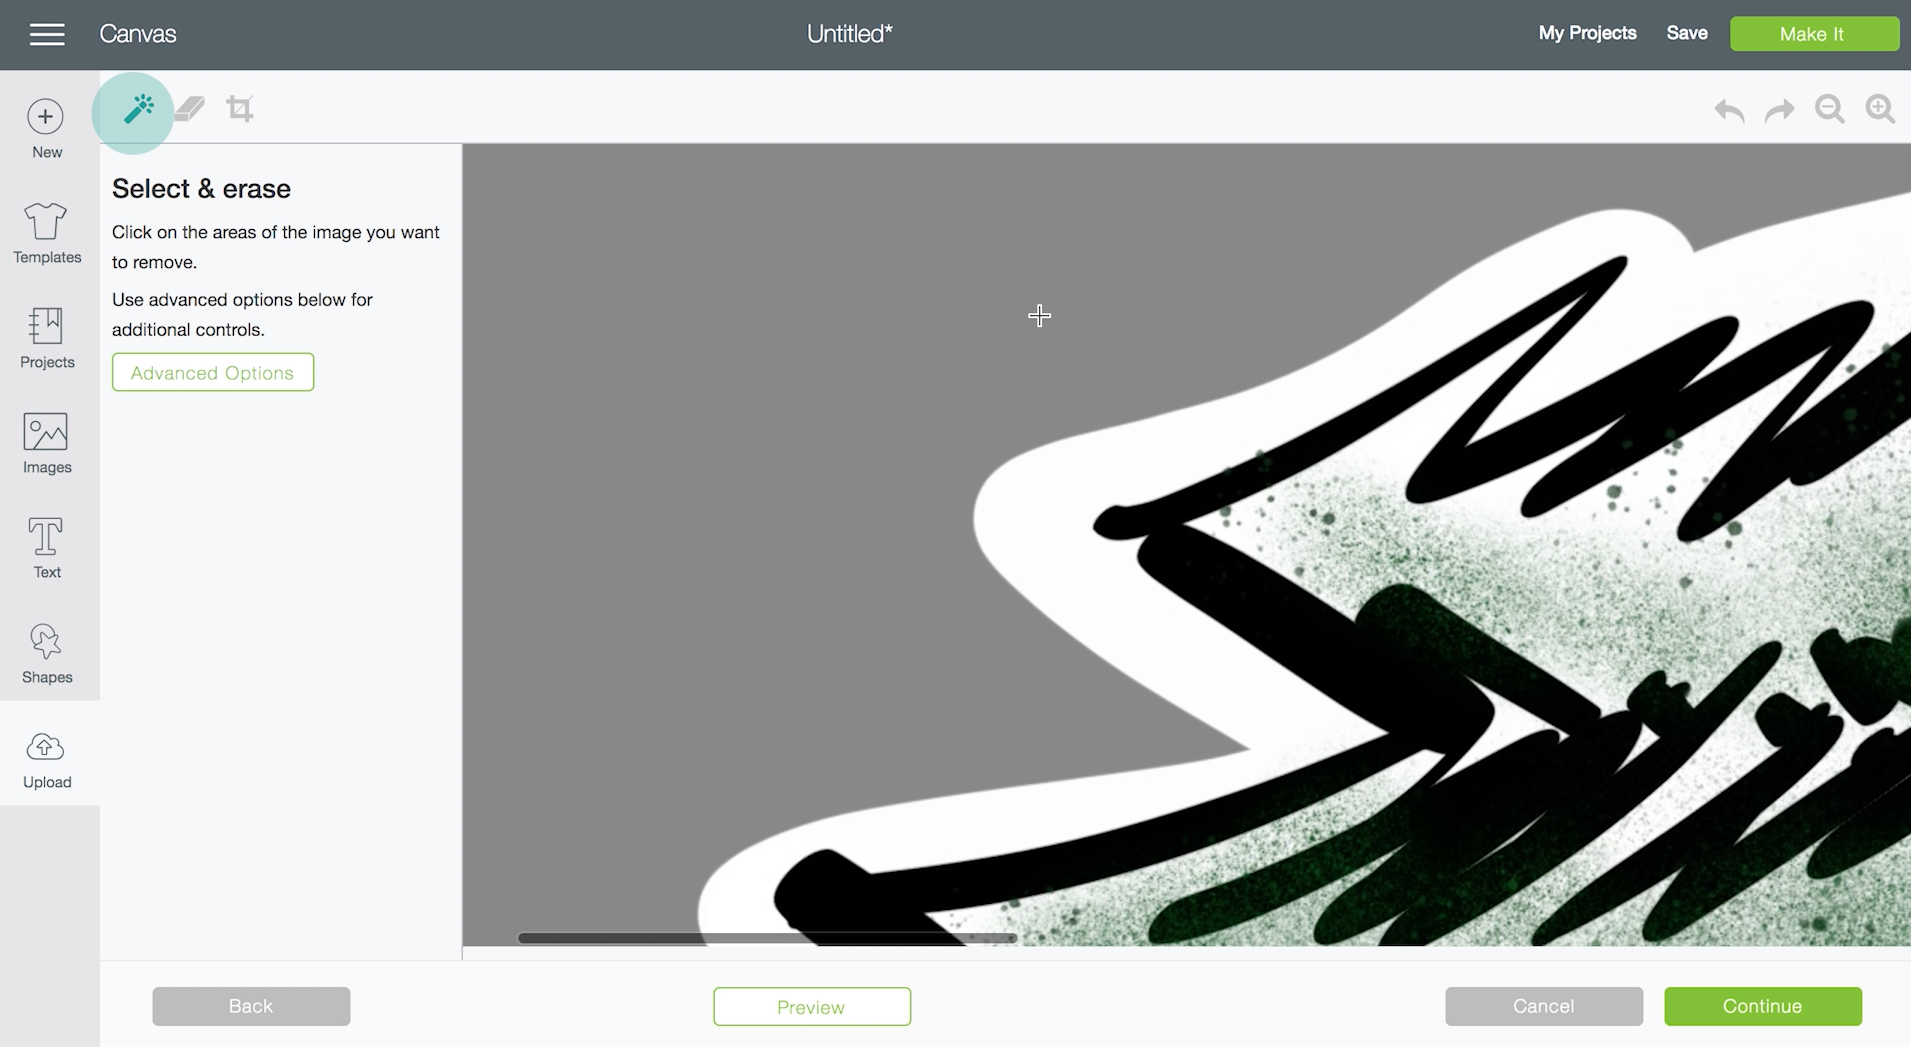
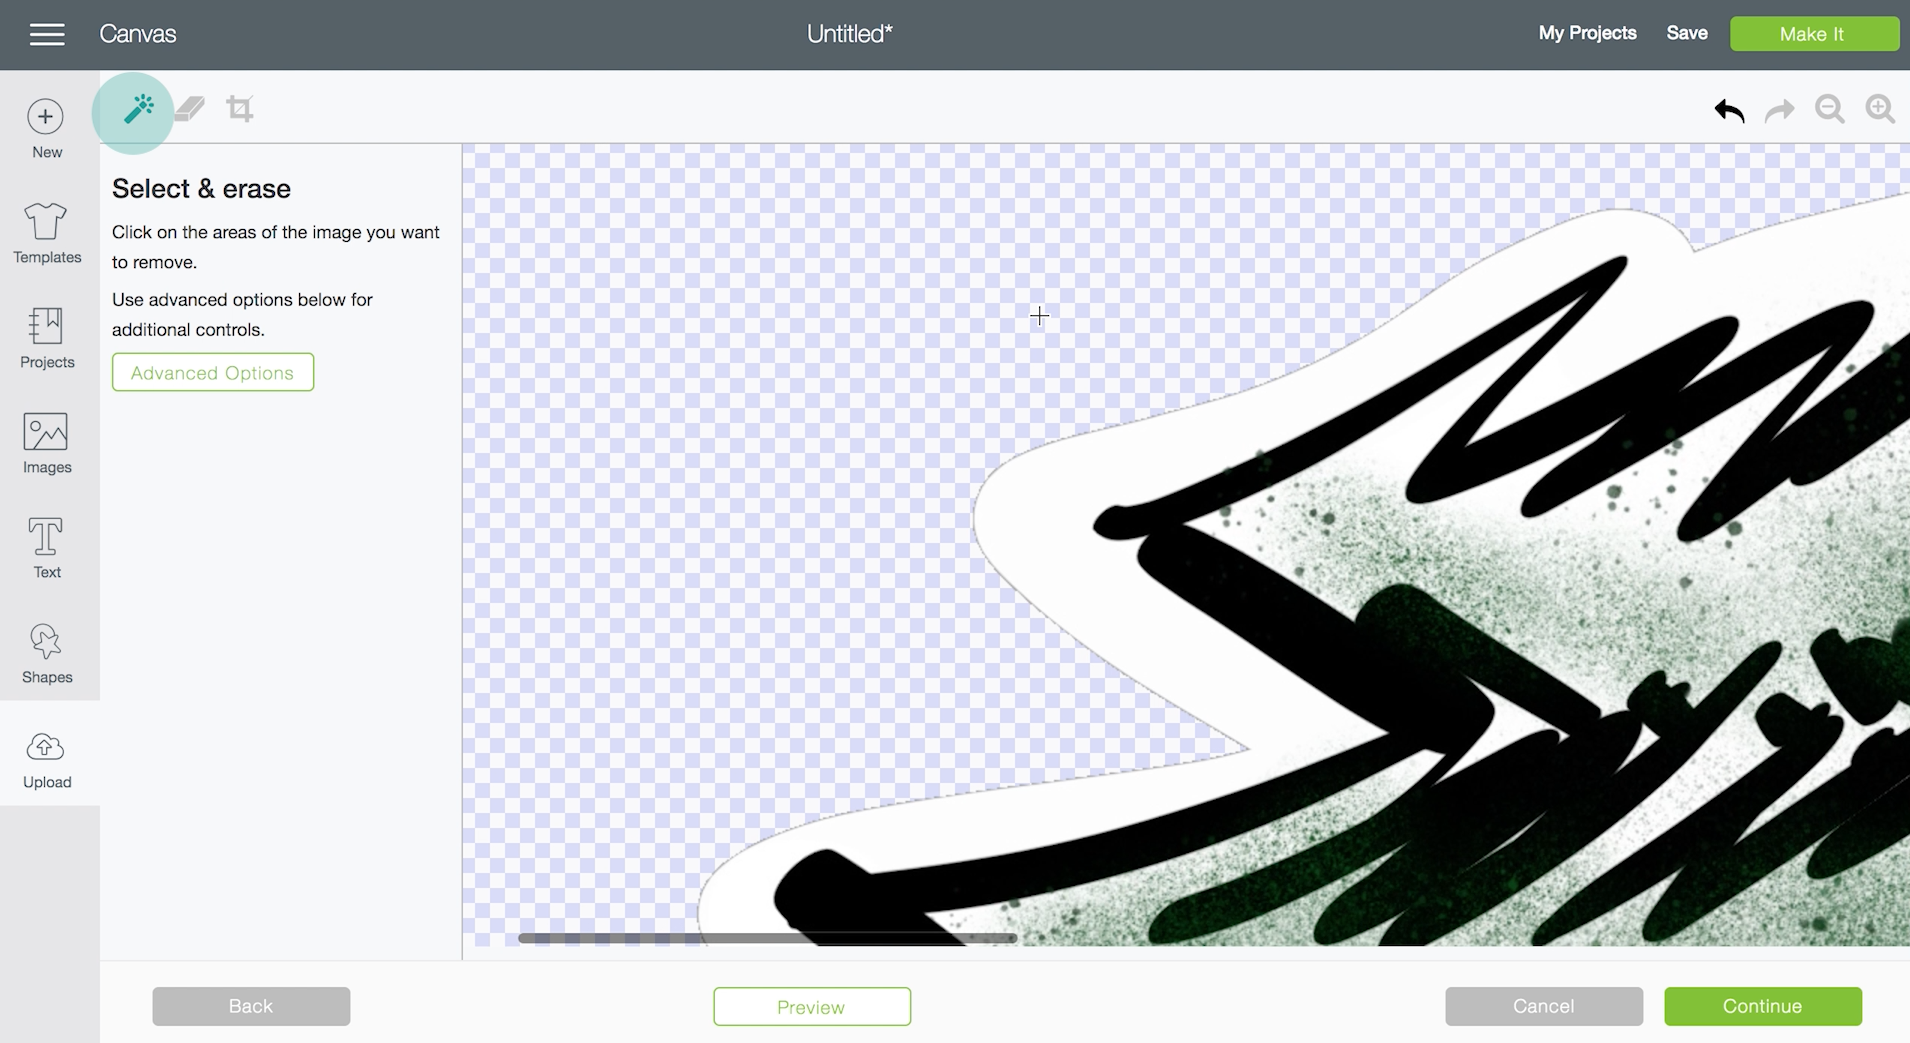
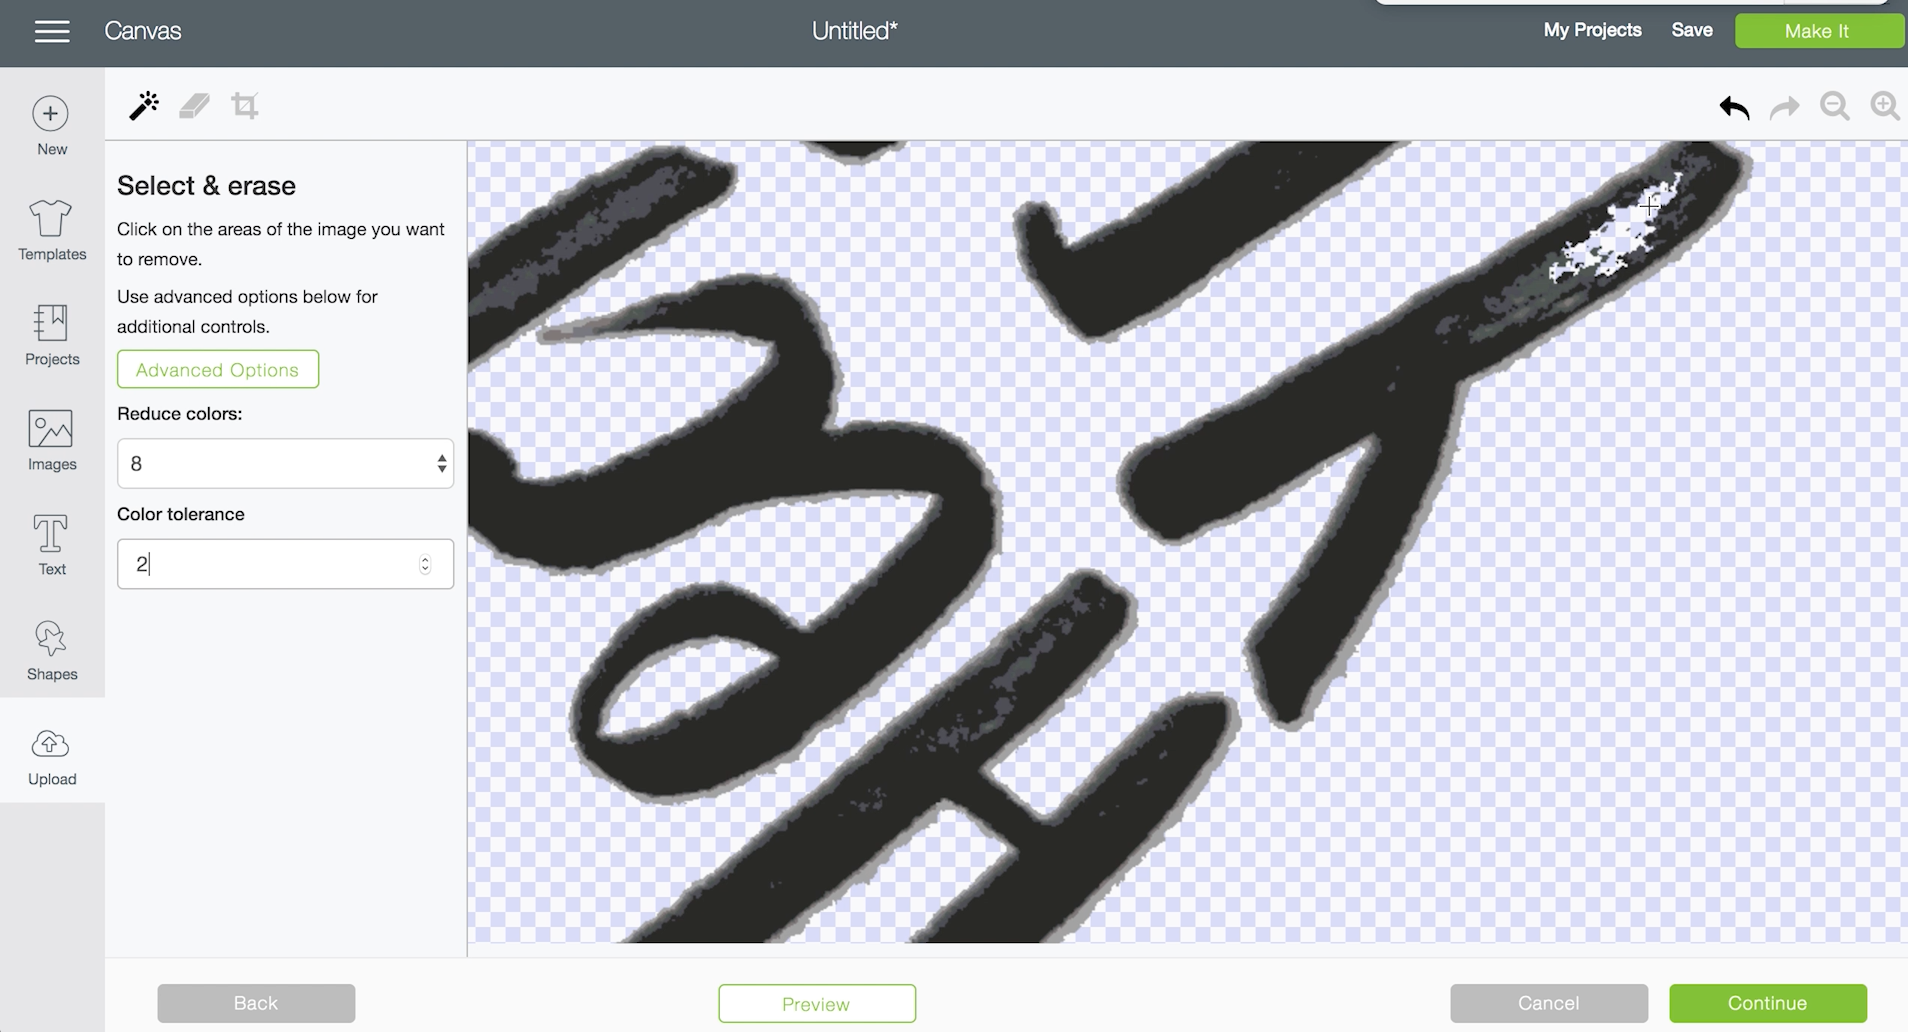
Click that little ‘Upload’ cloud and then when you get to the image type, I chose ‘complex’ to retain all the quality of the design I want to print. Then, when it’s time to erase, I chose the magic wand (highlighted in blue) and clicked the grey to erase the background. I didn’t have to do any more touch ups since this image was very clean.
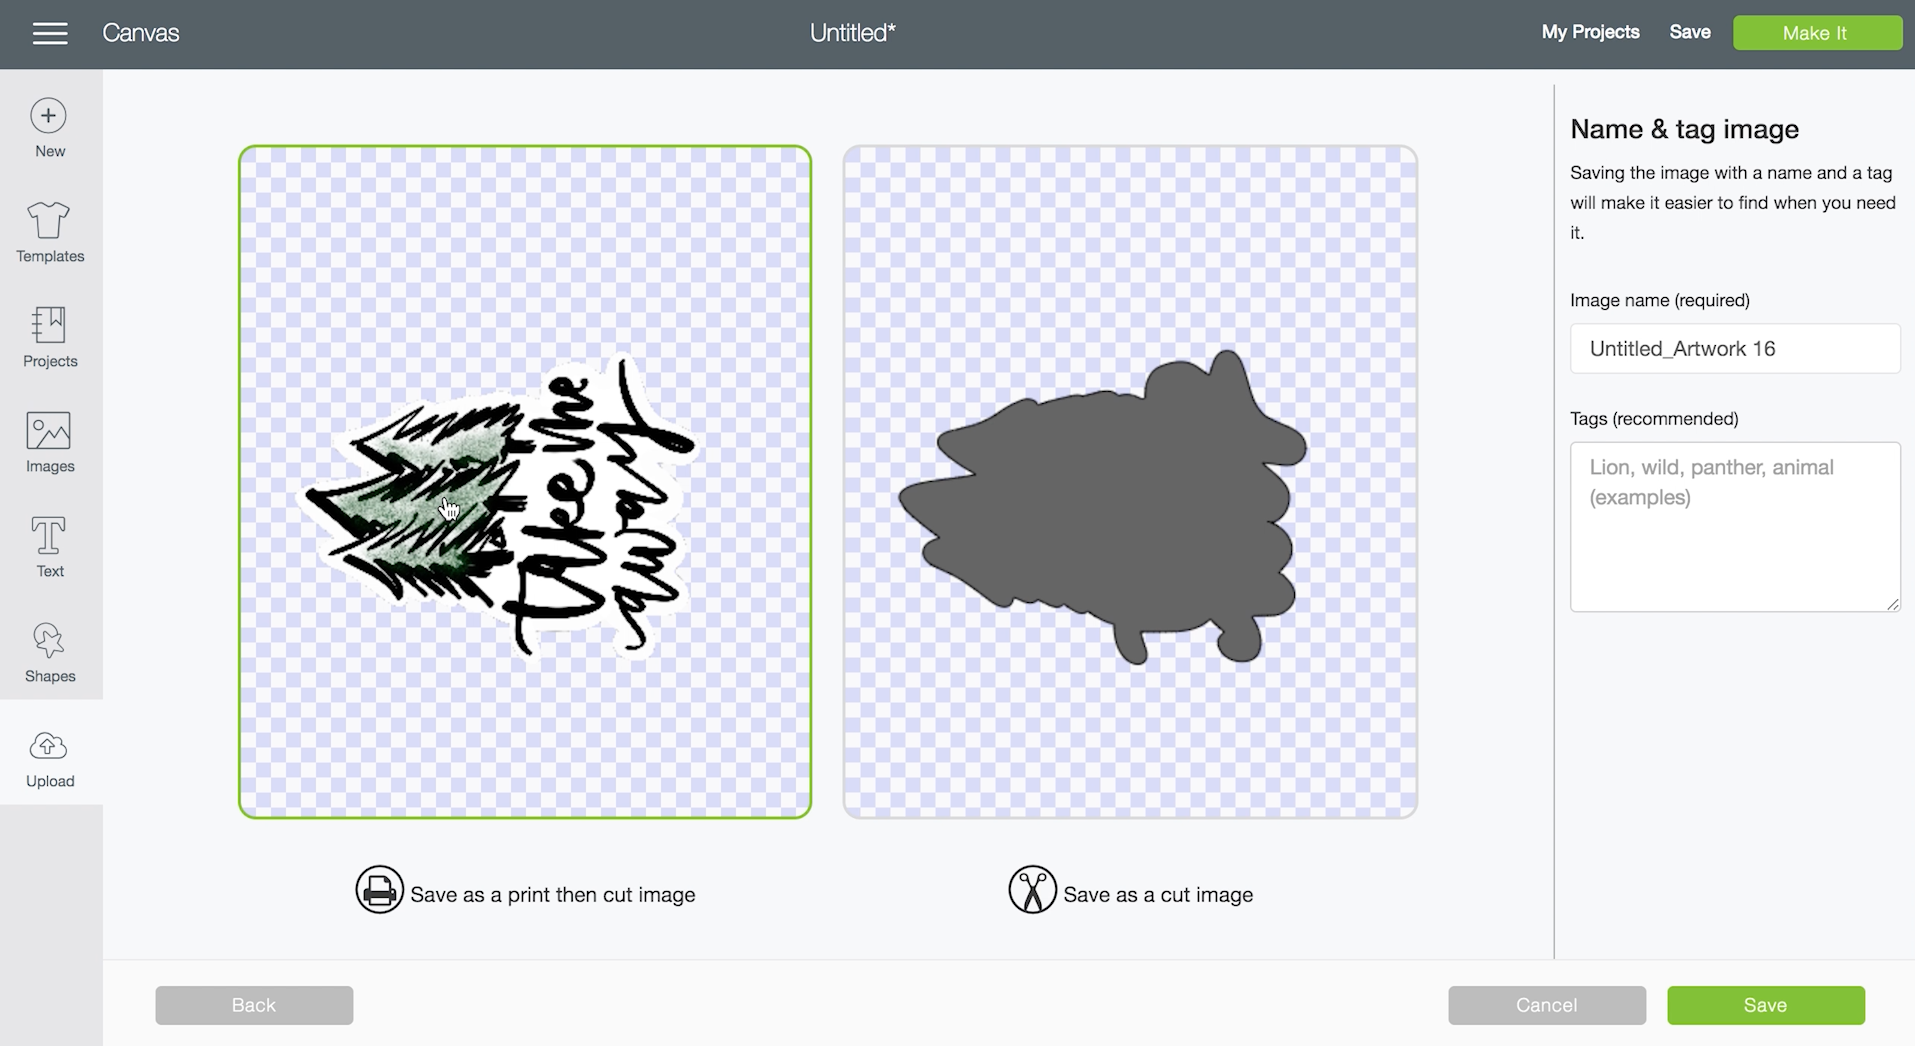
Depending on your image, you might need to do a bit more in this tab before moving on. When you go to the next screen, you can choose either print then cut or a cut only image.
For this one, of course, I chose print then cut. You can see how clean the cut lines are on the cut only image- that’s how you know you don’t have anything additional to erase in the previous tab. Then it will populate in your uploaded images and you can insert it onto your canvas.
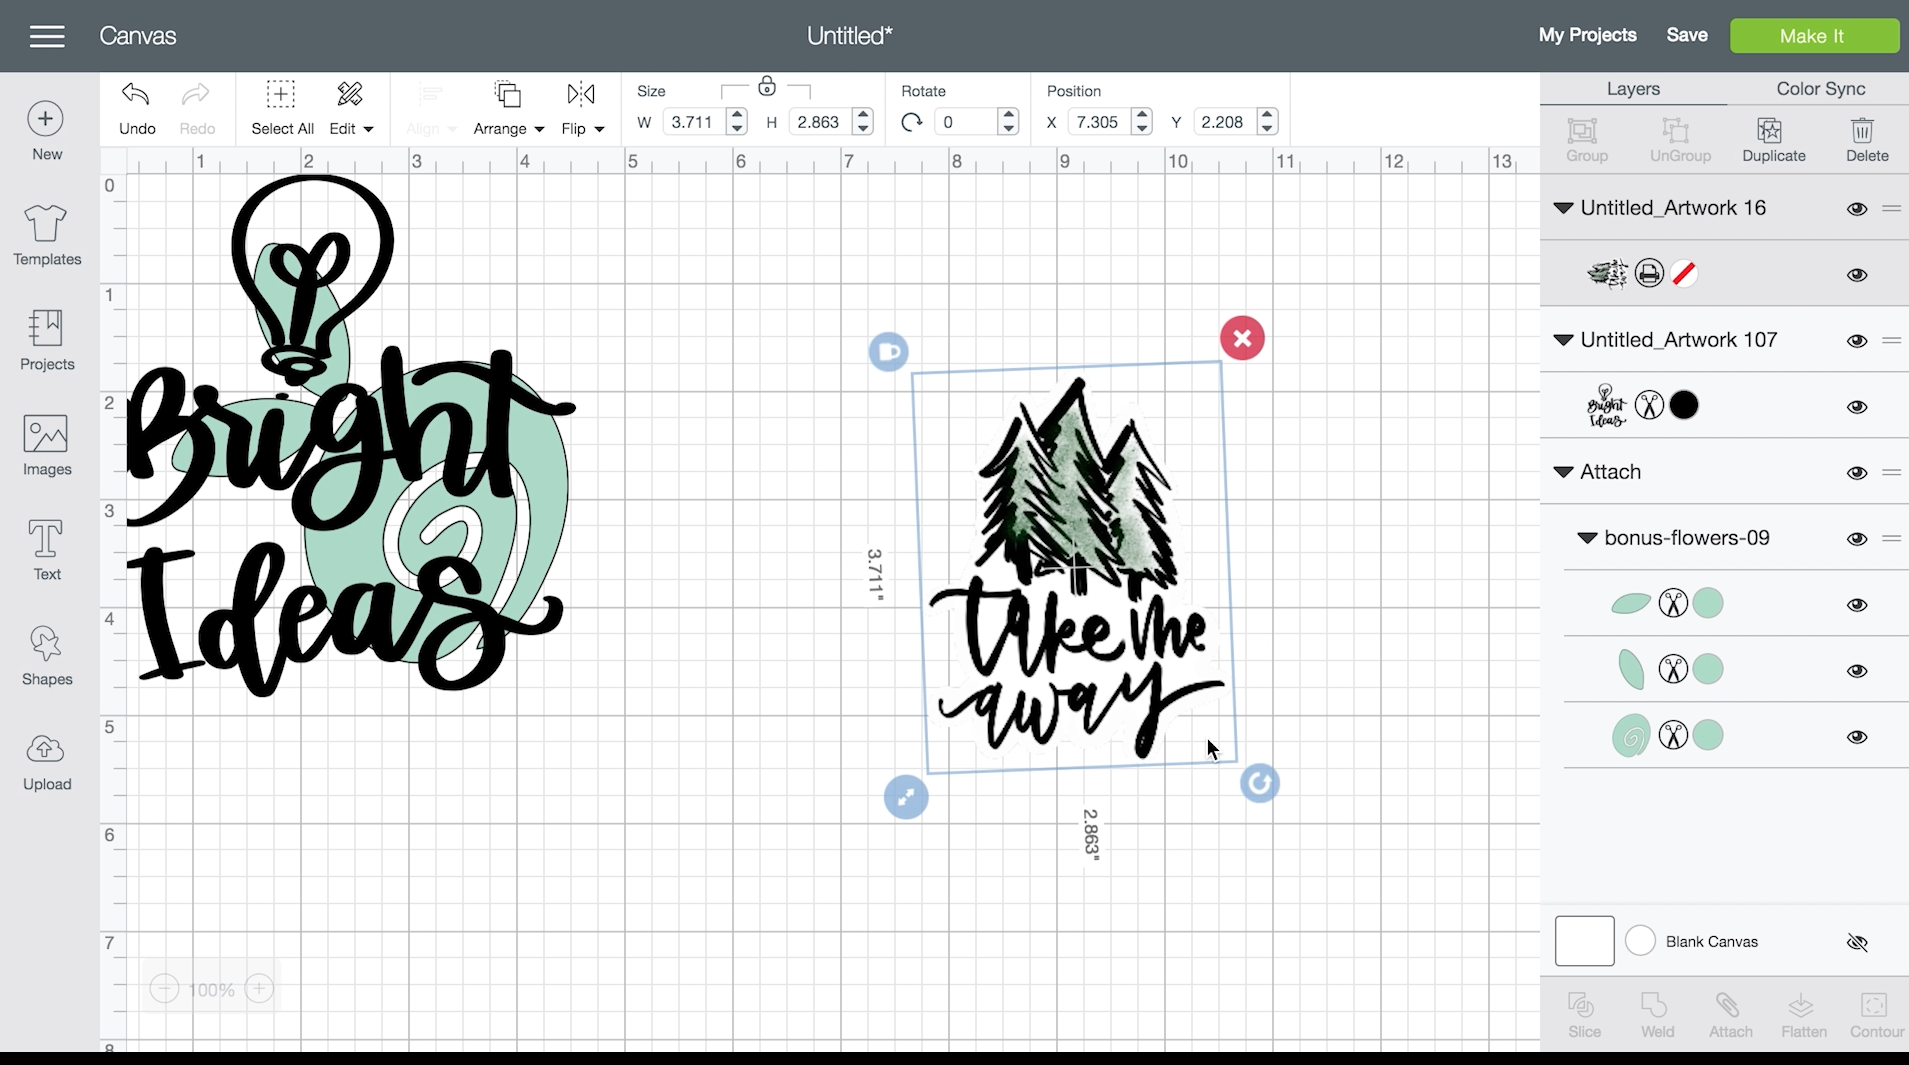
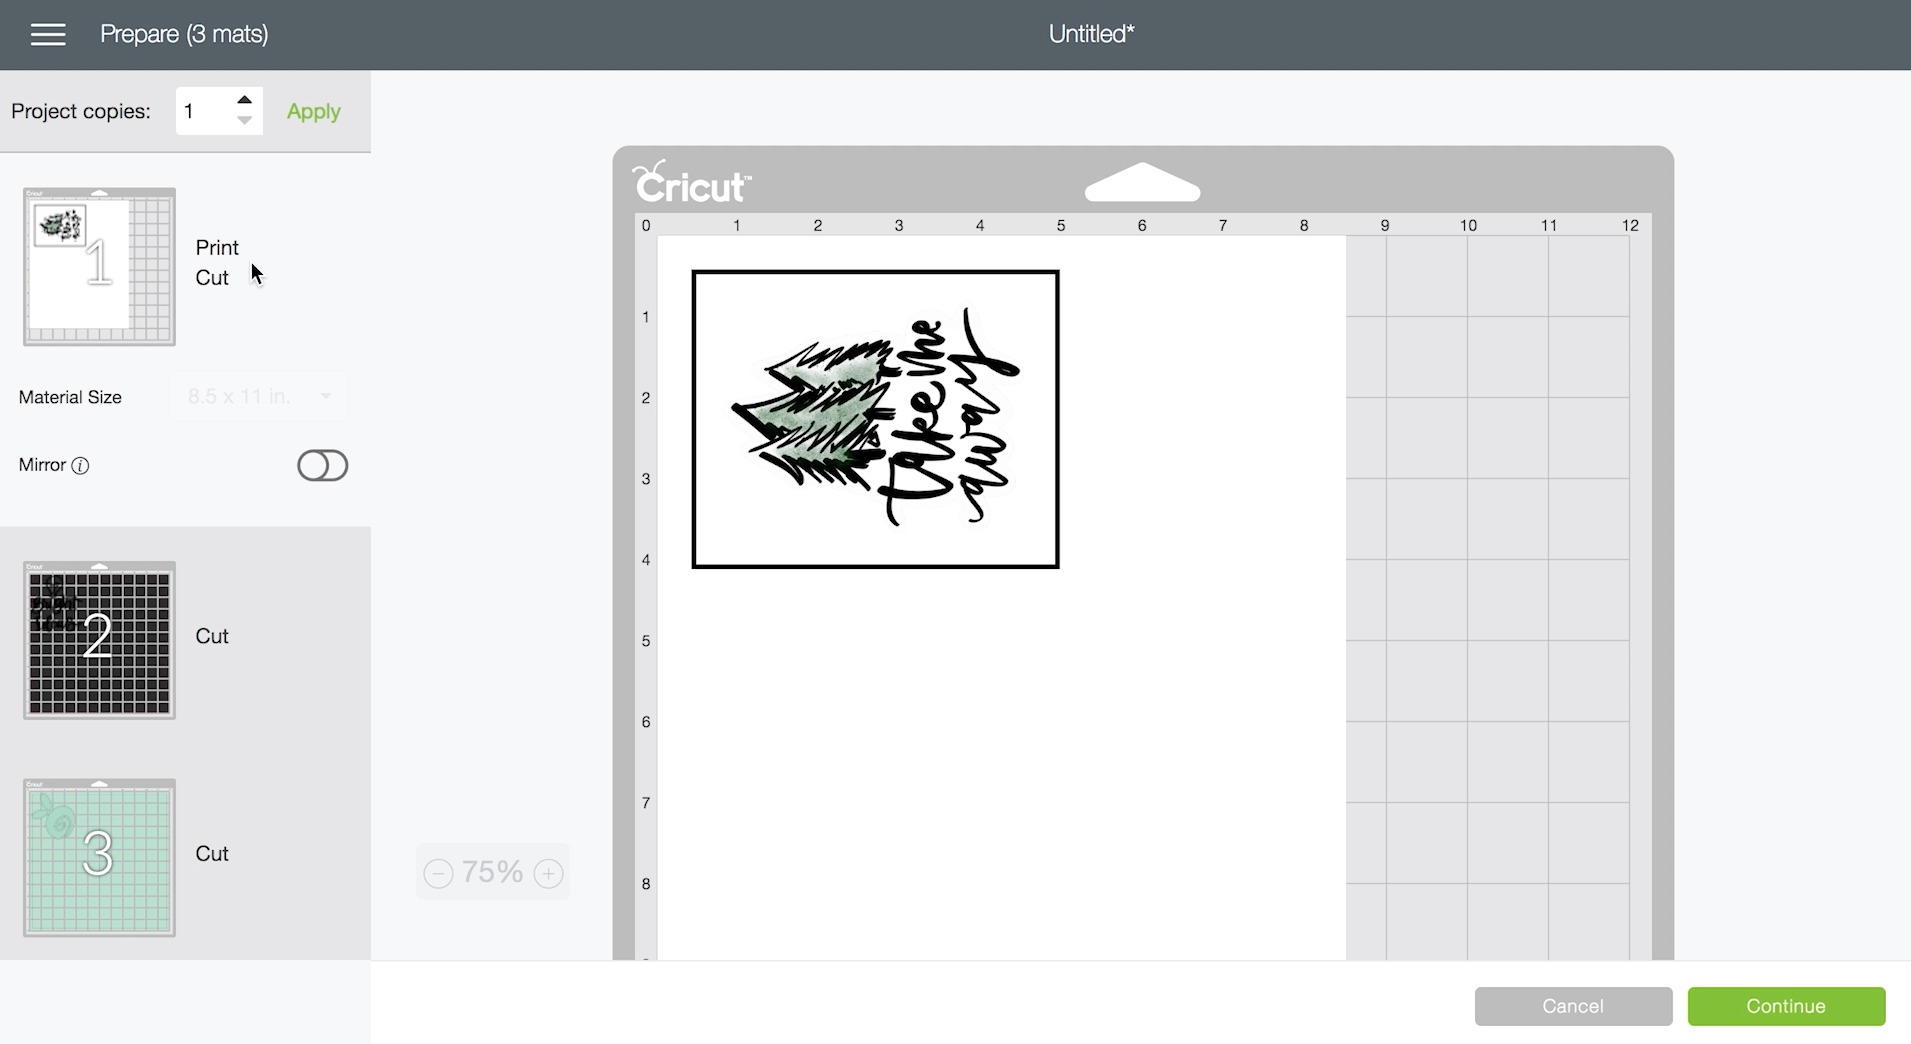
Like the PNG, you will see that it it is one layer only in the layers tab. Instead of the cut symbol by the layer, you’ll see a printer instead. When you hit ‘Make it’ it will load onto it’s own print then cut mat (with a black sensor box around it). From here you would print and then cut it.
Click here for a full tutorial on using print then cut on printable vinyl– I’ve got a video and written tutorial on that as well.
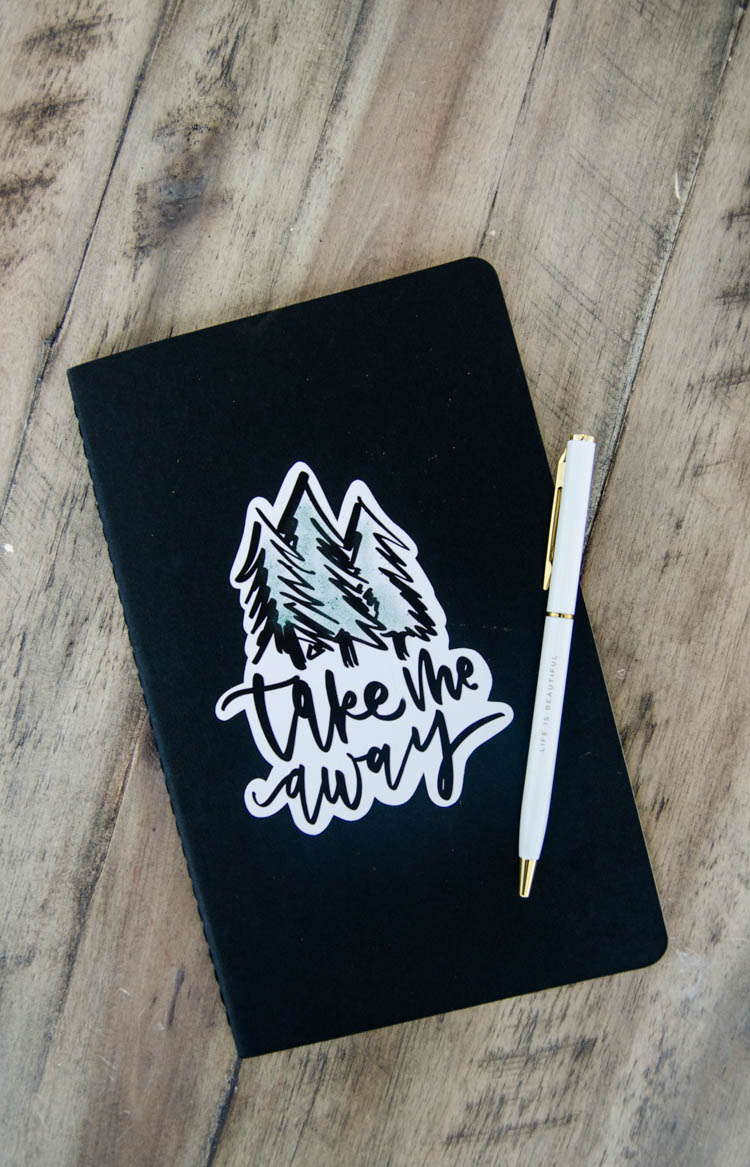
I used this vinyl decal (made with Cricut Printable Vinyl) on my Moleskin black paper notebook and am really so happy with how this one turned out! I think I will definitely be using this design again in the future.
HOW TO USE JPG IMAGES FOR PATTERN FILL (TWO WAYS)
Alright, I also wanted to demonstrate that ‘Pattern Fill’ option and why I don’t bother using it often. First, let me show you how I add a pattern to a shape or design in Cricut Design Space.
You’ll want to upload your pattern (I uploaded this beautiful floral watercolour design for my last Cricut Vs Silhouette tutorial. It’s from a pack of watercolour florals purchased here.
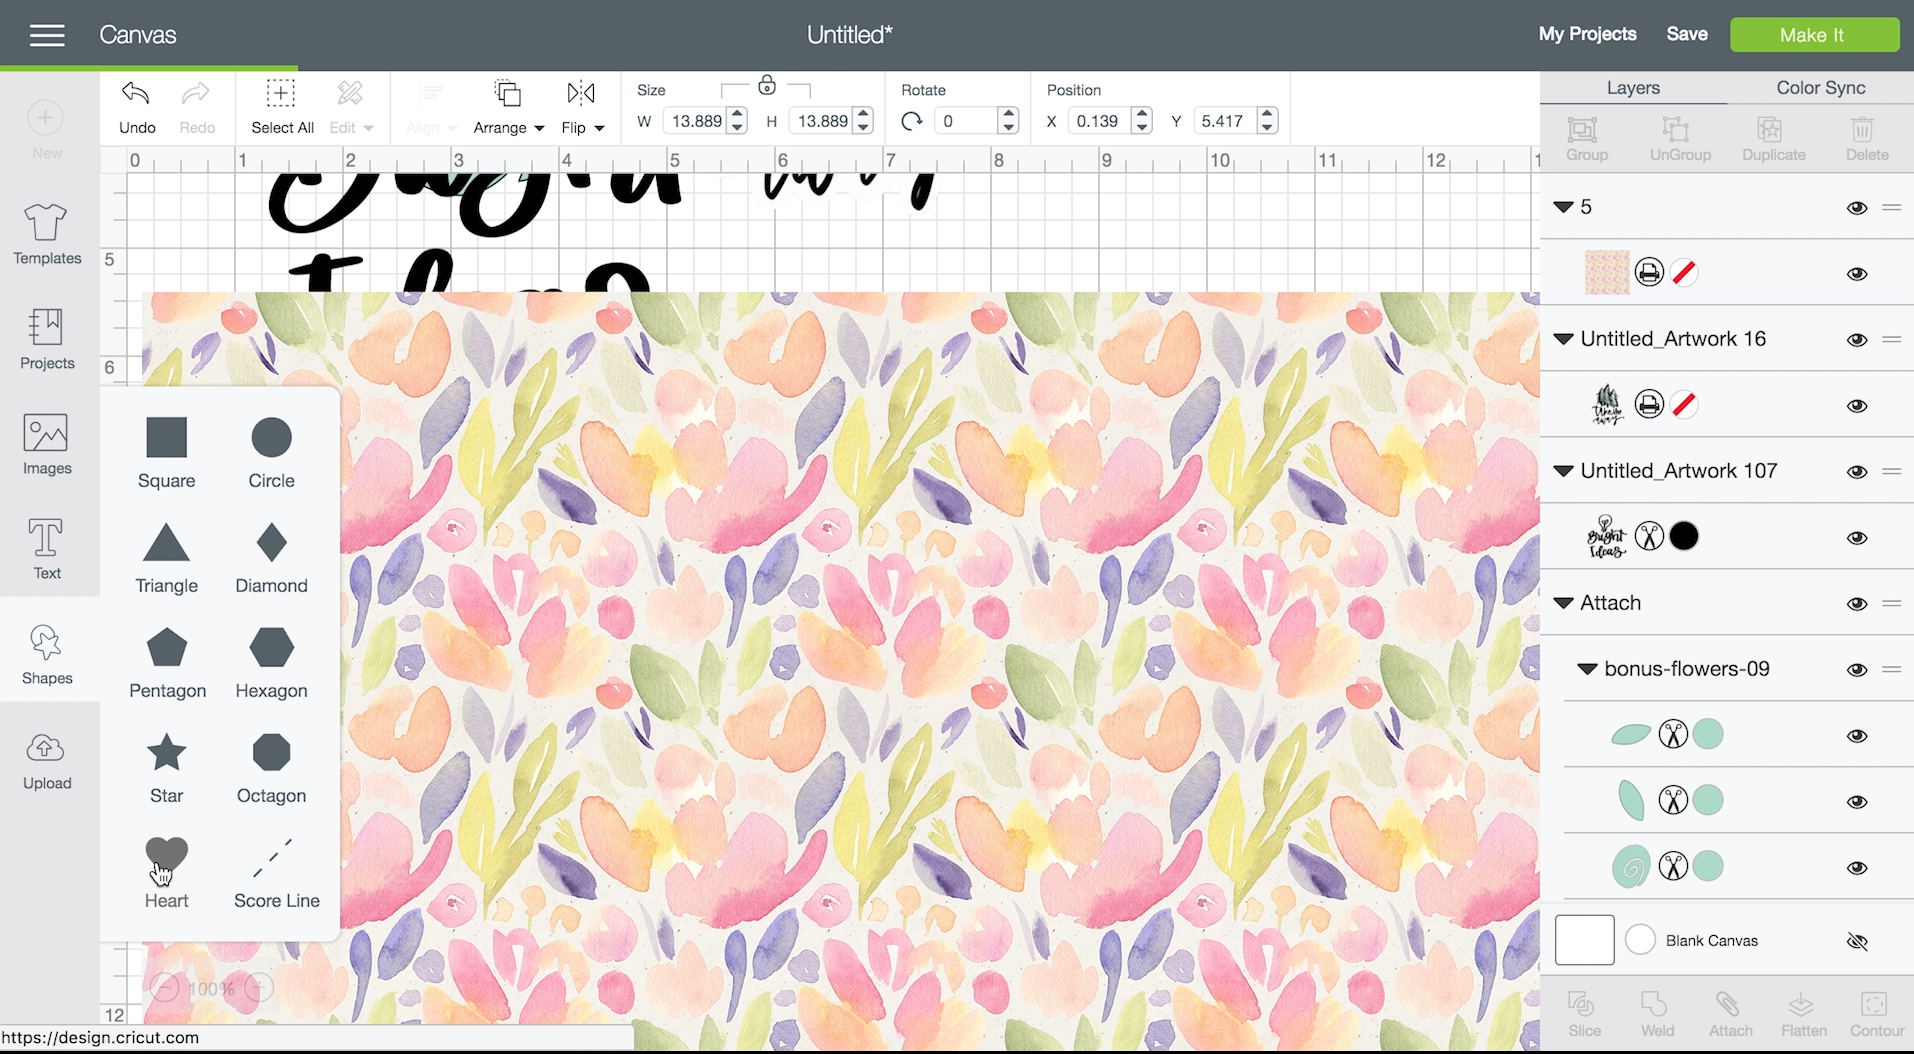
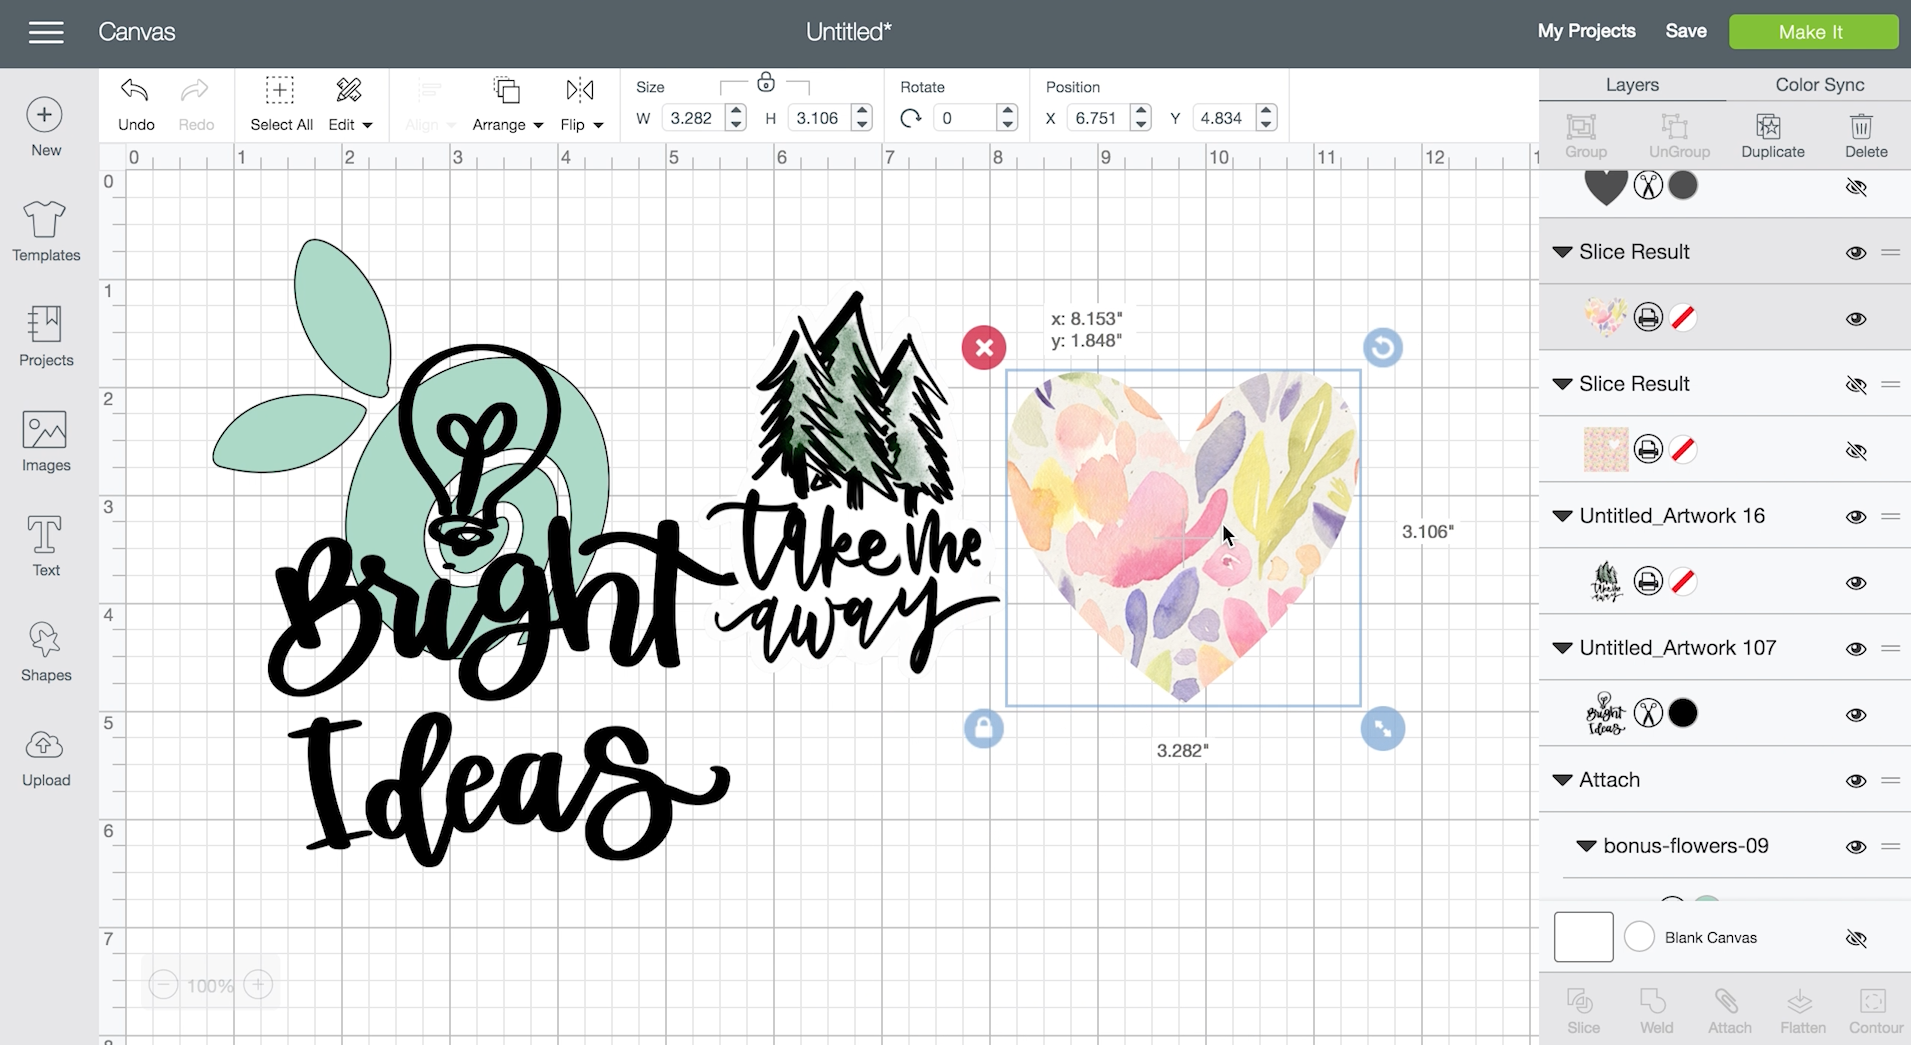
You would follow the exact same steps as the JPG image above (without erasing the background). Once you’ve inserted it in, add the shape you’d like the pattern to fill. I went simple and chose a heart from the shapes tab but you could use any PNG or SVG image you’ve uploaded as well.
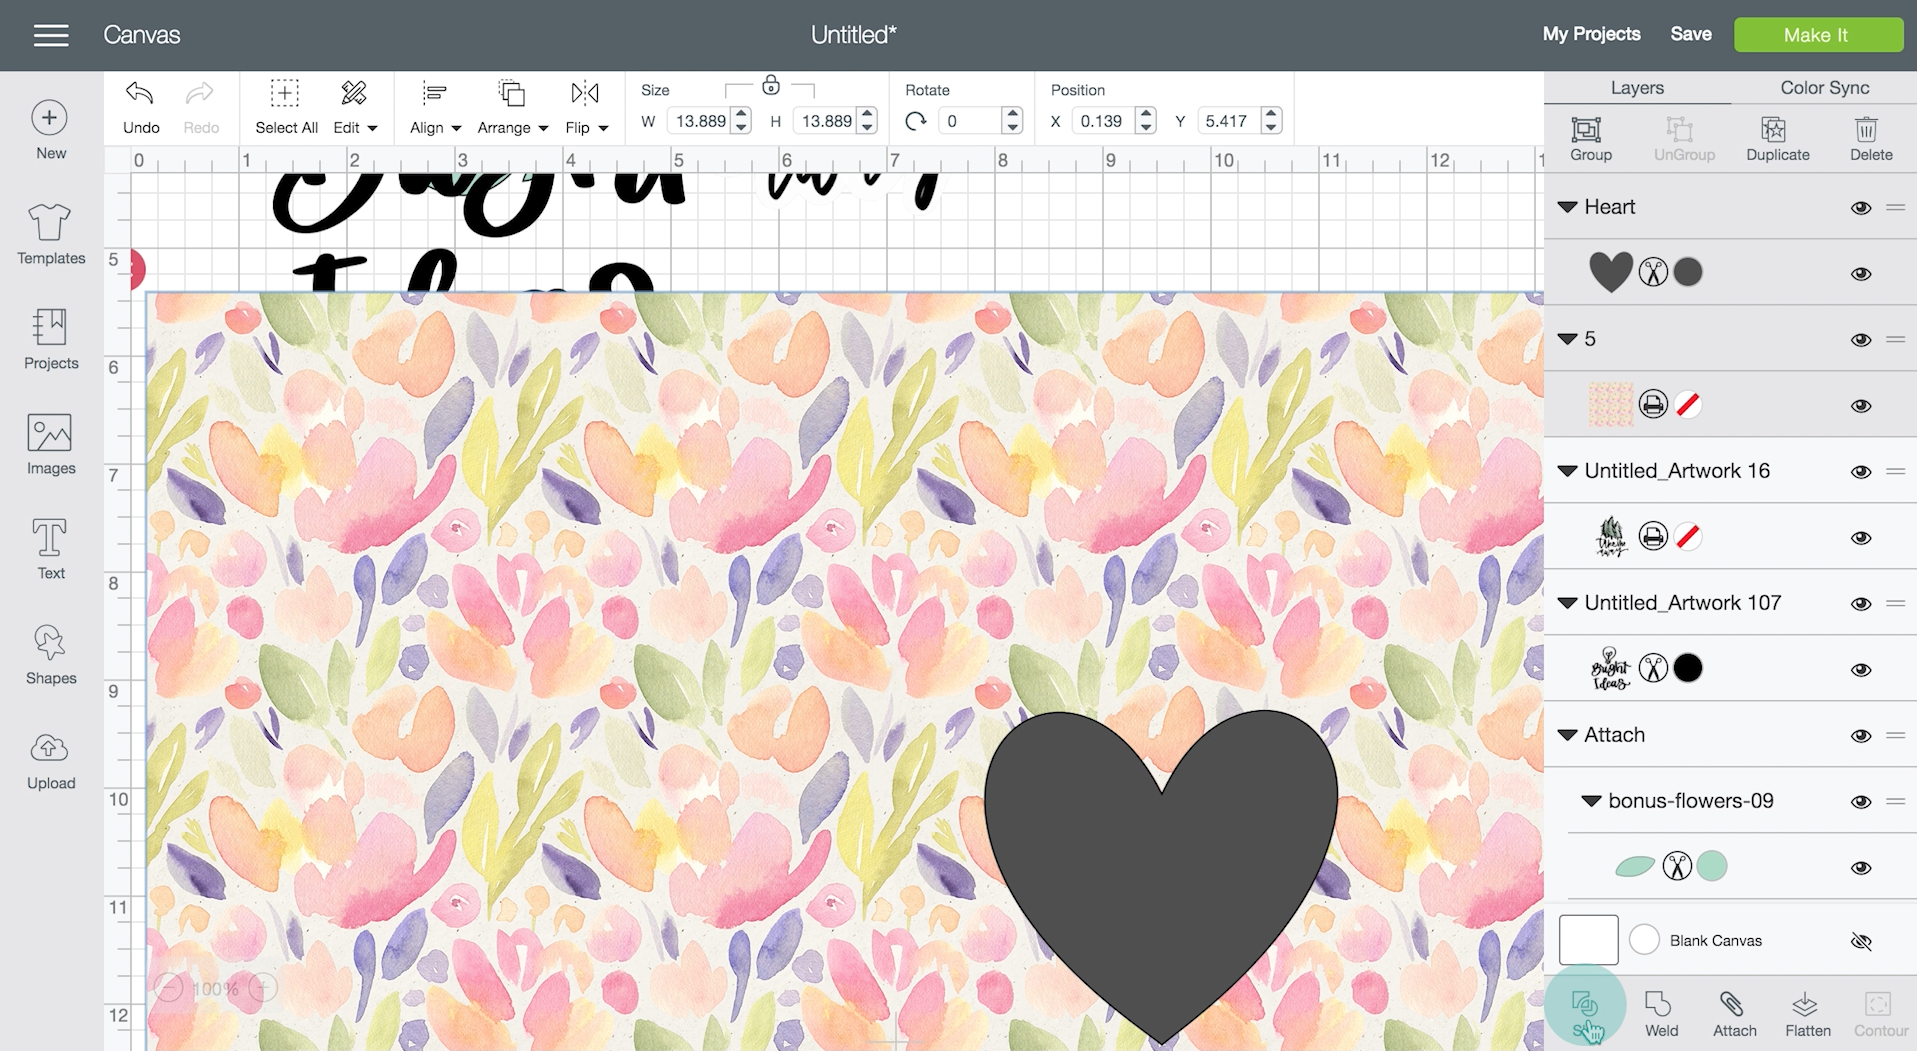
Lay your shape over your pattern exactly where you want the pattern to fill. You can resize the pattern and move it around as well until you’re happy. Then select both layers by holding down CTRL on your keyboard and selecting both the layers on the layer panel OR you can just click and drag your mouse over the pattern and shape to select them both. Then click ‘Slice’ at the bottom of the layers tab.
This will give you three layers. You can click the little eye beside the layers you don’t want to use (or just delete them) so you’re left with your pattern filled shape. I love how much control this gives me.
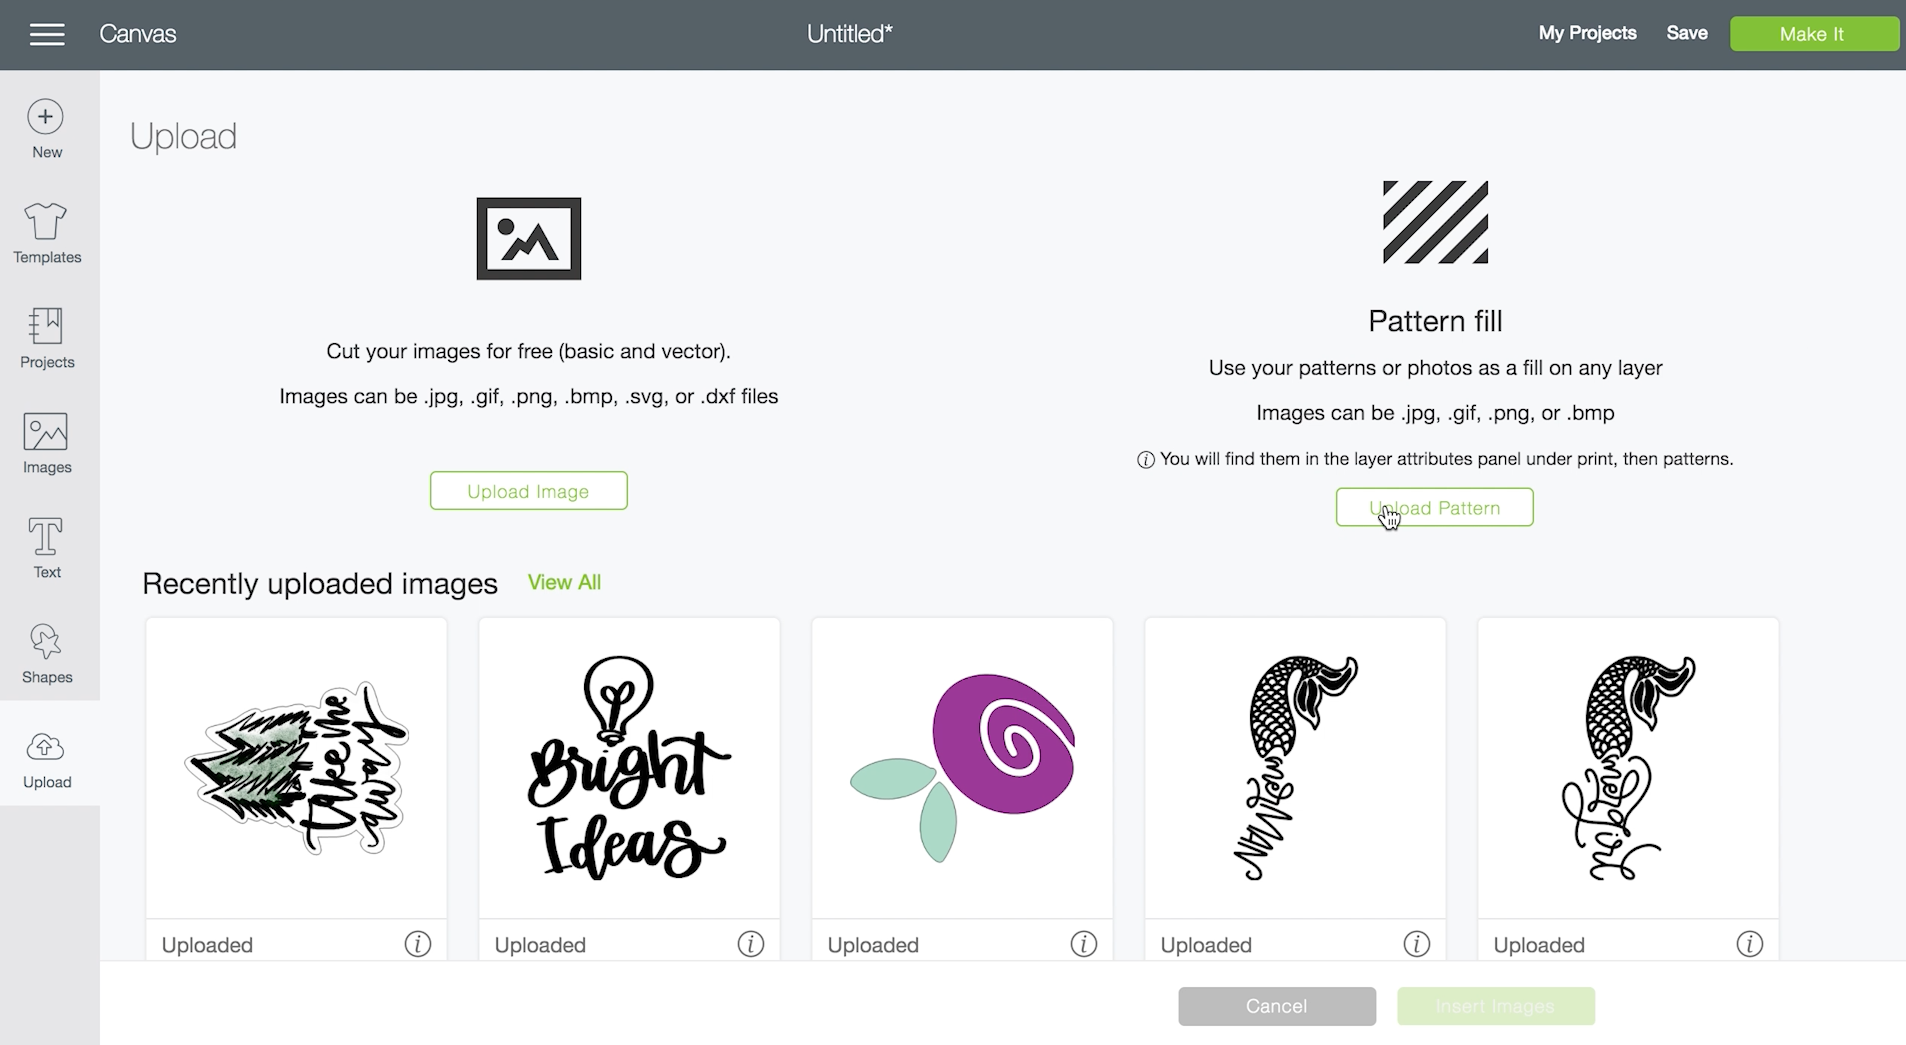
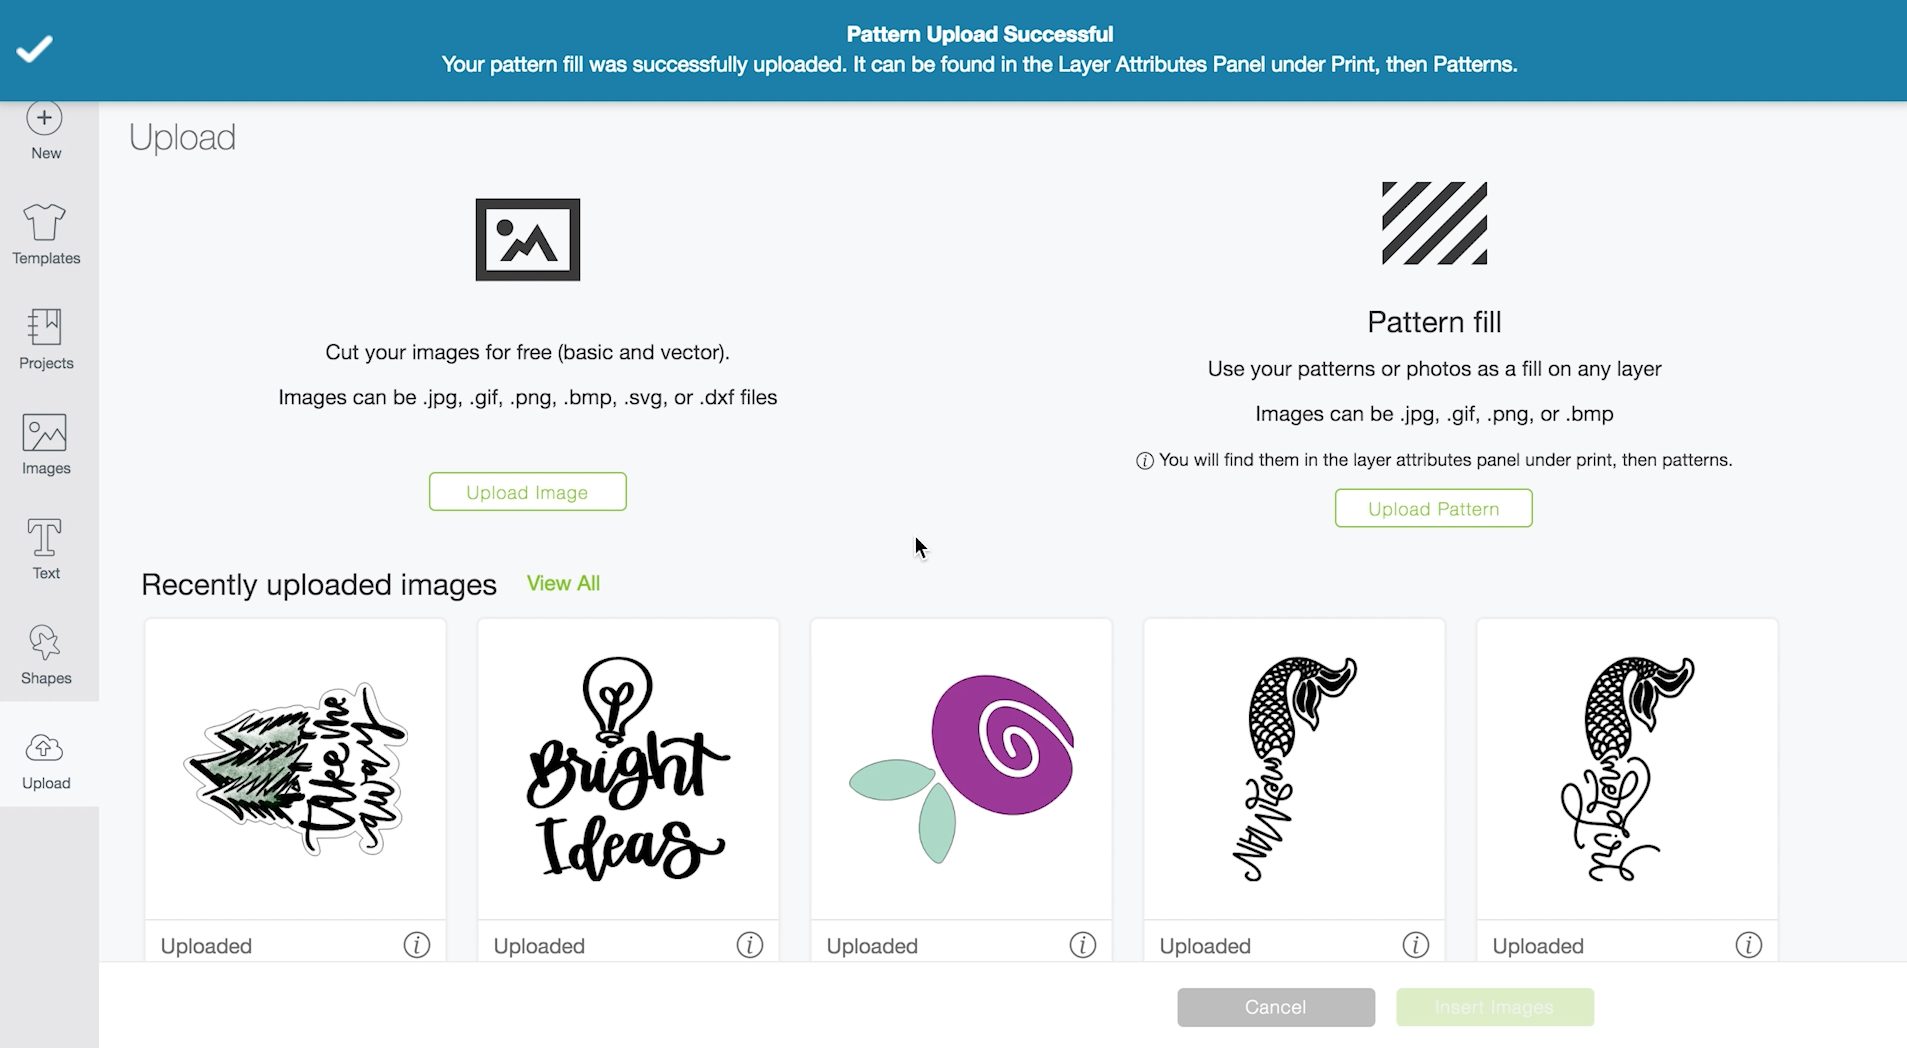

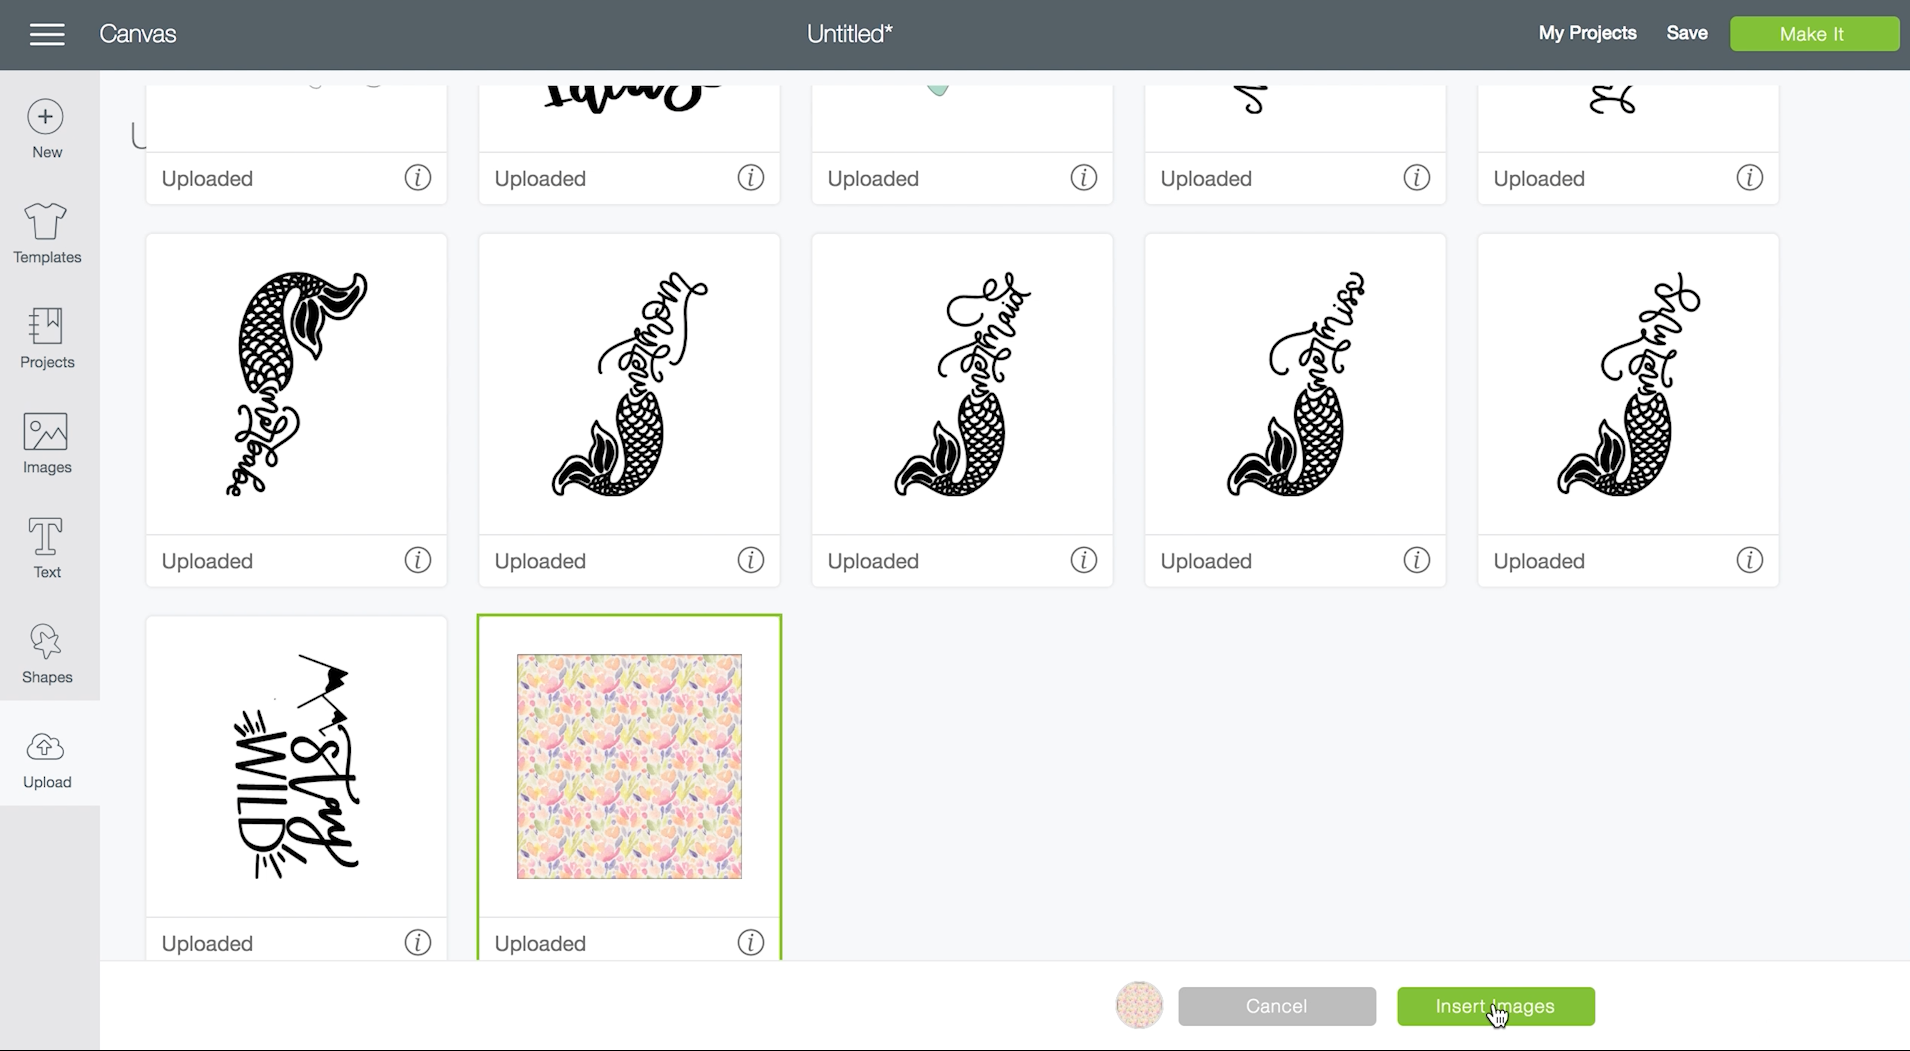
The other way you can get this effect is to upload your watercolour florals (pattern) as a Pattern Fill instead of under the standard Upload. When you go to the upload tab (that little cloud), you have two options. We’ve been using the Upload option, now let’s click the Pattern Fill option.
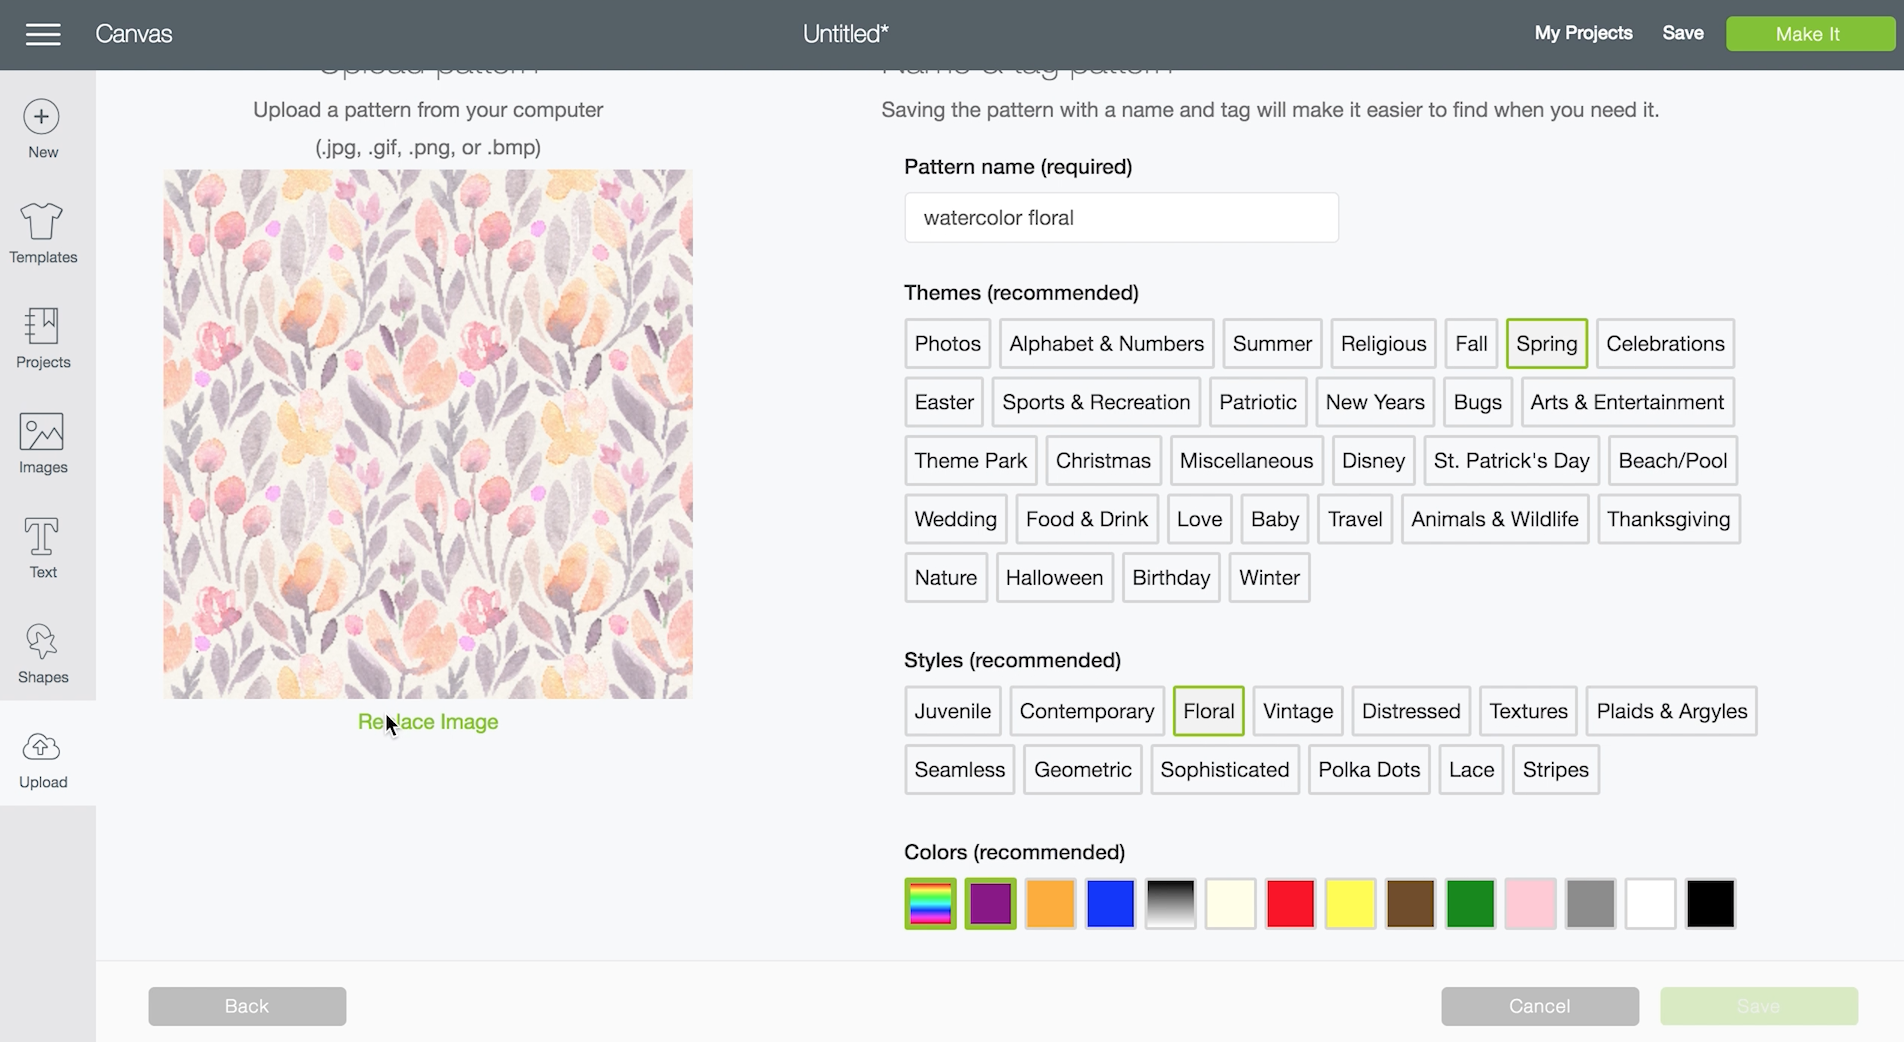
You select your pattern and then you’ll get to label or title your pattern before you save it. When you get back to your uploaded images gallery… you’ll see it’s not there. That’s because it’s been saved with the patterns, not with the images.
You need to select the shape or image that you’d like to fill with the pattern first and then turn it to a print (not cut only) in the layers tab. Then you will see the option of ‘Patterns’ in the layers tab and your pattern will show up there. When you select it, it will be added to your shape.
NOW in the video, I said you couldn’t alter that pattern but it was pointed out to me that you can make some changes it just doesn’t provide the same amount of control as the slice option does.
I totally forgot to make these hearts into an actual project until I was editing the video and realized I didn’t have one! But this is the technique and florals I used for this DIY- you can find the full tutorial for that in this post.
HOW TO GET YOUR LETTERING FROM PAPER TO CUT USING ONLY DESIGN SPACE
Alright, this is the really fun one (if you like to hand letter!). Right off the bat… I do this in Photoshop usually. Not because Design Space can’t do it (I’m going to show you how it can!) but because I’m way speedier in Photoshop. If you’re wanting a tutorial on how to do this in Photoshop (did you know you can try Photoshop for a month for free to see how you like it?!), you can check out my tutorial on that RIGHT HERE.
But for this tutorial… let’s look at how to get your lettering from paper to vinyl with only Cricut Design Space and your camera phone!

Let me preface by saying that if you do have a scanner, that will give you a better quality picture to begin with. But you really don’t need one if you’re not wanting to retain image quality (like watercolour details).
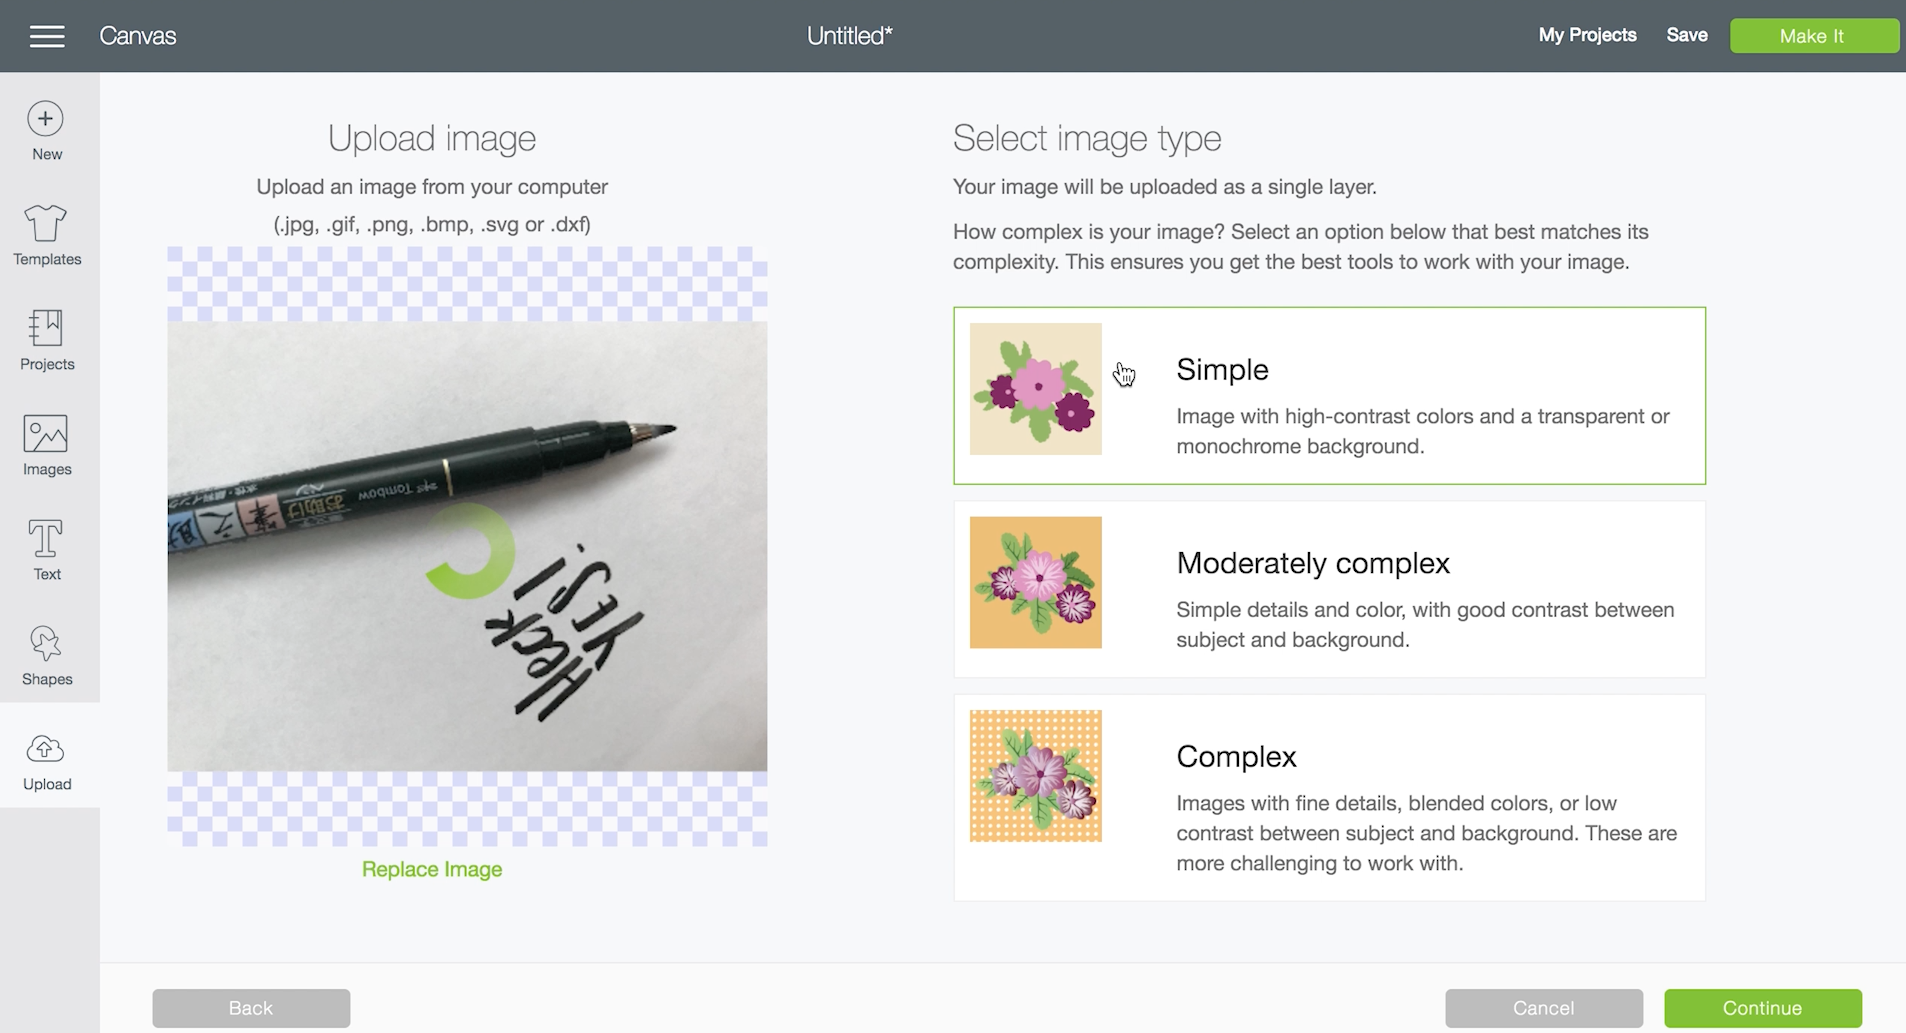
So I took this photo using my camera phone (low light and all… it’s not a great photo) and went to that upload tab (the cloud) and chose this image. When prompted with selecting the image type, choose SIMPLE image.
I know, it seems like it’s not a simple image but by choosing this, it will simplify your photo, losing image quality (which you don’t need anyways), but making it easier to delete the parts you don’t want. See how it makes it less detailed? This is perfect!
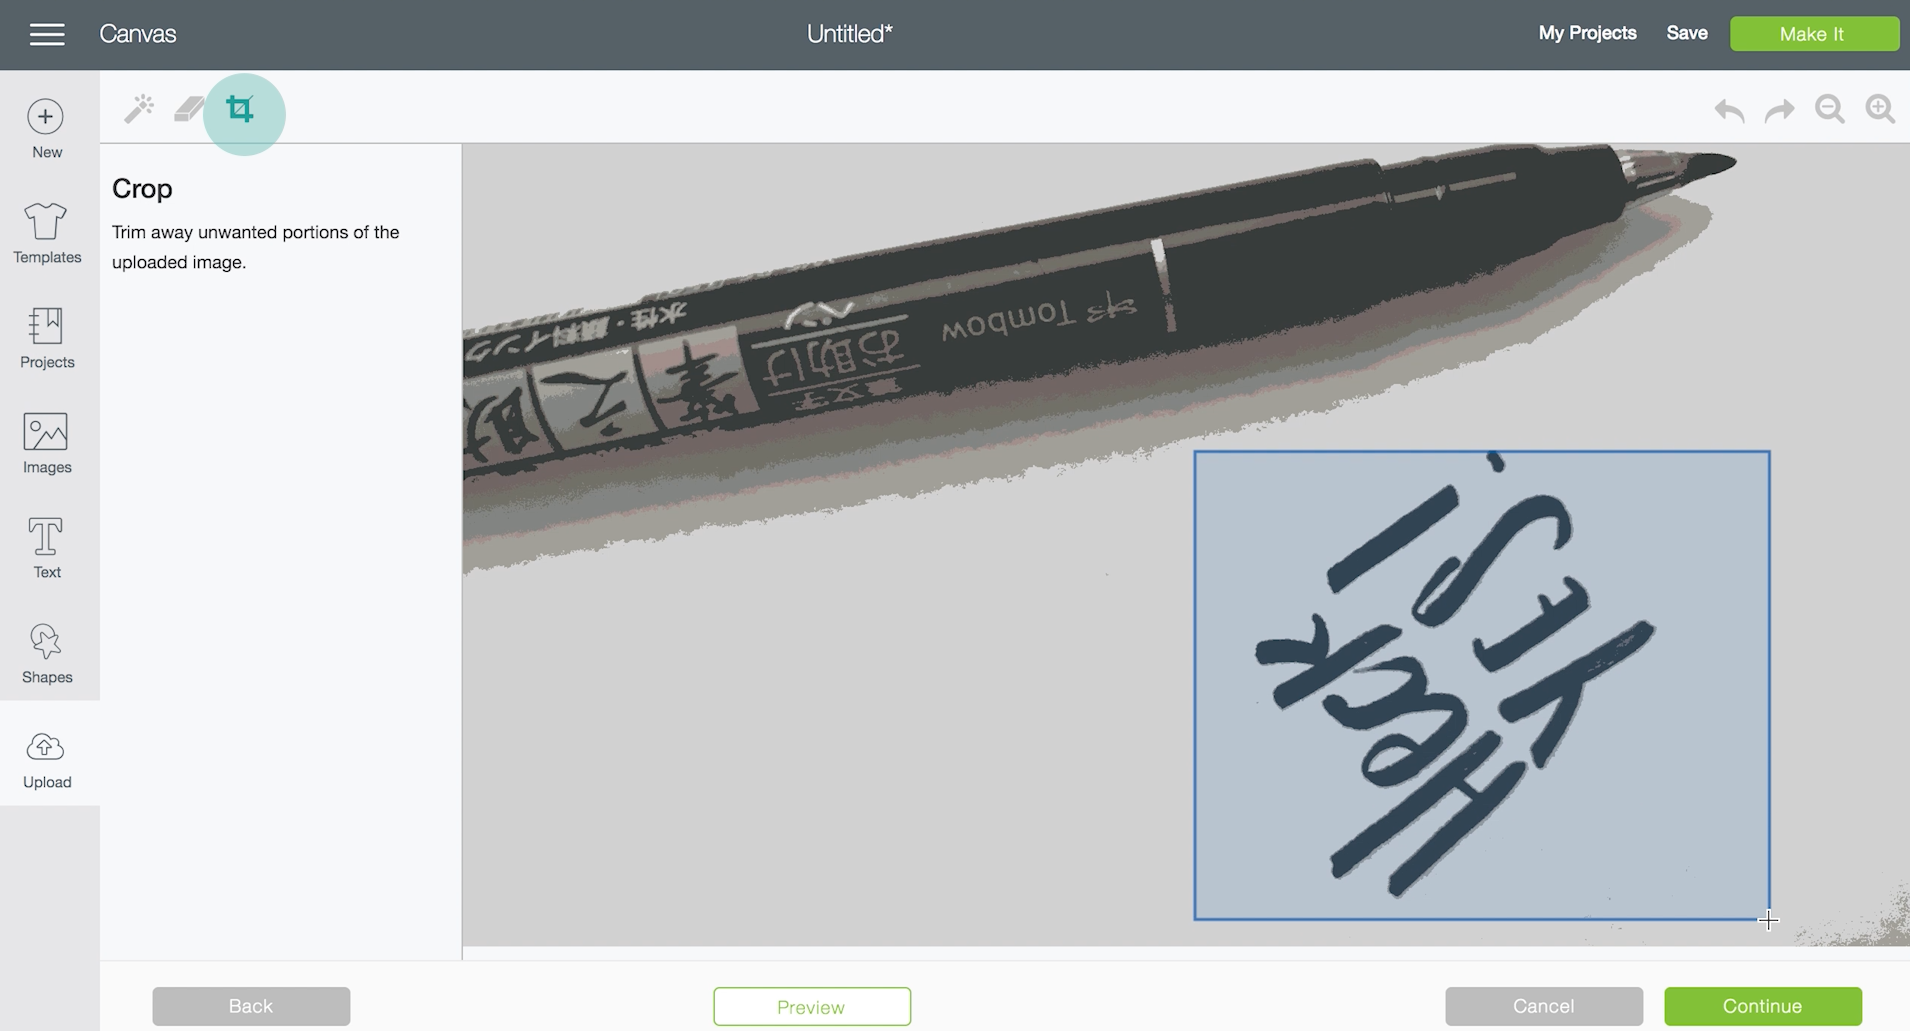
The first thing you should do is crop it down to just the area you want to keep. Even if you don’t have a pen in the picture, I find that the edges of the photo are always darker and I always seem to have little scraggler dark areas to erase if I don’t crop first.
Once it’s cropped down, you can use that magic wand to erase the background. You’ll also want to delete the background within your loopy letters (like in the e). You can click on the ‘preview’ button (highlighted in blue) and check and see what it will look like as a cut file.
You might see some dots outside of your design that need erasing. Switch to your eraser tool to do this. I toggle back and forth between preview and erase until I’m happy. This can be finicky. This is where I prefer Photoshop. But again… it works ;)
When you’re happy, you can choose ‘cut only image’ and insert it onto your canvas for cut. That’s what this decal is on the notebook.
Just like the PNG and JPG images above, this will import all as one layer and retain it’s layout when you click ‘Make It’.

I didn’t have anything else that needed a decal (I’ve stuck vinyl on everything in my life already) so I put this one on the inside cover of my notebook. This is the Cricut Adhesive Vinyl in Rose.
Alright! I SO hope that you found all the details you needed in this tutorial. If you have any suggestions for future Silhouette VS Cricut videos, feel free to request them in the comments!
This post went through so much information, it’s a good one to save or pin for the next time you’re uploading images and run into a question!
LIKE IT? PIN IT!

 Chugga Two Two! Modern Train Themed Birthday Party
Can you explain more of how to clean up a multi layer svg file to design space?
Hey there! I don’t do many multi-layer SVGs- best of luck!
Lin3850@aol.com i need so much help. I just received my cricut maker. I cant upload pics or sayings I saved to my favorites but icant upload anything.
I need so much help. I want to put inspirational sayings i saved
Hi Linda! You might want to try Cricut support, they’ll be able to better assist you :)
Hi! I’m new to the Cricut world, and have been making most of my things in illustrator and then uploading them into design space. For the “take me away” graphic that you printed and then cut, how did you get the white edge around the entire graphic? Hopefully that question makes sense!
It totally makes sense! I added it in Procreate on my iPad, I just added an extra layer and coloured it in… not super techy but I haven’t figured out a simpler way!
Hi! Is the “Bright Idea” PNG available to upload from your site?
It’s not right now, nope! I’m looking to add SVGs and PNGs to my shop soon though!
I am trying to upload a logo we recently had made for our farm. I can’t get the cow to print clearly, it just looks more like a black blob. My goal was to use it as a print file to create vinyl logos. I am still learning all my cricut can do. I am working with the cricut explore air. Thanks
It sounds like you have the ‘bleed’ on- try turning that off! Good luck :)
Hi! Great blog! Lots of great information.
So we’re trying to die cut stickers on sticky paper. We created a print file in Illustrator and then created a cut file mirroring that exactly (all of the same dimensions and made the silhouettes wider than the design in order to have the white space around it, similar to what you have on the “take me away” design). We cannot figure out why it is cutting uneven. We’ve tried to adjust the position both on the design space and physically on the mat. We’ve had success with doing this on regular copy paper, but as soon as the sticker paper is in there, the cuts are very uneven. We’re feeling exasperated and need some guidance. Is there anything you might suggest to remedy this?
Ohhh Courtney, I’m sorry I’m going to be no help! I didn’t have that experience at all, do you have the correct material selected with your machine?
I have had a similar issue! I did go thru the “recalibrate machine” step, which helped. But also, it could be having a more difficult time reading the registration marks on the sticker paper. Possibly try holding the lid of the machine closed while its looking.
Thanks so much for the tips! I did the recalibration as well- it helped a bit but I definitely think it’s something that could use improvement :)
hi there…Love the tutorial… quick question since I’m not sure this is on a video of yours…can the Cricut cut a person’s head from a photograph so that I can add it to say a cartoon body?
Thanks…I’m just starting to learn about Cricut.
Hi Norah! I think you’ll find this video helpful: https://youtu.be/pY4-cg2zaMQ
HI CAN YOU CUT A PHOTO OF YOURSELF ON CIRCUT EXPLORE AIR2 TO ADD ON A STOVE BURNER COVER
Hello I am using Cricut design space app and my image keeps moving to the upper left corner when It goes to the make screen. I suppose to save material. All I’m trying to do is cut the image no layers no colors. But I cannot find any way to do it. Thanks in advance.
Hey Mick, It’s my guess that you’re trying to cut a specific section of your material. Check out this snap mat tutorial!https://www.lemonthistle.com/how-to-use-cricut-snapmat-silhouette-vs-cricut-series/
Hi
Great tutorial thank you!
I’m having problems with picture clip art cutting on print and cut on Cricut, too many details so cut takes forever. Any tips?