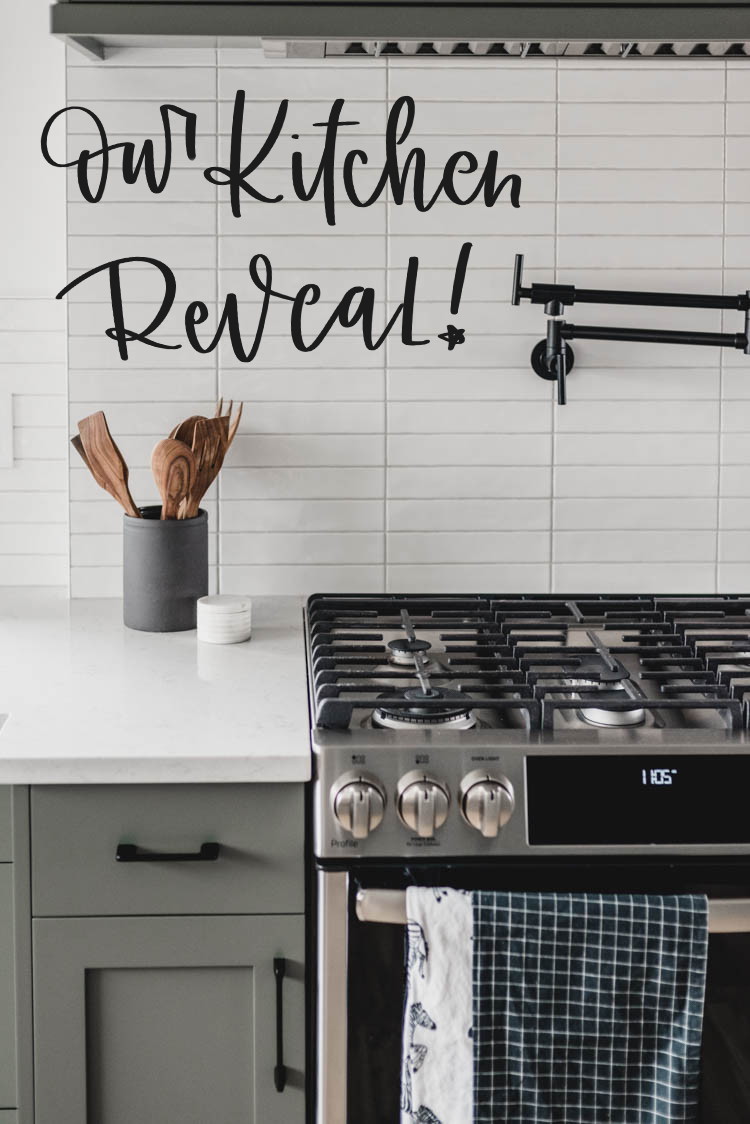
Sharing our green kitchen before and after! All the details, sources and design choices from our modern olive green kitchen with stacked tile, light wood details and matte black fixtures and hardware. In the before and after video, I’ll share all our design dreams and how we balanced DIY and contractors to make it happen in our budget!
*Some of the products in this space were provided through sponsorship. I’ll * them so you know :) See all my policies here!*
It’s FINALLY that time! We’ve been working on this kitchen remodel for months and I’ve been working on the styling, photos, video, and blog post for this reveal for what feels like weeks so I can’t tell you how darn excited I am to share the reveal of our modern olive green kitchen with you guys!
If you haven’t been following along (welcome!), we bought our new home this summer (a cute rancher- you can see all the before photos RIGHT HERE) with big plans to remodel it room by room. But the first room we took on was the biggest and turned into a full main floor remodel when we couldn’t find the same flooring to carry through the new kitchen. I shared the design plans for the kitchen RIGHT HERE and an update (including the setback of the flooring!) in a blog post and vlog style video RIGHT HERE. And now? Months later, I’m excited to share the before and after of the finished space!
You can find the video tour of this space RIGHT HERE.
I’m going to share all the before photos, after photos, details we chose, hidden storage (heck yes!), and sources BUT first… I wanted to chat a bit about what this kitchen means for us as DIYers, because it feels SO big.
This kitchen was such a labour of love but also so rewarding to see come to life. It’s not just the sweat that we put into the space (which we really did!) but also the reward of seeing the design and time that we spent dreaming about it coming to life. In our last home, we remodelled top top bottom but chose all ‘safe’ finishes. We went with a white kitchen, grey countertops, light grey walls, marble backsplash… all so beautiful, but all SO SAFE (you can see it RIGHT HERE). We loved it but always talked about taking some bigger risks in our next home to reflect the styles that we love so much.
Even as we were making the decisions for this kitchen, I had moments of uncertainty (A GREEN KITCHEN?!) but felt such a confidence in every decision so much more than I felt in any of the decisions in our last home. It’s like we’re getting comfortable tearing things apart and putting them back together ;)
We also had so much more confidence in the DOING. We did a lot ourselves- just the two of us while our kids slept. Don’t get me wrong… we still had lots of help (thanks Dad + Riley!) but unlike our last house, most of this was done by ourselves. We never would have thought of moving a window without someone more experienced than us to help when we made over our last house. We never would have ran electrical wires or built walls, or taken down walls, or even made a lot of these decisions without someone giving us the go-ahead. It’s been 5 years of us smashing tile and putting up drywall and I finally feel like we’re gaining some confidence. There’s still SO much for us to learn (and we learn something on every project), but this one felt like such a big accomplishment, so I’m just gushing a little bit. The transformation is SO huge in this space and it’s surreal to know that we did a lot of that by hand.
Alright… enough talking about my feelings ;) Let’s talk about the kitchen! This is a long one, you guys. So if you just want the source for something- click here to jump to the bottom of the post and I’ve got a list for ya!
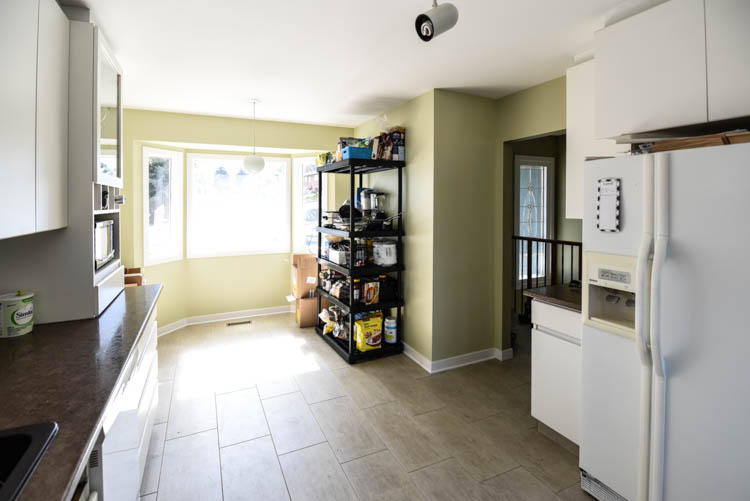
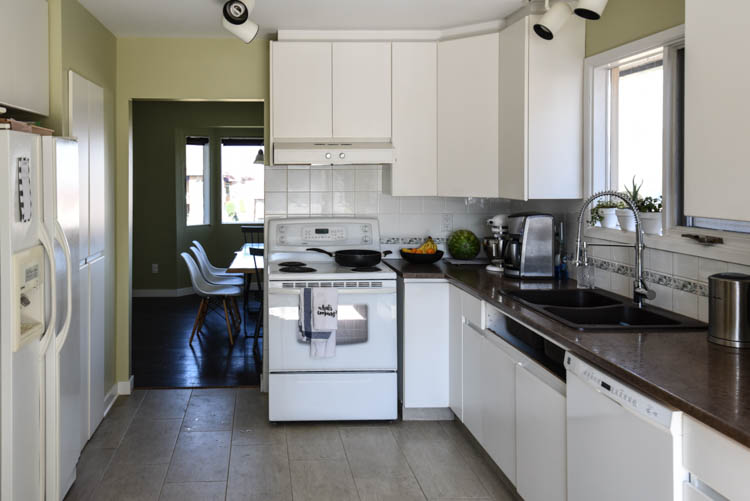
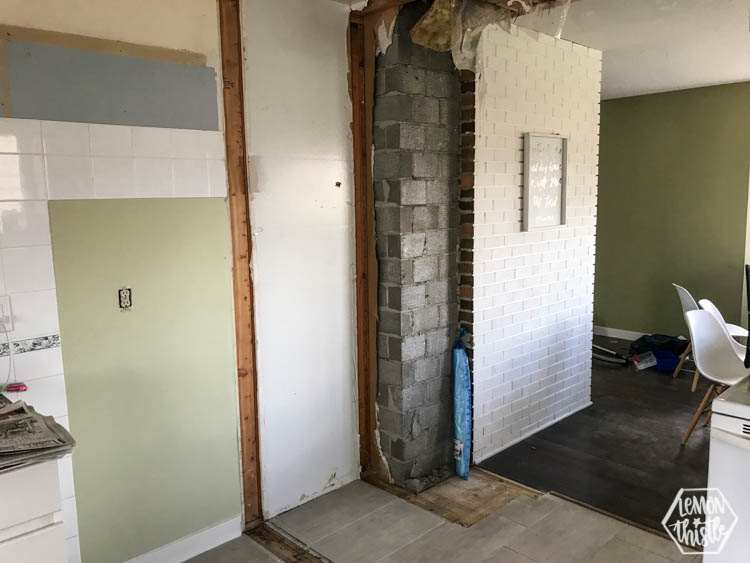
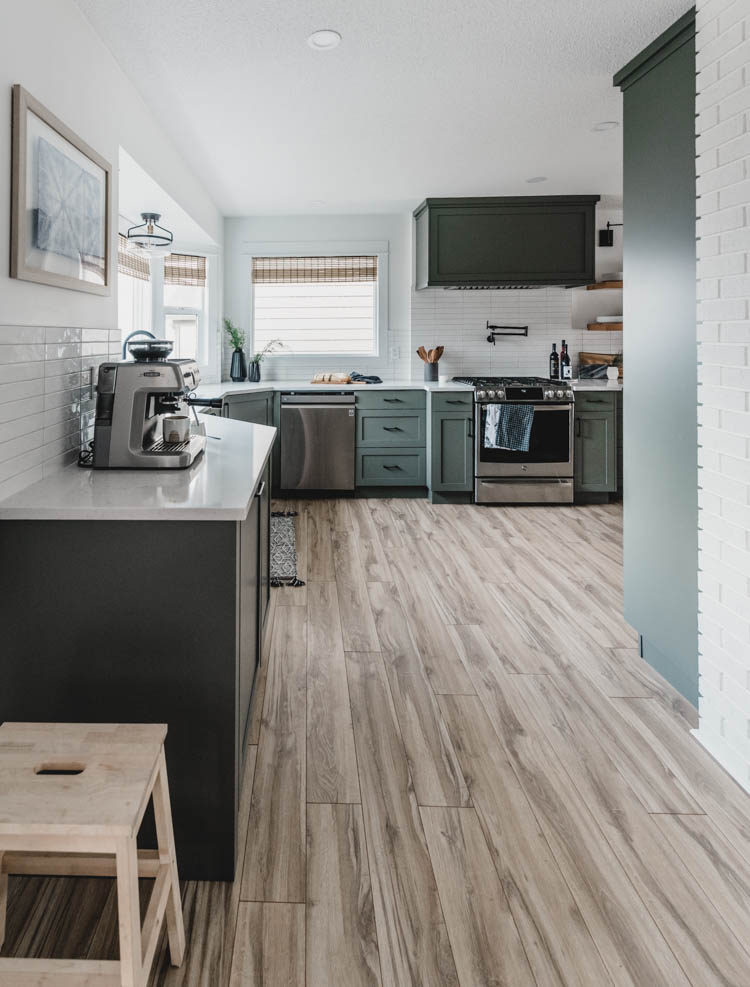
But first… THE BEFORE PHOTOS! I can hardly believe this is the same space. As a refresher to help make sense of these… the wall between the kitchen and dining room was removed and the kitchen was moved to where the dining room was and the dining room was moved to the front of the house where that plastic storage shelf was. This made for a much bigger kitchen AND access to the living room! You can see the before photos of our whole home right here.
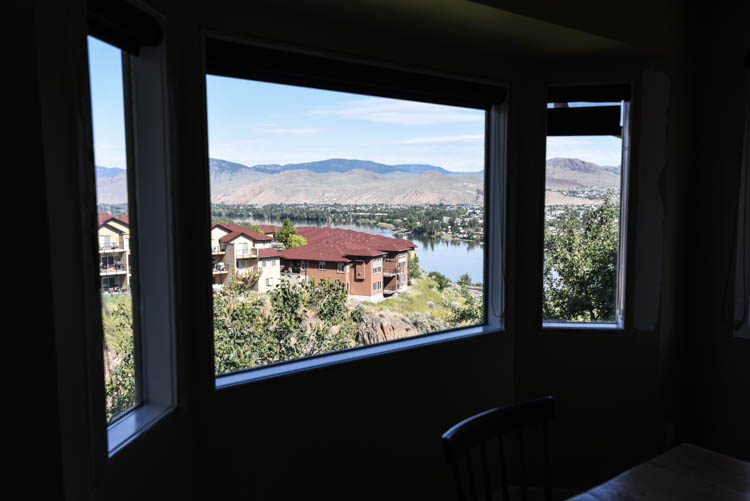
And that view right here is what I’m excited to look out at while I do dishes now!
We’d been talking about doing navy cabinets long before we bought this house. When we bought this rancher, I couldn’t pull the trigger on navy. I brought a pinboard full of green kitchens to Shane and I was surprised to hear he loved it as much as I did. This was our starting off point. I knew that I wanted a sort of muted green and I knew that I wanted shakers… and after a lot of Pinterest (are you following me over there yet?) and dreaming and paint swatches, we decided on the rest. You can see that design board we put together to finalize our decisions right here.
The aesthetics of the kitchen were easy for us. I love this stuff- picking colours, lights, hardware… it is such a fun challenge for me. The layout was a bit more of a challenge. Our biggest goal other than updating the aesthetics, was to make the kitchen more accessible and functional. We wanted to have access to the living room and the dining room and not to have to walk around a giant wall and fireplace for it. This was almost a deal breaker for me when buying this house. Shane suggested moving the kitchen to the back of the house (where the dining room was) to accomplish this. He’s going to forever be reminding me that he was right about that one. And he really was.
By moving the kitchen to the back of the house where the dining room was originally, we took advantage of the large opening to the living room space without having to tear down the giant brick fireplace in the centre of the home. It also gained us a rad view to the river and mountains and the backyard (to see the kids play!) from the kitchen windows. Moving the kitchen also let us gain back the wasted space that was at the end of the kitchen (we are assuming it was meant to be a breakfast nook!). This made for a dining room the same good size as before plus a giant (for us) kitchen. It’s night and day from what we started from.
This post is freaking huge. Just putting that out there. I couldn’t stop talking. So I’ve made it easy for you to find what you’re interested in:
- The Bay Window Challenge
- The Uneven Pantry Wall Challenge
- The Range Wall Challenge
- Appliances
- Flooring
- Wall Paint
- Countertop
- Tile
- Cabinets
- Hidden Storage & Appliance Garage
- Open Shelving
- Faucets & Sink
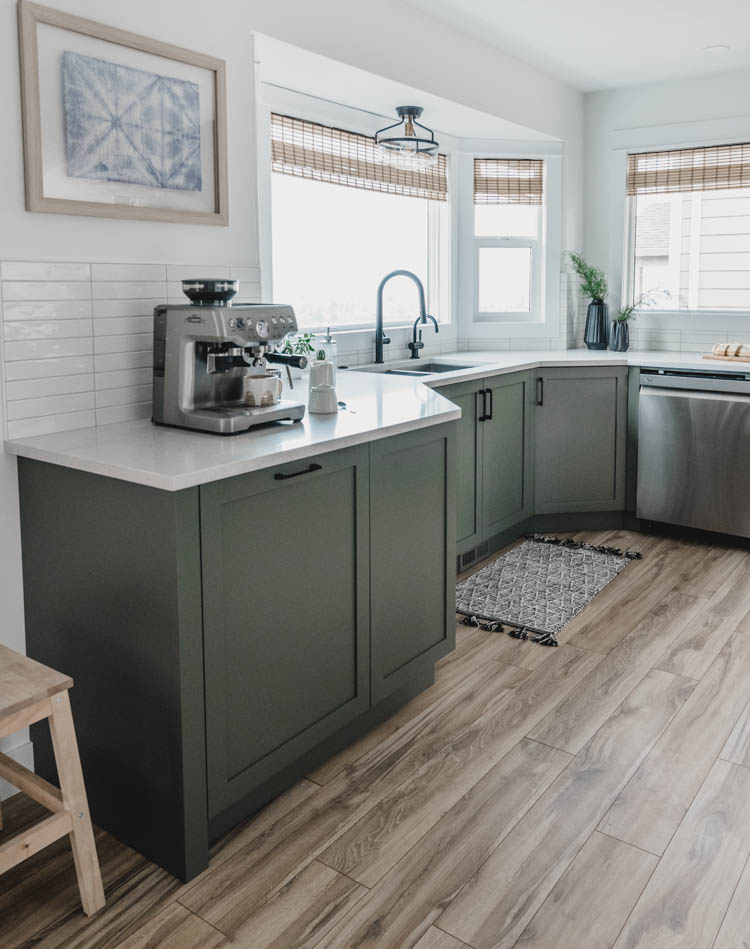
- Coffee Bar
- Lighting
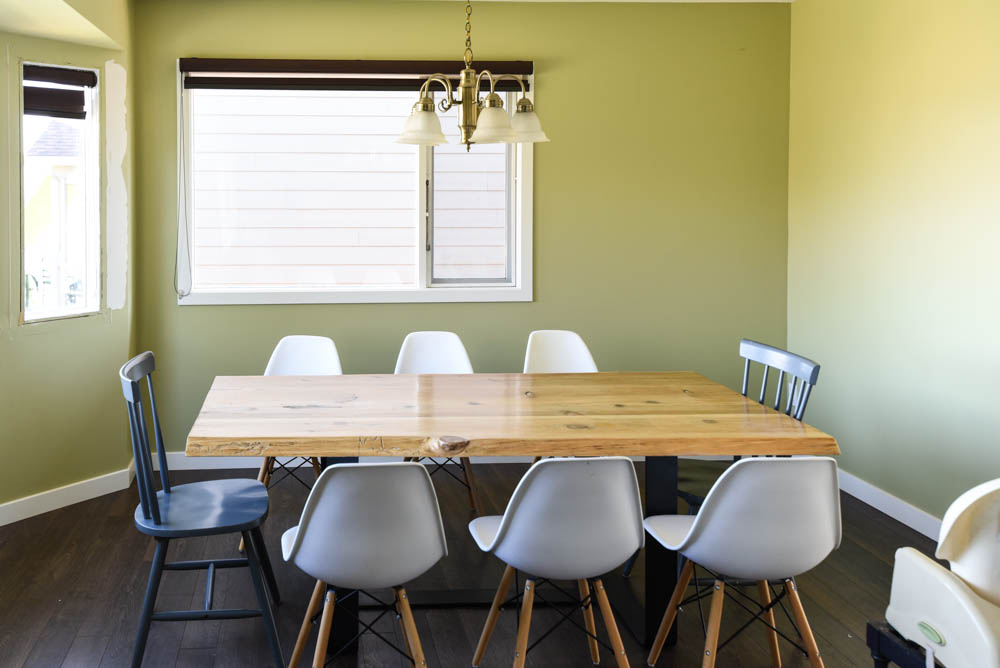
- Peninsula
- Windows & Coverings
- Decor
- AND all the Sources in one list
THE BAY WINDOW CHALLENGE
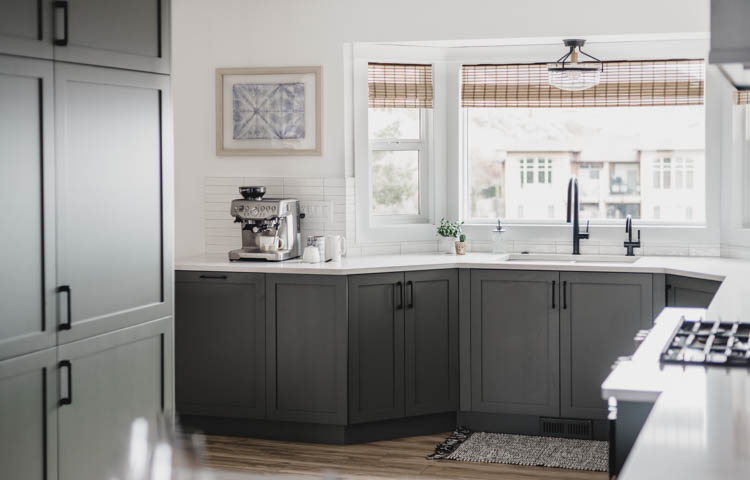
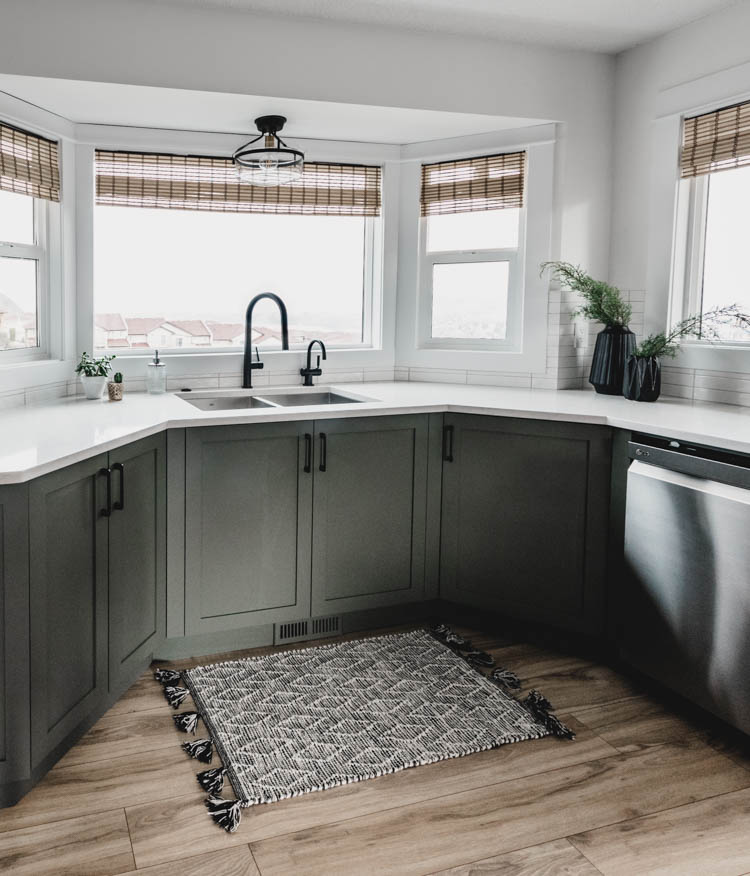
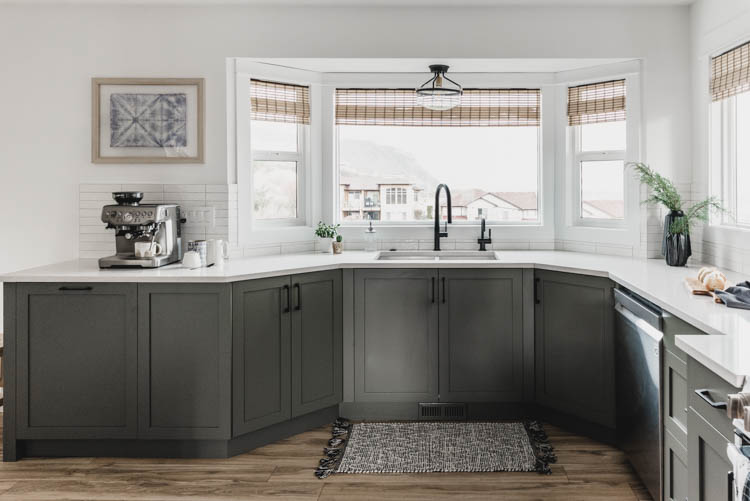
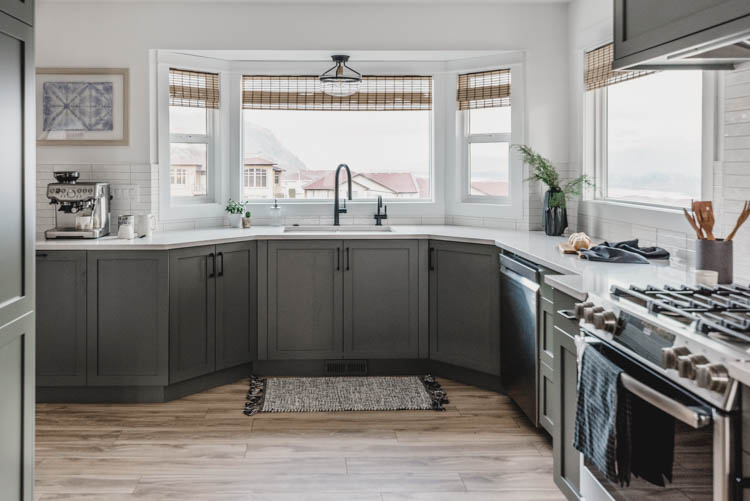
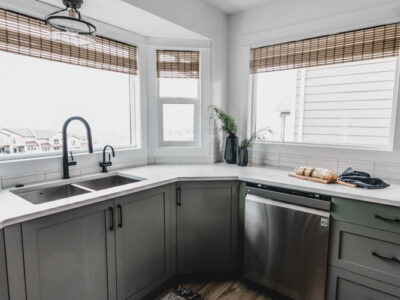
This move didn’t come without challenges, though! The bay window! It’s totally a beautiful feature now. But I spent SO much time researching how to do cabinets and countertops in this window space. I saw those who built it straight across and had the extra deep countertop (which didn’t allow me to see the backyard) and I saw those who built into the nook a bit, but not the whole depth. And I definitely couldn’t find a great example of this to show cabinet makers. I really love how this looks, it feels like the kitchen is that little bit bigger running the cabinets straight across. It also gives a design feature that I totally adore. It works with the age of the house (80s ranchers LOVE bay windows!) by featuring it instead of trying to ignore it.
THE UNEVEN PANTRY WALL CHALLENGE
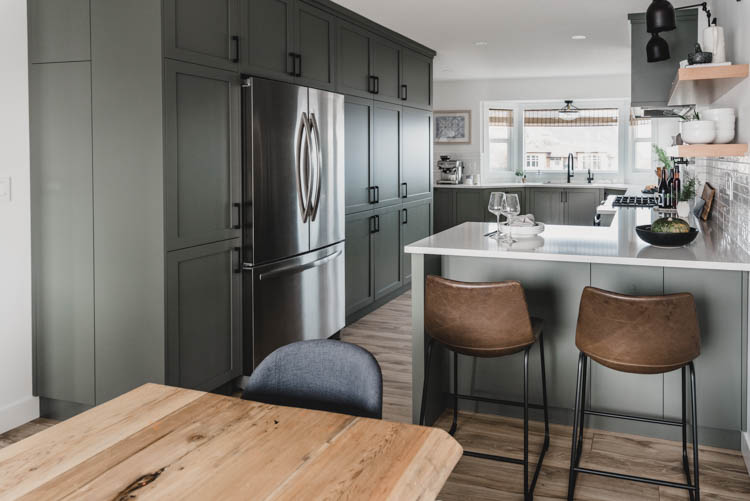
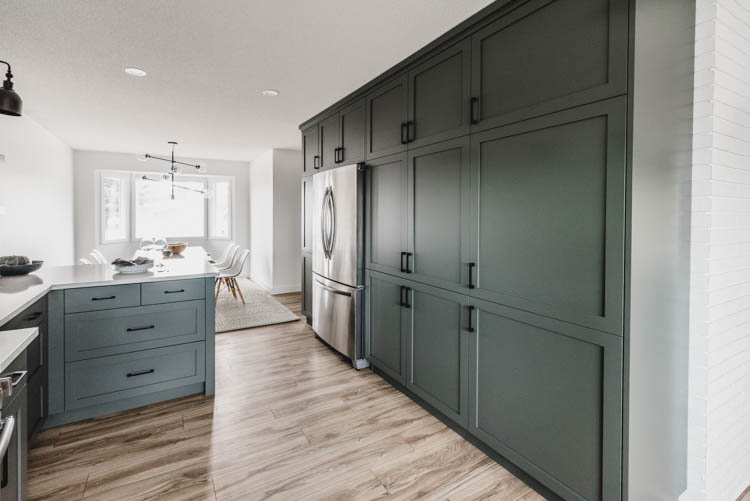
The other challenges? That giant pantry wall, for another. We had originally planned to do a coffee bar at the sink end of the pantry wall but that wall was brick and only a couple of feet before it sunk back into chimney for a foot or two before it stepped back again to the wall. Three depths! One wall!
We ended up using a full height pantry wall to disguise this. We ran it shallow on the chimney side and then where it stepped back, were able to accommodate a full depth fridge. This also left the pantry to the left of the fridge SUPER DEEP. We took advantage of that by breaking it up into a standard depth pantry cupboard PLUS a hidden broom closet and cupboard for chemicals that is accessible with touch latches from the dining side.
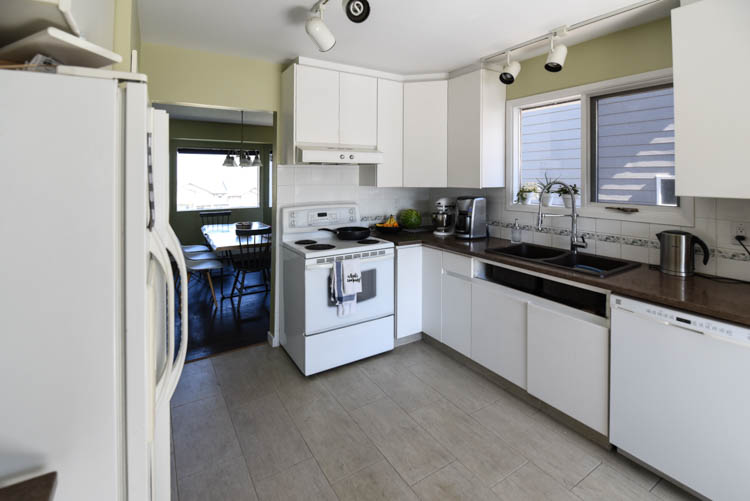
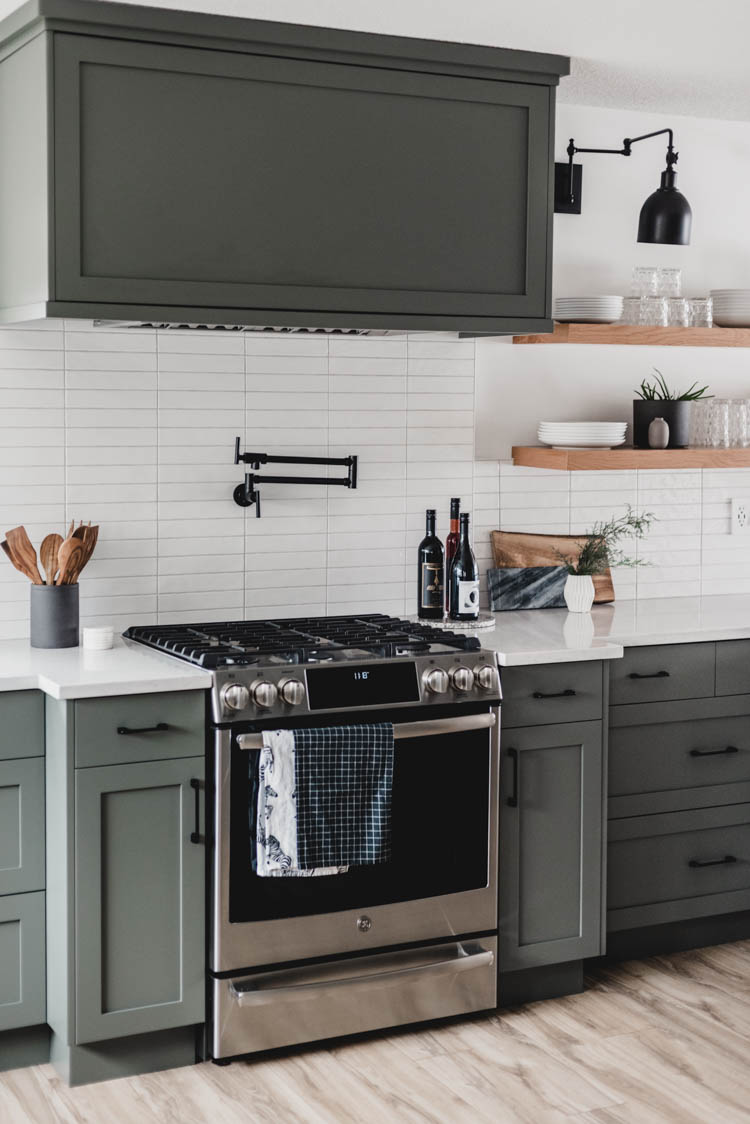
THE RANGE WALL CHALLENGE
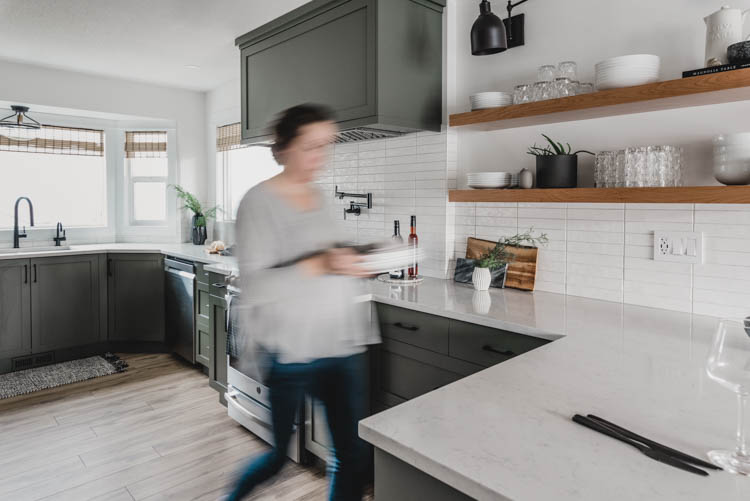
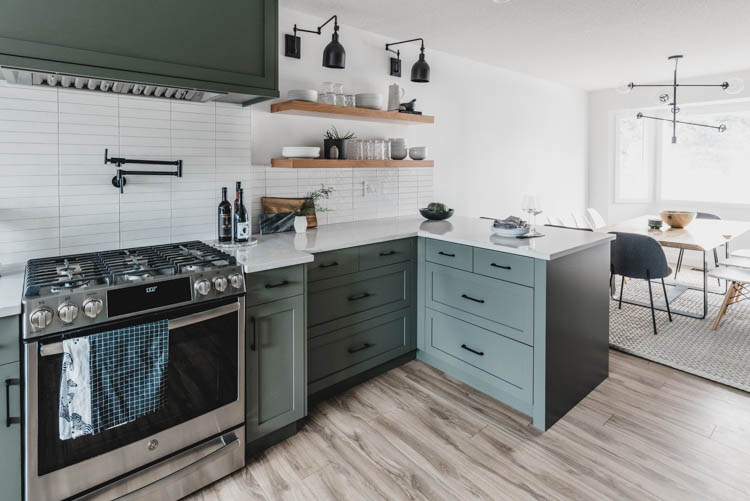
Last challenge (I’m sure there were more, but let’s leave it at this!) was that range wall. I knew what I wanted it to look like. I wanted a slide in gas range with a cabinetry range hood and a beautiful black pot filler. But… we had giant windows and it was an exterior wall. Did you know you can’t install plumbing on exterior walls? But sinks! Yes, but sink plumbing comes through the floor. The pipes in the exterior walls could/would freeze. We ended up shrinking the window to the left of the range by over two feet and built out a floating wall to hide the plumbing. We built it out wider than just the range and built the cabinets out around the range to create a feature out of the bump out- not just a plumbing cover-up. We ran the range hood across the whole feature bump out and YOU GUYS. It’s exactly what I was dreaming of. It looks like a feature. I’ve never been asked why the wall is like that. Because it looks like it’s part of the design… not a quick fix for the plumbing.

There’s tons of details (like the wall behind the bump out is also drywalled and insulated and the plumbing is attached to the most inside drywall… but we talked to lots of contractors before doing it, so I’m pretty darn confident in it.
Okay so now that you know all of the things that we had to think really hard about… ha! I just feel like that would be really helpful if you’re thinking through your own layout. These things are like puzzles and I love getting a peek inside the minds of others when they’re planning decor and renovations.
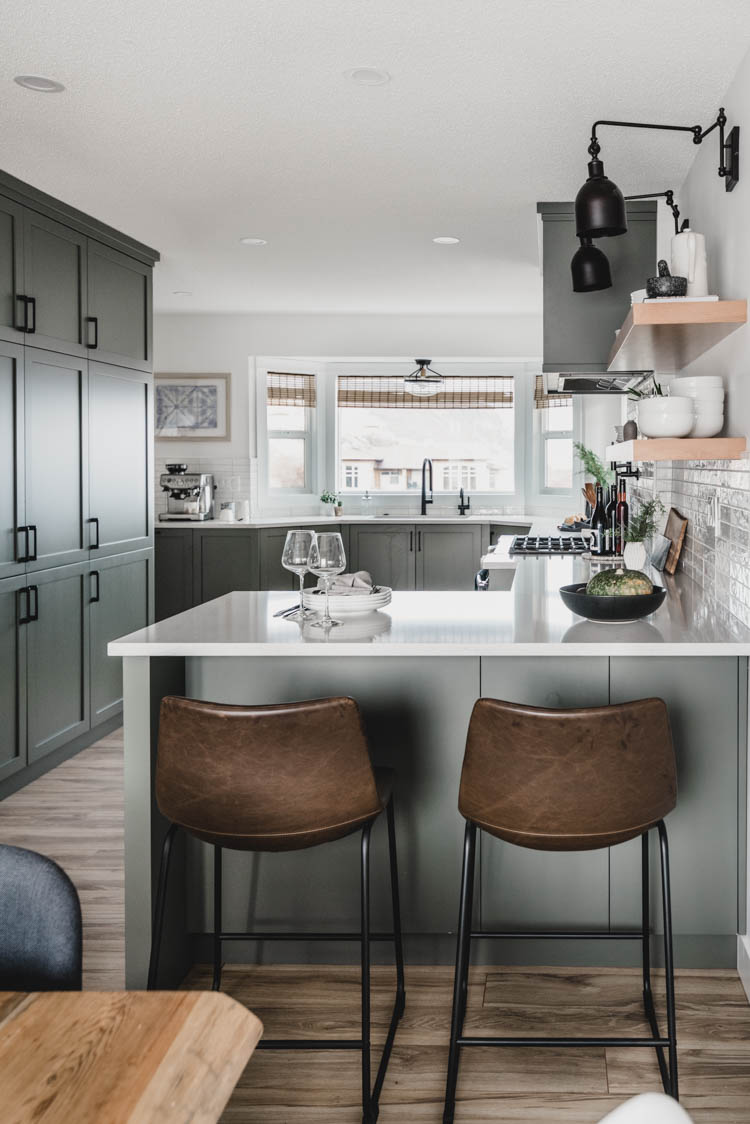
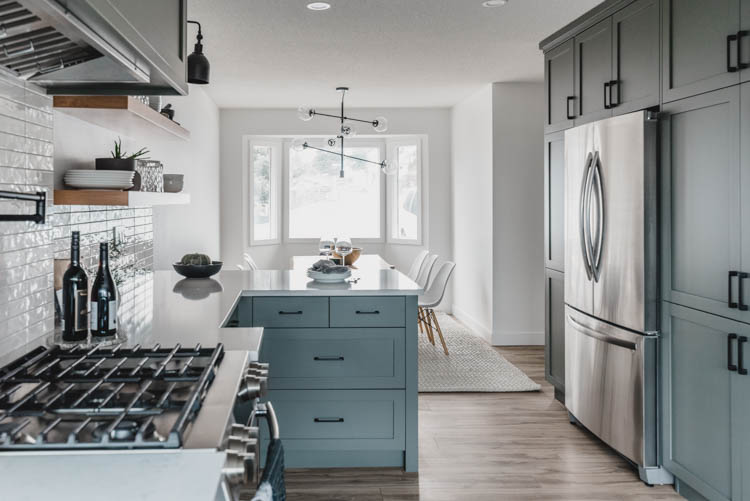
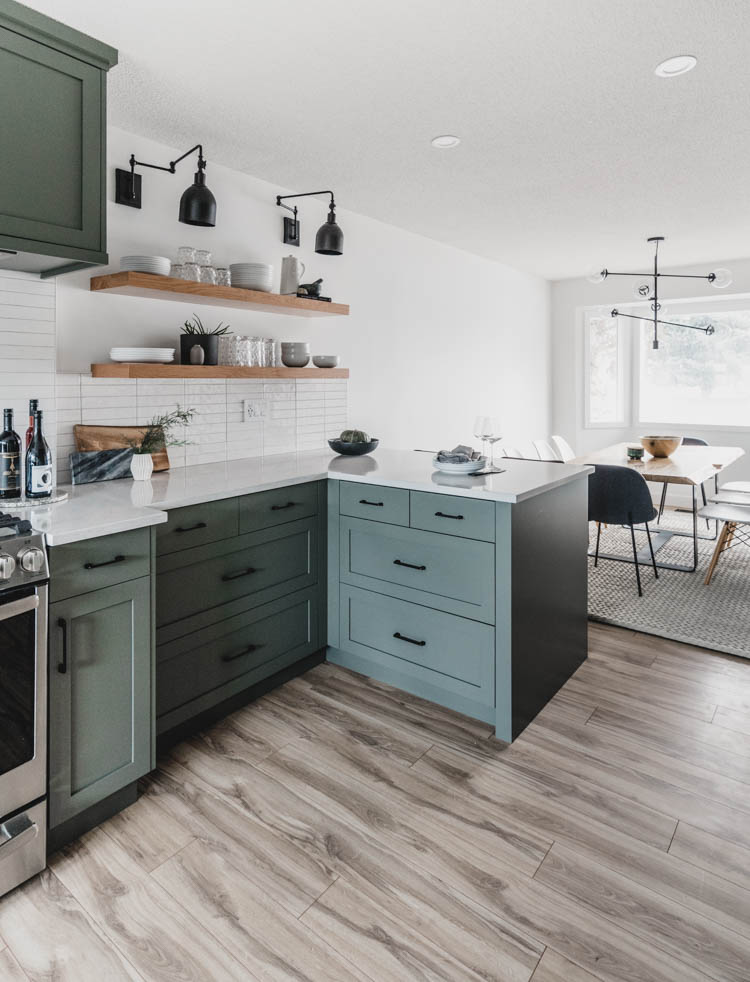
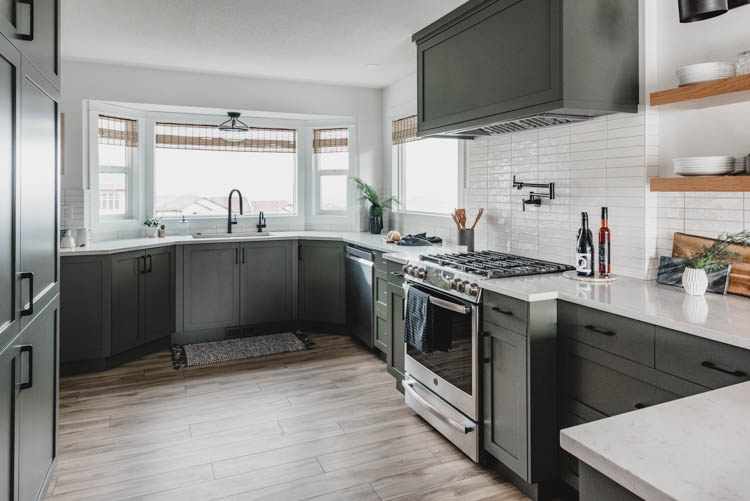
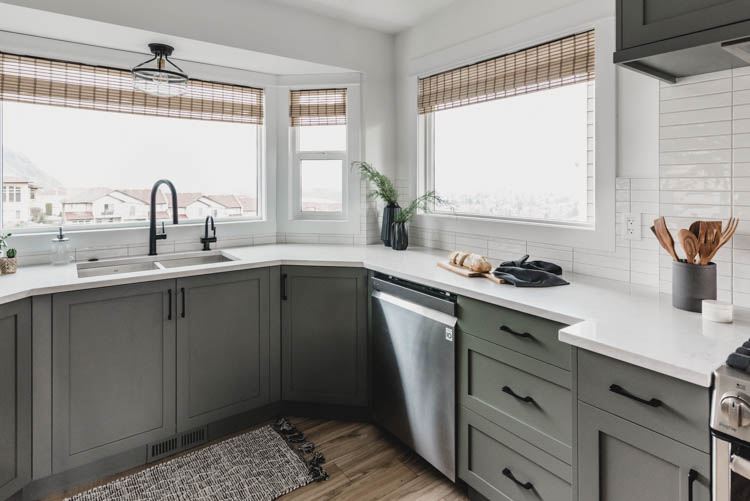
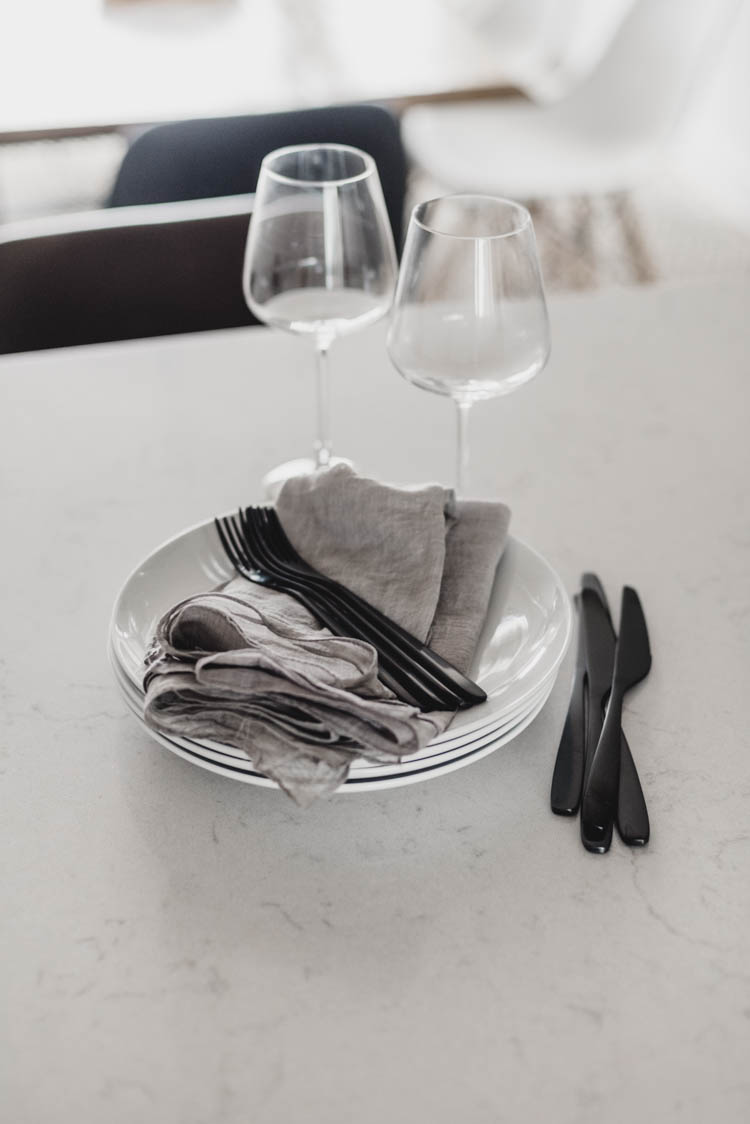
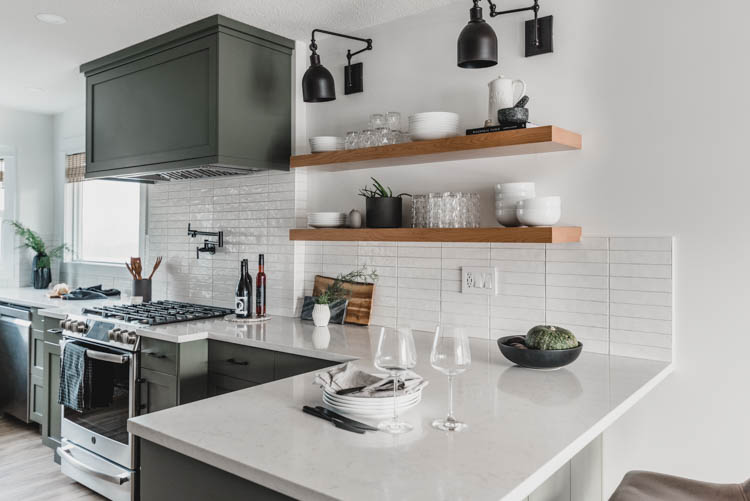
Since we knew we wanted green cabinets, we decided to go really neutral with everything else. We chose white walls, white tile, and a natural grey looking countertop. We grounded it all with black fixtures and hardware.
APPLIANCES
We talked briefly about going for darker appliances but for the price difference- the look of stainless is totally classic and easier to mix and match to get all the features we loved without breaking the bank. All three appliances are actually different brands (dishwasher is LG, range is GE and fridge is Frigidaire. We got a set last time around and while I loved them, when we went to look this time we had some specific requirements (slide in gas range; 36 inch full depth fridge with ice in the freezer/not on the door; dishwasher with hidden buttons and third rack for bottle pieces/knives) we would have paid a fortune to have them all exactly matching. Plus, they’re pretty spaced out so the differences aren’t too noticeable. None of the dishwashers had handles that we were looking at so matching handles wasn’t an issue between the range and dishwasher and the fridge was on a different wall. This is not from a partnership but I feel like it’s super helpful information- we got all the appliances at Home Depot and they price matched and beat the prices by 10% on all the appliances… even Costco’s prices. That is freaking amazing.
The only exception is the range hood as Home Depot doesn’t carry the inserts like this. We ordered this 34″ one from Costco and are really, really happy with it.
THE FLOORING
Before I move on to the details… the flooring! This is such a big part of the kitchen and I feel like it really completes the look but it’s NOT something we’d planned to take on. We had hoped to find more of the same laminate that was installed throughout our entire main floor to carry on through the kitchen/dining. We would have only had to buy about 300 square feet to match this BUT it turns out it was discontinued and NONE was available anywhere in western canada. I called SO many stores, you guys. Since continuous flooring was a big deal for us, we decided to refloor our entire main floor. We’re actually not done yet… one more room to go! We found this flooring on for a case sale deal. I know that’s no help if you were looking for something similar :) We are really happy with it so far!
WALL PAINT
Picking white paint can be a total challenge… but picking white paint and white tile and white grout that all go together? And throw in a grey countertop in there too, why don’t you! There are so many undertones at play to watch out for. I’m so happy with the mix of whites and how clean and classic they look all pulled together. We settled on a paint called Expert White from *General Paint and painted the trim the same colour (just in a semigloss). I talk more about choosing paint colours (including these ones) in this post here.
THE COUNTERTOP
We are in love with this countertop! It’s called *Lagoon from Silestone by Cosentino. We had always wanted solid surface countertops in our last place but given our budget and the style of home, we couldn’t justify it. In this home, the kitchen suited it so much better. It’s a quartz and the pattern is non-directional but still has that subtle veined look that I love. Anything directional would have been really busy in a kitchen with so many angles and turns and this is the perfect balance. I chat more about it here!
THE TILE
The tile is something I had a hard time deciding on. Everything else was honestly pretty easy. Not easy, but I was confident. The tile I had to call in help. I partnered with *Complete Floors in Kamloops and they took me through every white and grey tile they carried and we narrowed it down to this beautiful handmade looking tile in a stacked lay. I LOVE how it turned out.
Shane was team stacked tile from the get go I just really didn’t want it to look too modern- it’s such a modern layout So the handmade looking tiles with their rougher edges and uneven faces add the perfect warmth to the otherwise super modern lay. We went with the lightest grey grout possible to avoid pulling any warmth in the white grout and had one of their professionals lay it. I think that brick lay is really forgiving for tile but this made me a little nervous with all the angles and corners we would have had to cut.
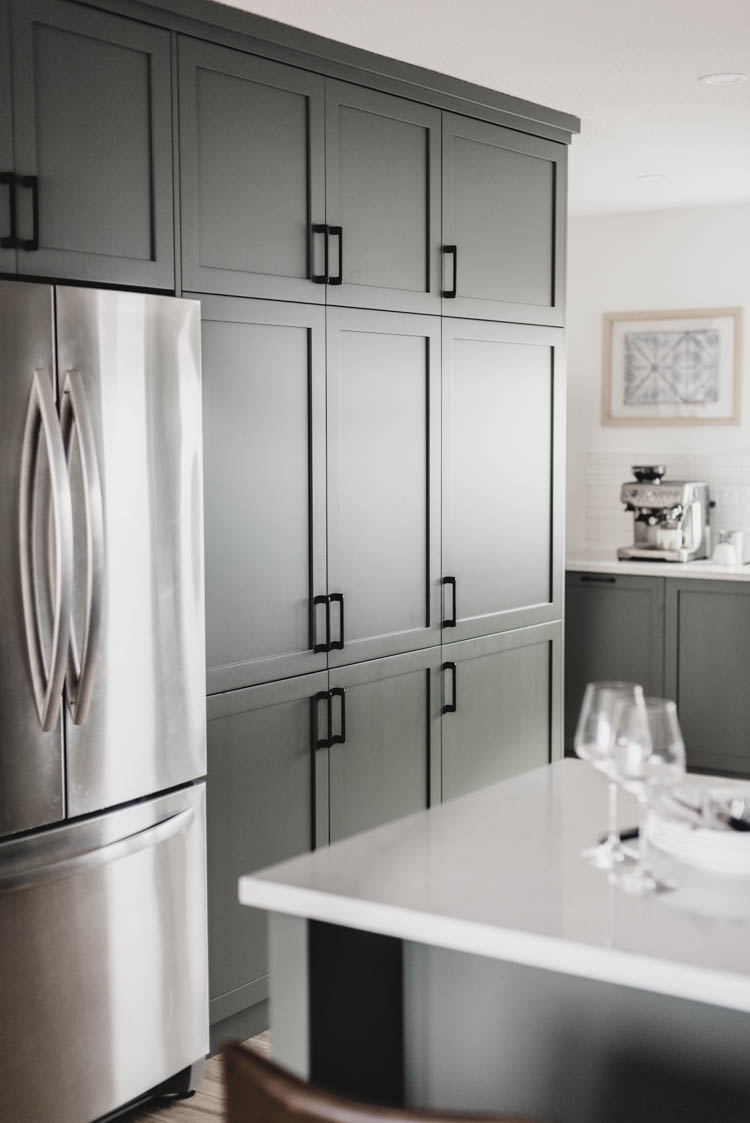
THE CABINETS
I was pretty set on flat panel shakers before we even started planning the kitchen. I love them for everything. I love them for interior doors, closets, cabinets… I just love them. I also love the thinner profile that these ones have. When we met with various cabinet makers, we were told that with painted cupboards- real wood isn’t actually best. Unless you want to be able to say, ‘they’re solid wood’. We went with what is essentially an MDF door. This is because solid wood expands and contracts with humidity and temperature. Which is totally fine BUT can create hairline cracks in the paint where the shaker meets the flat panel. That’s a pain to clean but you can also make it worse by cleaning it too hard. And this girl likes to scrub her cabinets because little people spill a lot of things on them.
The paint on them is a kind of lacquer that the cabinet makers had matched to the colour we loved- it’s called Dakota by General Paint. I wanted to go green but not too bold (y’know to keep it a little bit classic) and I love, love this colour. It looks totally green in the evenings but in the daytime it almost can look grey. I also didn’t want it to be TOO dark because I was set on black hardware and wanted it to be noticeable still. The hardware we chose is called North Dalston from *Liberty Hardware and it’s so pretty! The sleek profile is really nice looking but I also love that it will never snag on my clothes or stick out and get my knees… or my kids heads ;) We chose to do no knobs to keep it really uniform, but two different sizes of pulls.
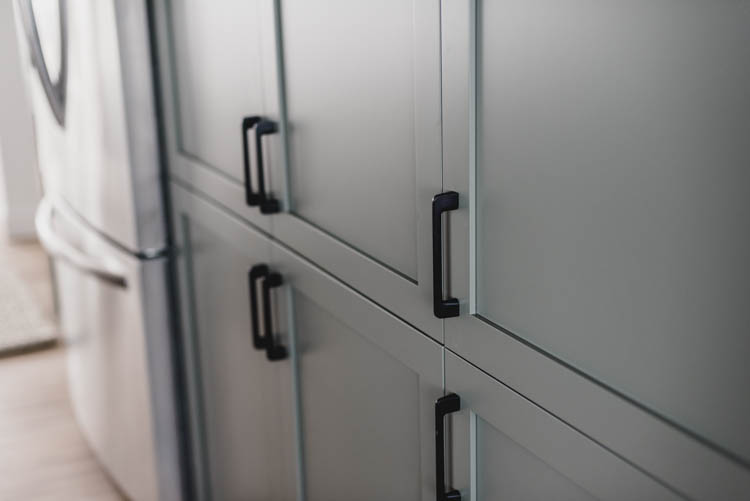
Uniform and consistent was my biggest hangup when I was designing the kitchen. I think this is how it still feels a little classic even with all the modern finishes. Every sightline is pretty symmetrical and looks intentional. When you look at the sink, we carried all the doors full height instead of opting for the faux drawer panel under the sink like usual. We couldn’t put drawers in the angled cabinets and the cabinet face with no pull is actually a cover panel for the side of that angled cabinet. I didn’t want to draw attention to this so by carrying all of the doors full height, it blends right in! The horizontal handle is the garbage/recycling pull out.
When you look at the range, it’s as symmetrical as possible as well- drawers all the way! Since the tiny drawers on either side of the oven would be too small to put hardware on if they were shakers, we opted for flat panels on all of the top drawers to keep it consistent. And again over by the peninsula, the peninsula mirrors the wall cabinets with two smaller drawers above two larger ones. I tried to keep the pantry wall really consistent as well with all the doors the same heights.
We had our cabinets made by Top 40 Woodworks in Kamloops and were really impressed by them. They worked with us quickly, were always kind to us (and my kids when I had to bring them along!) and their price was really reasonable compared to a lot of the other companies we got quotes from. Also- I loved that they thought outside the box when it came to weird spaces like our bay window and built custom boxes instead of wasting space. And they were patient when I was picky about symmetry… because WHO DOES THAT?! Me, apparently.

THE HIDDEN CUPBOARDS & APPLIANCE GARAGE
Speaking of getting creative instead of wasting space… I came with ideas, you guys. And I love that they delivered (not sponsored, just a really good experience). I wanted the microwave to be hidden. At first we talked about doing a built in one but didn’t love the extra expense. Instead I showed them photos from Pinterest of hidden appliance garages and they made it happen. The doors open and then slide in so they can stay open while the microwave is in use.
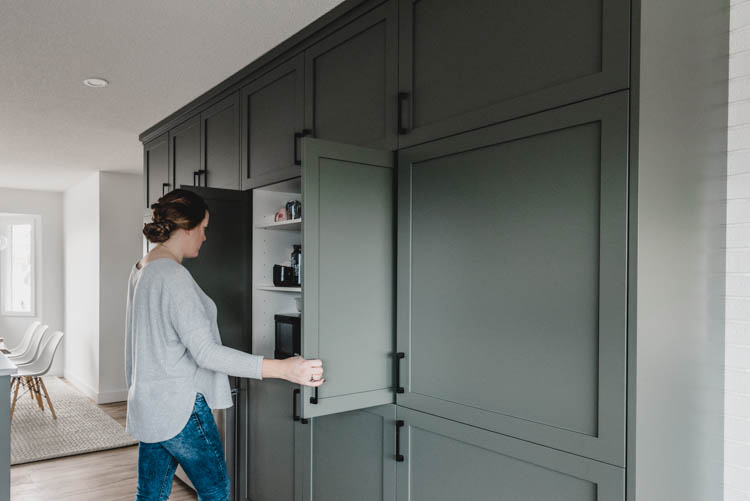
I wanted a hidden drawer above the recycling/garbage pull out to store garbage bags, light bulbs and all those random things. No problem! I wanted the peninsula to be all drawers and to use that hard to reach corner space for a hidden cupboard accessible from the back for craft stuff and playdoh for our kids. Easy! And when we got to planning the pantry wall and realized how deep the cupboard to the left of the fridge would be, I suggested adding a hidden broom closet there instead of a super deep pantry. I was so impressed that I didn’t have to explain my ideas over and over and that they just made it a reality.
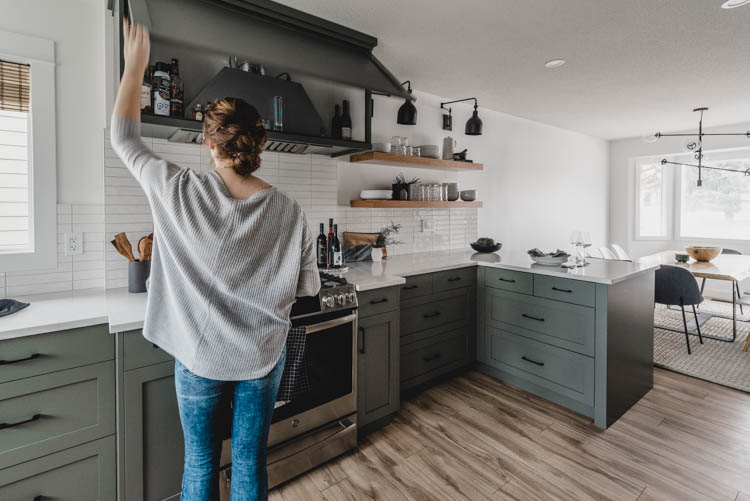
Speaking of hidden storage… above our stove! The range hood cover! We had just wanted it cased in for looks. We thought it would be a box and that was it. We didn’t know that they had made it a cupboard that opened with a touch latch. It’s more secret storage! We keep our liquors up here and it’s perfect.
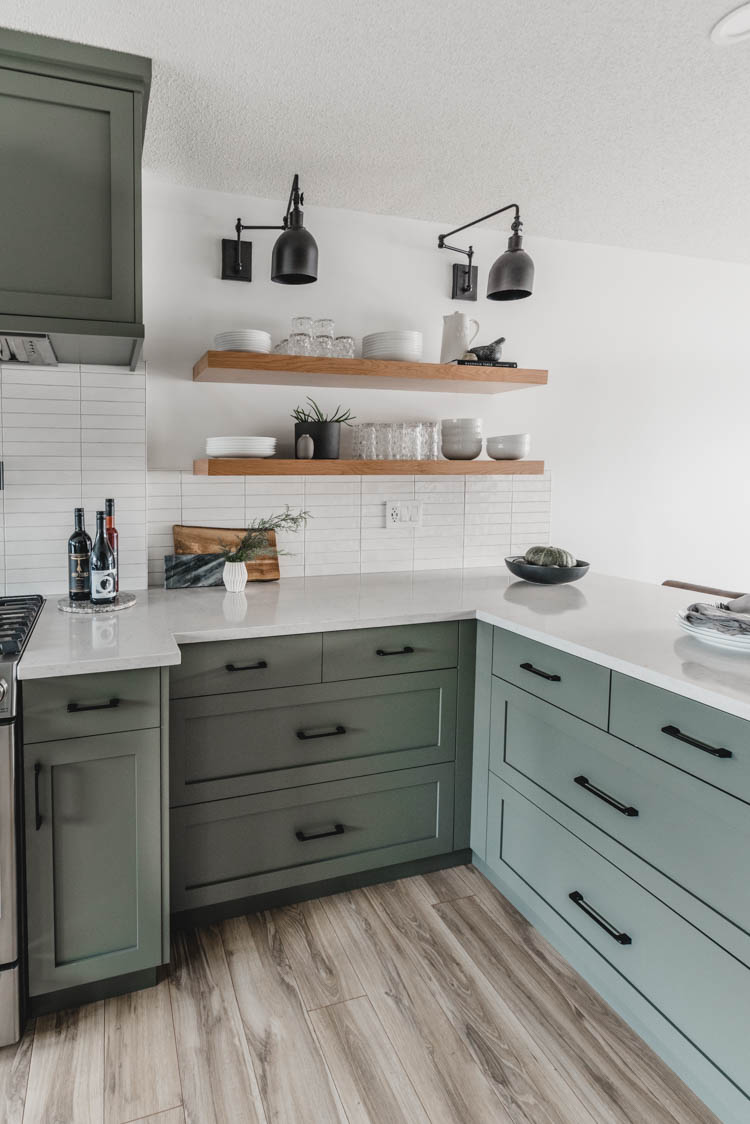
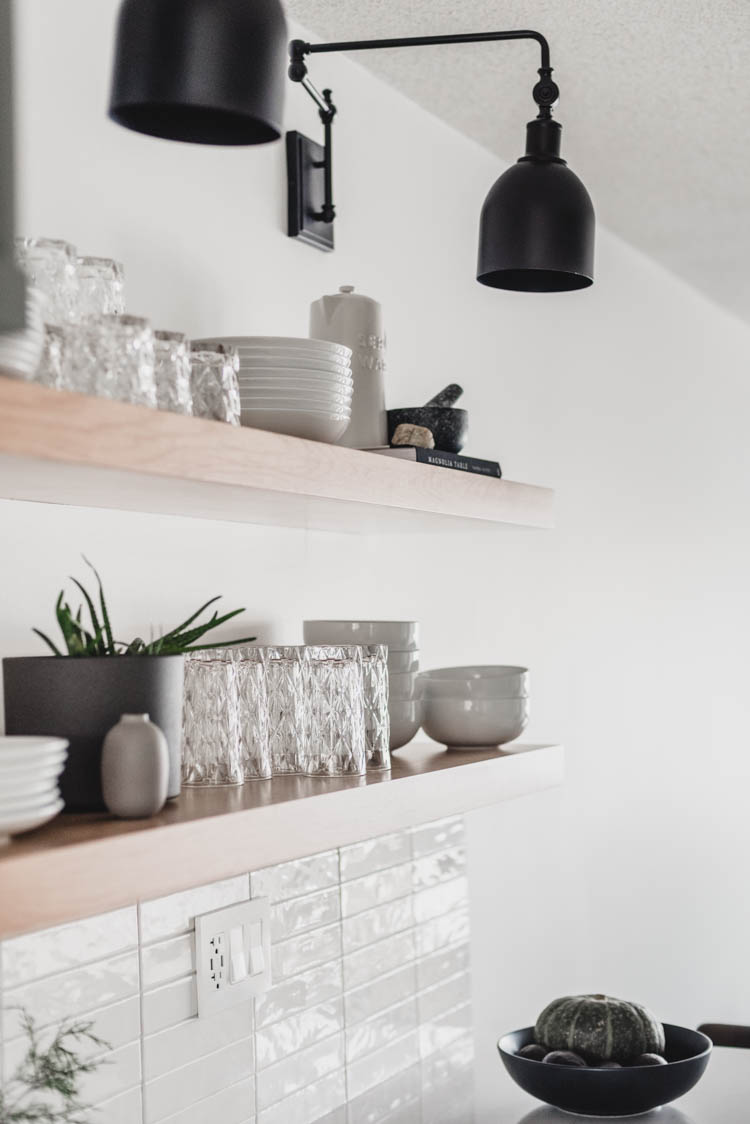
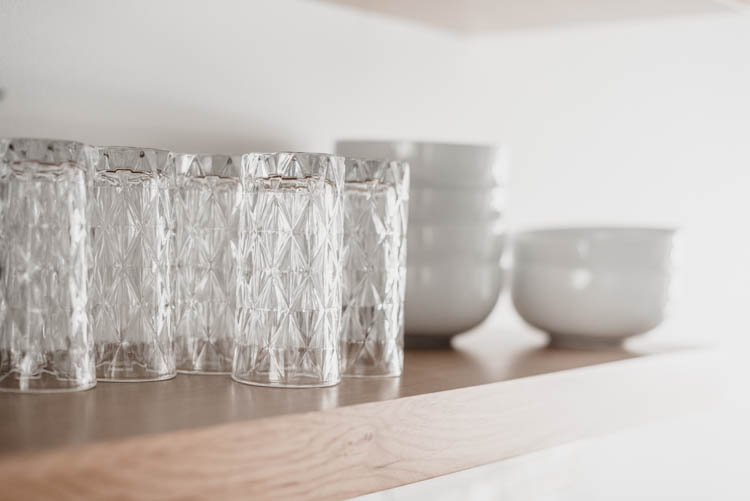
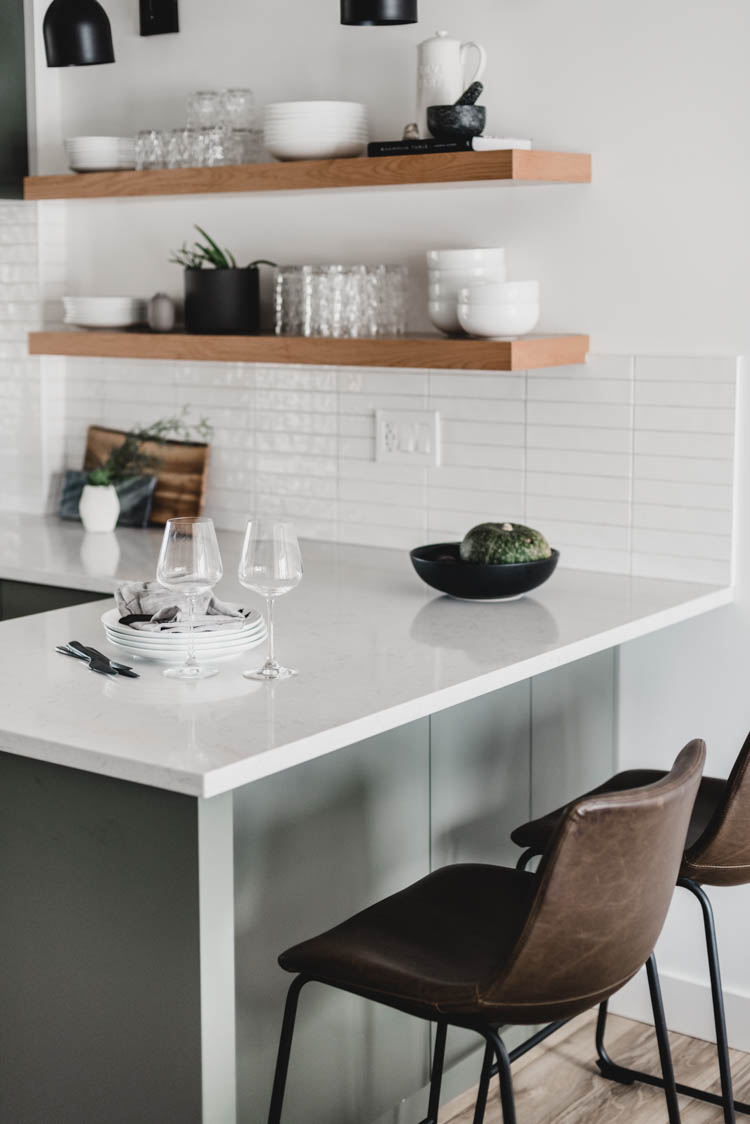
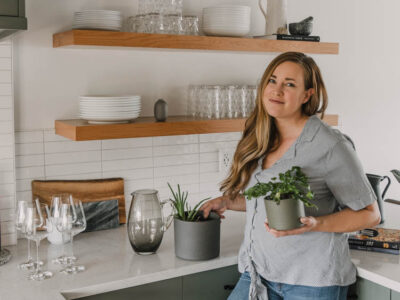
THE OPEN SHELVING
We loved having open shelving in our last kitchen. We knew we wanted to find a way to incorporate it again for our basic dishes (so convenient!). I also wanted to balance all the windows on the one side of the room by keeping it open on the other. We chose to use a natural wood colour to keep in consistent with the floor. These were made by the same company that made our cabinets.
*UPDATE* I chat alllll about styling my open shelves in this blog post!
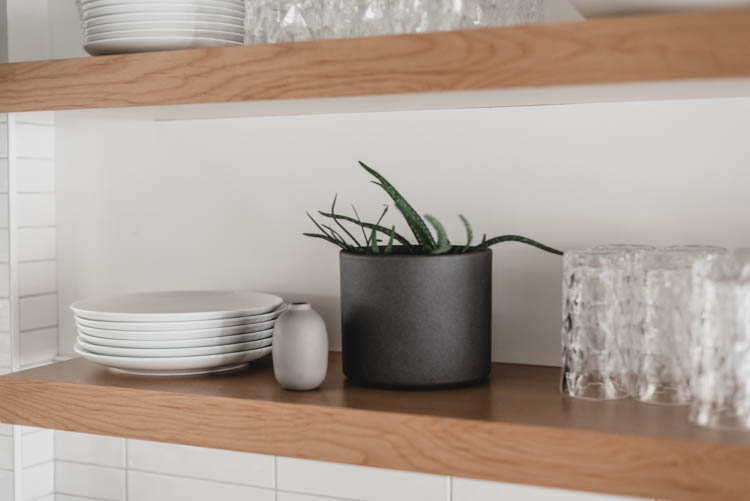
I really should make a whole post on styling practical kitchen open shelving but the basics are just having dishes that you like to display. For me that means PLAIN WHITE. Ha! I’m so easy to please. In our last house, this meant IKEA. I thought the budget pieces couldn’t be beat but they really didn’t hold up well at all. Almost all of them were chipped and every single plate and bowl and black marks from cutlery. We decided that we would upgrade and I’m completely in love with these pieces.
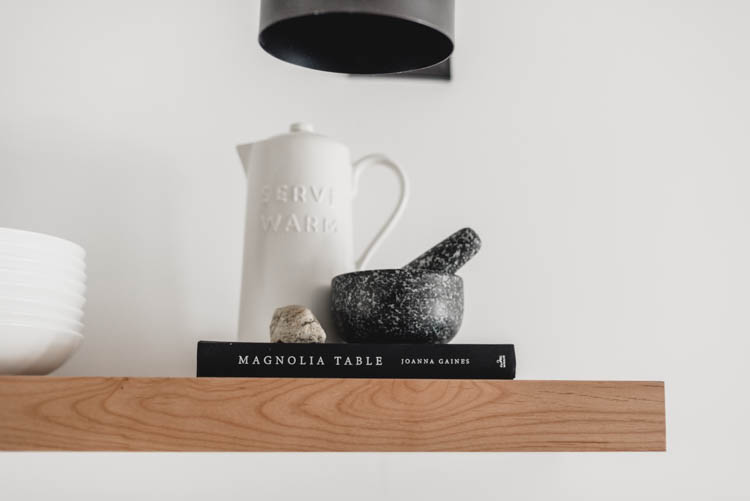
I partnered with *Kitchen Stuff Plus on a fall tablescape a few months ago and snagged these beautifully simple white dishes from them. They’re from the *Ashford Coupe collection and sold A La Carte so you don’t end up with more or less than you want. We really need 10 of everything (my immediate family living here is 6 on their own!), but when you buy in packs of 4 or 6, that’s just not an option. And then you end up with mugs too which we really didn’t need. Honestly guys… they’re so darn pretty and we even switched to black flatware and have NO scuffs or marks on them after months of use.

Since the shelves are larger than our last, I was able to add some decor but also to add some glasses! These are our every day drinking glasses now. They’re also from *Kitchen Stuff Plus- the Godinger Studio Triangle ‘Dof’ Glass. Aren’t they gorgeous, though?!
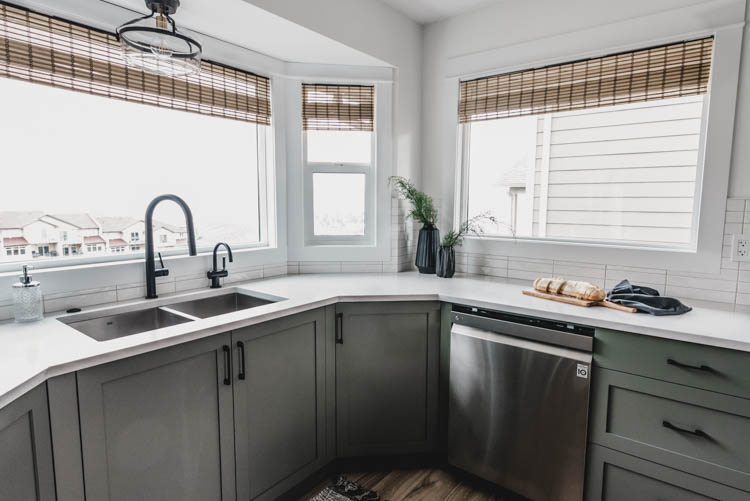
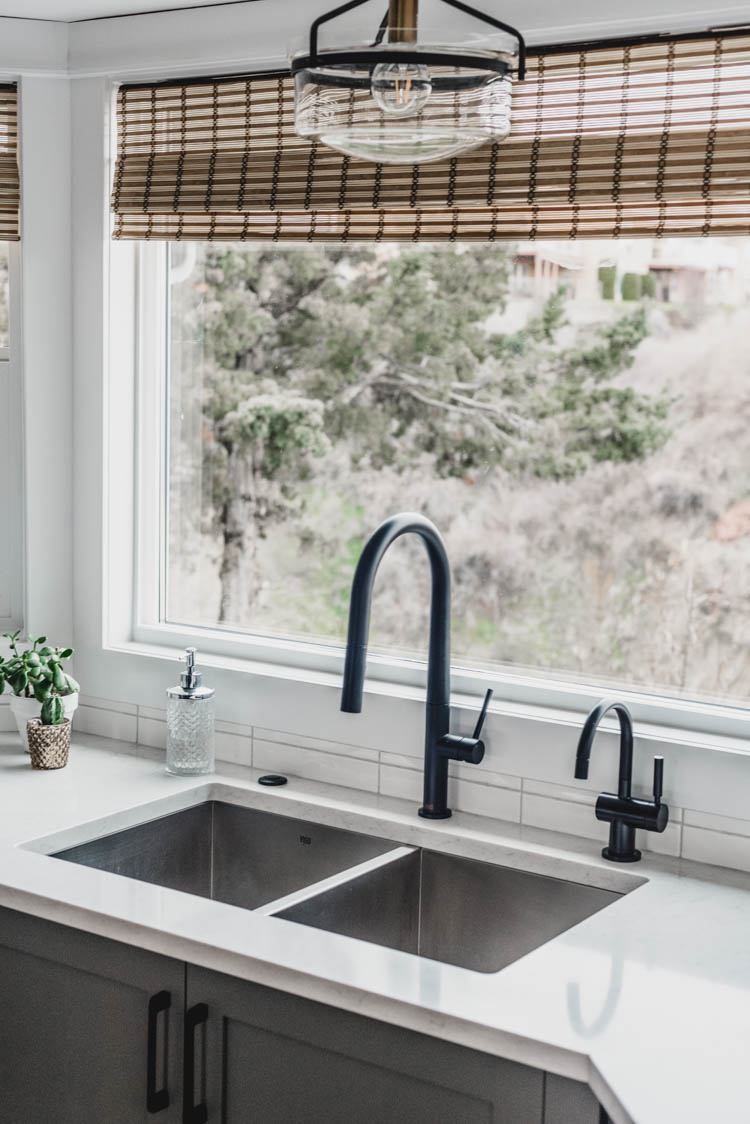
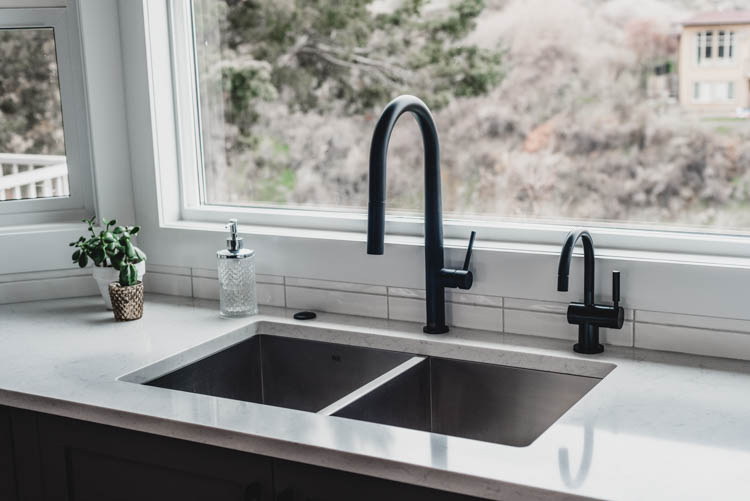
THE FAUCETS & SINK
You guys, this is something I was so anxious (in the excited way!) to see come to life. The sink IN the bay window?! With BLACK faucet and hot water dispenser?! It sounded so good but I was anxious to see if it was too crowded or too busy with the multiple faucets. But I’m so in love with it. It’s completely practical and totally beautiful.
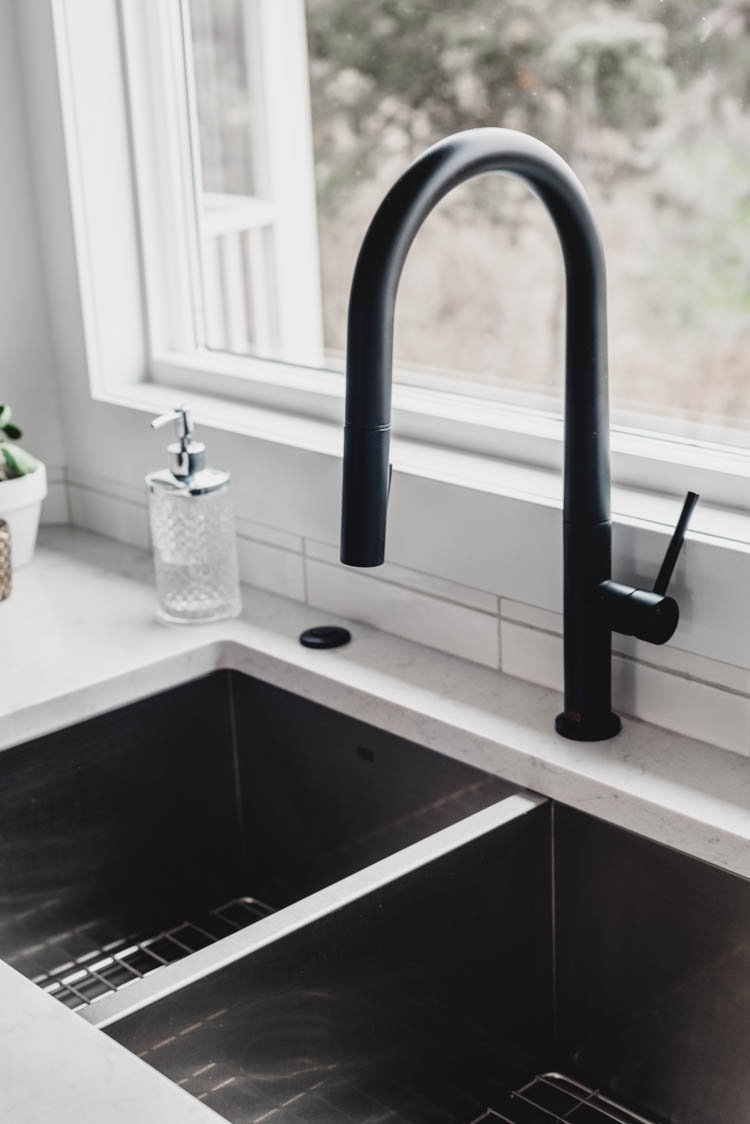
The under mount stainless steel sink is from *VIGO Industries and is an equal basin 32″ sink (*it’s the Suffolk) and It has the nice square corners and it drains much better than our last square sink like this. It’s a higher quality stainless too but it comes with the sink grates which is awesome because we will find a way to scratch and scuff any stainless sink (4 kids tossing their dishes in there and all!). The grates do such a good job of catching those tossed items without denting the sinks.
The faucet is also from *VIGO Industries. I love how sleek and modern it is. It’s one of their newer ones called *Greenwich Pull Down Spray Kitchen Faucet. The matte black finish is not only beautiful but I’ve been so happy with how it handles fingerprints and grease… I actually don’t notice them AT ALL. I expected this to be a big downfall of black. This finish is awesome!
And the hot water dispenser? We really wanted one. My dad has one and it makes whipping up americanos or teas for a crowd so easy. But honestly, I hadn’t ever seen one that I really loved the look of. When I spotted that hot water dispenser in a local kitchen and bath showroom… I was so excited! It’s from *Insinkerator and it’s the H3300 in Matte Black.
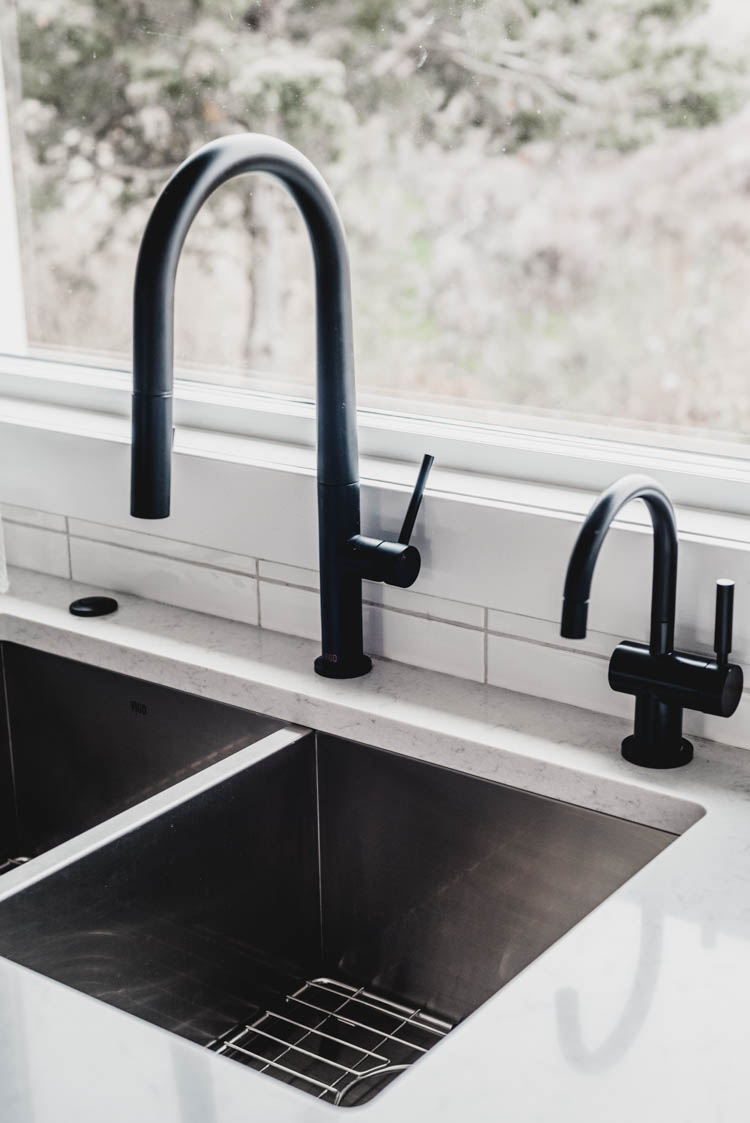
Speaking of Insinkerator… it’s hidden in the sink but we also installed a garbage disposal! It’s everything I thought it would be to not have to reach my hand in and pull out all the little bits of leftovers my kids throw in the sink. How’s that for a picture? And I was worried it might be too loud to use while the kids are in bed but it’s SO quiet. And see that matte black little button in the countertop? That’s it’s switch. It perfectly matches everything we have going on! I’m not sure I would do a kitchen renovation without one of these now- I’ve gotten pretty dependent on it! The model we have (that’s so quiet!) is the *Evolution Excel and is also from Insinkerator. I did order the matte black switch separately from Amazon (here).
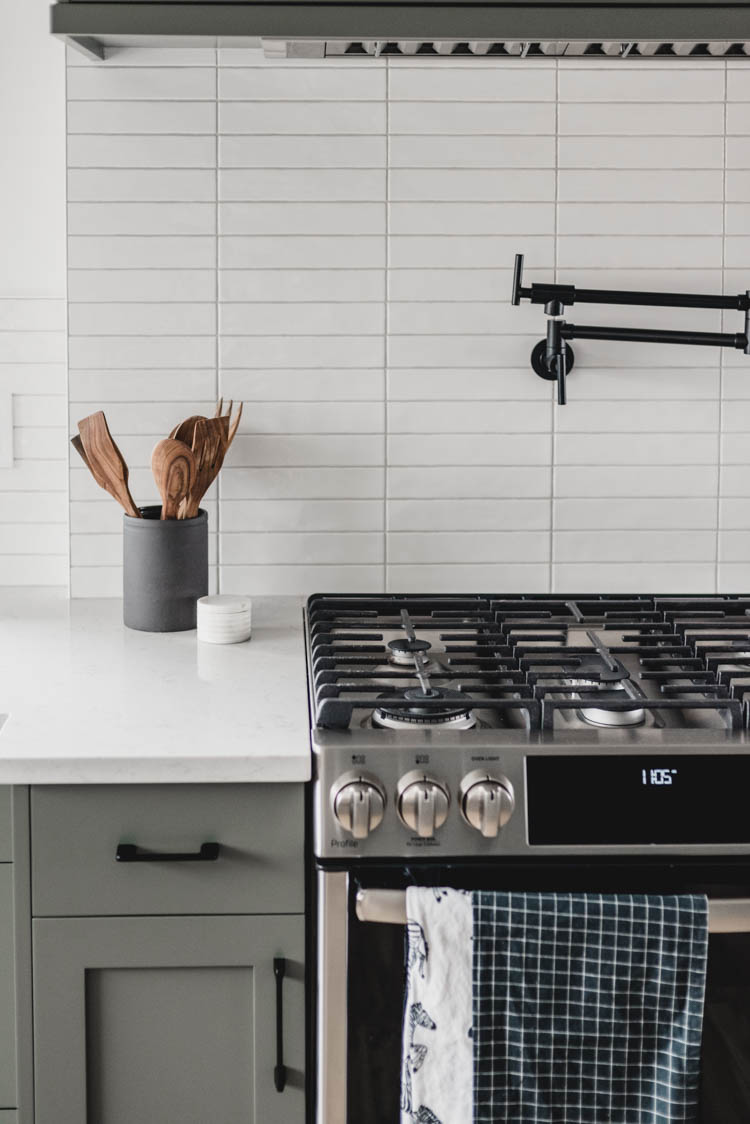
The last faucet in the space is that pot filler! I talked about the lengths we went to put it in there, but the funny part is it’s not a high end pot filler at all. That was one of our trade offs. We found it on Amazon for a deal (this is the one we have) but it works perfectly and looks great! It has a double shutoff which was recommended to me but other than that… it’s simple. And works perfectly. So win/win!

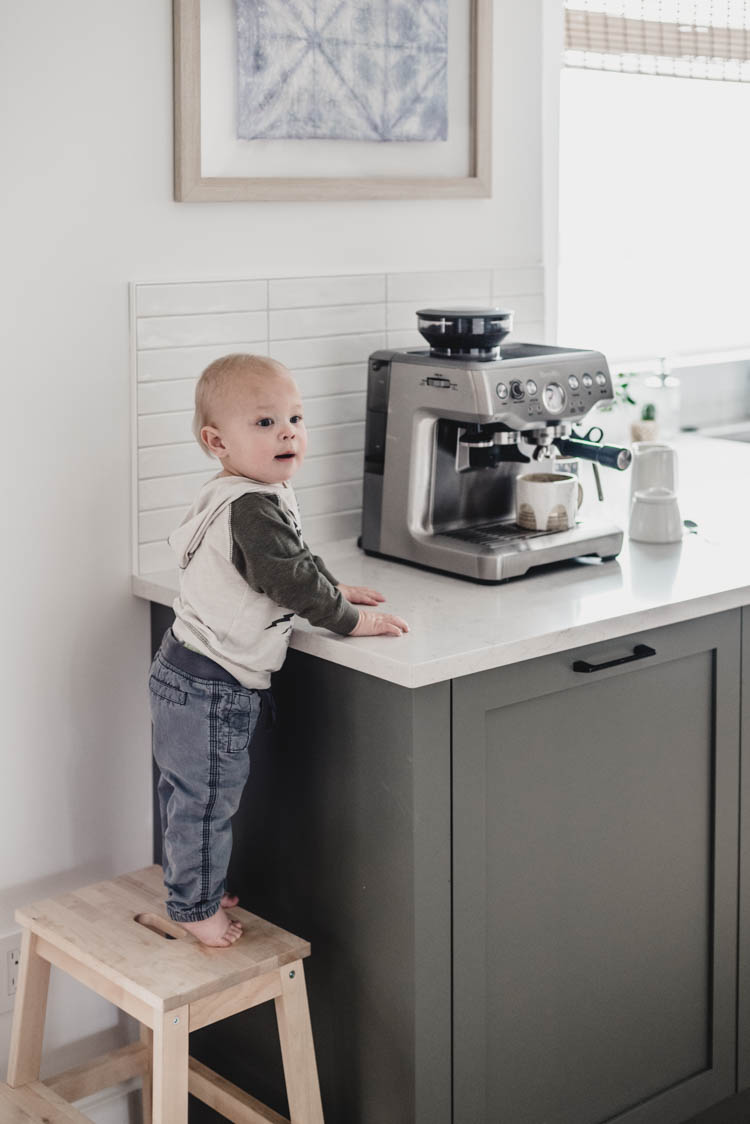
THE COFFEE BAR
You know that we’re coffee people when you plan your kitchen around where the coffee maker will go. This location is perfect. We have an outlet, it’s right over the garbage pull out to dump grinds and it is one step away from the sink to fill the tank or get hot water for your americanos. Per-fect. We had a Breville espresso machine (this one) that we got as a gift for our wedding more than 9 years ago and it just couldn’t keep up with us anymore .

We are so excited to be upgrading to the *Breville Barista Express and after using it for a few months now… I’ve packed away my regular coffee pot. I don’t want to drink anything else, you guys. It’s so good. We actually knew that this is the exact model we wanted for a long time now. My dad has one and so does my sister in law so we’d used it ourselves (and drank a lot of the coffee this machine makes!) long before we even bought this house and started planning a coffee bar area.
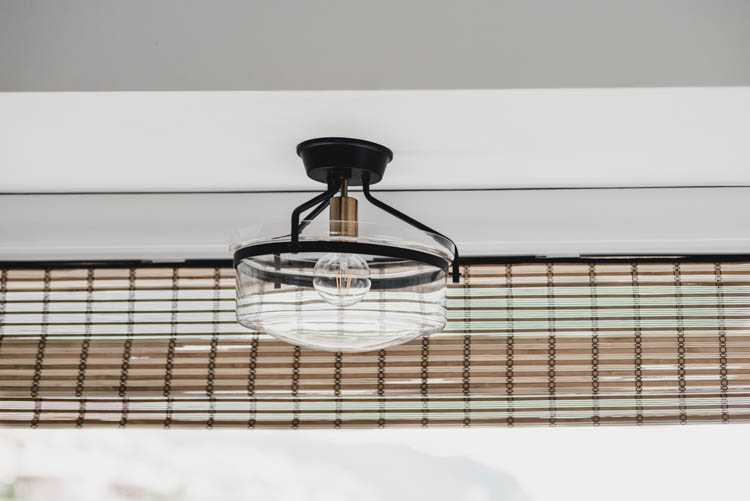
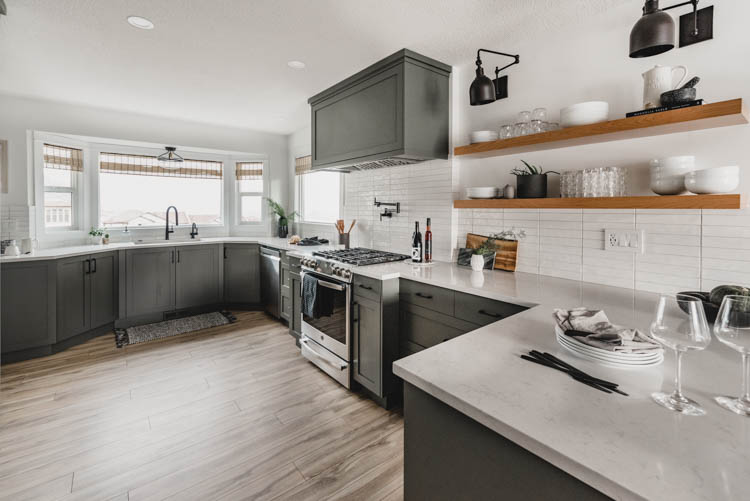
THE LIGHTING
Lighting can be a trick! But I really love shopping for it ;) Our biggest complaint about our last kitchen was that we didn’t do enough of the right lighting. It was just not bright enough in the evenings if we wanted to clean. We did it right this time around I think. We have potlights throughout the space for bright light when we want it and then have a pretty flush mount over the sink and arm lights over the open shelving.
Both of these lighting pieces are pretty classic in style. Not modern like many of the other details in the space. I really wanted to strike a balance between classic and modern to avoid going ultra modern and cold. These lights really help that! All the lights in the space are from *Wayfair Canada. The flush mount over the sink is called the *Rhinebeck by Alcott Hill and the arm lights are called the *Lyana Swing Arm Lamp by Grace Hill.
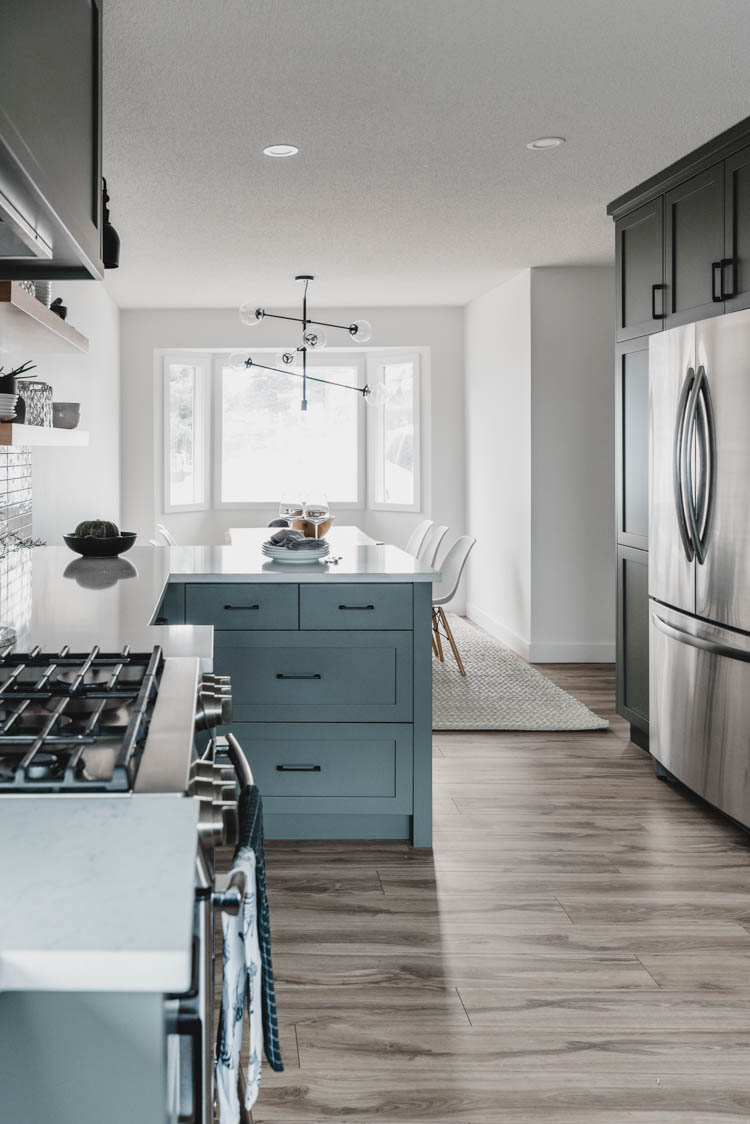
I also decided to have no pendant lights over the peninsula. I had a lot of questions about that decision but really… the peninsula is small. And the dining room light is right past it. And I wanted that to be the focus in the sightline instead of a mess of lights that you couldn’t differentiate. I’m so happy with this decision. The dining room light (I know it’s not the kitchen!) is called the *Bensley Antique 6 Light Chandelier by Langley Street and is also from Wayfair Canada.
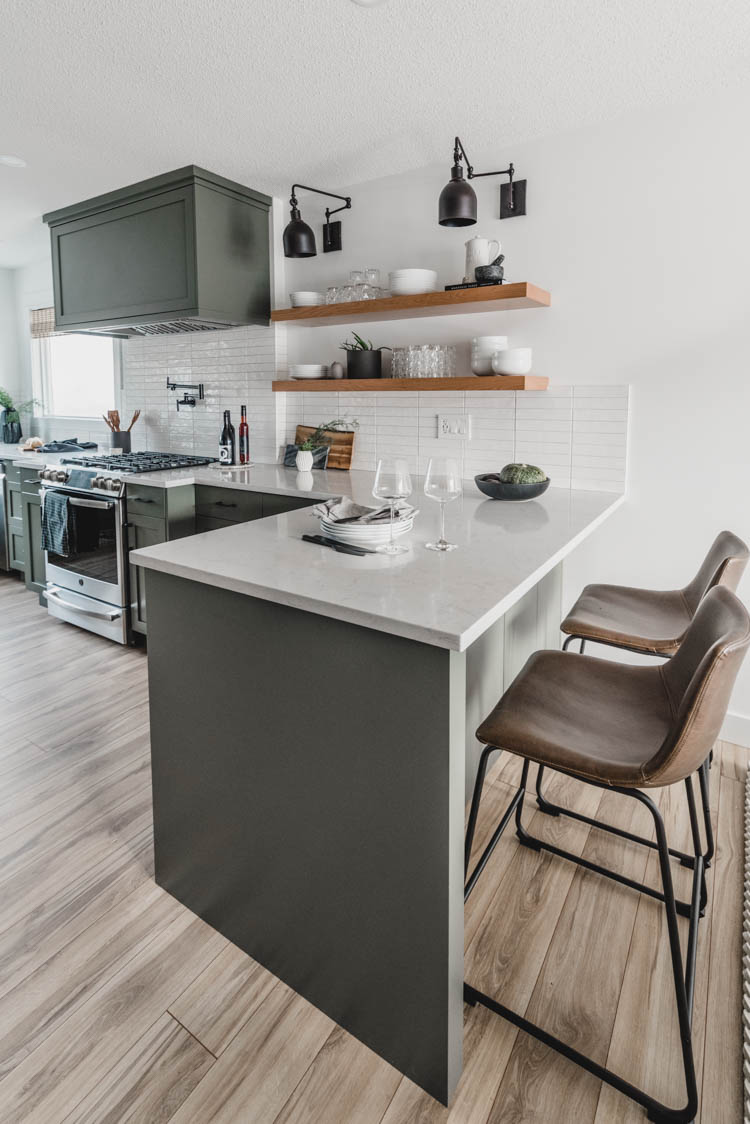
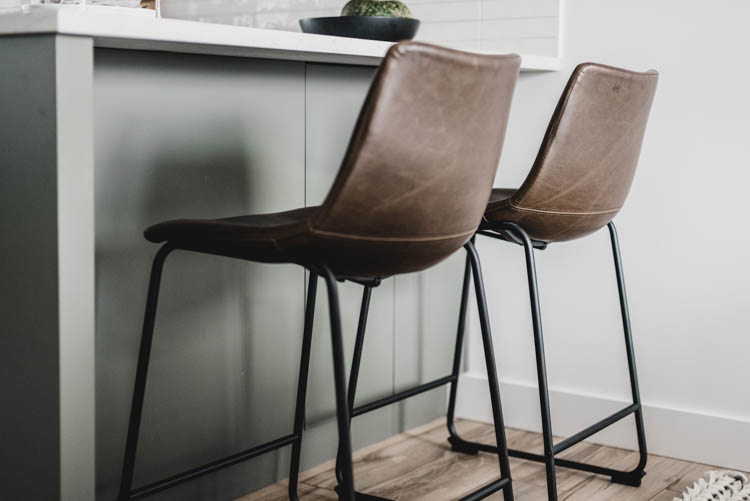
THE PENINSULA
Other than opting out of pendant lights, I also opted against a corner cabinet unit. I really wanted a symmetrical and uniform look to the kitchen to help it stay in that classic style even with the modern finishes. I mentioned that ‘wasted space’ in the corner was used for a hidden crafts cupboard for the kids. Having the bar stools there (they’re really comfy!) makes it easy for them to do their colouring or crafts while I cook but also is a great spot for them to sit and help me bake or cook. The bar stools are also from *Wayfair and come in a two pack. They’re called the *Liara Bar Stool by Mistana.

I did want to point out the chunky end panel for the peninsula as well. I asked for this both on the end of the peninsula and beside the garbage pull out (coffee maker). I know it’s a little detail but I really think it makes such a difference and gives it a custom look.
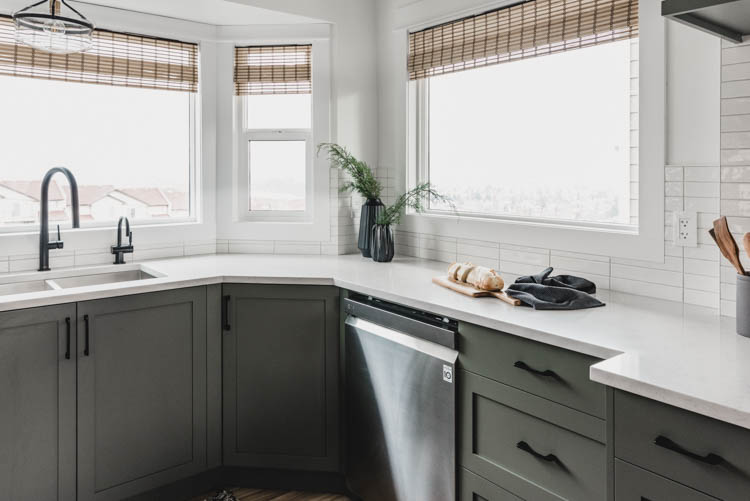
THE WINDOWS & COVERINGS
We really didn’t need to have window coverings in the kitchen for privacy since we look out over a green space, but the windows didn’t look *finished* without something. I was pretty set on wooden window shades for the look. I wanted to bring some of the warmth of the wood up the walls in that area of the kitchen to mirror the open shelving but just couldn’t justify spending hundreds of dollars on window coverings that would never get closed.
SO… I DIYed and I’m excited to try this again in some other spaces in our home! You can see the DIY tutorial for these faux window shades right here– the whole project for all 4 windows cost me $40. TOTAL. I’m obsessed. They could definitely be used over mini blinds or a roller shade as well (my plan in our kids room) so that when the shade is open, this is all you see.
DECOR
I just wanted to make a small section for decor in case that is what you were looking for details on! I tried to keep it pretty simple in here but did add some wall art above the coffee station. That was a last minute addition and also a DIY! I took photos of the process and shared the how-to as a blog post right here!
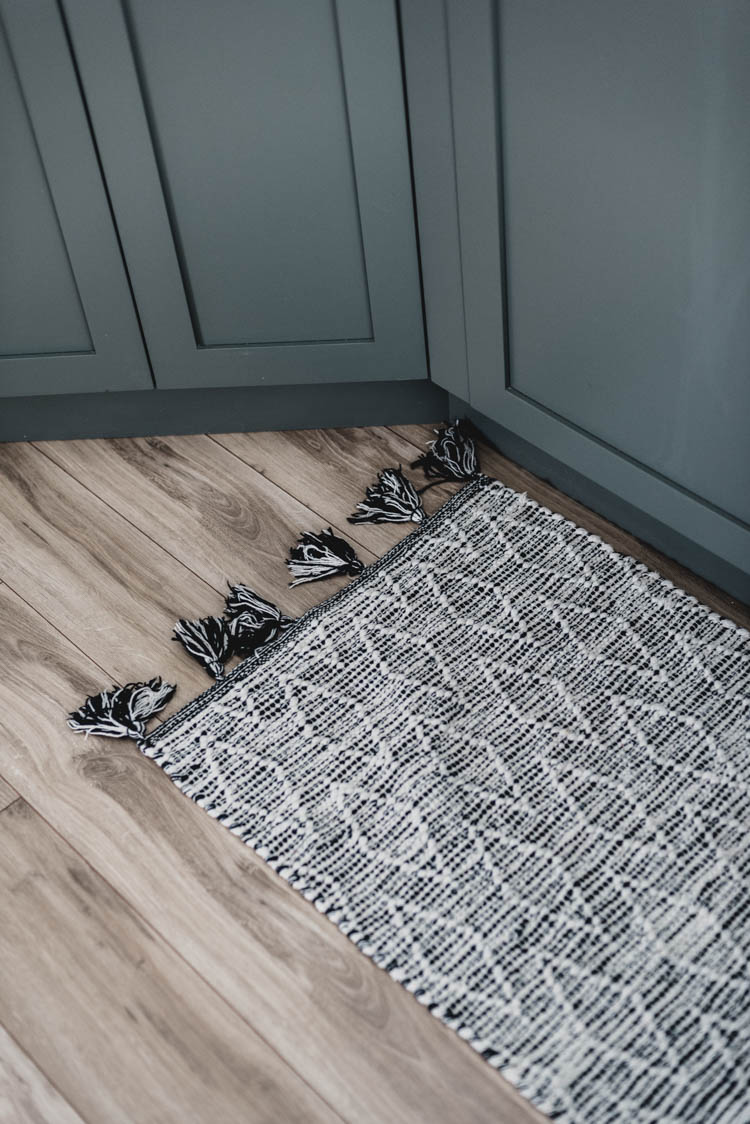
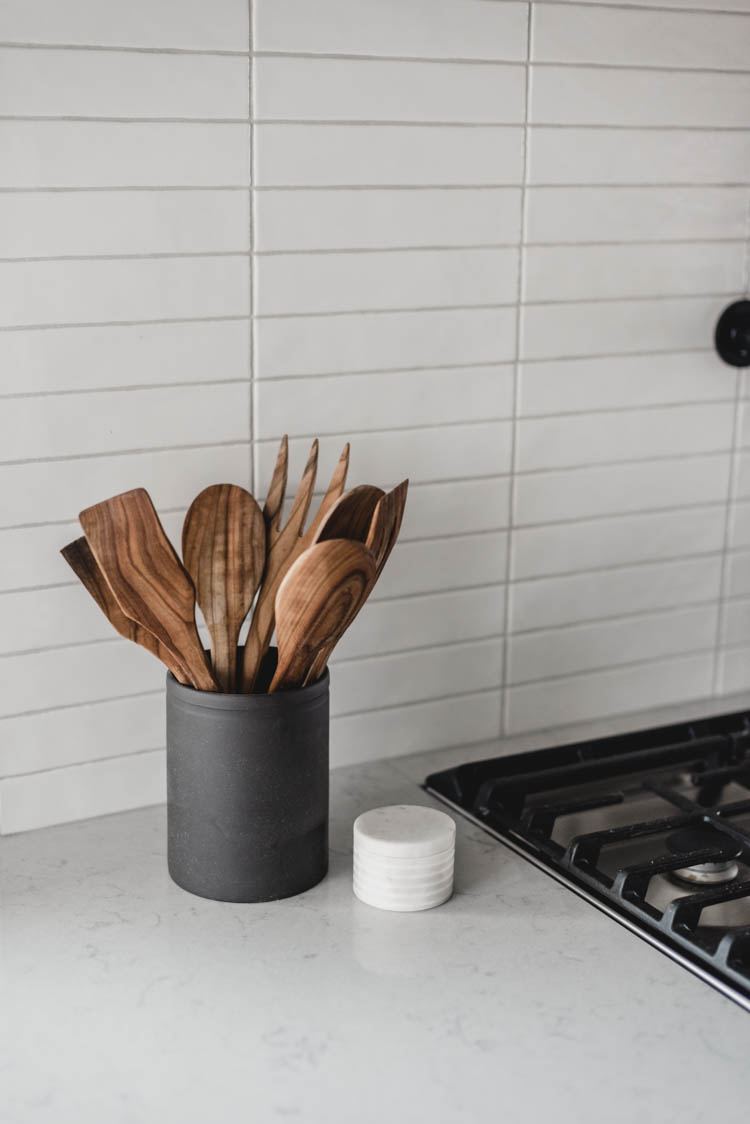
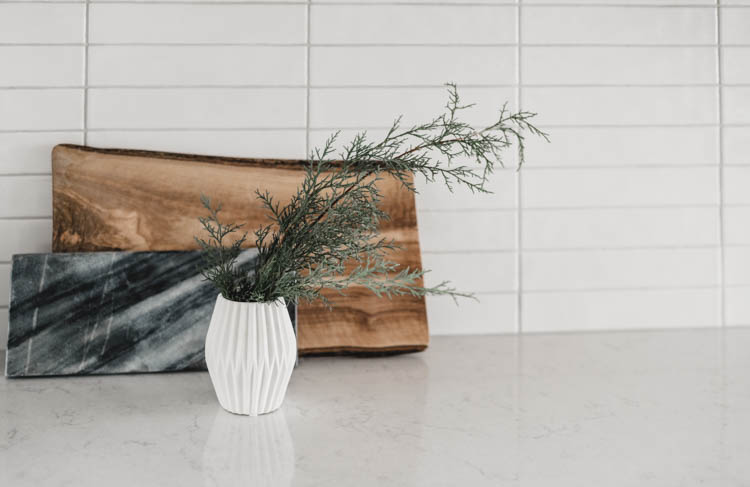
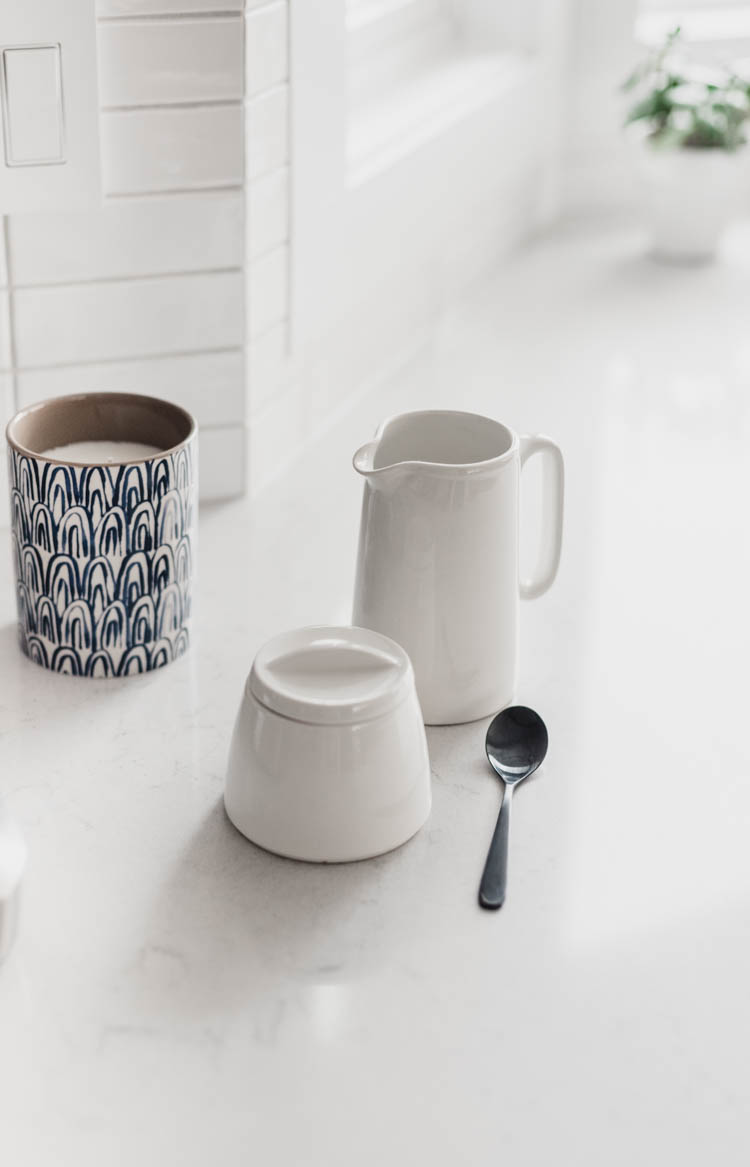
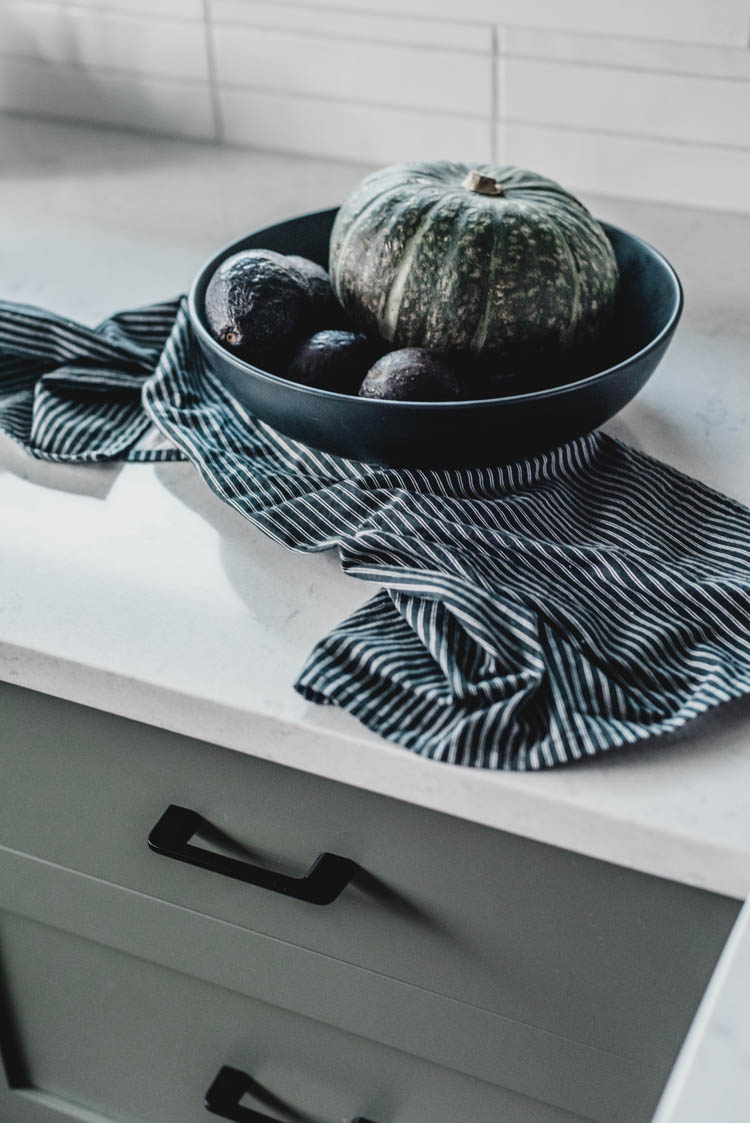
Other decor is pretty basic. A couple vases I’ve been collecting (Homesense) with some juniper sprigs and then all practical, kitchen-y things. That are pretty. My favourite serving boards, a fruit bowl, handmade wooden spoons, wines for the next date night… If only I could keep my counters this clear all the time ;) The rug in front of the sink is also from Homesense!
—-
Alright… this post is CRAZY long. So I’m going to leave it at that. Here’s all the sources in one place so you don’t have to dig through this post to find something!
ALL THE SOURCES!
- Cabinet Paint Colour: Colour Matched to Dakota by *General Paint (you can read more about this and other paint colours and comparables here)
- Cabinets: Top 40 Wood Works in Kamloops
- Cabinet Hardware: *North Dalston by Liberty Hardware in Matte Black
- Countertop: *Lagoon Quartz Countertops from Silestone by Cosentino
- Wall & Trim Paint Colour: Expert White from *General Paint
- Appliances: All from Home Depot Canada (because of price match!)
- Range hood insert: 34″Ancona Pro Insert Range Hood from Costco
- Garbage Disposal: *Evolution Excel from Insinkerator, In Counter Button in Matte Black ordered separately from Amazon (Silver or White come with the unit).
- Hot Water Dispenser: *H3300 in Matte Black from Insinkerator
- Faucet: *Greenwich Pull Down Spray Kitchen Faucet in Matte Black from VIGO Industries
- Sink: *32″ Suffolk Stainless Steel Double Bowl Undermount Kitchen Sink from VIGO Industries
- Pot Filler: Homili Foldable Pot Filler in Black from Amazon
- Tile: *Handmade looking 2×10 subway tile with the lightest grey grout available – ordered and installed by Complete Floors Kamloops
- Over Sink Light: *Rhinebeck Semi Flush Mount by Alcott Hill from Wayfair Canada
- Arm Lights: *Lyana Swing Arm Lamp by Grace Hill from Wayfair Canada
- Dining Light:*Bensley Antique 6 Light Chandelier by Langley Street from Wayfair Canada
- Window Coverings: They’re a DIY! Check out the tutorial HERE
- Art over Coffee Station: DIY Tutorial HERE
- Espresso Machine: *Breville Barista Express
- Bar Stools: *Laira 24″ Bar Stool by Mistana from Wayfair Canada
- Dishware on Open Shelving: *Ashford Coupe Collection at Kitchen Stuff Plus
- Glasses on Open Shelving: *Godinger Studio Triangle ‘Dof’ Glass from Kitchen Stuff Plus
- Misc Decor:
- Rug, Black Vases, Serving Boards on display, Salt Cellar- Homesense
- Soap Dispenser, Fruit Bowl – Presidents Choice / Superstore
- Breadboard & Granite Round (wine is on it!)- Kitchen Stuff Plus
- Wooden Spoons- Handmade locally
- Spoon Caddy, All Tea Towels, Tiny Grey Vase – HM Home
- Large black plant pot, cloth napkins – Far and Wide Collective
- Candle by coffee maker – Target
- Black Flatware – IKEA

 DIY Wooden Sign + Hidden Essential Oil Storage (Free Plans!)
I love this olive green kitchen. It is perfection! How are the black faucets? Are they spotty from water marks? I love the look of black and I want to use in my bathroom but I worry about the water marks.
Thank you so much Kelly! We really love them- I thought they’d be tough to keep clean but they’re really NOT. And we have lots of messy hands touching them ;)
Hello! I LOVE the green kitchen cabinets. Do you have any idea of a similar color in a more generic paint brand? I can’t seem to find anything like it here and I want to have the exact same color for our cabinets :)
Hi Michelle, YES! Thunderous from Sherwin Williams is super similar :)
Colleen! You guys absolutely knocked it out of the park with this gorgeous space! Seriously, every inch of it is just jaw droppingly gorgeous!!! You turned all of those “challenges” into the most amazing design features! I’ve looked through the photos a hundred times and just can’t pick a favourite part – it’s all so perfect! You guys should be SO proud of this beautiful space you’ve created and all the hard work you’ve put into it!
Totally agree with Kristi. Professional job with all those intricate details… also, professional photography! Congrats and thanks for the inspiration!
It’s so so good my friend!! I love everything!! The cabinet colour, the floors, the tile and pattern, the stools, etc., etc. It’s SO GOOD!! Be super proud!!
Thank you so much Lindi! It feels so great to see it DONE!
As an interior designer in Los Angeles, I think it’s beautiful. Well done. By the way, you have counter stools, not bar stools. Bar stools are taller (no matter what Wayfair calls them! ?).
If I was living in the space there’s only one thing I would change, and this is PURELY personal preference! I would want my range hood be the same color as the walls (white), because it would really make the space feel more spacious. However, I also like the drama the color on the range hood creates, too!
CONGRATS!
Thank you so much! That would definitely make it feel airy! I love how it grounds the space- with all the white and the windows it was feeling like an empty white box before this and the shelves went up :)
Colleen! It’s beautiful! I just ignored my children and fought with my computer to read through this beautiful post this morning. I’m obsessed and will be coming back as we work on our kitchen design (IRL one day)! I loved hearing how you overcame the challenges and your experience with that amazing custom cabinet company! You’re making me rething IKEA cabinets haha, but our kitchen alignment is so basic that I think we’ll be able to manage! But those shaker doors!!! I love them. Ok I’m obsessed with every detail. Incredible job. You should get so much recognition for this <3 xoxox
This is stunning, completely stealing this inspo for our upcoming project. I might have missed it, but where are the open shelves from?
thanks!
Your style is so beautiful. Where did you get the open shelving?
Thanks so much! We had them made by our cabinetry company but they are comparable in cost to the ones from semihandmade.com!
Do you have any idea of the stain color they used for the open shelves or a stain to buy that is similar?
Hi Ashley! Colleen had them custom made with her cabinets – Top 40 Woodworks.
Hi! It looks beautiful! Can you share where you got your open shelving from? Did you make them?
They were made by our cabinet makers! It was comparable in cost to semihandmade.com :)
Hello I love your open shelving!! Could you tell me how deep and how thick they are?
Colleen, you used two different sizes of the North Dalston Liberty pulls on your cabinets? What sizes did you use? They look perfect.
Yes! the 3 and 5″
Your kitchen is stunning! Where did you find your floating shelves? They’re exactly what I’ve been looking for.
Thanks so much! They were made with the cabinets- it was the same price as SemiHandmade which is where we were looking before (they look the same too!)
You mentioned the color was Dakota from General Paint. I checked their website and can’t find it. Do you have a link to it?
So they use the Colour Journeys system for colours (so does Para Paints!) It’s 422F Dakota (but you can’t link to colours… such a pain!)
Do you know of a similar color comparison in a US Brand paint? I am not from CA and don’t know how to get this color.
YES! Thunderous from Sherwin Williams is super similar :)
I was wondering what the finish and type of paint you used with the Dakota color? I don’t have a general paint nearby me so in attempts to either order it online or color match! Thanks! Adore the color.
Hey Kelsey! It’s a lacquer the cabinet company had made! Thunderous from Sherwin Williams is super similar :)
Lovely kitchen! I’m hunting for a backsplash and am admiring yours. Are you able to provide me with the brand of tiles? I would appreciate it!
Hi Sarah! I actually don’t know the brand! You could reach out to kamloops complete floors for that information :)
Will I get notified when you answer my question/post? I posted the other day the question, “what two sizes of the North Dalston cabinet pulls did you use in your kitchen?” I wouldn’t be bugging you this early, but I would love to order them.
I emailed ya! XO
I have a thing for green paint. So your cabinet color is right up my alley! Love all of your finishing touches. Gorgeous Kitchen!
Ahh I totally have a thing for green paint too :) Thank you Loralee!
Stunning! Absolutely beautiful! Well done!
Thanks so much Sharon!
I was wondering if you could link your black and white rug that lies in front of your kitchen sink? Thank you!!!
I don’t have one! It was a Homesense find!
It’s so gorgeous! I really love the green you chose, I love every single detail!
Thanks so much!
Hi love the cabinetry and colour we are actually mid way through our kitchen we had shaker doors so decided as we had extra doors to re use them I’m so pleased with it so far, my husband made a massive sliding door to keep the laundry kit in and he used barn hangers as so easy. We are on a really tight budget still have real stone work tops / counters as you guys say because we just had to.
Ours will come at around £4000 but we re used so much and used a si,Ilan couloir for cabinets as you but had copper knobs and taps I hope it works we are having similar tiles but the standard metro ones I yearning for yours and haven’t bought ours yet.
We have a dresser that massive and have re used that as well trying to tie it in. Ours won’t be as lovely as yours but it does show what an improvement you can make on budget with a very handy sore backed husband
Well done what was the final cost or did you give up with costs great if you can,
Marie Uk x
Hi Marie, that sounds totally lovely! We DIYed everything from the demo to the drywall and electrical so I don’t know that it would do any good to give the final cost- I’m all about saving where I can!
I love your open shelves. Can you tell me the dimensions of them?
Thanks!
They’re 18″ deep and these ones are about 4 feet :)
I am absolutely loving the green/grey color of your cabinets! I think I am going to go with cabinet refinishing. Did you have a cabinet refinishing company you love? Or did you paint yourself? Also, what is the name of that color?
We had them painted by Top 40 in Kamloops :) The colour we got is called Dakota If you do have a general paint, they do have it! They use the colour journeys system so you need to search their colours in there: https://www.colorjourneys.ca/en/cj_bucket_3_column_foyer_nuetralground/neutrals/#422F IF you don’t though, sherwin williams thunderous is almost identical!
I stumbled upon this post looking for kitchens with gray green cabinets because I needed a visual to show my husband because he wasn’t understanding how it would go together. And your cabinets, colors, countertops and tile is the exact same as I had already decided on (you have a beautiful style ?). I was watching one of your videos and you mentioned your son Calder. I went back and listened to multiple times to make sure I heard you right because my son is also named Calder! The odds of that are so crazy that I had to share it with you.
Beautiful beautiful kitchen! Love every single detail! Could you reference the wood used for open shelving?
I believe we went with natural aspen with a clear coat!
An Impressive project, beautifully executed… Thanks for sharing!
Hi, I just have to day I absolutley love the lights above the oven shelfs. Tried the links but they wont work. Where can I buy the lamps?
The kitschen lokks great overall!
Regards Sara
Oh shoot! I need to uupdate those. You can find them here: https://www.wayfair.ca/lighting/pdp/gracie-oaks-lyana-1-light-swing-arm-lamp-grks4228.html?&experiencetype=2&selectedvertical=3
roughly what are the dimensions of the kitchen? Any pics of the pantry cabinetry and appliance garage you can share? Also, how much space is between the fridge and the island? Thanks!
Hi! This is beautiful! Do you know where you got the stool your little tot is standing on near the coffee bar?
Thanks!
It’s IKEA!
Hi! I am trying to find that color (from the cabinet paint). The store couldn’t find that shade as they were unable to find the company in their system. Is there another way I can match it? I appreciate your help- I love the color!
The colour is Dakota from General Paint. They use the colour journeys system so you need to search their colours in there: https://www.colorjourneys.ca/en/cj_bucket_3_column_foyer_nuetralground/neutrals/#422F IF you don’t though, sherwin williams thunderous is almost identical!
It was the best article I have ever find on the internet. I was searching 3 shelf carts for my kitchen so that i can easily arrange my kitchen’s stuff. I want more space in the kitchen that is why i need this thing. I saw many kitchen masters use this thing. I will also try this for my kitchen.
Great!
Hi! Do you know what color the cabinets would be in Behr?
I’m not sure! It’s super close to Thunderous in Sherwin Williams though :)
Terrific kitchen with lots of personality! Can you tell me the two sizes of cabinet pulls used and what size is your backsplash tile?
Hello! I used the 5 1/6 and 3 3/4 size pulls- the backsplash tile I believe is 2×8 :)
I started searching Pinterest for ideas for our kitchen, and found the already-designed kitchen of my dreams! I’ve written down your sources and I’m pretty sure I’m going to steal your exact cabinet color, countertops, and hardware. Thanks for much for sharing the details! Your kitchen is beautiful.
Aw that makes me so happy! I’d love to see when you’re done!
Over a year later, and we did it! We went with Sherwin Williams Thunderous upon your recommendation and we love it so much. We also tried out several different cabinet pulls and ended up going with yours! We were just painting old cabinets and they have some curve in the door details, so the slight roundness of the pulls looks great with them.
Thanks so much! I can’t figure out how to share a photo directly, but I have photos here: http://healthyishpseudofoodie.blogspot.com/2022/03/kitchen-renovation.html
It turned out so wonderfully Amy! Thank you so much for letting me know :)
Hello. This kitchen is beautiful. I was hopping you could help me with your cabinet pulls. What 2 sizes did you use and I am trying to see from your pics where you put the 2 different sizes.
Thank you
Hello! I used the 5 1/6 and 3 3/4 size pulls- the big ones are on all the cabinet doors and big drawers, the small ones are the top/small drawers :)
Hello! I’m in love with this remodel! I know you said you got your floors from a sale something, but could you tell me the brand or color of them? Thank you for all this information!!
Hi Beth! i specifically have left that out because they held up terribly, I wouldn’t recommend them. We replaced our floors after a flood last year and I’ve never been more excited for something new(ish) to go!
This is perfect!!! I love all your choices, it came together so beautifully!
We’re starting a kitchen reno and I had been eyeing the same Vigo kitchen faucet, but the reviews were about the pain chipping and seeing the bronze underneath. Now that you have had this for a few months, how has it held up?
Thanks!!
Can you tell me what type of flooring you have?
They got the hardwood from Complete Floors in Kamloops! Here’s the details: Supplier – Golden Moulding, Product Line – Mega Plank and color is White Oak
Could you please give the exact size of your tile and the brand? I am in US and trying to figure out if I can get it here.
Your kitchen came out beautiful!
Hi! We’ve provided all the information we have for that tile, along with where we ordered it from and a link to their website. You’re welcome to reach out to them (complete floors in Kamloops) to see if they can help you out :)
This kitchen renovation is so perfect! And it’s so close to the footprint of our kitchen/dining which I was wanting to flip flop as well. We also have a bay window that has been a design challenge, but this makes me want to embrace it! I do have one question… looking at your layout (it looks very close to what I have planned for ours as well) I am wondering if it has ever bothered you that your sink/stove/refrigerator “work triangle” are far apart? People keep telling me that I’m making a mistake with the layout, but I think it would be fine. Have you had any regrets about the layout? Thanks for the detailed post!
I’m putting in a new kitchen and yours is my primary inspiration. Did you stack 3 cabinets on your pantry wall with a door on each cabinet? Or are they tall cabinets that you put two doors on each pantry with a smaller second cabinet with a door on top? I love the symmetry and clean lines of your kitchen. You have achieved the perfect blend of modern and traditional…….Thank you
Hello do you know your grout line size?? I love the backsplash!
Wow, what a transformation!! Great job, this doesn’t even look like the same house! Wow, the Dakota color looks amazing on your cabinets! I fell in love with this color as soon as I saw it at our home improvement store and have been planning on using it for my project in a few weeks. My husband said it was too “moody” of a color to use in the kitchen, but I’m going to show him this blog post and I’m pretty sure it will convince him to just go with it haha!
What are the dimensions of the peninsula? And the amount of space between that and the cabinet pantry? We’re contemplating something similar but our worries ours may be to narrow.
The peninsula has a 33” bank of drawers. The fridge is 36” away. We did the minimum 30” at first and it was way too crowded so downsized everything. I hope that helps.
Hello,
I love your kitchen design?
Any chance you would be able to share the name and colour of grout you used?
Thank you!
Thank you so much! The grout used was Mapei Frost.
Hello, I love your kitchen! It’s 100% my dream. I’m from Europe, please help me with colour of your kitchen. I need to find substitute Dakota shade in RAL. What you think, RAL 1405005 is similar? Or maybe another RAL?
I’m not sure what RAL is? I know that thunderous from sherwin williams is almost identical :)
I love this color so much!! Could you tell me the paint sheen?? I am curious as to which sheen to get because I will be painting my cabinets soon!
This one is a satin finish but is done with an enamel paint by the cabinet company!
Hi!
Seriously wanted to reach out.
This is my current kitchen inspiration and I absolutely love it. I was trying so hard to find a stain but in the end it happened to be solid colored cabinets. I’m over the moon about finding this.
Here’s the best part.
My last kitchen was based off your last kitchen remodel. I kid you not. I have no clue how I stumbled across this new kitchen and then learned I used your previous one. What are the odds!?!?!
Ohmygoodness Tiff that’s so fun! Thank you for the comment! I would love to see either of them finished up!
Hi, you have so many comments, I’ve tried to read through them hoping my questions have already been answered because we really love your backsplash. I saw the tiles are 2×10 with mapei frost grout and visited the tile shop you linked. However, I cannot find what manufacturer makes the tiles. Also, wondering if you remember the grout spacing. Thanks so much!
Hi Judy, you could check with our flooring supplier completefloors.ca