• Skip to main content
  • Skip to header left navigation
  • Skip to header right navigation
  • Skip to site footer
  • Shop
  • Get The Email
  • Work With Me
  • About
  • Search

  • DIY
    • DIY Home Decor
    • With Power Tools
    • Renovation
    • For Kids
    • For Parties
    • Wearable
    • Organization
    • Cricut Crafts
  • Home Decor
    • Room Reveals
    • Kid Friendly
    • DIY Home Decor
    • Renovation
  • Lettering
    • Hand Lettered Printables
    • Free Practice Sheets
    • Handlettered DIY
    • Free Brush Lettering Quickstart Guide
    • Learn Brush Lettering E-Course SALE
Lemon Thistle

Lemon Thistle

Rad DIY, Lettering and Design for Real People

  • Printables
    • For Cricut
    • Party Printables
    • Home Decor Printables
    • Bachelor Bingos
    • Free Monthly Wallpapers
    • Handlettering Practice Sheets
    • All Free Printables
  • Entertain
    • Party Printables
    • Party DIY
    • Tablescapes
    • Dinner Party
    • Kids Parties
    • Party Eats
    • Baby Showers
    • Wedding + Showers
  • Blog

DIY Textile Art – Simple Faux Shibori

Feb 21

DIY Textile art- simple faux shibori tutorial

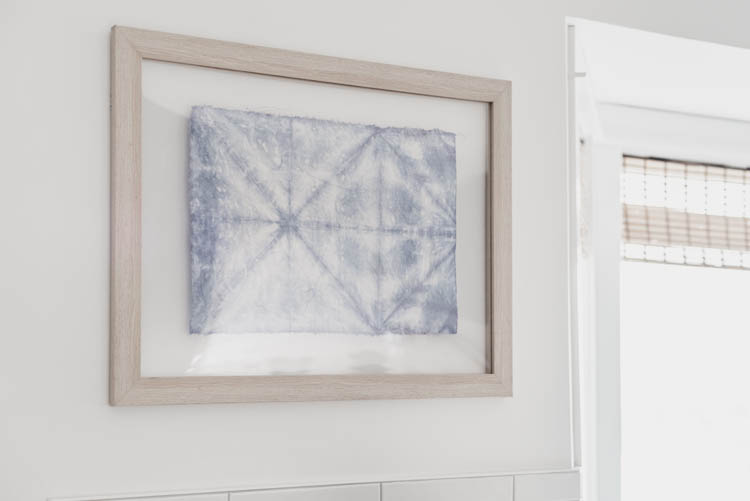
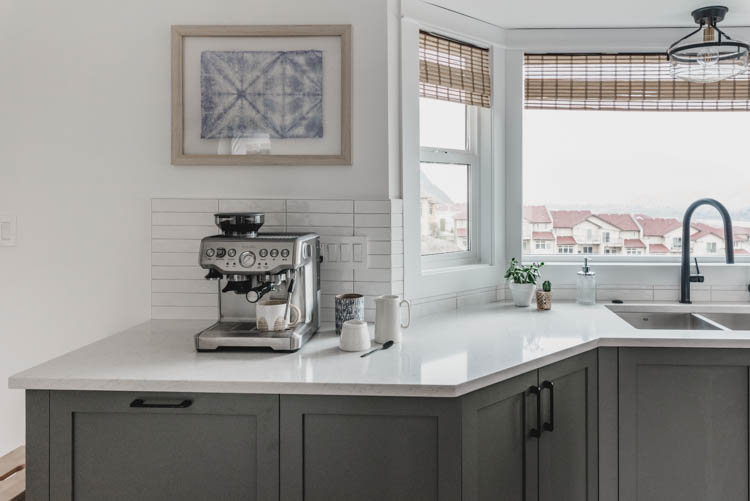
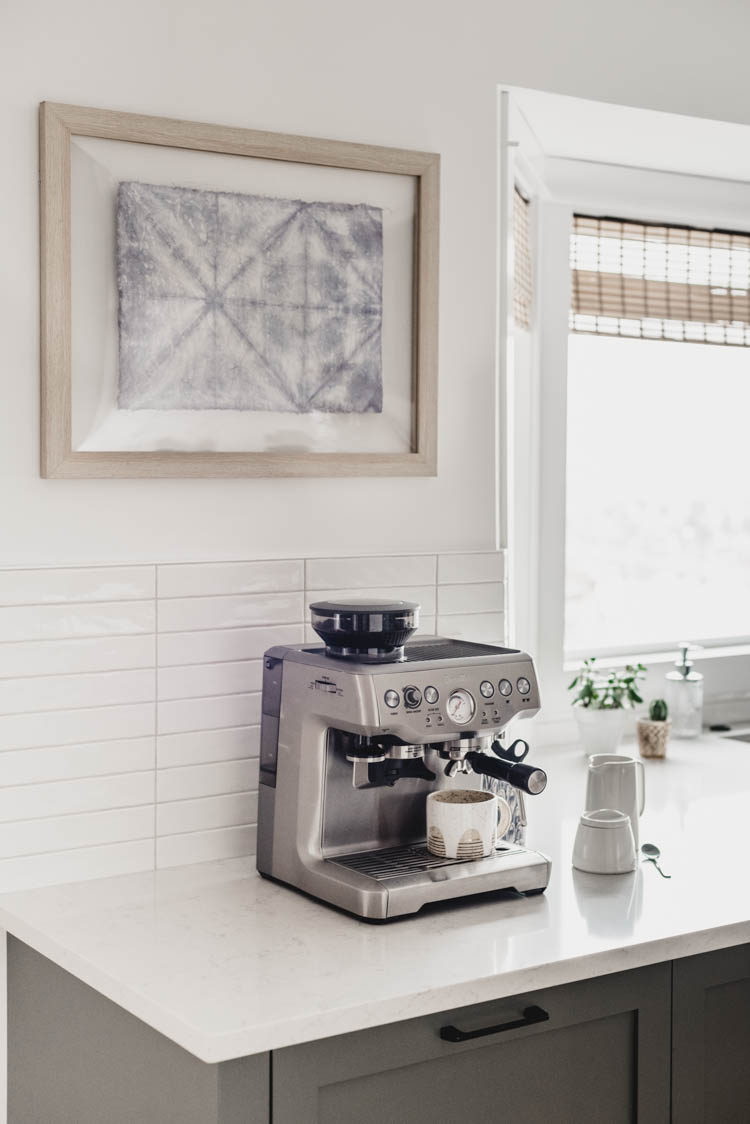
I’m slowly digging through the many, many photos I took during our kitchen remodel and getting organized to share a couple of the DIYs and informational posts that I’d promised through that whole process. We shared our finished kitchen remodel at the end of 2018 and of the last things I did in there was this piece of art. I was so stumped on what to put above the coffee bar here- I considered my usual go-to hand lettered art, I considered a photo, I considered a mug rack… but none of them seemed quite right. I wanted to balance the wood from the open shelving and faux wood blinds but wanted to keep it pretty subtle, not to draw attention away from the view we love so much. 

One day, Ashley from Arrows and Bow shared a piece she found at Home Goods (maybe? it was somewhere I don’t have here in Canada) for her boys’ room in her Instagram stories. It was perfect. It was subtle but full of texture and I started thinking about how I could create something similar for this spot. I headed to Michaels to find a floating frame with a similar wood tone and dug in my scrap fabric bin. I did a little bit of google and had a solid plan. I made this in between cleaning my kitchen for final photos. I had no idea if it would work or if I would have nothing to show for it at the end, but ohmygoodness I’m so glad I took that risk and tried. It’s perfect. You’ll have to excuse the wall paint on my fingers… I hadn’t planned on getting crafty and taking photos but inspiration sprung ;)

So if you’re looking for something a bit different but not too bold for your space… this DIY is for you! If you have been dreaming of adding some shibori to your home but don’t want the hurdle of learning a new material (shibori dye is different than regular fabric dye)… then this is for you too! 

Simple DIY Faux Shibori tutorial

Simple DIY Faux Shibori tutorial

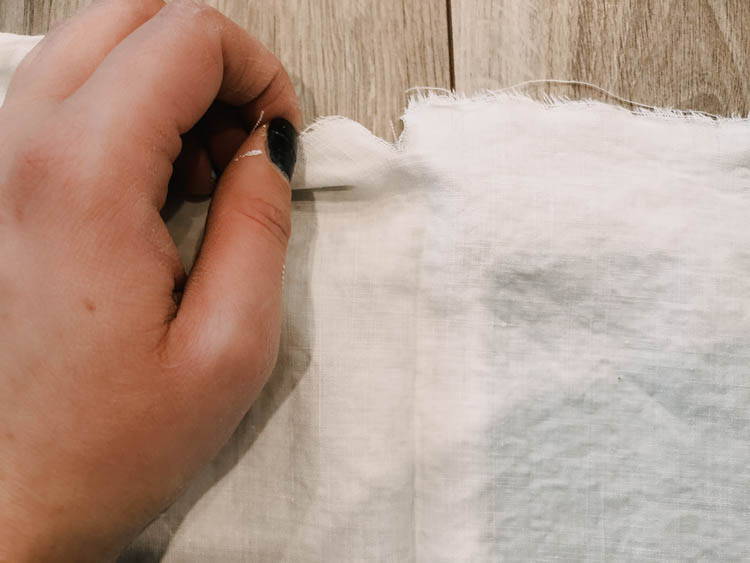
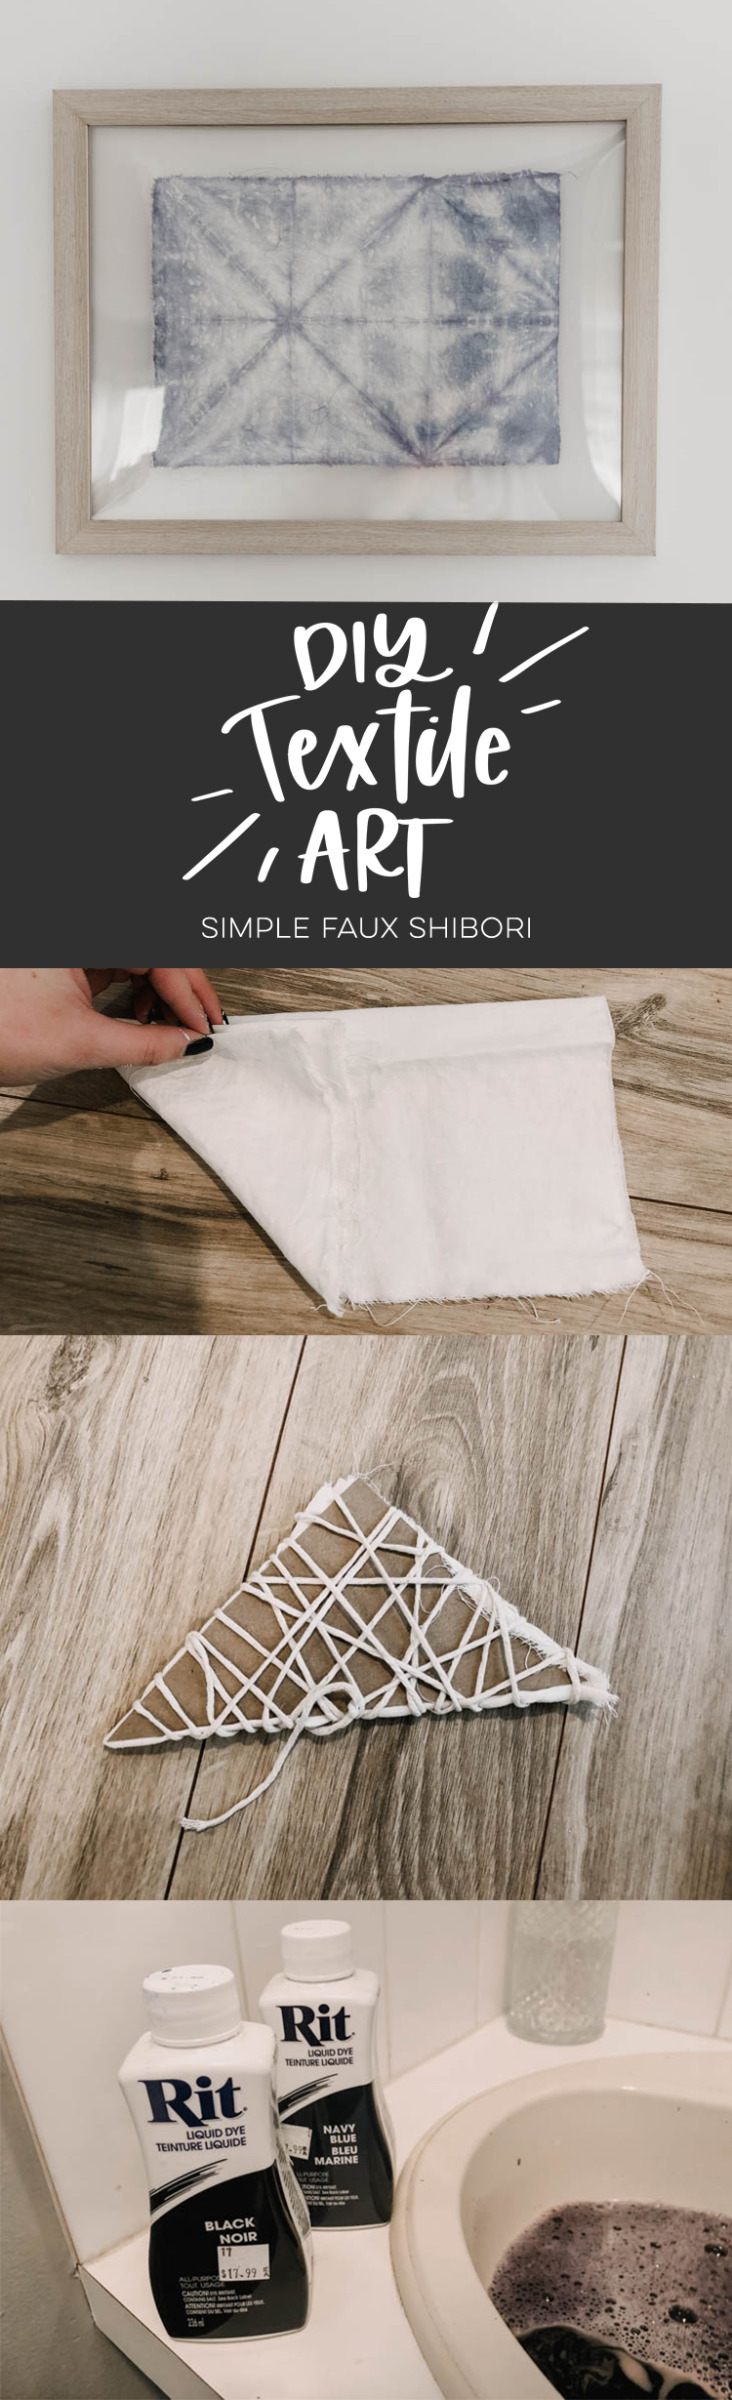
The first thing you’ll need to do is to find your material. I used a scrap of linen that I had leftover from an old pillow case. I tore it down to size to leave the edges raw and wild. I love this look. To do this, just snip a start in the fabric where you want and firmly grip both sides to tear it. It should tear beautifully along the weave.

Simple DIY Faux Shibori tutorial

Simple DIY Faux Shibori tutorial

Simple DIY Faux Shibori tutorial

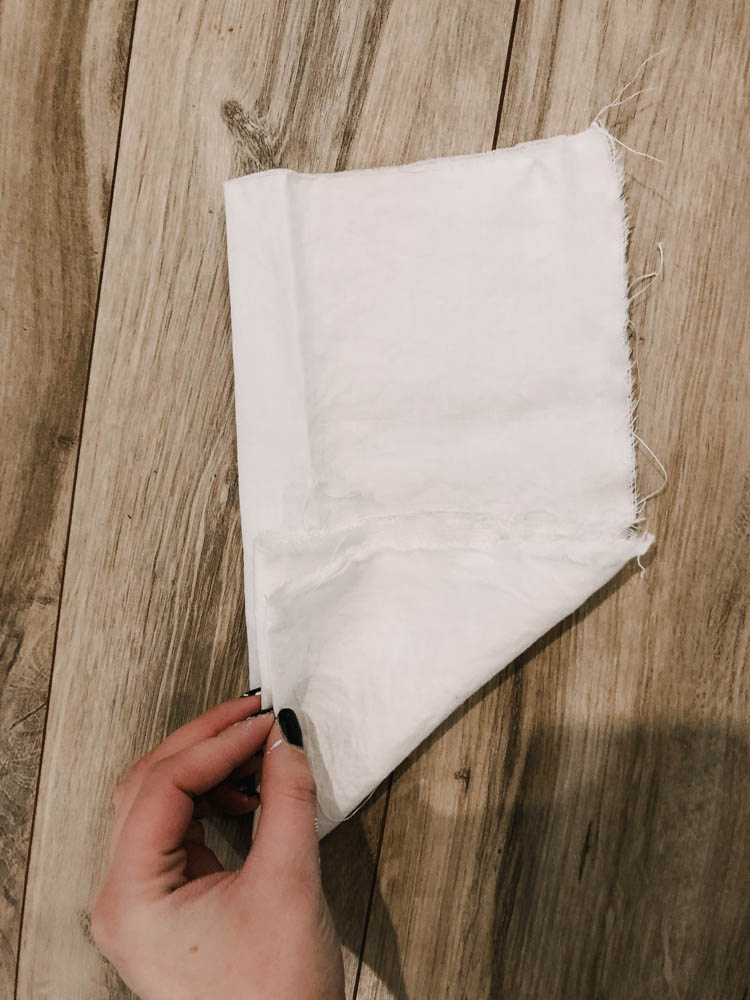
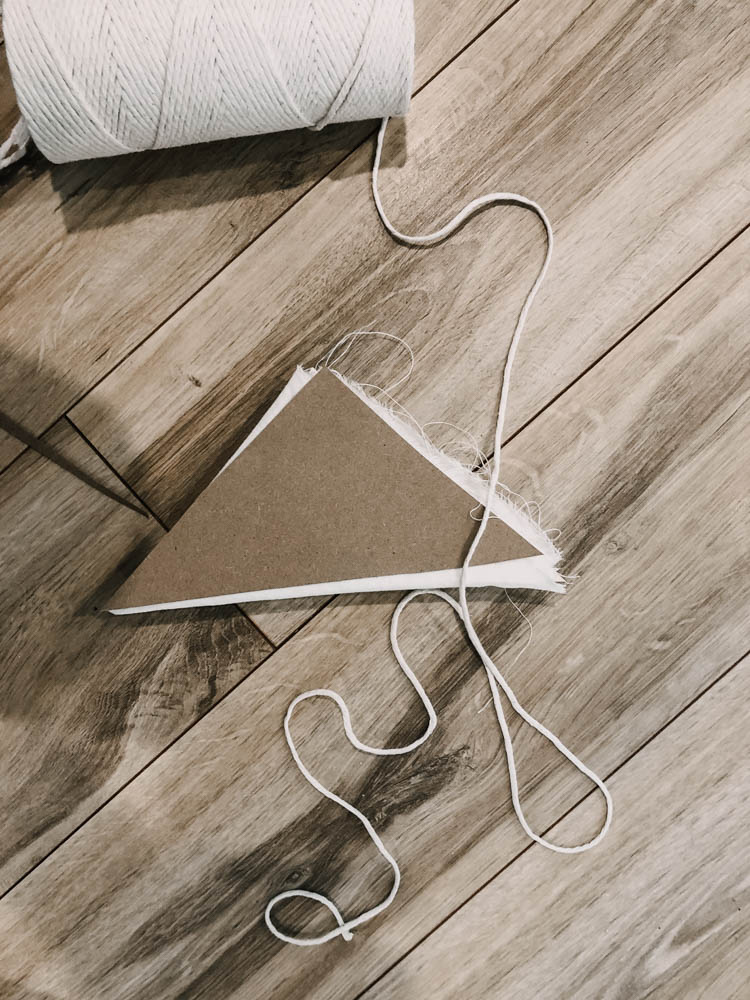
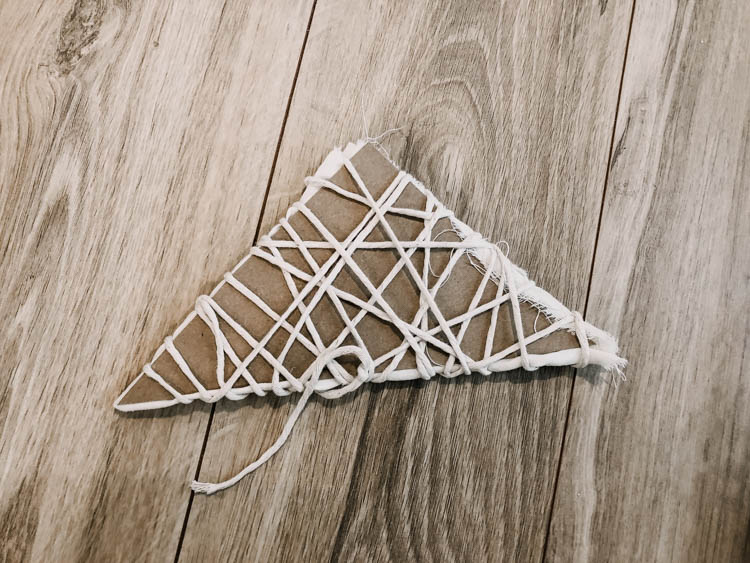
Once it’s torn, it’s time to tie it up and get to dying! To create the pattern that you see here, I folded my material into triangles. I started by folding it accordion style into thirds. Then, accordion style, I folded triangles in to the strip of fabric. When this was done, I cut cardboard to size and used cotton string (any string would be fine, I’m sure… or elastics) to tie it tightly. 

Simple DIY Faux Shibori tutorial

Simple DIY Faux Shibori tutorial

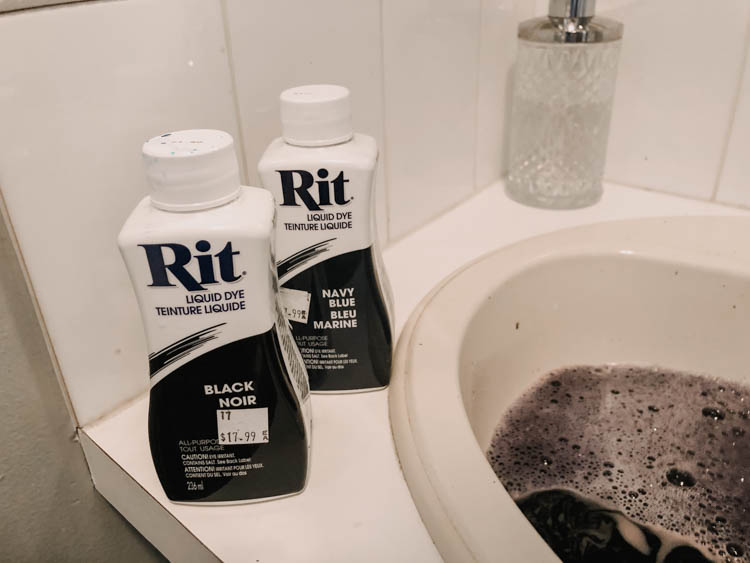
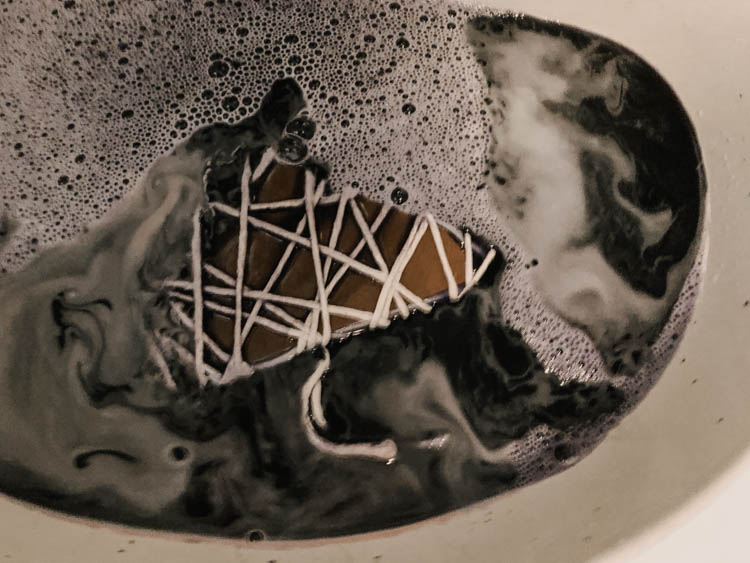
Now… dye! To get an even fabric dye, you would typically wet your fabric first. Since I didn’t want it to dye all the way through, I just dunked the fabric all bundled up in the water for a few seconds. Then, I added warm water to my sink and added my liquid dye. I had bought the giant liquid dyes for another project- you definitely don’t need full bottles for this. I mixed the navy blue and black Rit dyes for a muted blue-gray colour.

Immerse your fabric bundle into your dye and walk away. I left mine for about 10 minutes for this soft colour. You could leave it for much longer or add more dye to your water if you wanted a bolder design. Keep in mind that your dye will dry a bit lighter than it looks when it’s wet. 

DIY Textile Art for the kitchen

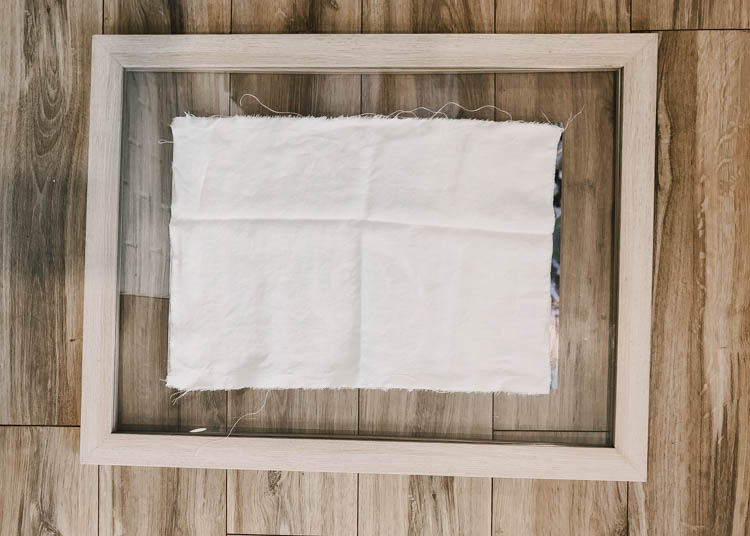
I let it dry a bit before unbundling it (just to minimize mess) and when it unfolded, I knew it was the perfect solution to my lack of art in the kitchen! The raw edges, the crinkled texture, the soft tones, and that wood frame that ties it all together… it’s exactly what I needed here!

DIY Textile Art in a floating frame... plus simple faux shibori tutorial

Love this art for in the kitchen! Perfect little DIY

Love this art for in the kitchen! Perfect little DIY

So there you have it! How you can make your own subtle textile art. I want to do something in similar tones for our dining room but am thinking maybe a photograph there. If you see anything that you think I need to see… send it my way, friends!

WANT TO SEE THE WHOLE KITCHEN? CHECK IT OUT HERE!

LIKE IT? PIN IT?

Simple DIY Faux Shibori tutorial

Category: DIY, Home DecorTag: Art, Craft, DIY Home Decor, Kitchen, Wall Art, Wall Decor
Facebook0Tweet0Pin0LinkedIn0
Previous Post: ← Everything you need to know about transfer tape for vinyl including what kind to use for what materials How to Use Transfer Tape for Vinyl – Cricut VS Silhouette
Next Post: Easy Striped Cake With Railroad Cake Topper Easy Striped Cake With Railroad Cake Topper | Train Party Cake →

Reader Interactions

Comments

  1. NancyGrace

    Mar 01 at 11:47 am

    Thanks for the tutorial. You made it look SO EASY, and I LOVE the results. Congrats on your beautiful new kitchen!

    Reply
    • Colleen Pastoor

      Mar 05 at 8:31 pm

      Thanks so much! We are sure happy with it :)

      Reply
  2. Janet

    Mar 06 at 11:30 pm

    Beautiful piece!

    Reply
    • Colleen Pastoor

      Mar 11 at 7:33 pm

      Thanks so much Janet! I am so happy with it :)

      Reply

Leave a Reply Cancel reply

Your email address will not be published. Required fields are marked *

Sidebar

WOOHOO!

Check your email to confirm!

(+ get your freebies + discounts)


Thanks for dropping by!
I’m Colleen: wife; mom to 4 wild ones; and DIY blogger behind Lemon Thistle. You can expect to see rad DIY, modern home decor, renovations, hand lettering and the occasional party on Lemon Thistle. Read More…

email facebook youtube instagram pinterest

Unless otherwise noted, all content and images are mine. Full posts may not be shared without express written consent. But I love when you share! Feel free to share, without altering, one image with proper credit and a link to the original post. All free printables are for personal use only.

Everyone loves proper credit- if you ever notice something improperly credited, please please shoot me an email and I’ll fix it lightning fast.

Find all my policies right here.
This includes my privacy policy, info on the GDRP compliance and information on affiliate links (Including Amazon Affiliates).

Visit Colleen Pastoor’s profile on Pinterest.

colleenpastoor

My house is never this clean
-
DIY + Home Decor Blogger
Mama of 4 👶🏼🧒🏼👦🏼👧🏼
Renovating our 🏠 the DIY way
🖤 Lettering & ☕️
-
✉️[email protected]

colleen pastoor/lemon thistle
Let’s talk about coffee! This is my coffee ‘st Let’s talk about coffee! This is my coffee ‘station’ and the second photo is my dads! I’m talking aaaall about them over on YT today!
Also... see how nice that fresh silicone looks?! 😉 IYKYK
The hallway is finally finished and I’m so stink The hallway is finally finished and I’m so stinking happy! 

It’s felt like such a long time coming for such a small space. Since we moved in 2.5 years ago, this space has seen new doors and hardware, new trim, new floors... twice😅, we changed the boob light to a pot light and I hated it and now it’s got the most beautiful flush mount fixture I’m in love with (thanks @mymitzi!). It finally got some fresh paint and now frames on walls and last but not least... After this weekend, the new floors look like they were here all along (no door jamb gaps!) which was the last thing really bugging me since our flood last year. 

All this to say that home takes time and sometimes getting it right might take a couple tries. Also- the spaces we don’t really think about (hallways) can totally help a house feel like home with some love (and family photos 🥰)
ps. I partnered with #mymitzi to create a tiktok for This makeover... are you following me over there yet?! I’d love if you popped over and said hi!
It’s done! It works! And I’m calling it a grea It’s done! It works! And I’m calling it a great use of my afternoon the other day. Did you catch the stories? These projects both cost me under $10 by using pieces I already had in my home (yay for scraps!) and one package of drawer slides).
You can find the full video about these two kitchen organization projects over on YouTube in collaboration with my friend @love_create_celebrate and her #scrapsmademodern challenge! But for now... I’m rejoicing this coffee maker is off my counter for good 🎉
How’s your January going? Full speed or are you How’s your January going? Full speed or are you taking it a bit slow too? 

I’m not going to lie, I’m easing into this new year thing pretty slowly. All my decorations are still up (we always leave them up til Ukrainian Christmas which is later this week) and I I’ve yet to respond to my emails since before Christmas 😅
I’m enjoying the slowness of it all.
Happy Christmas Eve from our fam to yours 🥰 Happy Christmas Eve from our fam to yours 🥰
Yes, I made the paper bag snowflakes too. Have you Yes, I made the paper bag snowflakes too. Have you? 😅
This year has been one of a kind and I know so man This year has been one of a kind and I know so many people who are taking this year as the push they’ve been waiting for to start a side hustle, start an new career altogether or to just get creative about how they’re making money. So today I’m excited to partner with @kregjig to share some rad projects to make and sell this year! 
Like this rolling storage system I made for my office, that rad dollhouse and the gorgeous bath toy storage. All of these projects are things that I’d personally love to buy for our family and look like they’d be a great return on your time making them! And yes, all of them use #Kreg tools to make them easy to assemble and quick to make! Plus, they’re having a great sale on right now with deals on their K4 and K5 jigs, Rip-Cut and even a hardware jig bundle! There’s never been a better time to get your workshop set up!  #sponsored
Just a peaceful moment and then a real life moment Just a peaceful moment and then a real life moment for ya 🙃 
My #holidayhometour is on the blog and YouTube (I’ll put links in my stories) as part of the #seasonalsimplicity holiday home tour series. I’ll share those too so you don’t miss any!
My holiday home tour will be up tomorrow, but for My holiday home tour will be up tomorrow, but for tonight... I’m just enjoying the lights. And possibly a hallmark movie with some more custom order lettering 😅 what are your plans?
#christmasdecor #christmastree #holidaylights
Load More... Follow on Instagram

Copyright © 2021 · Lemon Thistle · All Rights Reserved · Powered by Mai Theme