• Skip to main content
  • Skip to header left navigation
  • Skip to header right navigation
  • Skip to site footer
  • Shop
  • Get The Email
  • Work With Me
  • About
  • Search

  • DIY
    • DIY Home Decor
    • With Power Tools
    • Renovation
    • For Kids
    • For Parties
    • Wearable
    • Organization
    • Cricut Crafts
  • Home Decor
    • Room Reveals
    • Kid Friendly
    • DIY Home Decor
    • Renovation
  • Lettering
    • Hand Lettered Printables
    • Free Practice Sheets
    • Handlettered DIY
    • Free Brush Lettering Quickstart Guide
Lemon Thistle

Lemon Thistle

Rad DIY, Lettering and Design for Real People

  • Printables
    • For Cricut
    • Party Printables
    • Home Decor Printables
    • Bachelor Bingo
    • Handlettering Practice Sheets
    • All Free Printables
  • Entertain
    • Party Printables
    • Party DIY
    • Tablescapes
    • Kids Parties
  • Blog

Let’s Play! Round Chalkboard with Script

Jun 27

DIY Round Chalkboard with 3d hand lettering... I LOVE this! Perfect for backyard games

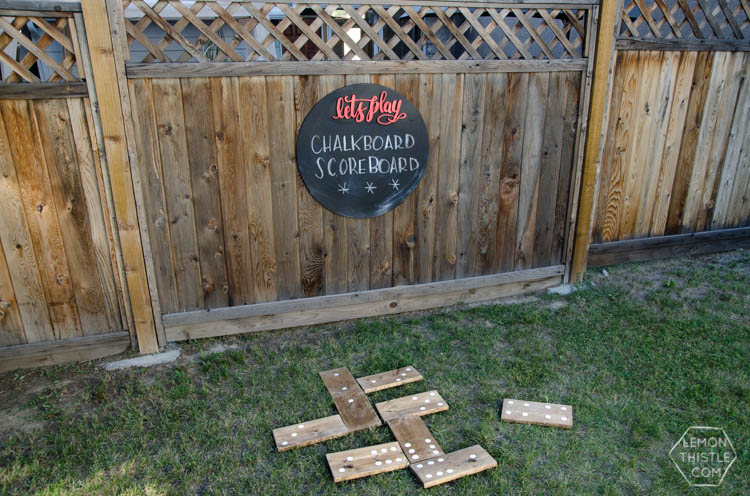
If you follow along on social media, you might have spotted a Q & A I did over on the Dremel Facebook page. I was so thrilled when they asked me to partner as a Dremel Maker this month to bring you a super fun tutorial. They challenged me to make something with the theme ‘play’ and since we already made all the yard games we’d been dreaming of last summer, I though it was the perfect opportunity to create a score board.

DIY Round Chalkboard with 3d hand lettering... I LOVE this! Perfect for backyard games

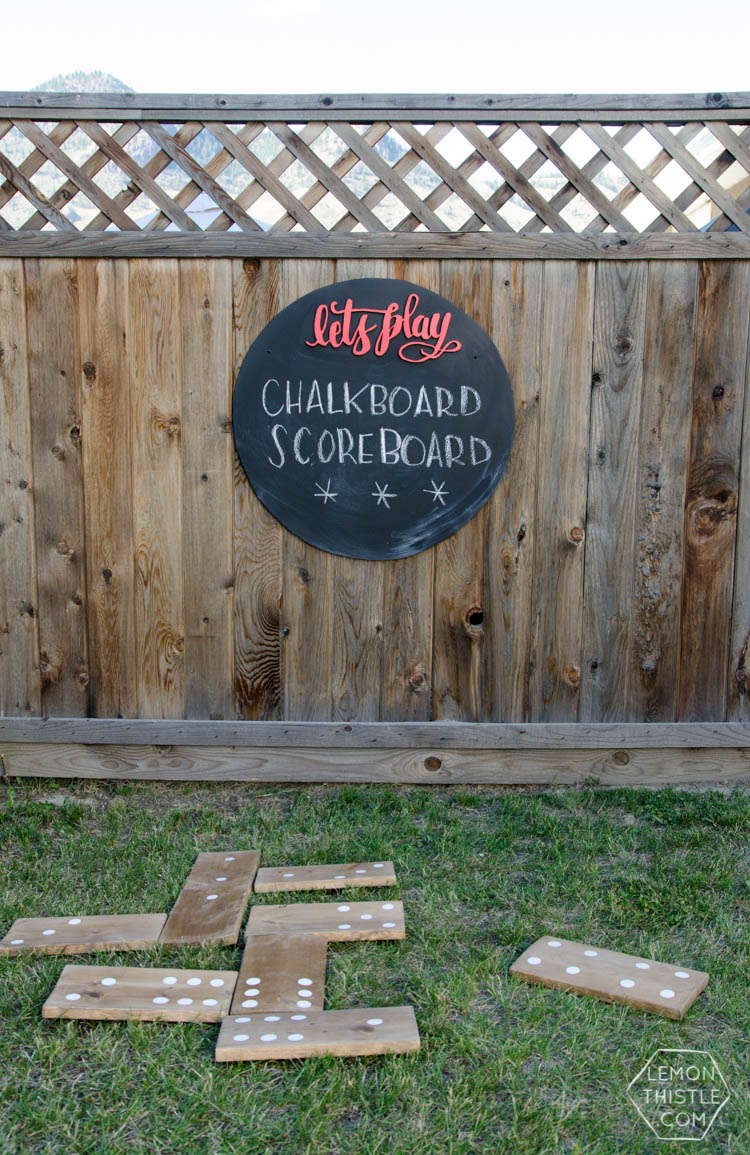
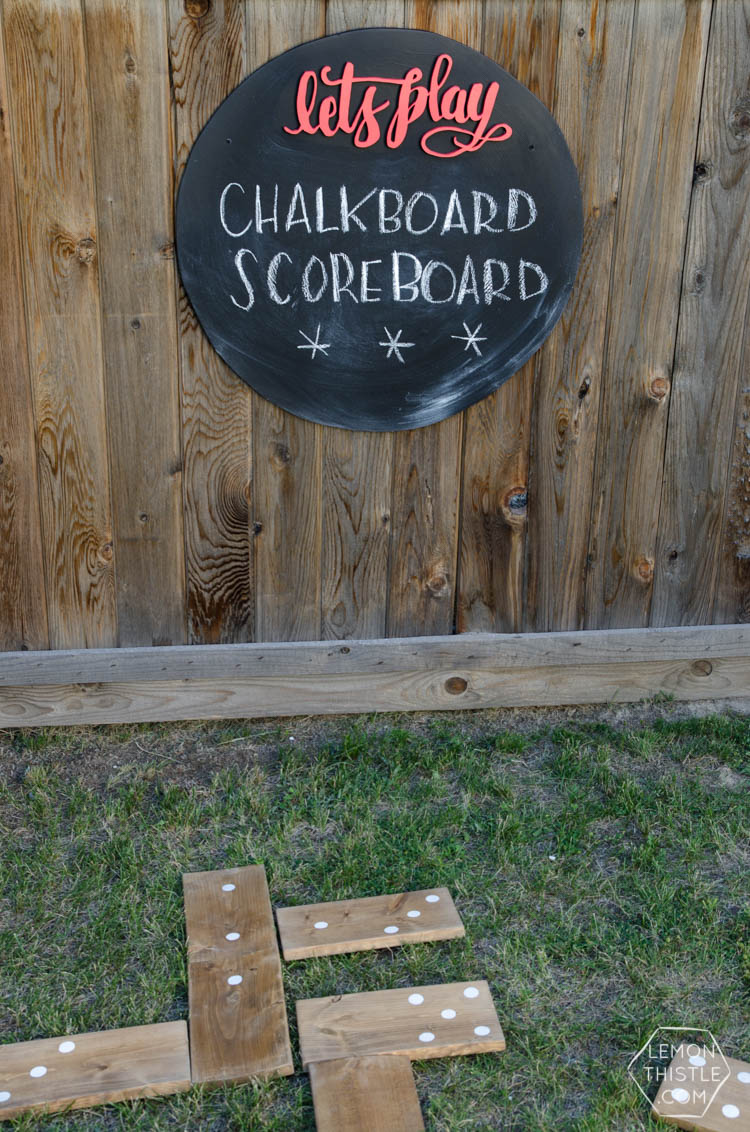
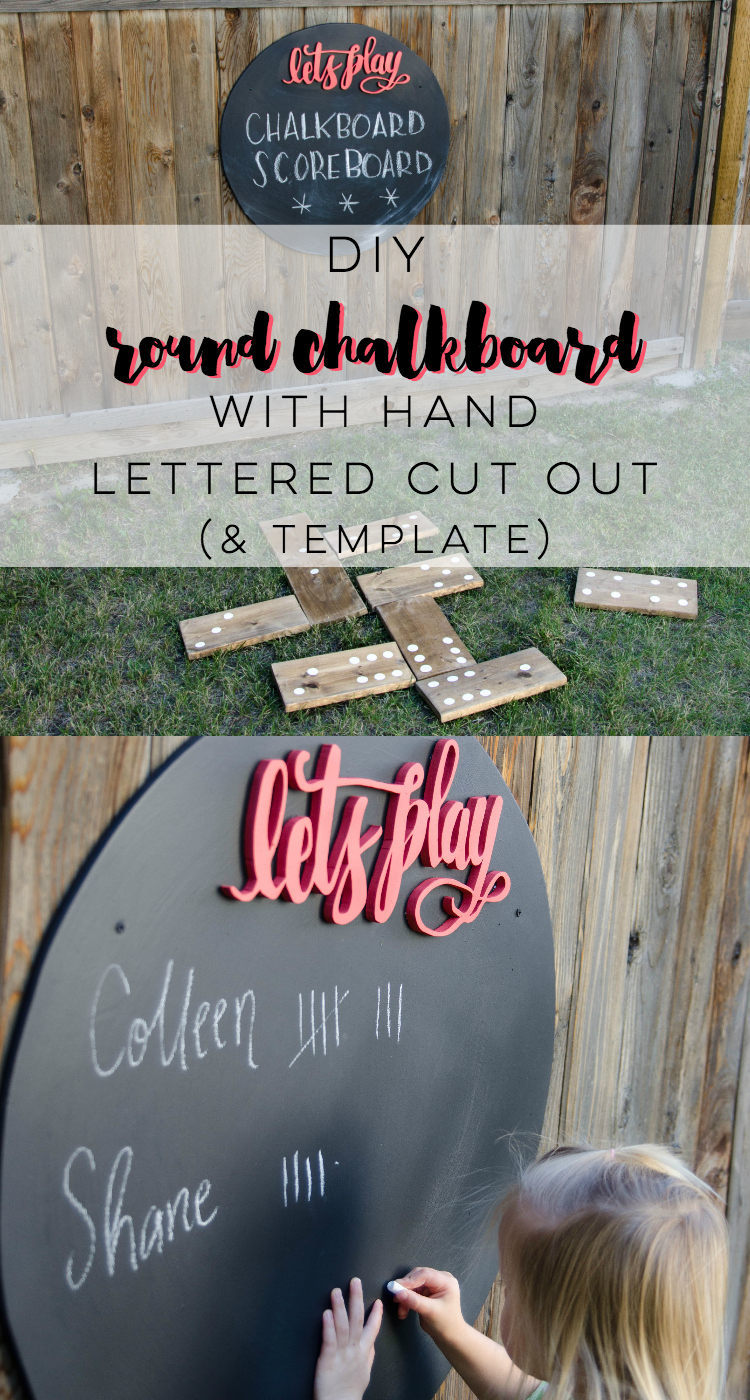
I LOVE how this ended up turning out you guys! I wanted to do something that was more fun than a standard square chalkboard and really wanted to add a hand lettered element (it seems like I find a way to add it to everything lately!). So when I was looking through the Dremel tools and spotted the Moto-Saw which is a baby of a jig saw and a scroll saw, I knew exactly what I wanted to do. I’ve been totally inspired with Virginia from Fynes Designs‘ scroll saw skills but wanted to try using my hand lettering instead of a font. Popping that over a large circle chalkboard got my husband’s vote when we were drawing up ideas, so I ran with it.

Here’s what you’ll need to make your own:

  • Fine Plywood (I used 3/4″)
  • Pencil and string to draw circle
  • Hand Lettered Template
  • Transfer Paper (or see below for another method), tape and a pencil
  • Dremel Moto-Saw (or a jigsaw and a scroll saw if you happen to have them!)
  • Fine sandpaper (I used 120 grit)
  • Chalkboard and bright paint
  • Super glue, construction adhesive or similar
  • Black screws to attach to fence panel

DIY Round Chalkboard with 3d hand lettering... I LOVE this! Perfect for backyard games

DIY Round Chalkboard with 3d hand lettering... I LOVE this! Perfect for backyard games

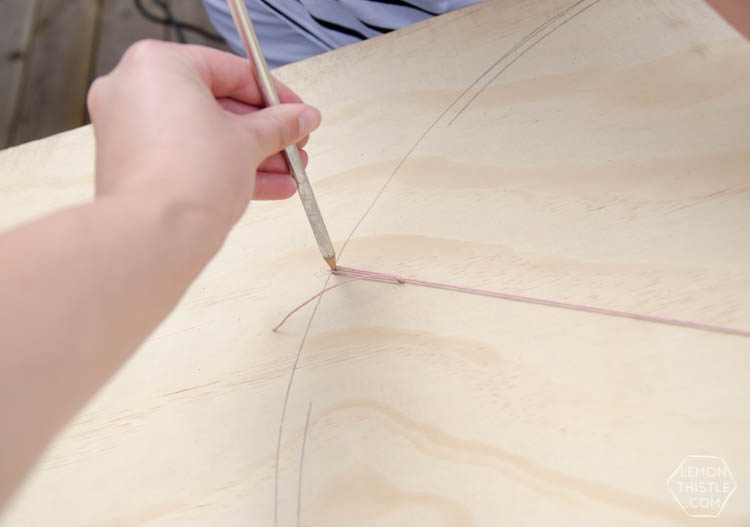
The first thing you’ll need to do is decide how large you’d like your circle to be. We went pretty big, and I love it. Shane reminded me it should be big enough that the kids could use it to color and we could to keep score. I used the elementary way to draw out my circle- with a string and a pencil. It worked just fine for me (after a couple false starts!). You’ll want to cut the piece of plywood to size (fairly close anyways) with a circular saw or something similar, before you cut it into a circle with your finer saw.

DIY Round Chalkboard with 3d hand lettering... I LOVE this! Perfect for backyard games

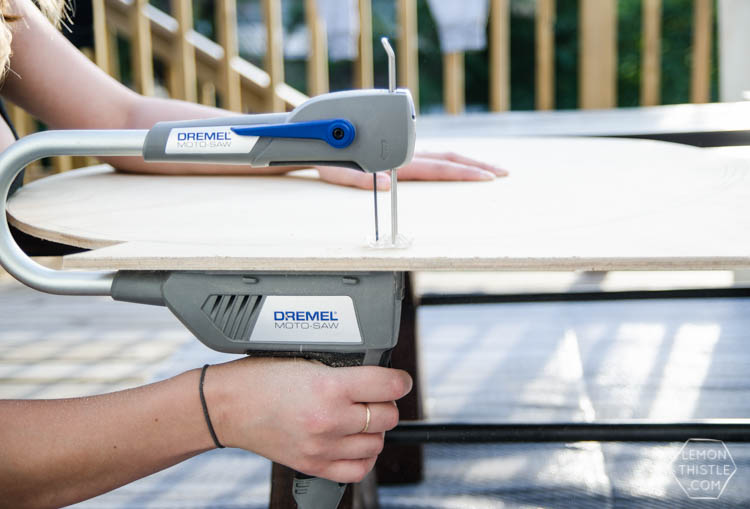
I used the Moto-Saw to cut the circle out, just like you would a jigsaw. It was really convenient to use one saw to cut both the circle and the lettering- I just kept it out all afternoon. The big difference between the Moto-Saw and an actual jigsaw is that you hold it from the bottom, so need to apply upwards pressure as you cut (where as a jigsaw you press down). Because of this, there is also an arm (like the scroll saw), so you can only cut straight so far before you run out of space. This just means you’ll need to cut away the scrap as you go and isn’t much of a factor in a shape like a circle. When it’s cut to size, sand the snot out of it to make the edges nice and smooth. I had quite a fine plywood so the face didn’t need much.

DIY Round Chalkboard with 3d hand lettering... I LOVE this! Perfect for backyard games

DIY Round Chalkboard with 3d hand lettering... I LOVE this! Perfect for backyard games

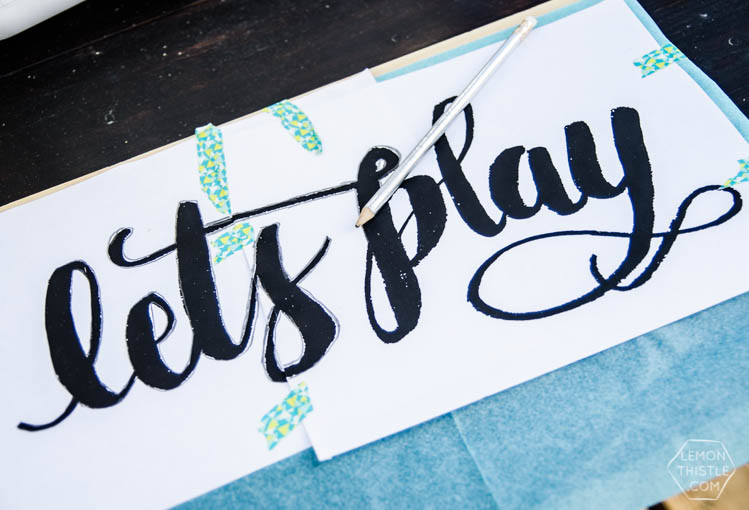
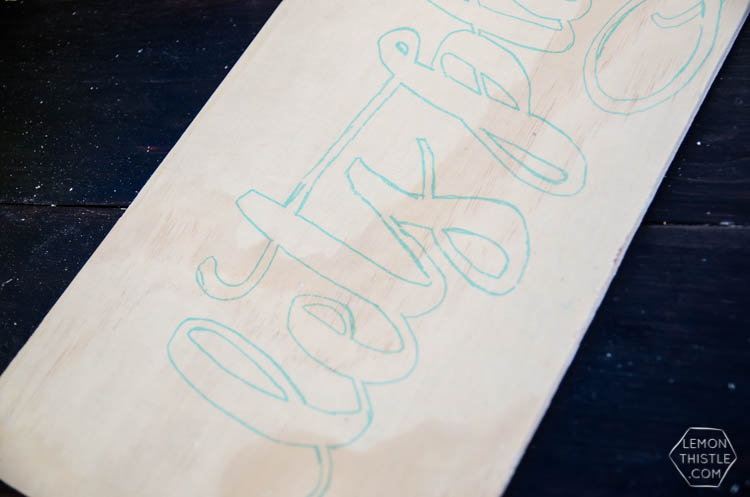
Now for the lettering! If you want to do the same wording that I did, you can CLICK HERE to download the free printable template that I hand lettered. Just print it out (two pages) and tape the pages together. If you are doing a different word or letters, print them out or draw them out to make your own template. I used transfer paper (found at the craft or art store) between my template and plywood to transfer the design. You just tape it all down and trace your design firmly with a pencil to create the transfer. If you don’t want to head out and get transfer paper- I hear ya. I usually hack it, but I have to be honest- this works much better. To hack it, just color like crazy with a pencil on the back of your template, then flip it over and do the same. The outline will be much fainter than what you see here.

DIY Round Chalkboard with 3d hand lettering... I LOVE this! Perfect for backyard games

DIY Round Chalkboard with 3d hand lettering... I LOVE this! Perfect for backyard games

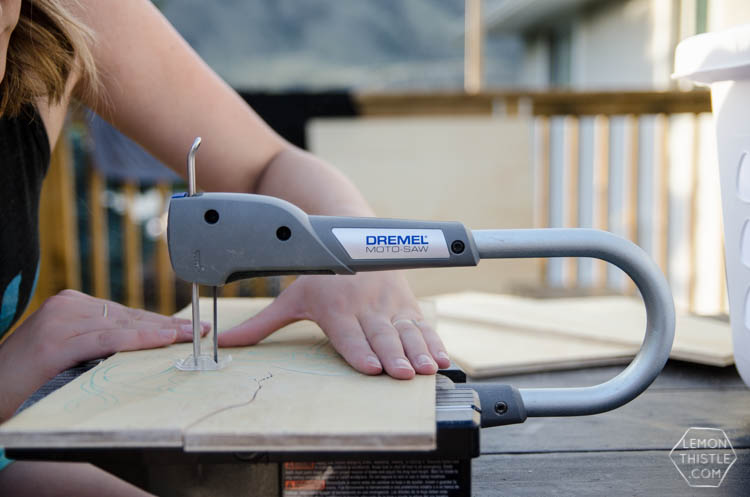
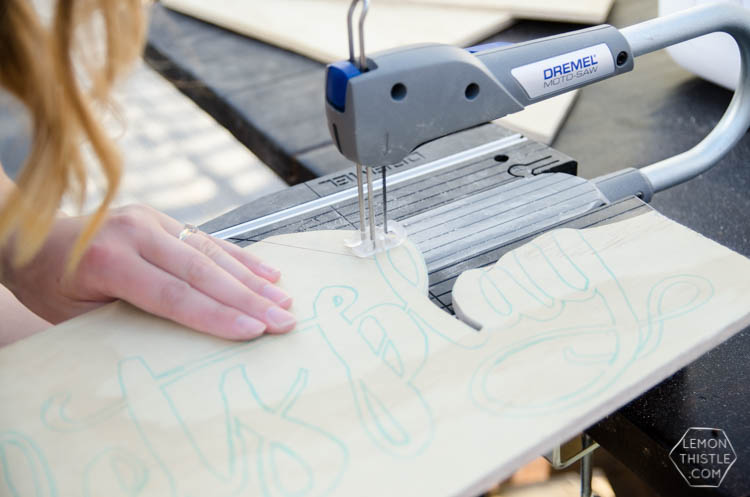
Next is the fun part! The Moto-Saw clips in to a table base (that just clamps on to your table surface) and becomes a scroll saw. I have been dying to get my hands on a scroll saw since rooming with Virgina at SNAP. She’s a freaking genius with those things and since I got my Moto-Saw, I’m totally addicted. It really is the most fun tool that I’ve used (but maybe that’s because I was cutting out lettering which is my fave right now).

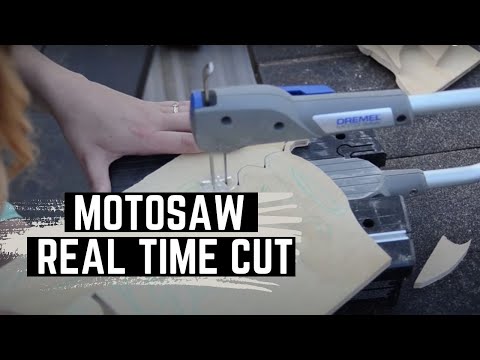
I had Shane film me using it, because I love watching things like this. It does take a bit of practice to get smooth curves- you can definitely see where I started, and by the end I was a lot smoother. I found the trick was to go quicker through the corners than you want to. As long as you keep the wood moving through the saw, you can do pretty tight corners which was a nice surprise for me.
DIY Round Chalkboard with 3d hand lettering... I LOVE this! Perfect for backyard games

DIY Round Chalkboard with 3d hand lettering... I LOVE this! Perfect for backyard games

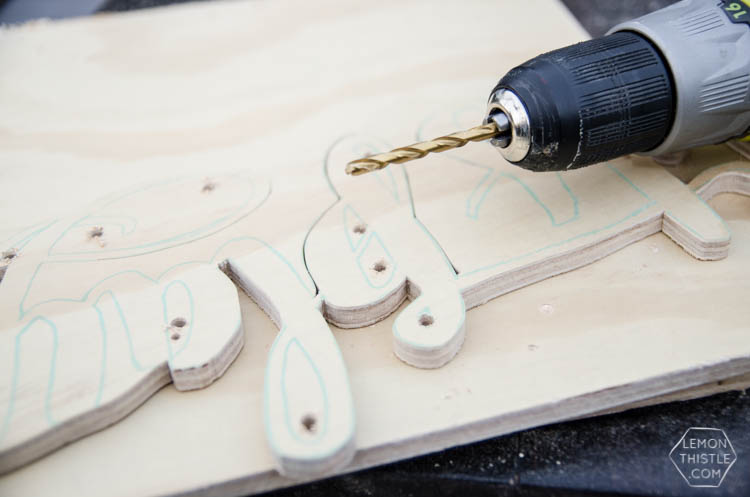
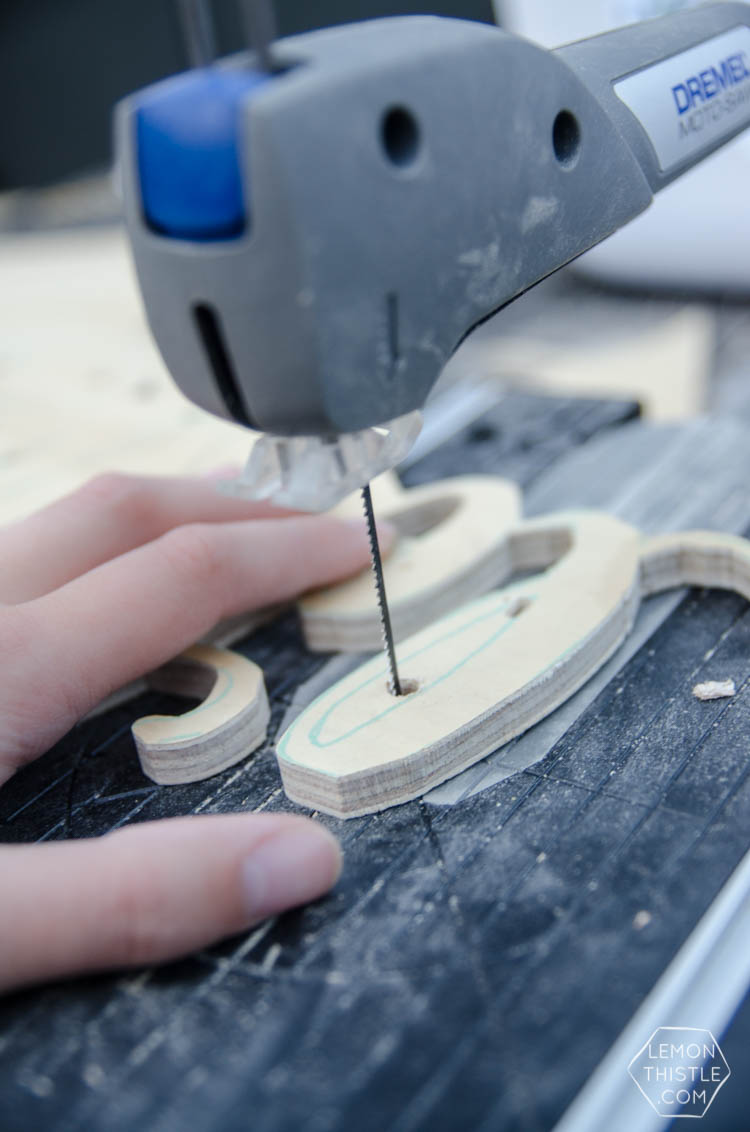
To get in the little nooks, I used a drill bit slightly larger than the blade, then threaded the blade through that. I was worried that these little bits would be difficult, but I found them easier than some of the sharp angles in the other parts of the lettering!

DIY Round Chalkboard with 3d hand lettering... I LOVE this! Perfect for backyard games

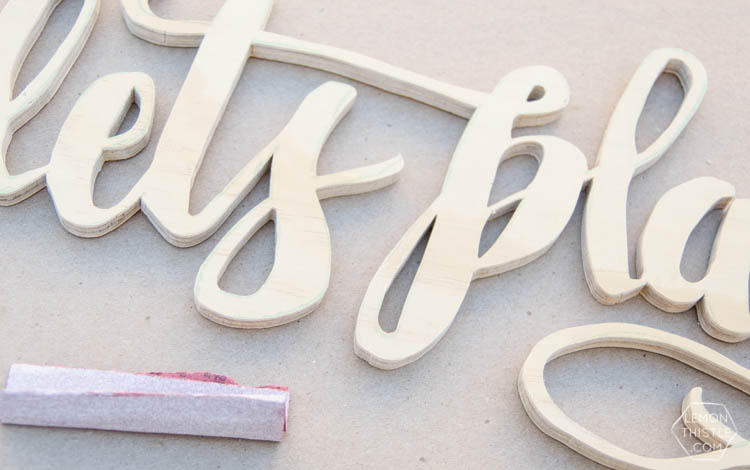
When you’re all done, give it a light sanding. I used 120 grit sandpaper and just rolled up a small strip as pictured to do the lettering. I used a palm sander on the circle chalkboard piece.

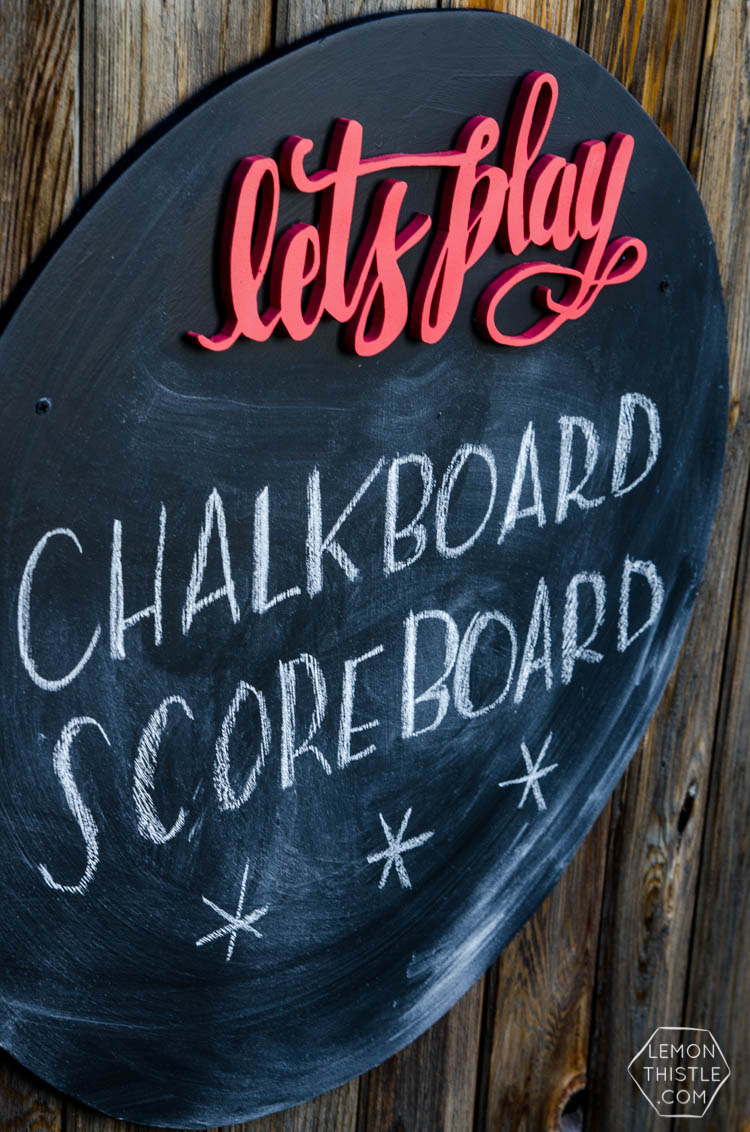
Next up… painting! It was a really warm day when I painted this you guys (I know you’re not supposed to paint when it’s warm, and now I know why). The paint dried as I brushed it on. You can still see some of the brushstrokes on the chalkboard because of this. After one coat on the chalkboard, I switched to a paint sprayer (find my beginner tips on that here). The chalkboard paint sprayed great, to my surprise! The color I used for the lettering is a fun pinky red called ‘Fresh Berries’ by Para Paints. Paired with the script and the black and white… it kind of reminds me of vintage Coca Cola!

DIY Round Chalkboard with 3d hand lettering... I LOVE this! Perfect for backyard games

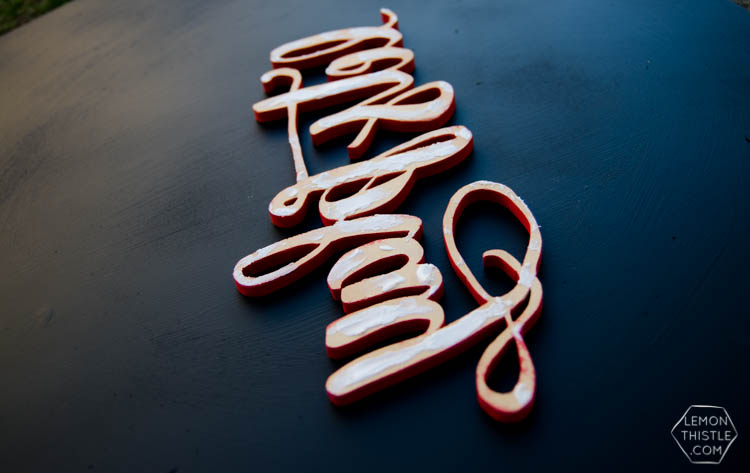
When the paint is dry (I did a couple coats), use a glue or construction adhesive to attach the lettering to the chalkboard. I think I need to ask Virginia what type of glue she uses, because I wasn’t too happy with how thick the one I tried was. But it dries clear, so you’ll never know ;)

DIY Round Chalkboard with 3d hand lettering... I LOVE this! Perfect for backyard games

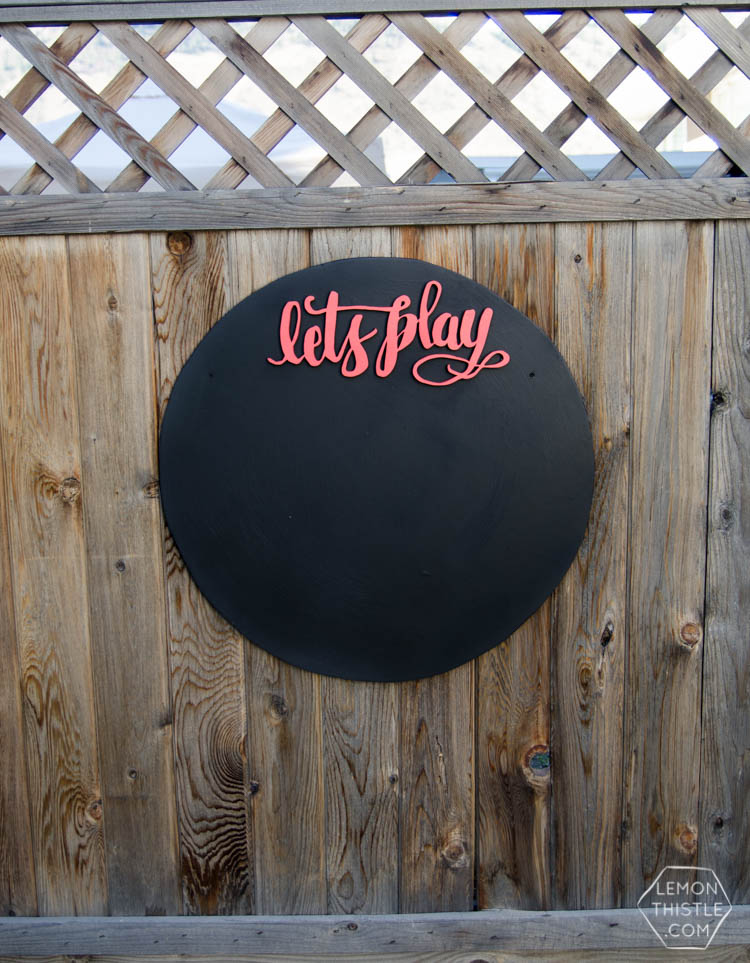
I wanted to make sure it was secure since it’s outside (windy) and in reach of wild children. I chose to screw it directly into our fence using black screws. And looking at our fence in photos makes me realize how badly it needs to be stained! But that’s a project for another day. Oh! And remember that if you want to be able to erase your chalkboard and not have the lines forever showing… prime your chalkboard by rubbing a piece of chalk on it’s side all over, then give it a good wipe before writing!

DIY Round Chalkboard with 3d hand lettering... I LOVE this! Perfect for backyard games

DIY Round Chalkboard with 3d hand lettering... I LOVE this! Perfect for backyard games

DIY Round Chalkboard with 3d hand lettering... I LOVE this! Perfect for backyard games

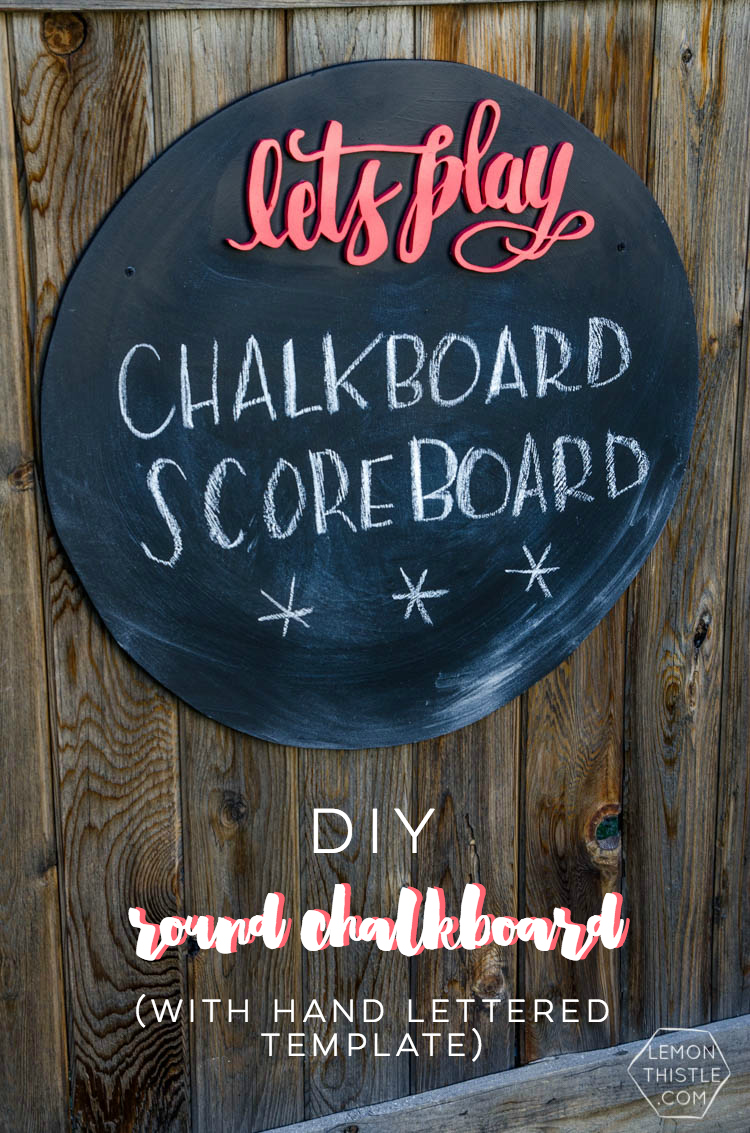
I’m so happy with how this guy turned out and even more happy with how darn easy (although a bit time consuming) it was. This totally gives me confidence to turn more hand lettering into cutouts! What do you think? Would you try it? And how about yard games… do you have any and how do you track scores?

DIY Round Chalkboard with 3d hand lettering... I LOVE this! Perfect for backyard games

Category: DIY, Home DecorTag: Activity, Building, Chalkboard, DIY Home Decor, Games, Handlettered DIY, Handlettered Printables, Handlettering, Outdoor, Printable, Sponsored, Wall Decor, Wood
Facebook0Tweet0Pin0LinkedIn0
Previous Post: « I love this laundry room makeover! I can't believe those countertops are WOOD! A Laundry Room Makeover (top to bottom!)
Next Post: Every Moment Matters -Handlettered June Tech Wallpapers »

Reader Interactions

Comments

  1. Jacie Fella

    Jun 27 at 11:30 am

    This is the coolest ever! I have a round chalkboard, now all I need to do is sweet talk the hubby into buying a new tool (because he “needs” convincing; ) I love this project!

    Reply
    • Colleen Pastoor

      Jun 28 at 11:17 pm

      Thanks so much Jacie! I’ve always wanted a round chalkboard for some reason… I actually want to paint one directly on my kitchen wall but need to figure out a way to make clean edges with the paint.

      and SUCH a fun tool!

      Reply
  2. Anita

    Jun 27 at 7:49 pm

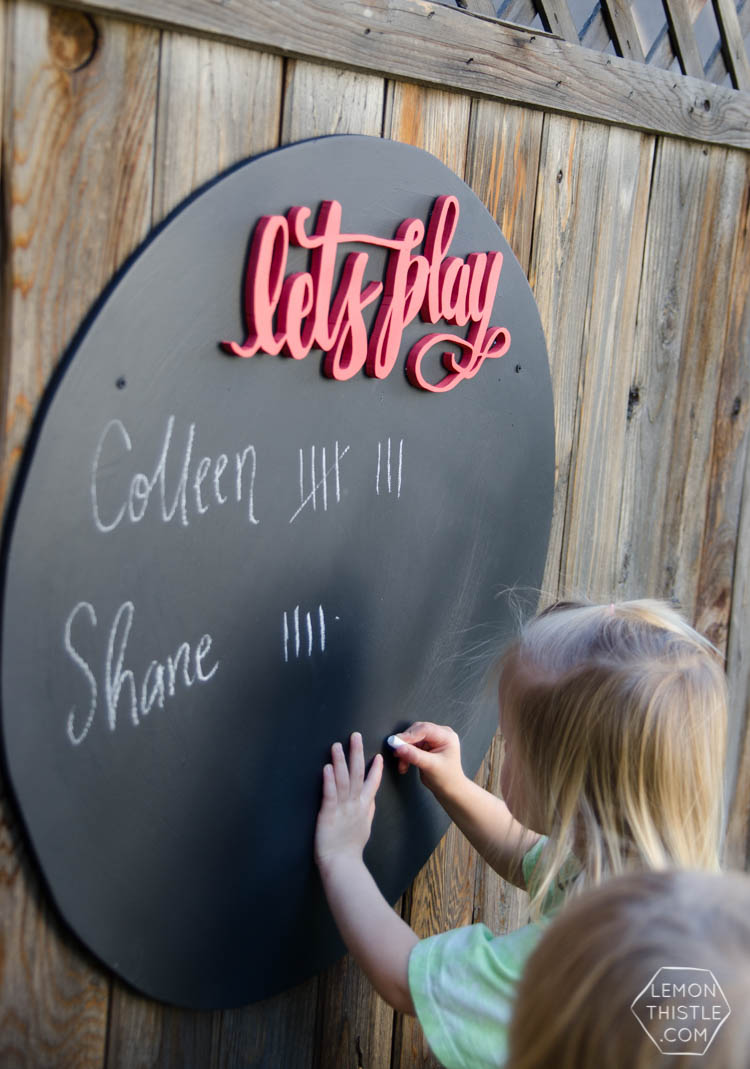
    OF COURSE Colleen is beating Shane on the scoreboard :P

    Love this DIY!

    Reply
    • Colleen Pastoor

      Jun 28 at 2:25 pm

      Glad you caught that ;)

      Reply
  3. Corey Willis

    Jun 29 at 1:37 pm

    Hooray for video Colleen! Love this project and that tool is something I think I need!

    Reply
    • Colleen Pastoor

      Jun 30 at 1:03 pm

      Thanks so much Corey! It is definitely fun to play with, I’m sure you’d love it :)

      Reply

Leave a Reply Cancel reply

Your email address will not be published. Required fields are marked *

Sidebar

WOOHOO!

Check your email to confirm!

(+ get your freebies + discounts)


Thanks for dropping by!
I’m Colleen: wife; mom to 4 wild ones; and DIY blogger behind Lemon Thistle. You can expect to see rad DIY, modern home decor, renovations, hand lettering and the occasional party on Lemon Thistle. Read More…

email facebook youtube instagram pinterest

Unless otherwise noted, all content and images are mine. Full posts may not be shared without express written consent. But I love when you share! Feel free to share, without altering, one image with proper credit and a link to the original post. All free printables are for personal use only.

Everyone loves proper credit- if you ever notice something improperly credited, please please shoot me an email and I’ll fix it lightning fast.

Find all my policies right here.
This includes my privacy policy, info on the GDRP compliance and information on affiliate links (Including Amazon Affiliates).

Visit Colleen Pastoor’s profile on Pinterest.

colleenpastoor

My house is never this clean
-
DIY + Home Decor Blogger
Mama of 4 👶🏼🧒🏼👦🏼👧🏼
Renovating our 🏠 the DIY way
🖤 Lettering & ☕️
-
✉️[email protected]

colleen pastoor/lemon thistle
Which do you like best? Even though it didn’t wi Which do you like best?
Even though it didn’t win the vote, I still decided to make this free printable a set instead of just the one!
You can find them plus so many other gorgeous spring printables from some friends of mine over on the blog today!
I’ve been doing some polls in my stories (thank I’ve been doing some polls in my stories (thank you for your responses!) and one that totally surprised me? 
Almost half of you don’t know I blog! That’s my job, guys 😂 IG is just a fun little part of that! So tell me... is this new information to you or are you team ‘knew that!’? 

Also... Should I do a blogging Q&A? 🤷🏼‍♀️
Happy Valentine’s Day, friends 🥰 Happy Valentine’s Day, friends 🥰
Anyone else feeling the balance between work and f Anyone else feeling the balance between work and family and rest and keeping your house liveable has all just toppled this year? I keep seeing articles about pandemic fatigue and long term stress and burnout and while it’s totally relatable, I really just want tips on how to actually deal with that. I thought I’d share some things that are helping me if you’re in the same boat... and I’d love if you shared your tips in the comments! We could all use them 🥰
-I’ve been going for a walk every day by myself. Even when it’s freaking cold like today, I just bundle. It’s the only time I get truly to myself with no kiddo asking for something and that I don’t have to try squeeze in an email or something else.
-I’ve been putting the instant pot to work and leaning on cheater meals (local soup mixes are amazing), Costco dinners... whatever
- I’m prioritizing friendships with phone calls, zoom games nights and group chats about the bachelor (with matching snacks!)
- I’ve given myself a schedule that has downtime to play with the kids and to read... even when there’s things I feel like I ‘should be’ doing
- I’ve realized exactly how much time I’ve been spending on my phone and that it’s become my response to stress. Have you ever looked up your screen time analytics? 🥴 look at how many times you pick it up in your day. I’m setting app limits for myself and trying to break this habit, but I’d really love tips!
Can you believe that address sign is a DIY?! I'm s Can you believe that address sign is a DIY?! I'm sharing the whole tutorial in partnership with @OfficialCricut today over on my blog! I'd originally made it as a place holder for a metal one but after having it up for 4 months... we totally love it long term! What do you think? Would you try it? #cricut #cricutmade #ad
What are your Sunday plans? Mine are to sit right What are your Sunday plans? Mine are to sit right here for the first half of the day drinking coffee, then the second half of the day it’s to clean this house so it looks like my Instagram feed again 😂
Who has DIY projects on their mind this year?! 

👏🏻CLOSED 👏🏻 congrats @kelseycford ✨
@ryobi_canada and I want to help you start knocking those projects off your list by giving away a new nailer and battery set! #ad 
This tool is what we used for this accent wall and all the trim in our home. It’s the one I used to trim out my built in shelving and add the decorative moulding to my geometric barn door. What I’m saying is this thing is a workhorse and I want you to have one too 😉
To enter:
✨Follow me @colleenpastoor and @ryobi_canada 
✨like and save this photo 
✨ tag some friends who’d love to win in the comments! One tag per comment, each is an entry. 
✨ share to your stories for a bonus 5 entries!

Open to Canadians only this time (sorry US friends!) and not associated with Instagram. Closes Friday Jan 22 at noon PST!
Let’s talk about coffee! This is my coffee ‘st Let’s talk about coffee! This is my coffee ‘station’ and the second photo is my dads! I’m talking aaaall about them over on YT today!
Also... see how nice that fresh silicone looks?! 😉 IYKYK
The hallway is finally finished and I’m so stink The hallway is finally finished and I’m so stinking happy! 

It’s felt like such a long time coming for such a small space. Since we moved in 2.5 years ago, this space has seen new doors and hardware, new trim, new floors... twice😅, we changed the boob light to a pot light and I hated it and now it’s got the most beautiful flush mount fixture I’m in love with (thanks @mymitzi!). It finally got some fresh paint and now frames on walls and last but not least... After this weekend, the new floors look like they were here all along (no door jamb gaps!) which was the last thing really bugging me since our flood last year. 

All this to say that home takes time and sometimes getting it right might take a couple tries. Also- the spaces we don’t really think about (hallways) can totally help a house feel like home with some love (and family photos 🥰)
ps. I partnered with #mymitzi to create a tiktok for This makeover... are you following me over there yet?! I’d love if you popped over and said hi!
Load More... Follow on Instagram

Copyright © 2021 · Lemon Thistle · All Rights Reserved · Powered by Mai Theme