• Skip to main content
  • Skip to header left navigation
  • Skip to header right navigation
  • Skip to site footer
  • Shop
  • Get The Email
  • Work With Me
  • About
  • Search

  • DIY
    • DIY Home Decor
    • With Power Tools
    • Renovation
    • For Kids
    • For Parties
    • Wearable
    • Organization
    • Cricut Crafts
  • Home Decor
    • Room Reveals
    • Kid Friendly
    • DIY Home Decor
    • Renovation
  • Lettering
    • Hand Lettered Printables
    • Free Practice Sheets
    • Handlettered DIY
    • Free Brush Lettering Quickstart Guide
Lemon Thistle

Lemon Thistle

Rad DIY, Lettering and Design for Real People

  • Printables
    • For Cricut
    • Party Printables
    • Home Decor Printables
    • Bachelor Bingo
    • Handlettering Practice Sheets
    • All Free Printables
  • Entertain
    • Party Printables
    • Party DIY
    • Tablescapes
    • Kids Parties
  • Blog

A DIY Bathroom Renovation (Phase1.5)

Jul 22

DIY Bathroom Renovation- I love that it breaks it down into stages! I've always wondered if I could renovate in phases. Everything is DIY too, from the tile to the shelf!

We have been slowly picking away at renovations around here and I’ve been sharing a few room reveals when I realized I never did share our bathroom renovation with you guys! I shared it over at Remodelaholic last year, and since we’ve added some shelving, but did I show you? Nope! So it’s more than about time. I’m not only going to show you the progress that we’ve made, but I’m going to chat about renovating in phases and why we chose to go that route.

Let’s start with the super pink before… shall we?

DIY Bathroom Renovation- I love that it breaks it down into stages! I've always wondered if I could renovate in phases. Everything is DIY too, from the tile to the shelf!

DIY Bathroom Renovation- I love that it breaks it down into stages! I've always wondered if I could renovate in phases. Everything is DIY too, from the tile to the shelf!

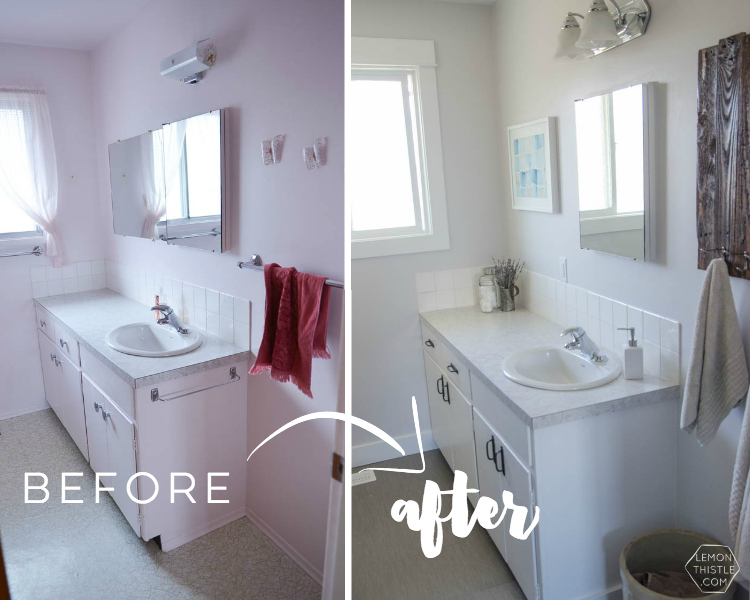
It was in major need of some love. Before we moved in we did a good chunk of this makeover.

Let’s call this Phase 1:

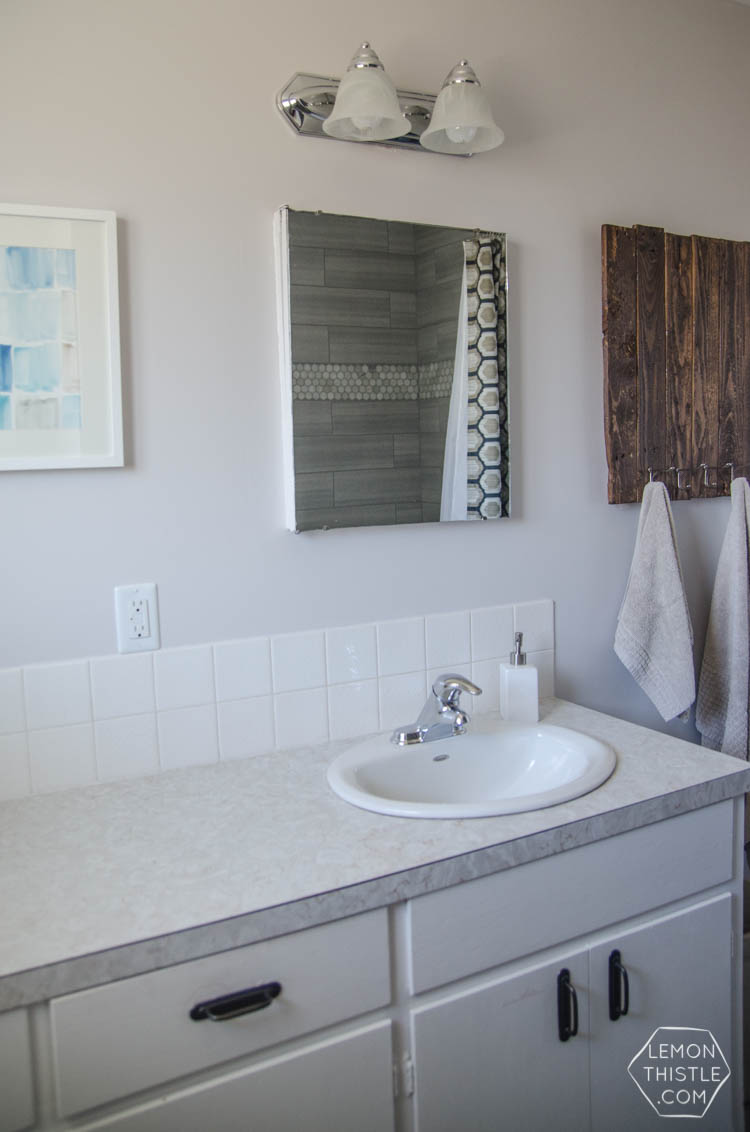
  • Painted EVERYTHING to get rid of that bubblegum pink (walls, ceiling, vanity)
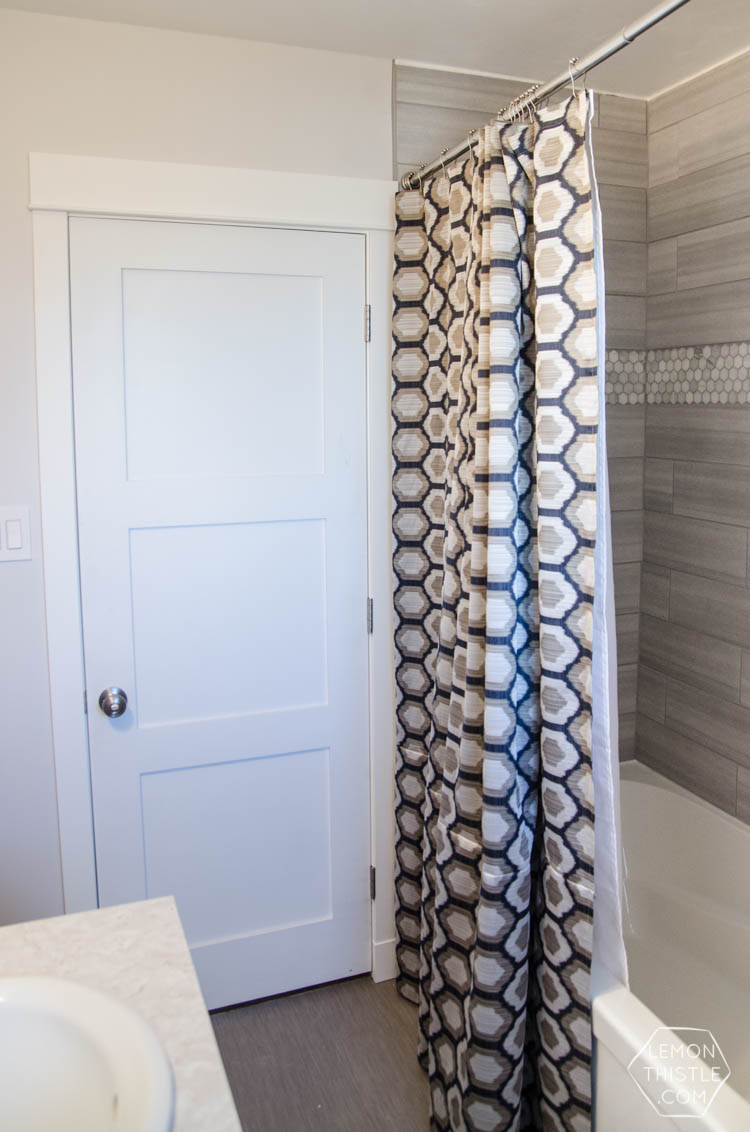
  • New shaker door and textured window (along with all the other doors and windows in the house)
  • New farmhouse trim and baseboards (along with all in the house)
  • New toilet seat (it was broken)
  • Added a fan for humidity and proper outlets
  • Temporary light fixture (we already have the new one picked out but are holding off, but this one was functional and free thanks to my Dad’s bathroom renovation)
  • New hardware for the vanity

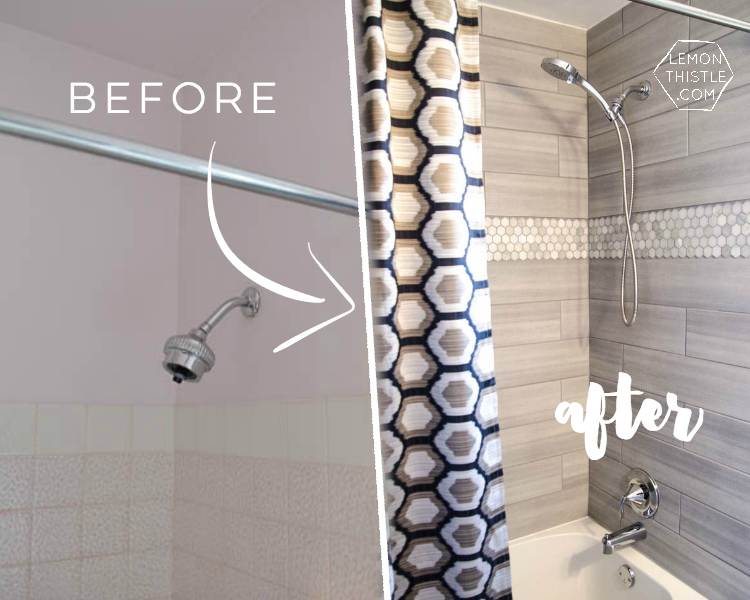
But then we moved in. And started using the bathtub. And it leaked, friends. Not just little leaks, but BIG awful leaks. We would have plumbers in to fix it- then another leak would start. This went on for months (and about 5 fixes) until we were out of options. It was leaking into our basement suite, our wall was rotting from all the water, the tile surround was cracked and we couldn’t figure out where the leaks were coming from. We had to reconsider our waiting.

I should mention that we only have one bathroom in our house (other than our suite), so not using the tub wasn’t an option. But we really couldn’t afford to do the whole bathroom the way we wanted to. We could either do it all at a lower price point (read: nothing special) just to get it done, or we could do the parts we HAD to do to fix the problem, and do another phase of renovations a year or two down the road. Obviously we chose to go in phases. I am really happy with our decision, but I know that phases aren’t for everyone.

DIY Bathroom Renovation- I love that it breaks it down into stages! I've always wondered if I could renovate in phases. Everything is DIY too, from the tile to the shelf!

DIY Bathroom Renovation- I love that it breaks it down into stages! I've always wondered if I could renovate in phases. Everything is DIY too, from the tile to the shelf!

DIY Bathroom Renovation- I love that it breaks it down into stages! I've always wondered if I could renovate in phases. Everything is DIY too, from the tile to the shelf!

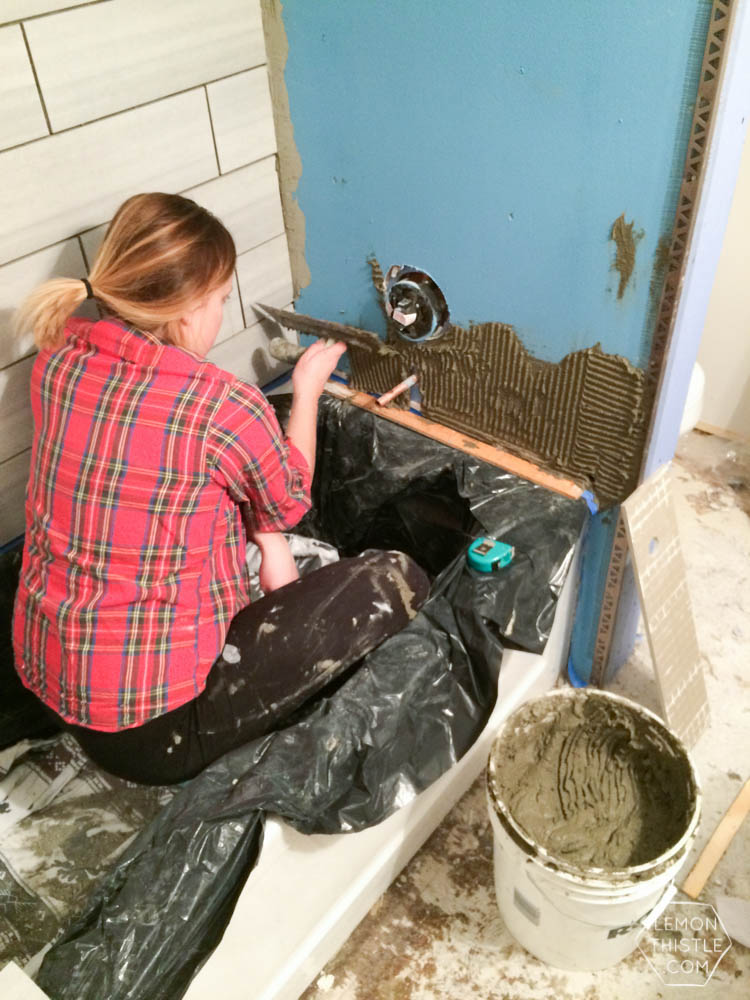
So Phase 1.5! We tore out the bathtub and the flooring, all the damaged drywall, and all the plumbing we could reach before we did anything.

Here’s what we did at this point:

  • New plumbing, tub, surrounding drywall, tile surround, and trim (faucet/ shower)
  • New shower curtain and rod (A DIY, you can find right here. It’s extra-tall and wonderful)
  • Temporary vinyl flooring
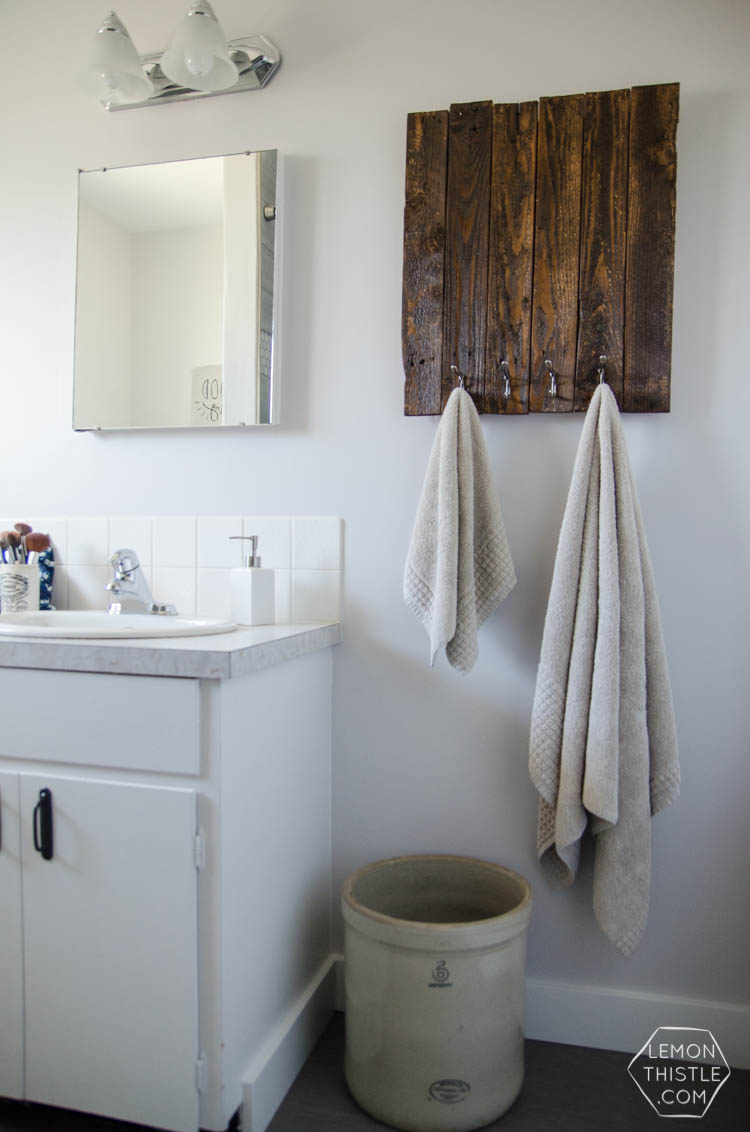
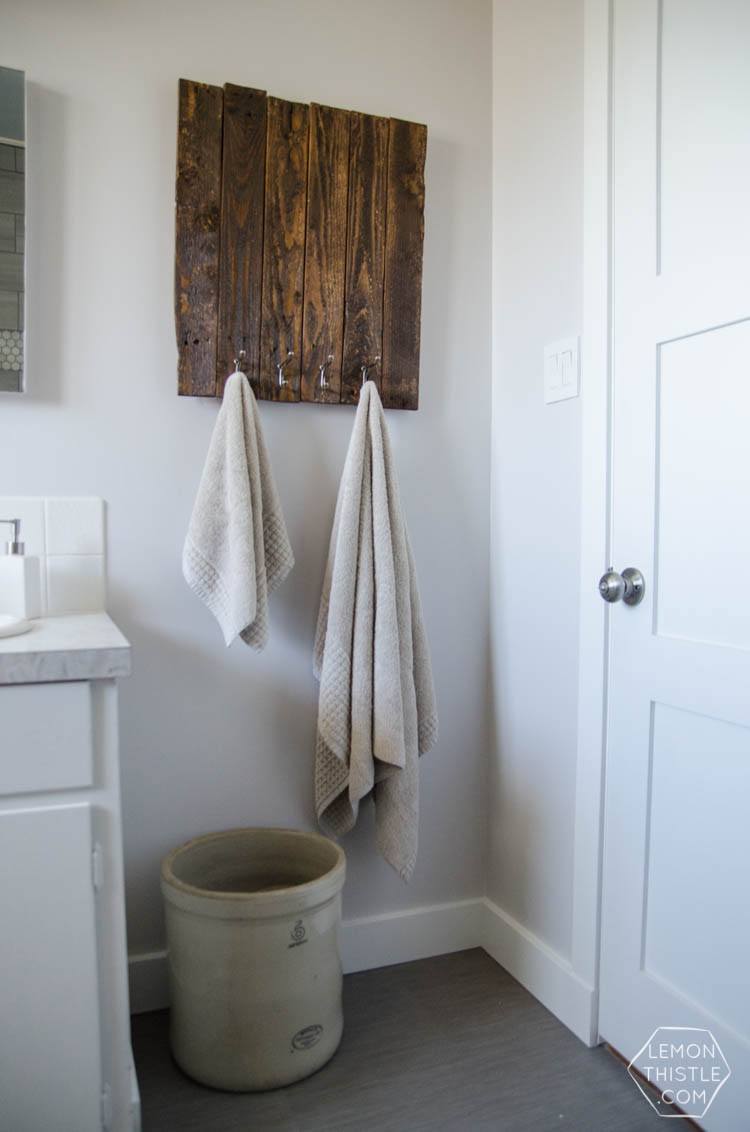
  • New Towel Rack (I made this one out of pallet wood! You can check out the DIY here)
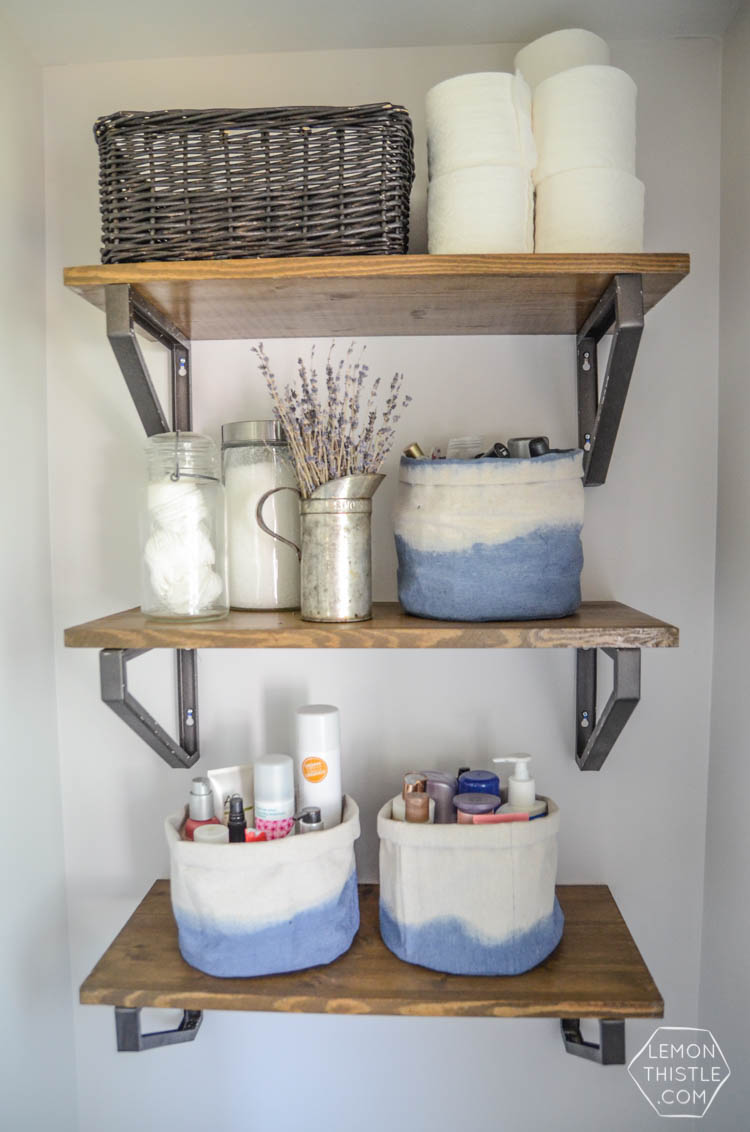
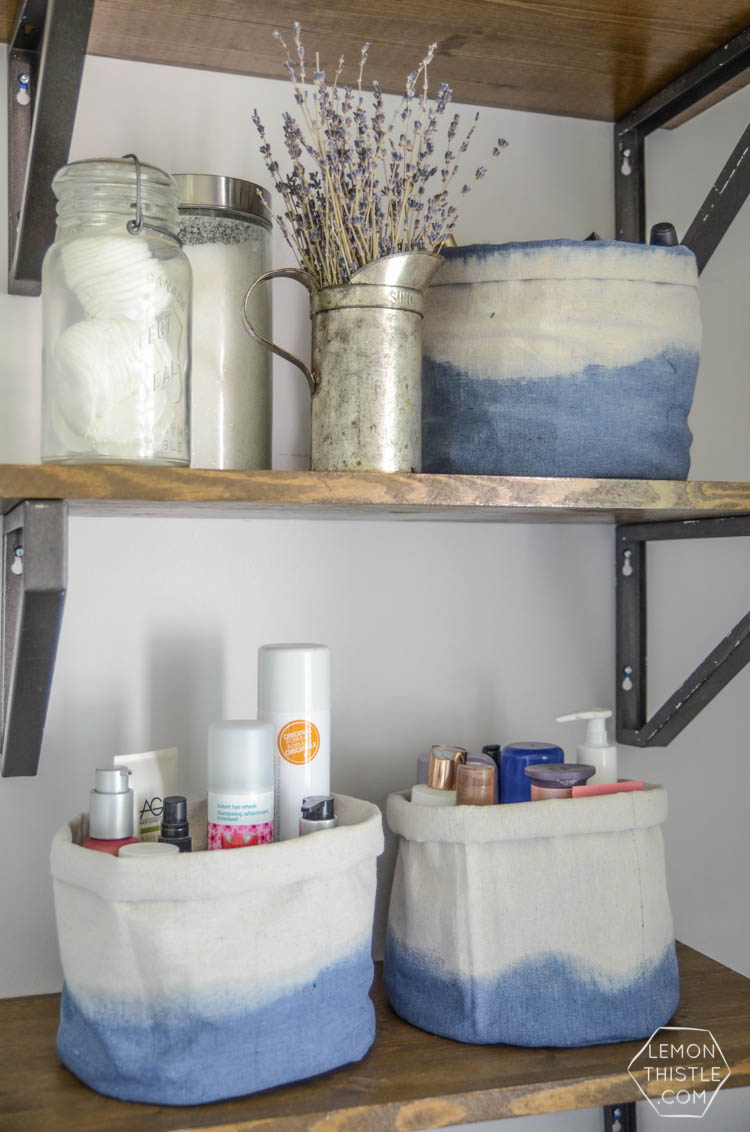
  • DIY open shelving and storage baskets above toilet (find that right here)

DIY Bathroom Renovation- I love that it breaks it down into stages! I've always wondered if I could renovate in phases. Everything is DIY too, from the tile to the shelf!

DIY Bathroom Renovation- I love that it breaks it down into stages! I've always wondered if I could renovate in phases. Everything is DIY too, from the tile to the shelf!

DIY Bathroom Renovation- I love that it breaks it down into stages! I've always wondered if I could renovate in phases. Everything is DIY too, from the tile to the shelf!

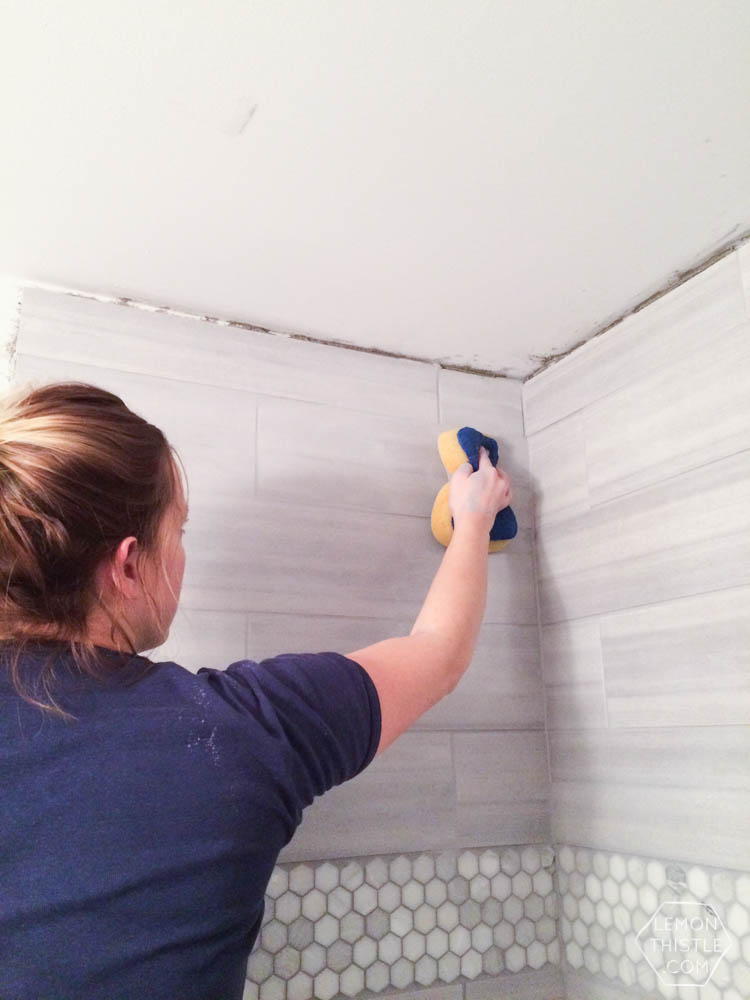
We chose to use the flooring that we had leftover from our kitchen (we had been saving it to do our bathroom floor) on the shower walls to save some cash and avoid buying new stuff. While we paid a plumber to make sure plumbing was done right, I tried my hand at tiling (I had already done the shower in the basement suite and it turned out well).

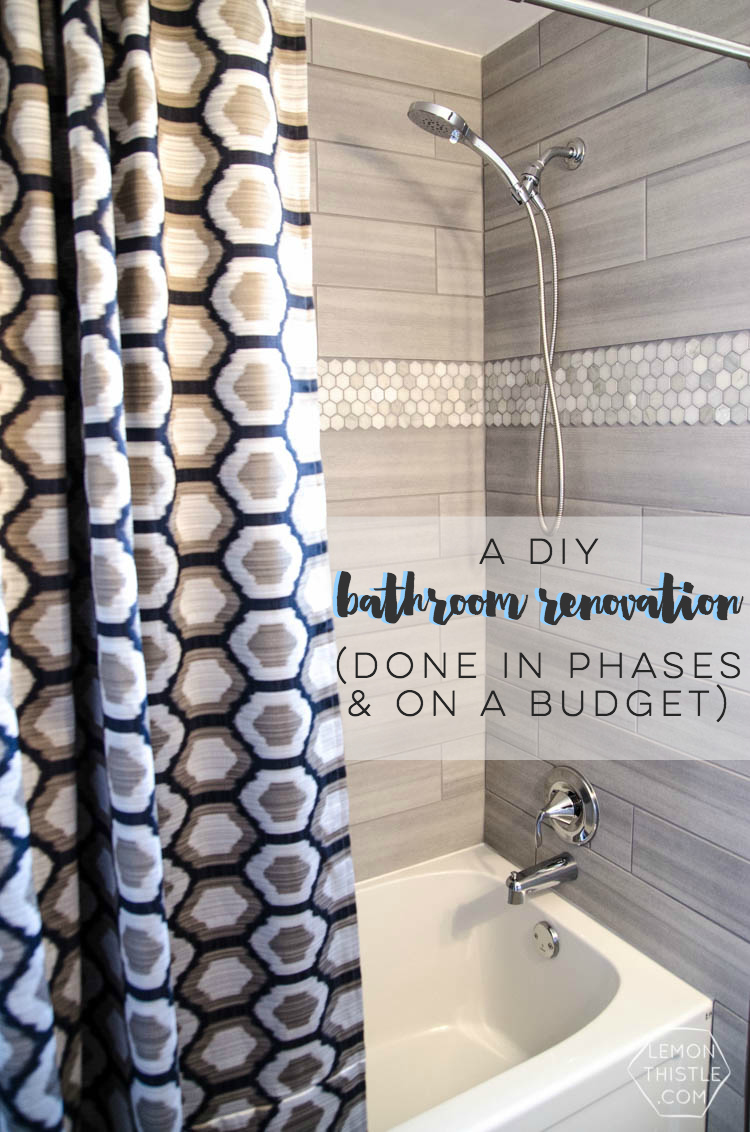
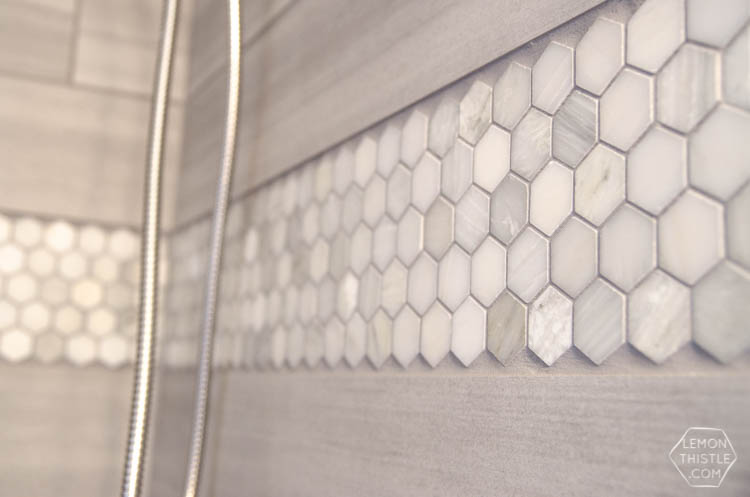
We were short a tiny bit of tile, so decided to use the leftover backsplash from the kitchen (hex) and buy a couple more sheets to make an accent strip around the shower at eye level. Leftovers for the win, I LOVE the way the accent strip turned out. The main tile is called San Marco Viva Linen and pretty much every tile store around here carried it at the time. The hex is straight from The Home Depot. The faucets are Moen (Eva and Iso-we love their lifetime warranty given the leaky things we started with).

DIY Bathroom Renovation- I love that it breaks it down into stages! I've always wondered if I could renovate in phases. Everything is DIY too, from the tile to the shelf!

DIY Bathroom Renovation- I love that it breaks it down into stages! I've always wondered if I could renovate in phases. Everything is DIY too, from the tile to the shelf!

DIY Bathroom Renovation- I love that it breaks it down into stages! I've always wondered if I could renovate in phases. Everything is DIY too, from the tile to the shelf!

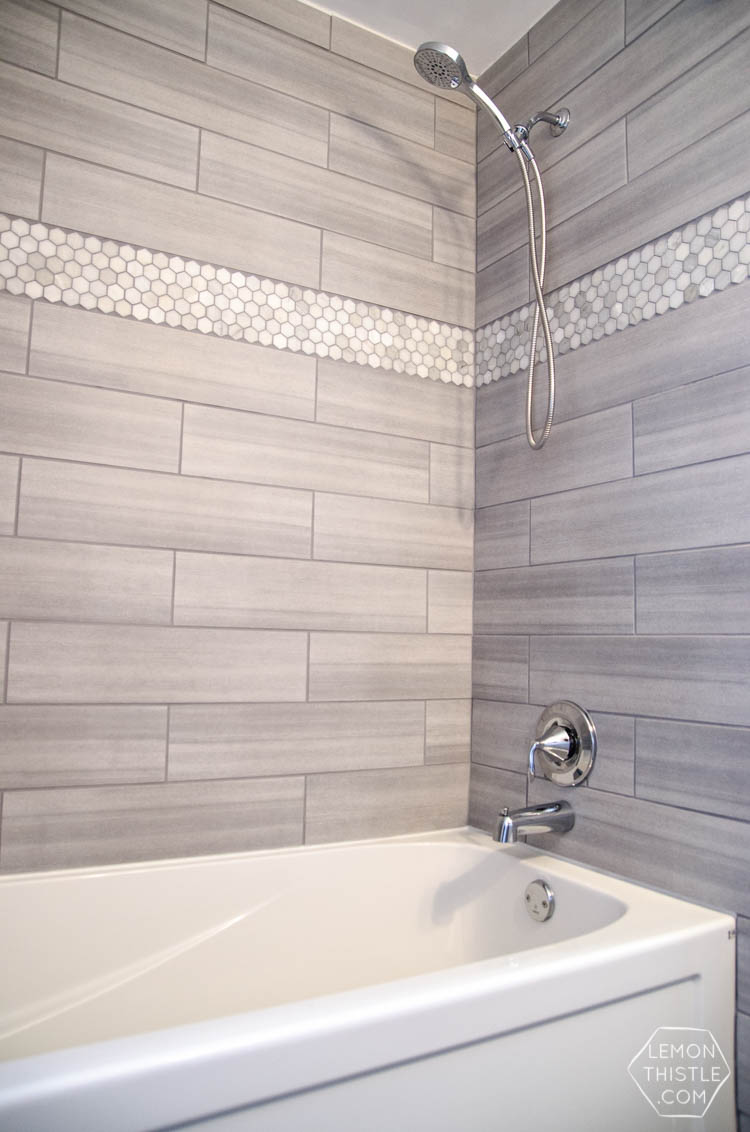
One of the things that drove us completely crazy with our old shower is that the shower head was SO low. Both my hubby and I are fairly tall, so having to bend down to wash our hair was a pain. We put our shower head higher than average (such a good decision!) and tiled right to our ceiling (to avoid hiring a drywall finisher).

We love the way this looks, but a standard height bar and shower curtain looked silly with the change. I couldn’t find a longer shower curtain anywhere, so I decided to make one. I love the way it turned out- the look of the longer curtain pulls the whole bathroom together. Plus- I wasn’t limited in patterns, I could pick from any fabric because we use a shower curtain liner inside the tub. I shared the whole DIY tutorial for that baby RIGHT HERE.

DIY Bathroom Renovation- I love that it breaks it down into stages! I've always wondered if I could renovate in phases. Everything is DIY too, from the tile to the shelf!

DIY Bathroom Renovation- I love that it breaks it down into stages! I've always wondered if I could renovate in phases. Everything is DIY too, from the tile to the shelf!

The flooring is also leftovers- we had a swack of leftover vinyl interlocking tile from the basement and sold most of it, but luckily not until after we saved some to do the bathroom floor. We plan to do tile when we finish the renovation. Since this tile doesn’t glue down, we can pull it up to tile and put it in storage in case we have to replace a piece or two from the basement.

Let me be clear- we didn’t NEED to re-do the floors. We could have peeled back the old lino enough to see if the subfloor was damaged too much because of the leaks (it didn’t end up being). BUT it was cracked like crazy (which made it hard to clean) and with twin toddlers (18 months when we did this) rolling around, I wasn’t crazy about that. If you were choosing to renovate in stages and didn’t have free floors kickin’ around, this might not be your best option.

But, why didn’t you just tile the floor now? We want to put in a new toilet and vanity down the road (Phase 2!) and without knowing the exact sizes and placements? Total waste of time right now.

Here’s what we have planned for Phase 2:

  • A new vanity! We’re planning a DIY one and in my mind- it’s rad
  • New mirror (that means removing this built in medicine cabinet and patching the drywall (ugh)
  • New lighting
  • New toilet
  • New flooring (hello tile!)
  • Built in storage behind the toilet (this is a dream, I’m not sure if it’s going to happen)

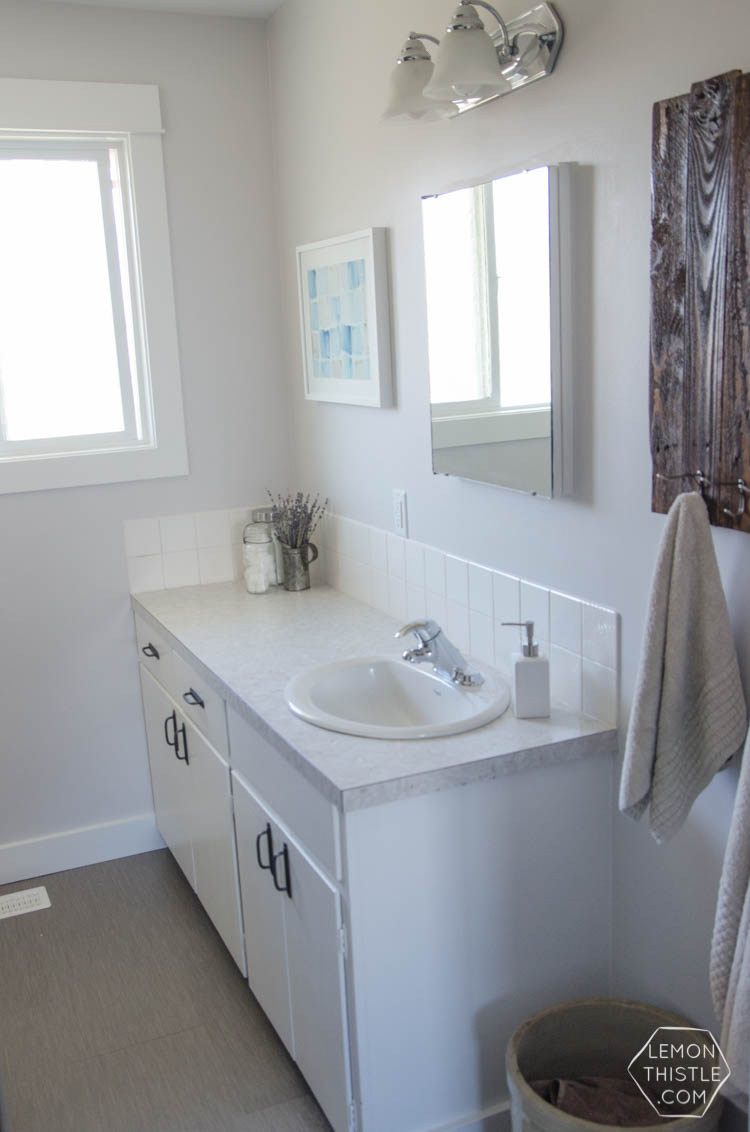
Having a bathroom that I’m no longer ashamed of made me want to decorate it a little bit. To pull the room together, I created a super-quick watercolour painting. I used a piece of poster board I had (the frame is bigger than standard watercolour paper), and painted squares of watercolour- almost like pixels or paint swatches. It’s honestly so simple, anyone could pull it off! Lastly, we’re all about functionality- so we have a vintage Medalta for our hamper, and an old tin bucket for our trash can (I love that thing!).

DIY Bathroom Renovation- I love that it breaks it down into stages! I've always wondered if I could renovate in phases. Everything is DIY too, from the tile to the shelf!

DIY Bathroom Renovation- I love that it breaks it down into stages! I've always wondered if I could renovate in phases. Everything is DIY too, from the tile to the shelf!

So this is what it looks like right now! I am really happy with it as-is, to be honest. It’s leaps and bounds (I love that saying) above what we used to have. Even still, I can’t wait for Phase 2! I’m so sick of cleaning this vanity. But it’s been put off until next year, because as any homeowner knows… things come up that are of higher priority than a pretty vanity.

I no longer hate using our bathroom- and waiting a year or more to finish it doesn’t stress me out now. We were able to complete this phase (even with the surprise bathtub) without running up our credit cards, and we aren’t sacrificing the things we love (like a tile floor) for the sake of budget and time constraints. We still have a ways to go though.

Oh! And another benefit of renovating in phases? We were only displaced about a week since all of our efforts was focused on that tub. Flooring went down (no grout, mind you) while we were using the bathroom again.

DIY Bathroom Renovation- I love that it breaks it down into stages! I've always wondered if I could renovate in phases. Everything is DIY too, from the tile to the shelf!

So tell me… would you ever renovate in phases? I’d love to hear your thoughts! And if this post inspires a project of you’re own, I would LOVE to see it! Share to my Facebook page, or tag me on Instagram @colleenpastoor.

Category: Home DecorTag: Bathroom, DIY Home Decor, Marble, Our Home, Renovation, Tips and Tricks
Facebook0Tweet0Pin0LinkedIn0
Previous Post: « I LOVE this DIY giant canvas backdrop for a party... or a nursery. The hand lettering and floral garland is gorgeous! Plus, such great tips to paint thin lines on fabric. A Giant DIY Wallhanging (the best way to letter on fabric!)
Next Post: Brush Lettering for Beginners: 3 Tips »

Reader Interactions

Comments

  1. Kristi

    Jul 22 at 7:38 am

    That tile is incredible!!! Great job friend! Looking forward to phase 2!

    Reply
    • Colleen Pastoor

      Jul 22 at 4:44 pm

      Thanks so much Kristi! I really am too (it can’t come soon enough!)

      Reply
    • Jessica

      Mar 11 at 3:37 pm

      What is the name of the hex tile you bought from home depot?

      Reply
      • Sarah

        Mar 17 at 8:00 am

        We’re not sure! It was leftover from a kitchen that Colleen did 5+ years ago, when I checked the link from that post it was no longer available on the Home Depot website – sorry!

        Reply
  2. Courtney

    Jul 22 at 7:51 am

    This is gorgeous Colleen! Your shower tile work is what bathroom dreams are made of!

    Reply
    • Colleen Pastoor

      Jul 22 at 4:44 pm

      Thank you so much Courtney! I so appreciate that :)

      Reply
  3. Roberta

    Aug 19 at 7:35 pm

    Great bathroom redo! I am sharing this on Pinterest.

    Reply
    • Colleen Pastoor

      Aug 19 at 8:43 pm

      Thanks so much Roberta!

      Reply
  4. Cate

    Dec 31 at 10:49 am

    Hello,

    Love the grey tile with the hex pattern accent. What colour did you paint the walls?

    Reply
    • Colleen Pastoor

      Jan 07 at 2:27 pm

      Thanks so much Cate! It’s actually a custom color from Beautitone BUT the closest match I’ve found (almost identical!) is from Para Paints called Dreaming in the Clouds :)

      Reply
  5. Erika

    Jan 03 at 8:20 pm

    Where did you get the grey tile? I love it!

    Reply
    • Colleen Pastoor

      Jan 07 at 2:29 pm

      Thanks so much Erika! I got it from a local tile store, they had it at several at the time. I’ve heard it’s near impossible to get in the US though!

      Reply
  6. Keri

    Feb 28 at 6:47 pm

    I love the bath remodel. May I ask what bathtub you have ?

    Reply
    • Colleen Pastoor

      Mar 02 at 6:30 am

      Hi Keri, It’s just a builder basic from our local plumbing supply store!

      Reply
  7. Tracey

    Mar 09 at 7:25 am

    Loving your renos. How much was your budget for the bathroom? If you don’t mind me asking.

    Reply
    • Colleen Pastoor

      Mar 13 at 6:18 pm

      Thanks so much Tracey! For this portion of the bathroom, we’d used leftover flooring (but it’s $2 a SF) and had all the tile leftover from our kitchen as well (we’d bought extra). I’d say to do the floor and tub (we left the rest) it cost about 1000

      Reply
  8. Sherrie

    Aug 06 at 6:59 am

    What type of tile is on the wall? It looks like wood grain ceramic tile..

    Reply
    • Colleen Pastoor

      Aug 17 at 8:14 am

      Hi Sherrie, it’s called San Marco Viva in Linen :) It’s not actually a wood grain just linear

      Reply
  9. Shannon

    Apr 17 at 8:04 am

    Hi Colleen,

    How did you adhere the mosaic tile? Love the look of it but unsure of how to have it look so clean with the hexagon edges?

    Reply
    • Colleen Pastoor

      Feb 27 at 4:43 pm

      The tiles are grouted in! Standard mortar and grout :) Clean edges are from a good wet saw!

      Reply
  10. Cheryl

    Jul 20 at 9:25 pm

    Do you use just regular floor glue to attach the flooring to the wall??

    Reply
    • Colleen Pastoor

      Jul 26 at 9:42 am

      The tile on the wall is traditional tile, attached with mortar. Just the flooring is vinyl.

      Reply
  11. Denise Tremmel

    Sep 19 at 7:18 pm

    Can I ask what color grout you used? We have the same hex tile in our kitchen, and have not grouted it for over 2 years because we cannot decide on a color. Your’s looks great!

    Reply
    • Colleen Pastoor

      Sep 22 at 9:01 pm

      Absolutely! Grout is such a tough one! It’s called Delorian Gray and we love how it worked with those tiles. We actually used it on the whole floor when we finished this bathroom (https://www.lemonthistle.com/a-modern-bathroom-makeover-one-room-challenge-reveal/) and in our kitchen with the same tiles (https://www.lemonthistle.com/adding-personality-to-an-all-white-kitchen/).

      Reply
  12. Miriam Hernandez

    Jun 26 at 11:13 am

    Can you tell me what kind of door and floor trim did you use? In the middle of renovation (on a budget) a new purchase.

    Reply
    • Colleen Pastoor

      Jul 12 at 12:24 am

      Of course! We have shaker doors throughout then just flat trim. We called everywhere in town to get the pricing and ended up with trim from Windsor Plywood and doors from Dan’s Doors (if you’re local). You can ask about B grade doors too- that’s what we used in this house to save cost and they were totally awesome.

      Reply
  13. Martina

    Oct 18 at 11:10 am

    It definitely takes a lot a phases to finish a bathroom right?! I know the feeling. Great job on this space friend!

    Reply

Leave a Reply Cancel reply

Your email address will not be published. Required fields are marked *

Sidebar

WOOHOO!

Check your email to confirm!

(+ get your freebies + discounts)


Thanks for dropping by!
I’m Colleen: wife; mom to 4 wild ones; and DIY blogger behind Lemon Thistle. You can expect to see rad DIY, modern home decor, renovations, hand lettering and the occasional party on Lemon Thistle. Read More…

email facebook youtube instagram pinterest

Unless otherwise noted, all content and images are mine. Full posts may not be shared without express written consent. But I love when you share! Feel free to share, without altering, one image with proper credit and a link to the original post. All free printables are for personal use only.

Everyone loves proper credit- if you ever notice something improperly credited, please please shoot me an email and I’ll fix it lightning fast.

Find all my policies right here.
This includes my privacy policy, info on the GDRP compliance and information on affiliate links (Including Amazon Affiliates).

Visit Colleen Pastoor’s profile on Pinterest.

colleenpastoor

My house is never this clean
-
DIY + Home Decor Blogger
Mama of 4 👶🏼🧒🏼👦🏼👧🏼
Renovating our 🏠 the DIY way
🖤 Lettering & ☕️
-
✉️[email protected]

colleen pastoor/lemon thistle
What’s next on your project list? Spring is teas What’s next on your project list? Spring is teasing us so we’re starting on outdoor projects around here!
$100 play room makeover is DONE! This room has se $100 play room makeover is DONE! 
This room has seen so much change over the past year (swipe over to see it 2 weeks ago, 10 months ago and 1 year ago!). I took this last week to make over this space with mostly pieces we already had and I’m so so happy with the results! It’s a good reminder that some hard work, creativity and of course paint can work magic.
I’m sharing all the details (and that under stairs space!) on YouTube today (link in my stories!) and so is my friend @thediymommy (she made over her daughters bedroom for $100!).
Do you think dried grasses are only for fall decor Do you think dried grasses are only for fall decor? I used to think so, but these bunny tail grasses are too cute to put in a bin until next year. Plus the name sounds like spring decor to me ;) What do you think?

Ps. Today’s going to be a full day of playroom progress! I’ll share as much as I can in stories as I go :)
Paint is honestly magic.✨ I am so excited to sha Paint is honestly magic.✨
I am so excited to share this kitchen makeover with you guys! These are the same cabinets, just painted (countertops too!) And some updated finishes. I blogged the full before and after if you’d like to check it out!
Big thank you to @schaubhardware and @wagnerspraytech for partnering to make this space possible!
Ps. Most of the work done here was by the homeowners so if you’re thinking about taking on a makeover in your own home, maybe this is the encouragement you need 😘
As I’m sitting here staring at the dishes on the As I’m sitting here staring at the dishes on the counter while I try to focus on editing a video, I thought it’s as good of time as any to share this reminder 😘
I feel like I’ve lucked into the best job out th I feel like I’ve lucked into the best job out there, but then I’m also so aware of the amount of work it took to get here. Today I chatted with two of my blog friends in an Instagram live about DIY blogging as a job and answered some questions we get asked all the time about our work and the balance of it all! I saved it as an IGTV so you can watch it if you missed 🥰

Big thanks to @love_create_celebrate and @thediymommy for chatting with me today! One of the biggest perks of this job is all the talented ladies I’ve had the privilege of meeting and calling friends- these two are top of that list!
I’m having some fun in stories with a little giv I’m having some fun in stories with a little giveaway guessing game. I’d love if you played along!

I put up a question box and you can guess my next room makeover and the guesses are all over the place. Some are projects on my dream list, some are rooms I wish to even have in my house and some are spaces we’ve already tackled! Like our main bathroom ✨ these photos are from my spring home tour I shared over on the blog earlier this week. Hung up a pennant and called it decked for spring 🐣
Who is ready for spring?! I know we totally are- w Who is ready for spring?!
I know we totally are- we’ve been soaking up outside time this week with the kids home on spring break but over on the blog... it’s spring home tour time! I am sharing my home all ready for spring along with some amazing bloggers as part of the #seasonalsimplicity spring series!
You know I love a touch of DIY decor in every spac You know I love a touch of DIY decor in every space in my home, so I’m so excited to be partnering with @HGTVCanada to celebrate #$aveMyReno being back TONIGHT! #partner
 
My favourite thing about $ave My Reno is that they encourage home owners to get involved and DIY to maximize budget. They even help kids get involved- it’s everything Shane and I work towards in our own projects. You can catch it every Tuesday at 9/9:30PM EP on @HGTVCanada or catch up on episodes on STACKTV through @primevideoca!
 
PS. I made those tie dye pillows, similar to the ones featured in tonight’s episode! You can catch my stories to see the super speedy how-to :)
Load More... Follow on Instagram

Copyright © 2021 · Lemon Thistle · All Rights Reserved · Powered by Mai Theme