• Skip to main content
  • Skip to header left navigation
  • Skip to header right navigation
  • Skip to site footer
  • Shop
  • Get The Email
  • Work With Me
  • About
  • Search

  • DIY
    • DIY Home Decor
    • With Power Tools
    • Renovation
    • For Kids
    • For Parties
    • Wearable
    • Organization
    • Cricut Crafts
  • Home Decor
    • Room Reveals
    • Kid Friendly
    • DIY Home Decor
    • Renovation
  • Lettering
    • Hand Lettered Printables
    • Free Practice Sheets
    • Handlettered DIY
    • Free Brush Lettering Quickstart Guide
    • Learn Brush Lettering E-Course SALE
Lemon Thistle

Lemon Thistle

Rad DIY, Lettering and Design for Real People

  • Printables
    • For Cricut
    • Party Printables
    • Home Decor Printables
    • Bachelor Bingos
    • Free Monthly Wallpapers
    • Handlettering Practice Sheets
    • All Free Printables
  • Entertain
    • Party Printables
    • Party DIY
    • Tablescapes
    • Dinner Party
    • Kids Parties
    • Party Eats
    • Baby Showers
    • Wedding + Showers
  • Blog

Design Tutorial- Make Your Own Favour Tags

Jul 18

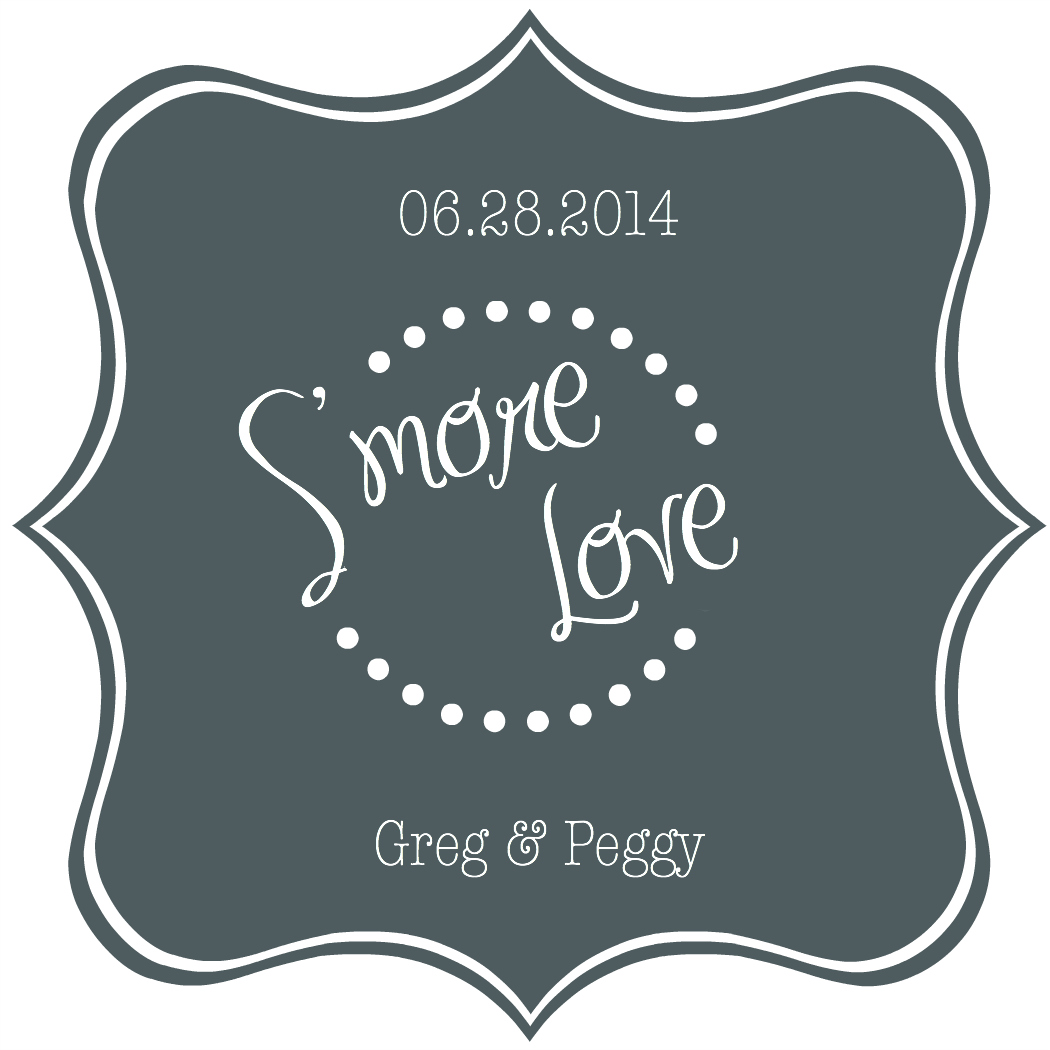
Last week when I told you about how I do hay bale seating on a budget, I promised you I’d show you how to make these S’more Love tags. I’ve been putting it off in hopes that I’d get some photos from the wedding to show you how beautiful they looked in action, but we’re not having luck in the ‘photography getting done quickly’ department.

Design your own favour tags! (Using no expensive programs!) -lemonthistle.com

This design tutorial really can be used to make anything design-y (technical term) without dropping a cent on fancy programs. I do use the Adobe programs for more complicated things and for my photo editing, but this time I used all online free software and so that’s what I’m sharing today. I also made some game cards for the shower I’m hosting this weekend using the same resources (inspiration here) and I’ll be sharing those as a freebie later this month. What I’m getting at is there’s free programs to do pretty much anything. I will warn you that this post got a bit wordy on me- but it really is simple to do. I made our wedding invites using Gimp long before I could afford Photoshop (it’s basically a free shareware photoshop). But Gimp is pretty time consuming to figure out, so when I discovered PicMonkey I was hooked. Most of the graphics and photo overlays I use on this site are done with PicMonkey. It’s is ridiculously user friendly, so I promise you can figure it out (if you haven’t already). To make a tag like this, we’re going to be using the ‘Design’ function that PicMonkey offers.

Before you start making anything pretty, you need to decide how big you want your tag to be printed. I decided I wanted to fit two wide and three high on a regular sheet of paper. I took those measurements in inches (accounting for space in between to make cutting easier) and punched them into this handy online calculator which tells you how many pixels you’ll need to make your image. It’s not a pretty tool- but it gets the job done. If you are going to print your tags, make sure you choose the 300DPI option from the drop down- this means it wont be grainy when you print it. You can go ahead and make your canvas that size.

Make your own favour tags! Easy tutorial using free online programs - lemonthistle.com

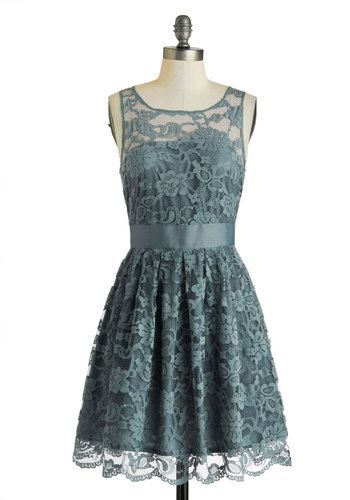
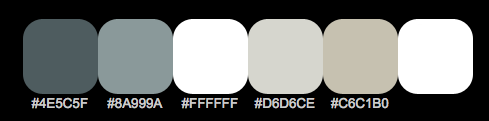
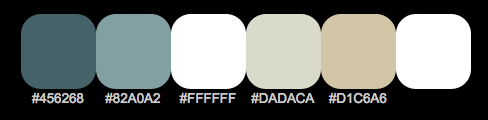
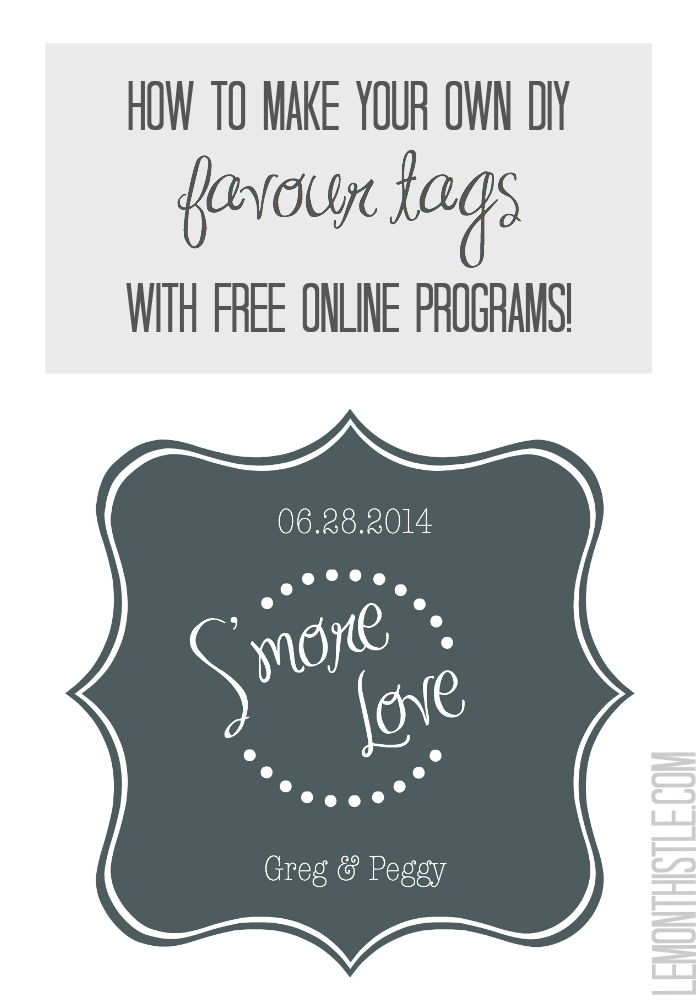
The vision for this tag was to add more of the smoke colour to the tablescapes- that were predominately white and burlap colored. That meant the main color needed to be smoke, not white. I did about four drafts that got sent back because they weren’t the ‘right’ colour of smoke. I asked for an inspiration photo and was sent their bridesmaid dress photo (from ModCloth). Here’s this super sneaky way to make sure you get the right color… a color selector tool! I took the photo and put it into this Color Hunter website and it spits out two colour pallets. One muted and one deeper. I sent both over and had my the client choose the colour they wanted. Everyone was happy- I didn’t have to keep guessing what they had in mind, and they knew that these colours came directly from the inspiration they had given. Once you’ve chosen your color- you can use that exact color in PicMonkey by using the color code (hex) that’s below the colours. We used the more muted dark colour.

Can I tell you why this was so important to me to get the right colour and stop the back and forth? You can’t save ‘in progress’ designs in Pic Monkey. Once you save it, you can’t go and change a colour. So each time the colour was changed, I had to re-make the tag from scratch.

Design your own DIY favour tags- no pricy programs required! - lemonthistle.com

Design your own DIY favour tags- no pricy programs required! - lemonthistle.com

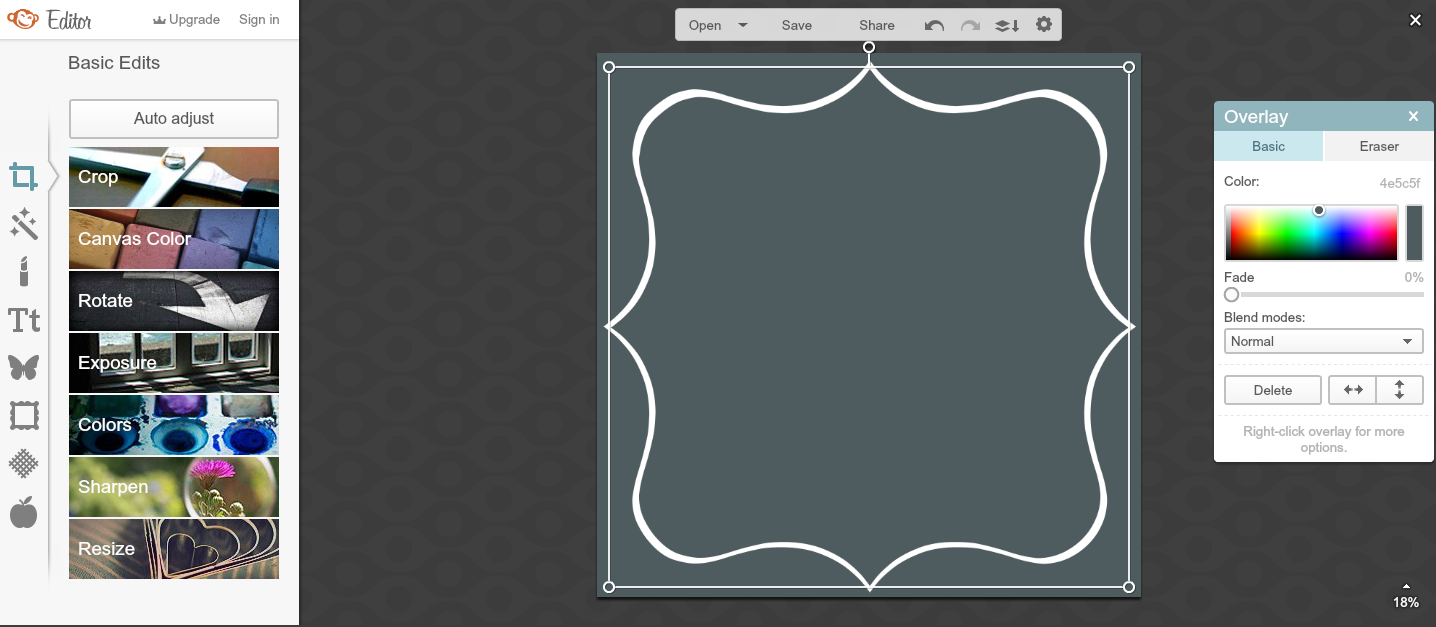
Okay, so we know the size- and the colour, it’s time to start designing! The first element was the label type outline. This was requested- and I knew PicMonkey has a bunch of free options like this. After making the background my smoke colour, I chose this label overlay and made it white (white is always ffffff on the hex codes). The overlays are found under the butterfly tab on the left. Then I duplicated that overlay (right click to find that option) and made it that same smoke colour. I made it a bit smaller and centered it, essentially making the white shape an outline. I’m not sure why, but I haven’t been able to figure out how to make just a shape outline in PicMonkey- so this is a bit of a cheat.

Design your own DIY favour tags- no pricy programs required! - lemonthistle.com

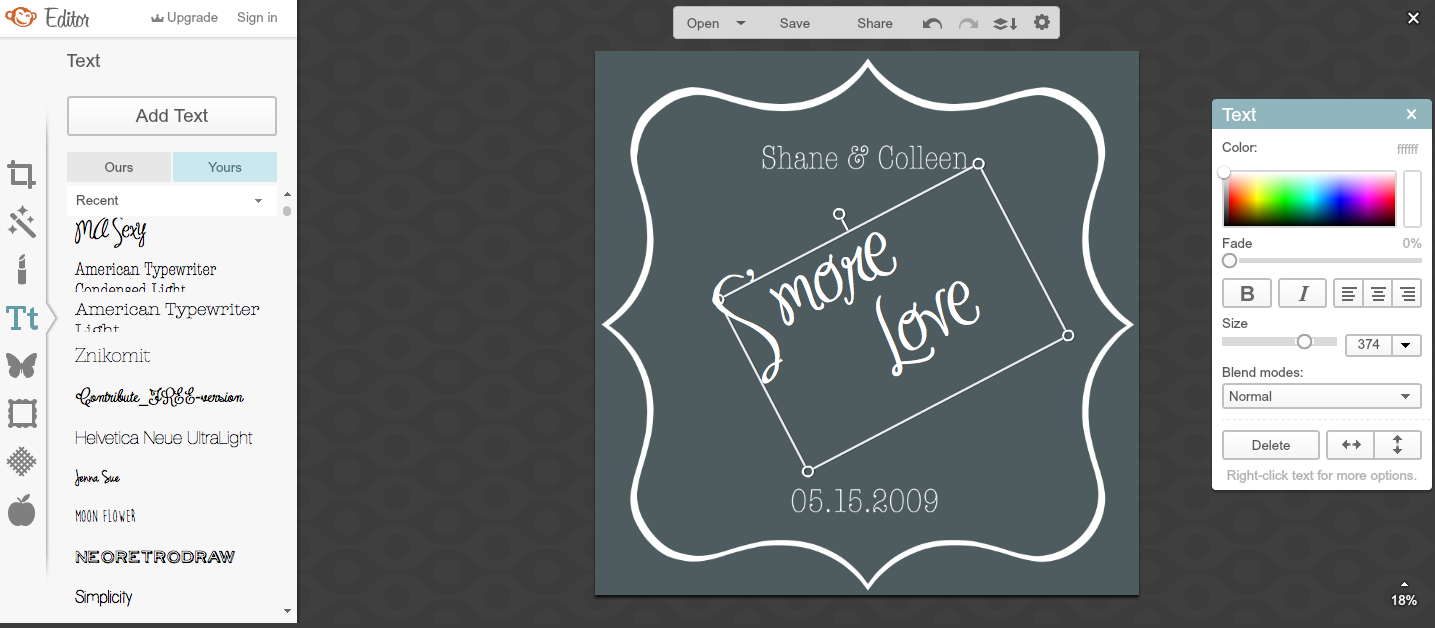
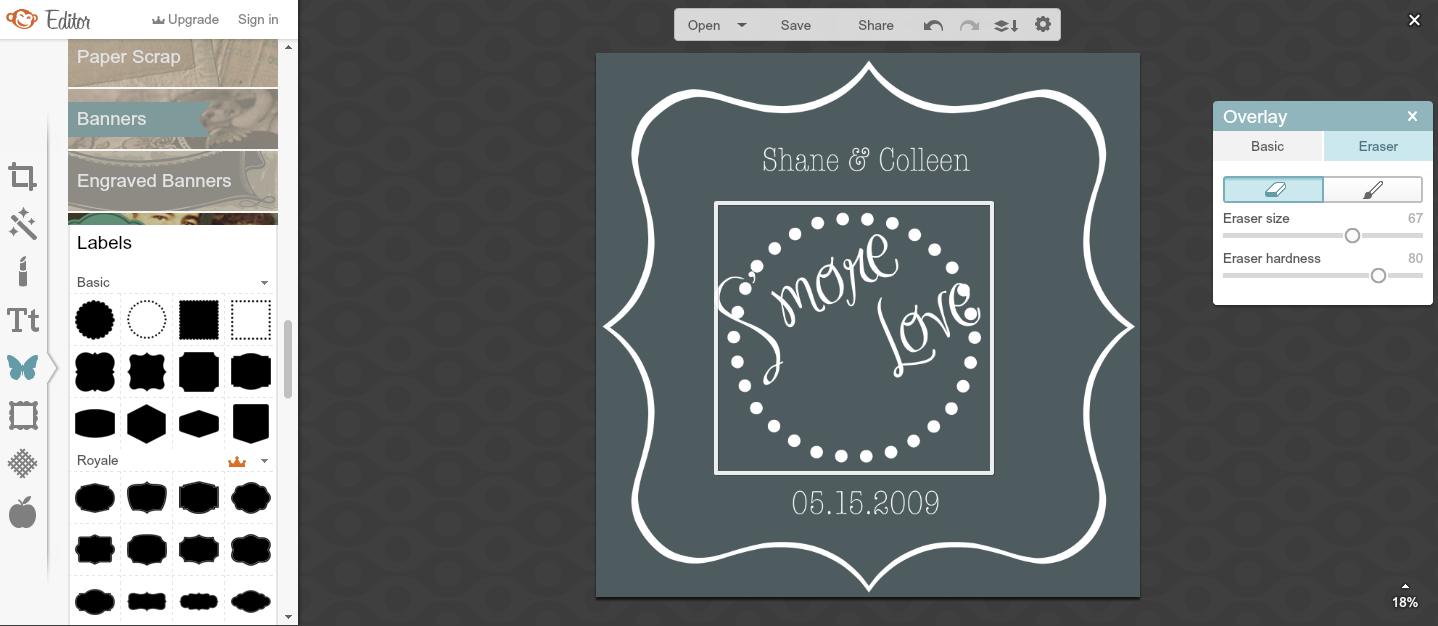
Next, I played with fonts. PicMonkey now lets you use any font you have installed on your computer- YAY! So you can go to a site like DaFont (my go-to) and download your favourite font for your project and use that… all for free. The fonts I chose for this project are American Typewriter Condensed Light and Ma Sexy. The dots around the S’more Love is actually another free overlay from PicMonkey. I used a dotted circle and positioned it how I’d like. The circle went through my text, so I used the eraser tool (while the overlay is selected) and erased the dots I didn’t want there.

Design your own DIY favour tags- no pricy programs required! - lemonthistle.com

Design your own DIY favour tags- no pricy programs required! - lemonthistle.com

Once you’re happy with it and are done all your tweaking, you can save that (make sure you save it as big as you can- Sean size if you’re using PicMonkey) and look at making it into a one page document. I went back to my handy inches to pixels calculator and input a standard sheet of paper (8.5×11 inches) to find my pixel size. Then, I created a new blank canvas in PicMonkey with those dimensions.

Design your own DIY favour tags- no pricy programs required! - lemonthistle.com

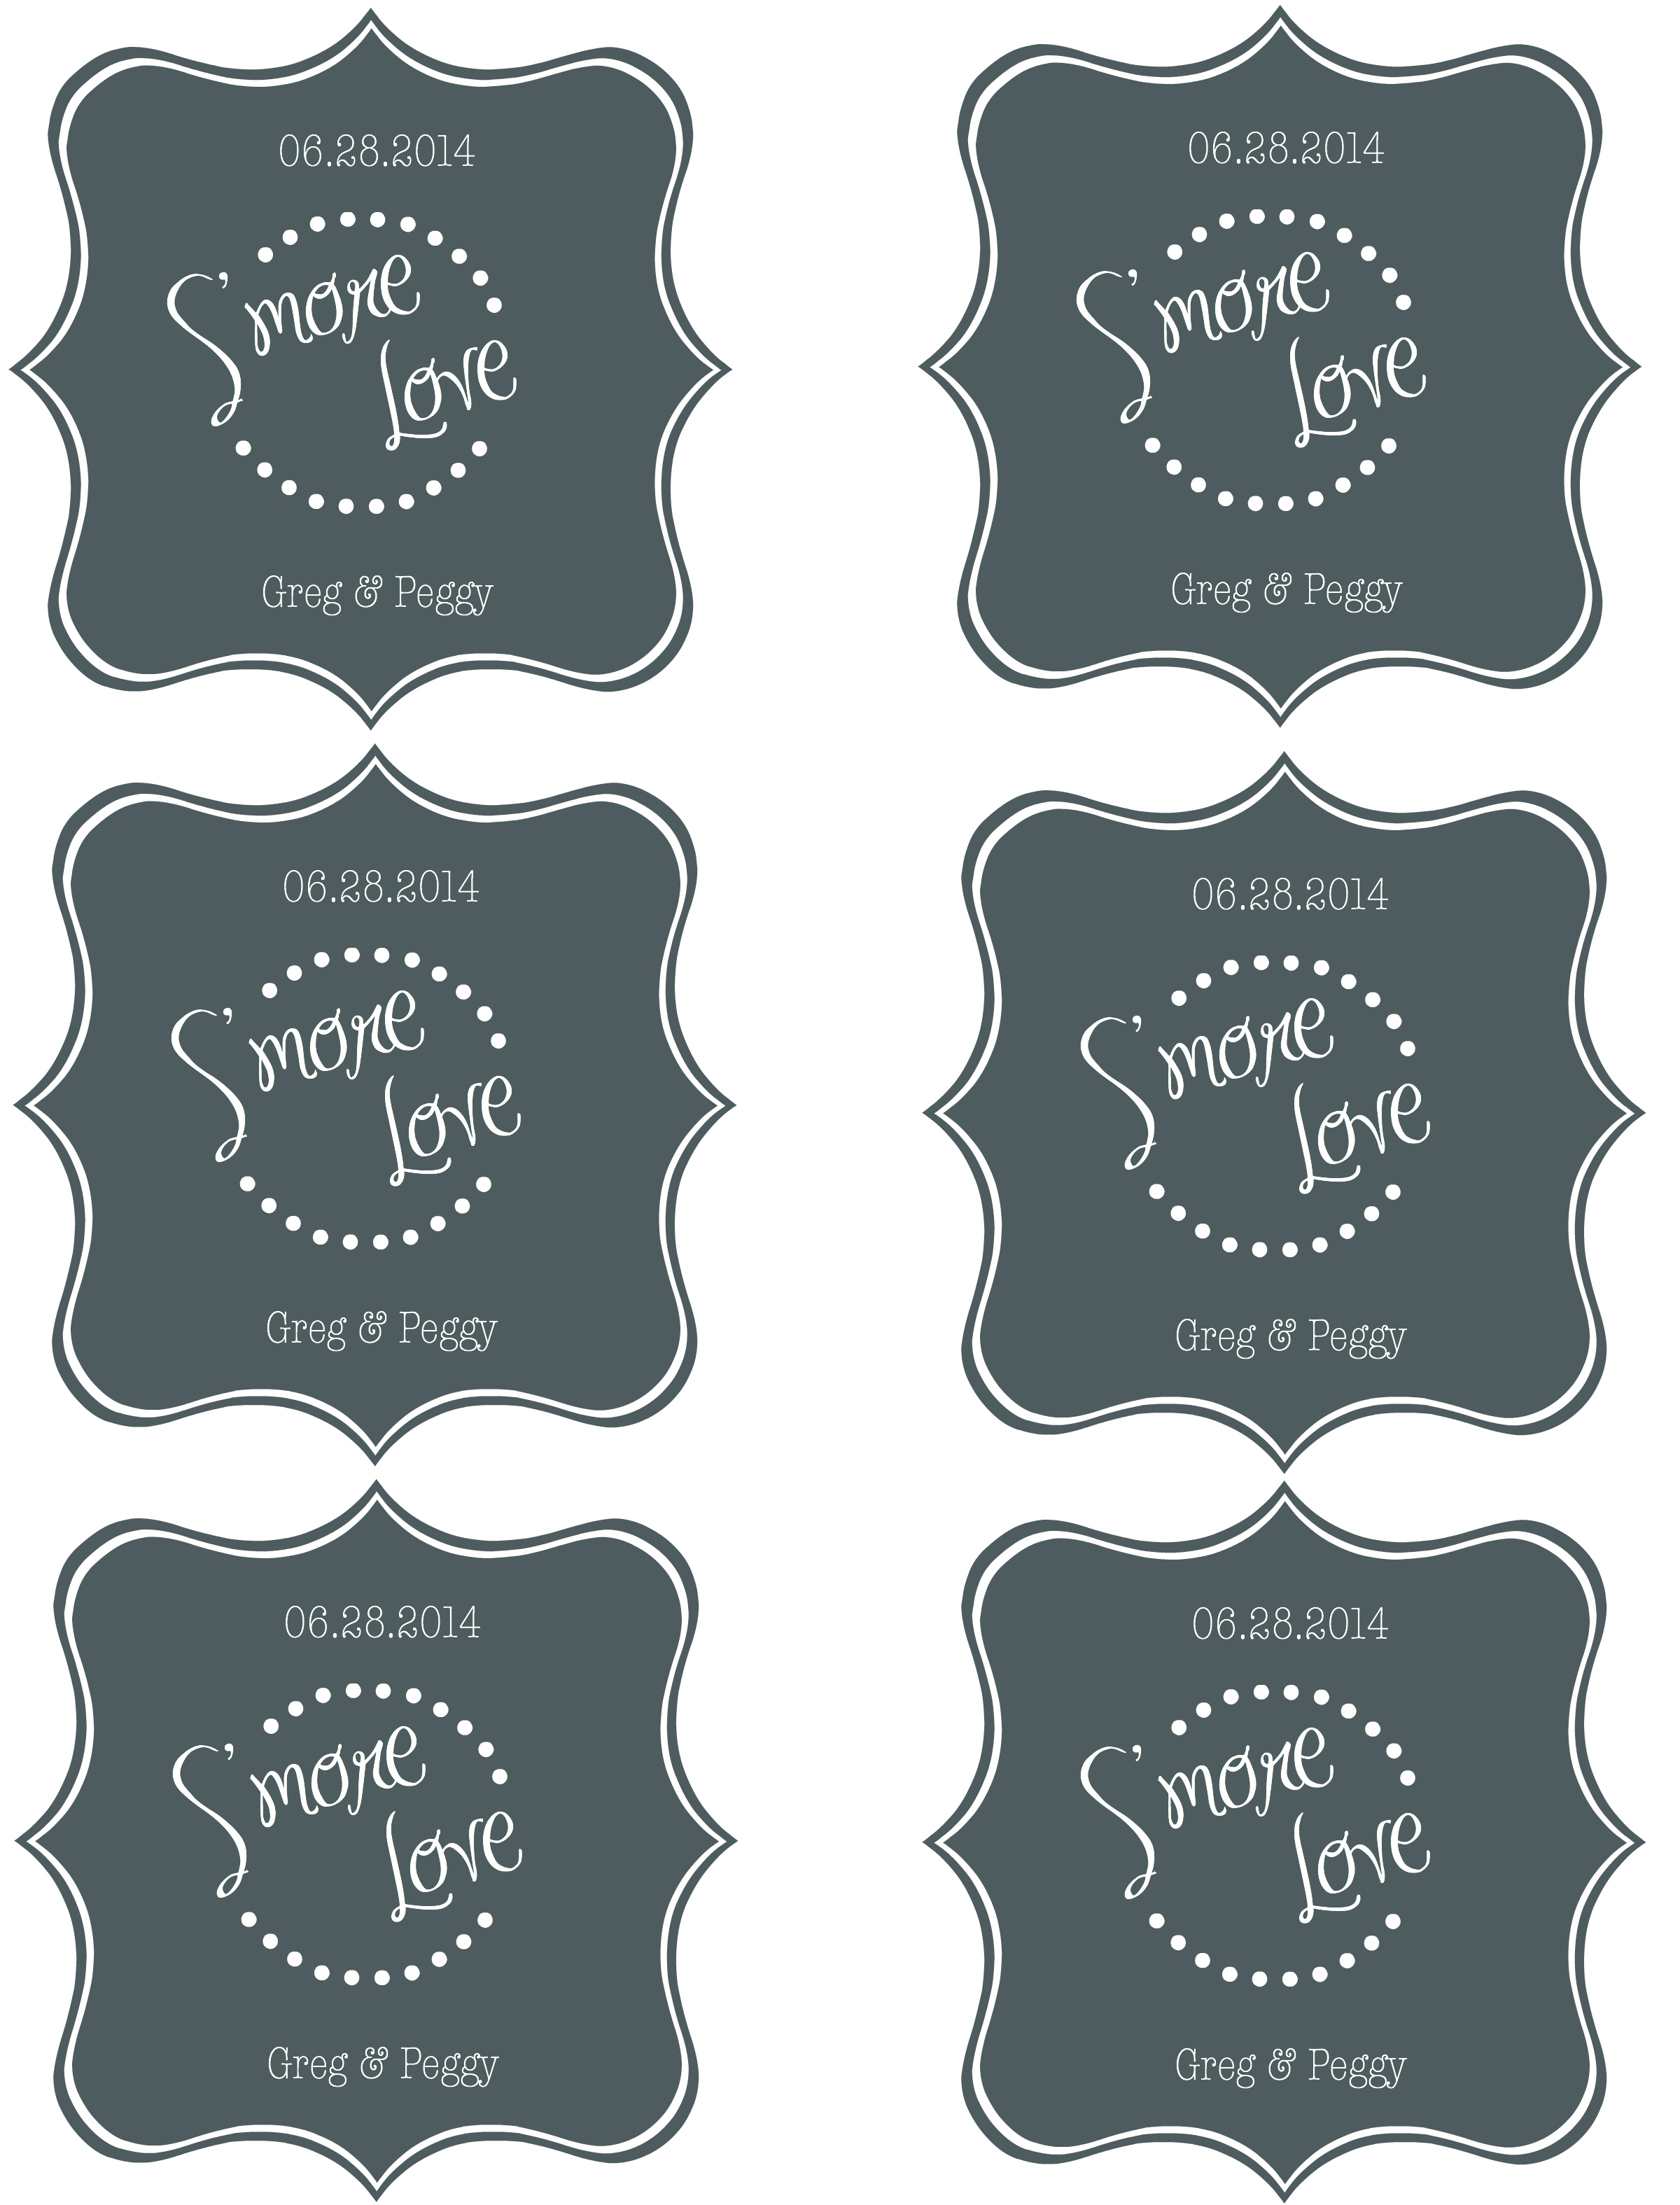
Adding the label you’ve made is easy! You go to the overlay tab again and at the top choose ‘Your Own’ and select the image. It will show up really small. Right click and choose ‘original size’ and it will be the size you had intended it to be. Now you can start arranging the labels on the page (duplicating by right clicking and selecting ‘duplicate overlay’). So easy, right?

Save that, and then open your image in your computer’s ‘preview’ program. Go up to the File drop down menu, and choose Save As- then change the file type to PDF. I find PDF is the best for printing on regular old paper at a Staples- it’s how I do everything for parties since its so cost effective. If your computer wont let you do this (I know some wont), there’s another handy tool out there for you to do this online here. There’s a video instruction on the site so I won’t go through it.

Once that’s done- I upload it to Staples and it’s done in an hour (HURRAY!). I know this is a bit wordy- but all the steps really are simple, especially once you play a bit.

How to make your own Favour Tags using free online programs! - lemonthistle.com

Again, I’m not a designer– I did this tag for my sister-in-law… but I do love to play around with design and do all of my own for my blog- so I’m hoping you find this helpful! Let me know if you have any feedback or questions! I’d love to hear from you. Do you do your own design?

Category: DIY, PrintablesTag: Design, Freebie, Party, Party DIY, Party Printables, Printable, Showers, Weddings
Facebook0Tweet0Pin0LinkedIn0
Previous Post: ← Ikea Hack! DIY Open Shelving - lemonthistle.com DIY Open Shelving for our Kitchen!
Next Post: Fiesta! A Super-fun Baby Shower Fiesta! A Super Fun Baby Shower →

Reader Interactions

Comments

  1. Lory at Designthusiasm

    Jul 18 at 9:19 pm

    I’m not familiar with Pic Monkey but I’m hearing about it over and over. I spend most of my day on Illy and Photoshop, so it’s impressive to see such great tags done on a free program. Well done!!

    Reply
    • Colleen Pastoor

      Jul 20 at 5:17 pm

      Wow Lory! I really appreciate the compliment :)

      Reply
  2. Kala

    Jul 19 at 7:10 pm

    Super cute! Ironically enough, I’m actually in the process of installing Gimp right now, before I even started reading this! I heard about it at Haven. I love PicMonkey, I just wish I could add my own fonts so I could use the fonts that are in on my logo throughout my blog, ya know? I’ve heard I can add fonts in Gimp, so hopefully that works out and I don’t spend too much time teaching myself how to navigate it! :)

    Reply
    • Kala

      Jul 19 at 7:18 pm

      And I’m an idiot. I just discovered I can use my own fonts in PicMonkey.

      Reply
      • Kala

        Jul 19 at 7:24 pm

        And I feel double dumb because you mentioned that in your post, that I obviously skimmed. :S

        Reply
    • Colleen Pastoor

      Jul 20 at 5:36 pm

      Ha! all your comments made me smile :) I need to work on using consistent fonts… I change my mind all to often! It’s awesome that pic monkey lets you use your own fonts now though.

      Reply
  3. jennifer prod

    Jul 21 at 8:30 am

    oh gosh, throwback to my picmonkey days! i think i used gimp too- and then on to photoshop! a similar journey, i guess? love the tags, and absolutely adore that dress :)

    Reply
    • Colleen Pastoor

      Jul 21 at 9:58 am

      Haha, I’m on the journey… I have photoshop but I’m not all that efficient!

      Reply
  4. rebecca lopez

    Jul 25 at 12:01 pm

    Great tutorial! Thank you so much for linking this up to The Creative Collection Link Party.

    Reply
    • Colleen Pastoor

      Jul 26 at 3:11 pm

      Thanks Rebecca! Great party as always :)

      Reply
  5. Bre @ Average But Inspired

    Jul 29 at 6:26 am

    Colleen, this is such an AWESOME tutorial!! THANK YOU! I am pinning this and definitely referring back to it. Thanks so much! – Bre @ Average But Inspired

    Reply
    • Colleen Pastoor

      Jul 29 at 2:08 pm

      Thanks for the kind words Bre! I’ve never written a web tutorial like this before so I’m glad you found it helpful :)

      Reply

Leave a Reply Cancel reply

Your email address will not be published. Required fields are marked *

Sidebar

WOOHOO!

Check your email to confirm!

(+ get your freebies + discounts)


Thanks for dropping by!
I’m Colleen: wife; mom to 4 wild ones; and DIY blogger behind Lemon Thistle. You can expect to see rad DIY, modern home decor, renovations, hand lettering and the occasional party on Lemon Thistle. Read More…

email facebook youtube instagram pinterest

Unless otherwise noted, all content and images are mine. Full posts may not be shared without express written consent. But I love when you share! Feel free to share, without altering, one image with proper credit and a link to the original post. All free printables are for personal use only.

Everyone loves proper credit- if you ever notice something improperly credited, please please shoot me an email and I’ll fix it lightning fast.

Find all my policies right here.
This includes my privacy policy, info on the GDRP compliance and information on affiliate links (Including Amazon Affiliates).

Visit Colleen Pastoor’s profile on Pinterest.

colleenpastoor

My house is never this clean
-
DIY + Home Decor Blogger
Mama of 4 👶🏼🧒🏼👦🏼👧🏼
Renovating our 🏠 the DIY way
🖤 Lettering & ☕️
-
✉️[email protected]

colleen pastoor/lemon thistle
The hallway is finally finished and I’m so stink The hallway is finally finished and I’m so stinking happy! 

It’s felt like such a long time coming for such a small space. Since we moved in 2.5 years ago, this space has seen new doors and hardware, new trim, new floors... twice😅, we changed the boob light to a pot light and I hated it and now it’s got the most beautiful flush mount fixture I’m in love with (thanks @mymitzi!). It finally got some fresh paint and now frames on walls and last but not least... After this weekend, the new floors look like they were here all along (no door jamb gaps!) which was the last thing really bugging me since our flood last year. 

All this to say that home takes time and sometimes getting it right might take a couple tries. Also- the spaces we don’t really think about (hallways) can totally help a house feel like home with some love (and family photos 🥰)
ps. I partnered with #mymitzi to create a tiktok for This makeover... are you following me over there yet?! I’d love if you popped over and said hi!
It’s done! It works! And I’m calling it a grea It’s done! It works! And I’m calling it a great use of my afternoon the other day. Did you catch the stories? These projects both cost me under $10 by using pieces I already had in my home (yay for scraps!) and one package of drawer slides).
You can find the full video about these two kitchen organization projects over on YouTube in collaboration with my friend @love_create_celebrate and her #scrapsmademodern challenge! But for now... I’m rejoicing this coffee maker is off my counter for good 🎉
How’s your January going? Full speed or are you How’s your January going? Full speed or are you taking it a bit slow too? 

I’m not going to lie, I’m easing into this new year thing pretty slowly. All my decorations are still up (we always leave them up til Ukrainian Christmas which is later this week) and I I’ve yet to respond to my emails since before Christmas 😅
I’m enjoying the slowness of it all.
Happy Christmas Eve from our fam to yours 🥰 Happy Christmas Eve from our fam to yours 🥰
Yes, I made the paper bag snowflakes too. Have you Yes, I made the paper bag snowflakes too. Have you? 😅
This year has been one of a kind and I know so man This year has been one of a kind and I know so many people who are taking this year as the push they’ve been waiting for to start a side hustle, start an new career altogether or to just get creative about how they’re making money. So today I’m excited to partner with @kregjig to share some rad projects to make and sell this year! 
Like this rolling storage system I made for my office, that rad dollhouse and the gorgeous bath toy storage. All of these projects are things that I’d personally love to buy for our family and look like they’d be a great return on your time making them! And yes, all of them use #Kreg tools to make them easy to assemble and quick to make! Plus, they’re having a great sale on right now with deals on their K4 and K5 jigs, Rip-Cut and even a hardware jig bundle! There’s never been a better time to get your workshop set up!  #sponsored
Just a peaceful moment and then a real life moment Just a peaceful moment and then a real life moment for ya 🙃 
My #holidayhometour is on the blog and YouTube (I’ll put links in my stories) as part of the #seasonalsimplicity holiday home tour series. I’ll share those too so you don’t miss any!
My holiday home tour will be up tomorrow, but for My holiday home tour will be up tomorrow, but for tonight... I’m just enjoying the lights. And possibly a hallmark movie with some more custom order lettering 😅 what are your plans?
#christmasdecor #christmastree #holidaylights
We finished decorating yesterday and I’m just si We finished decorating yesterday and I’m just sitting here enjoying every minute of it 🤩 have you decorated yet?
Ps... talking more about hand lettering in my stories tonight!
Load More... Follow on Instagram

Copyright © 2021 · Lemon Thistle · All Rights Reserved · Powered by Mai Theme