• Skip to main content
  • Skip to header left navigation
  • Skip to header right navigation
  • Skip to site footer
  • Shop
  • Get The Email
  • Work With Me
  • About
  • Search

  • DIY
    • DIY Home Decor
    • With Power Tools
    • Renovation
    • For Kids
    • For Parties
    • Wearable
    • Organization
    • Cricut Crafts
  • Home Decor
    • Room Reveals
    • Kid Friendly
    • DIY Home Decor
    • Renovation
  • Lettering
    • Hand Lettered Printables
    • Free Practice Sheets
    • Handlettered DIY
    • Free Brush Lettering Quickstart Guide
    • Learn Brush Lettering E-Course SALE
Lemon Thistle

Lemon Thistle

Rad DIY, Lettering and Design for Real People

  • Printables
    • For Cricut
    • Party Printables
    • Home Decor Printables
    • Bachelor Bingos
    • Free Monthly Wallpapers
    • Handlettering Practice Sheets
    • All Free Printables
  • Entertain
    • Party Printables
    • Party DIY
    • Tablescapes
    • Dinner Party
    • Kids Parties
    • Party Eats
    • Baby Showers
    • Wedding + Showers
  • Blog

Bold + Modern DIY Botanical Mural

Dec 21

DIY Botanical Mural - a simple version with a timelapse video of the process. Good tips for a beginner too!

A mural?! Why yes, a mural! Do you ever see something online when you’re reading blogs or watching some of your favourite home decor shows and think that it’s perfect for a space in your home? That you want to try it for yourself or that if you make this change and this change it would be totally do-able? That is how my mind works all. the. time. And that’s exactly what happened when I was browsing the Bravo TV Home + Design section of their website earlier this month.

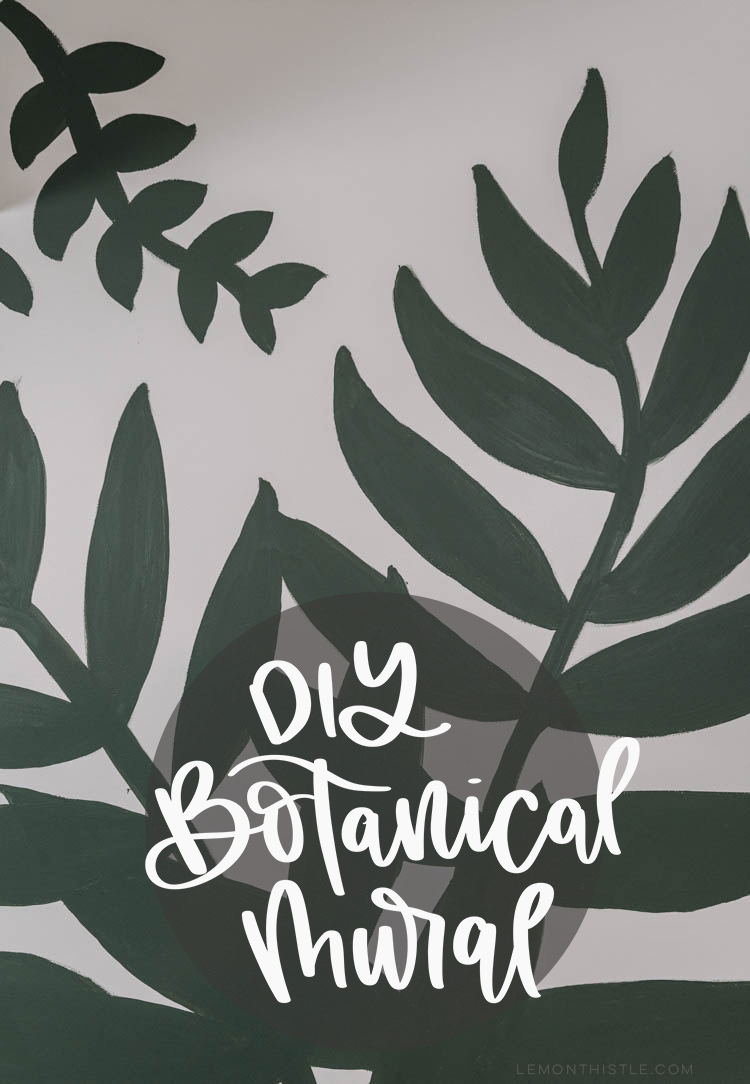
The very last picture of the (stunning!) home tour for Chelsea Meissner that they shared was the most beautiful giant palm frond botanical mural. Spoiler alert… it looks nothing like this. It looks 1000x better. But was also done by a professional artist and I knew I’d never be able to recreate it. So I brainstormed.

Sweet DIY leaves mural for a reading nook- love the boho vibes! Timelapse of mural in post.

Today I’m excited to partner with Bravo TV (sponsored) to share this rad DIY video with you! It was 100% inspired by their amazing Home + Design content (and I’m also totally inspired by this piece on hanging chairs and have added one to my wishlist this Christmas!).

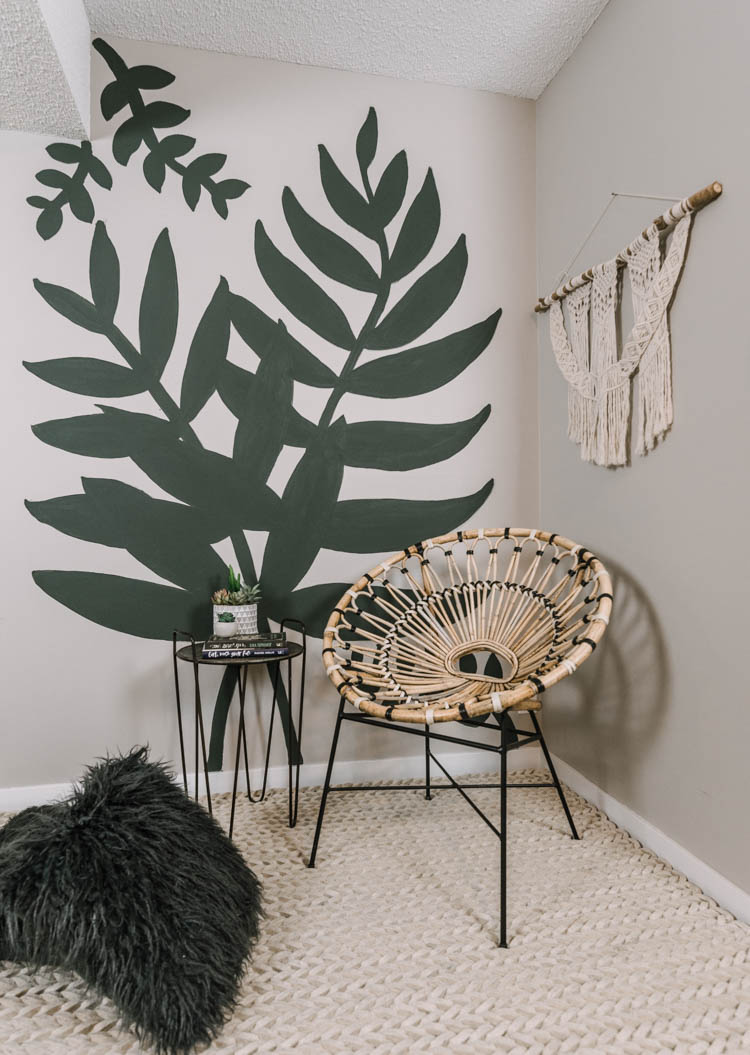
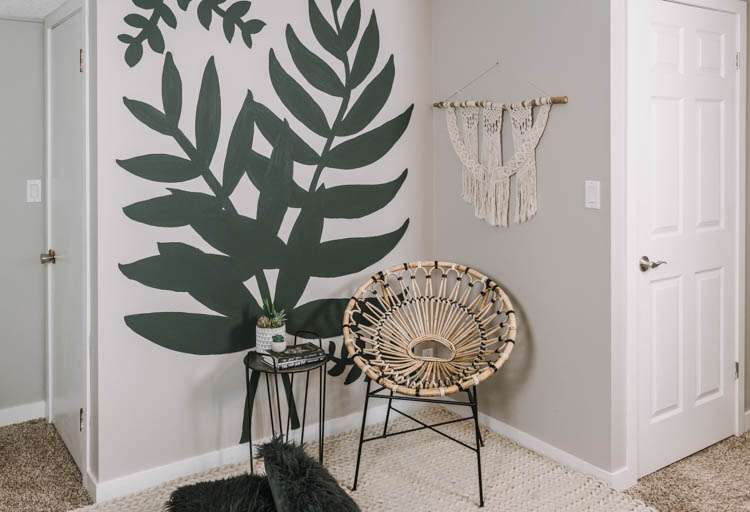
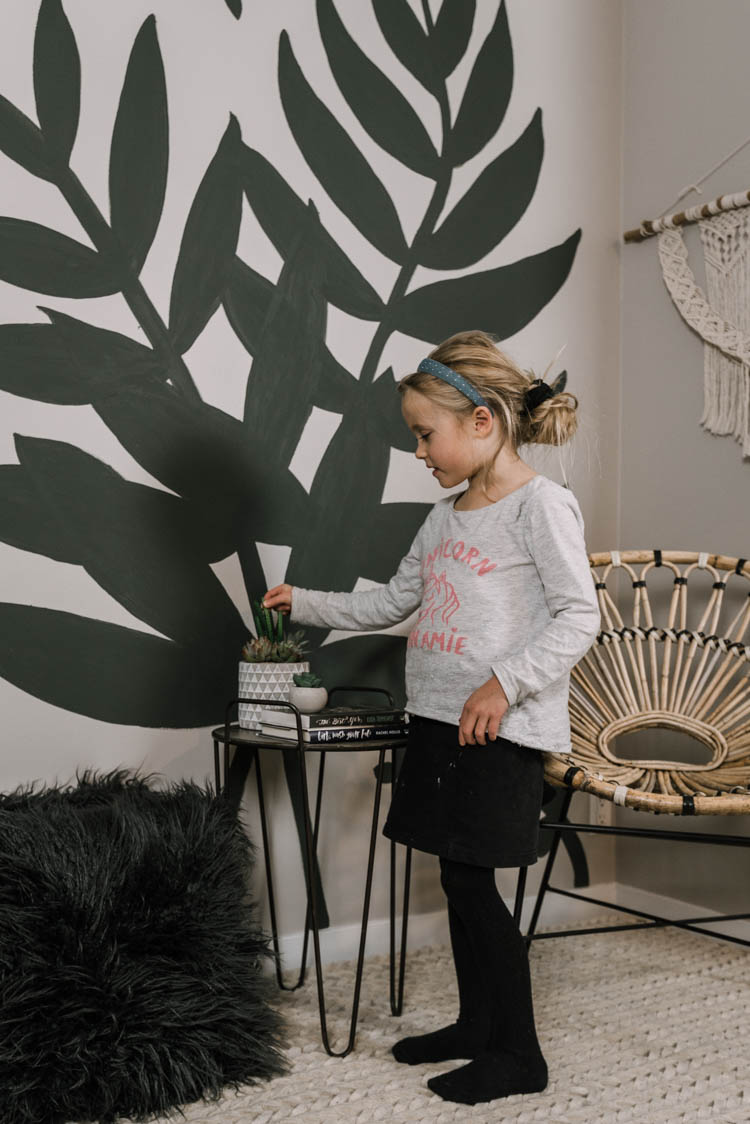
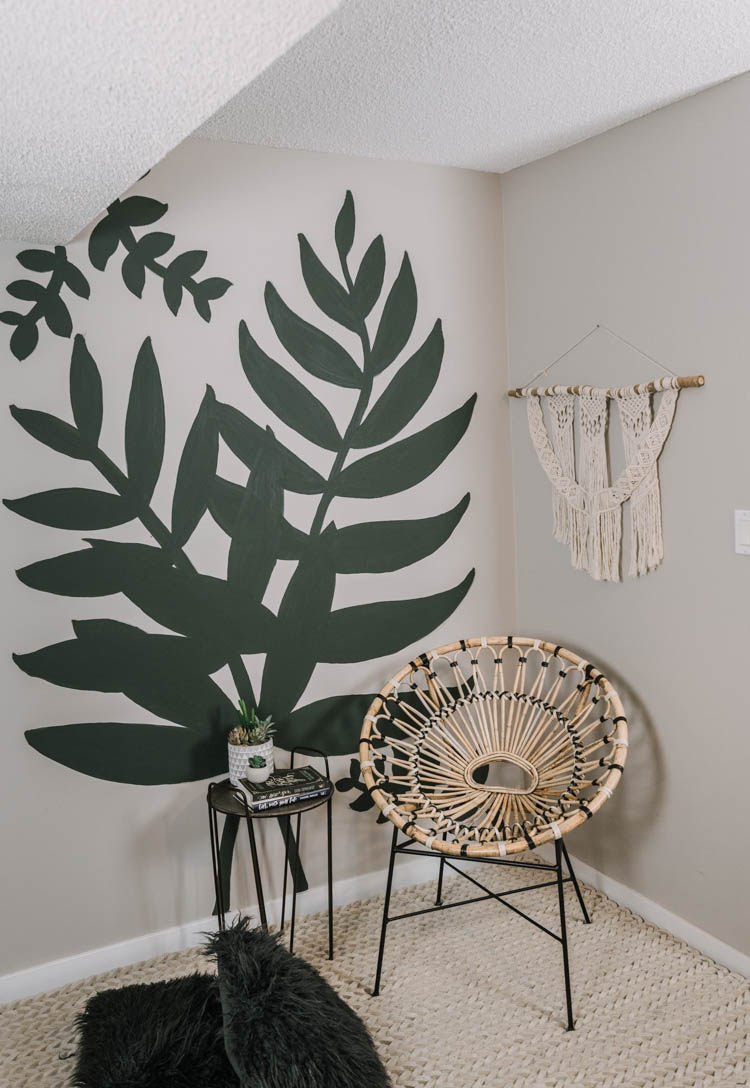
This bold botanical mural is perfect for our space. This is a dark neglected corner in our kids playroom. We’d had a shelf here to pile toys that never get used and it had no personality (you can see all the before photos from this space in our new home tour!). Now, it’s a sweet little reading nook for them to take a minute of quiet (with four kids- it’s hard to find those moments sometimes!) and read their favourite book. I am working my way through painting the whole downstairs with this warm grey. It’s the same colour we used in the guest bedroom makeover which is right across this room and the green I used for the botanicals is the green I used in the guest bedroom for the feature wall. I love that they’re two totally different looks but the palette remains the same and gives cohesiveness for the whole space.

Sweet DIY leaves mural for a reading nook- love the boho vibes! Timelapse of mural in post.

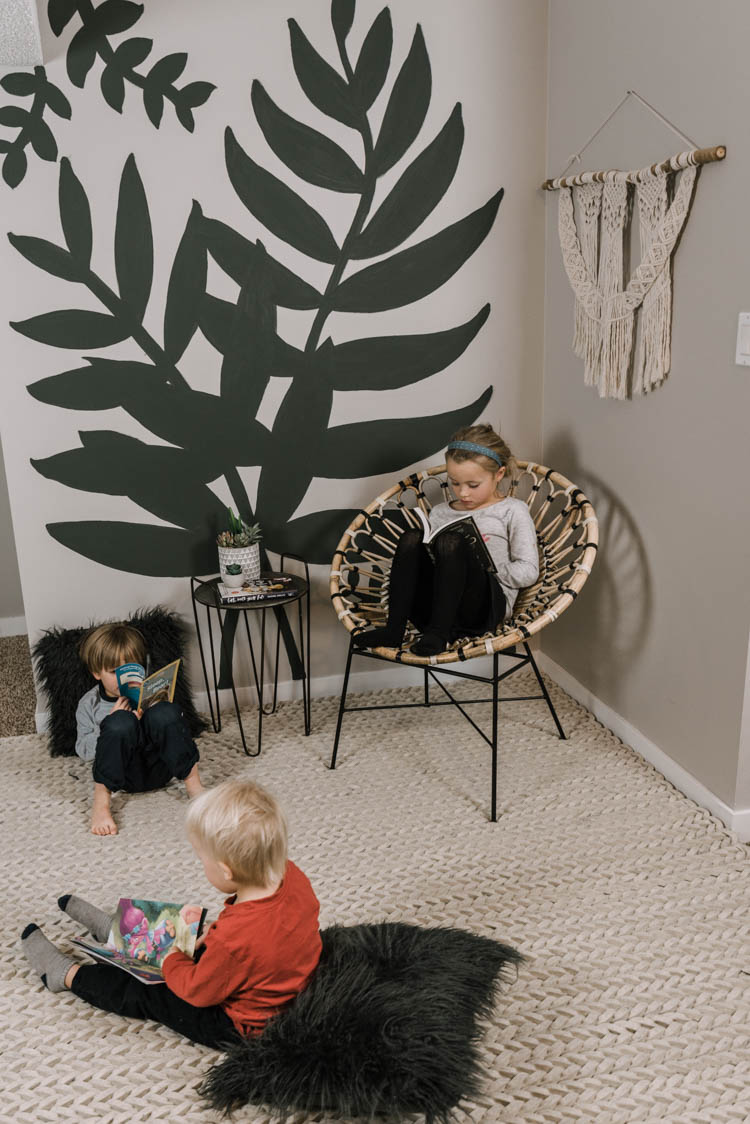
Since this is a kids space, going bold and a bit playful is exactly what I wanted. It’s different than our neutral main floor and best of all, they are totally in love with it. When my son saw it the evening after I’d painted it, he ran upstairs to tell daddy that mom did such a great job and that it’s so special down there. That kid just makes my day.

So before I get to the video of my painting the mural (I also share a bunch of tips that I found helpful while doing it!), I thought I’d share a bit of encouragement. I KNOW that some of you are thinking that this was a brave choice. That this was a risk. But really, what is the risk? Not liking it? Then what? Then paint over it!

Sweet DIY leaves mural for a reading nook- love the boho vibes! Timelapse of mural in post.

We made a couple ‘bold choices’ like this in our last house- a cloud wall in our kids room and a hand painted brush stroke wall in our entry. I loved them for a while, then I didn’t. And when I didn’t… I painted over them NO PROBLEM. I did do a light sand to get rid of any raised bits and used a high quality primer and a good coverage paint but you would never know that these ‘risky’ decisions had been made. Nope- they’re gone and covered over with paint. So let me just urge you to make the decision to try something new- to take the risk on loving a space in your home. Even if that means you’ll want to change it again in a year. Because wouldn’t you rather love it than always wish it was different?

DIY Botanical Mural - a simple version with a timelapse video of the process. Good tips for a beginner too!

Alright… let’s get to the video! I’m sharing this over on YouTube but thought I’d put it in the post as well. Are you following me over there yet?


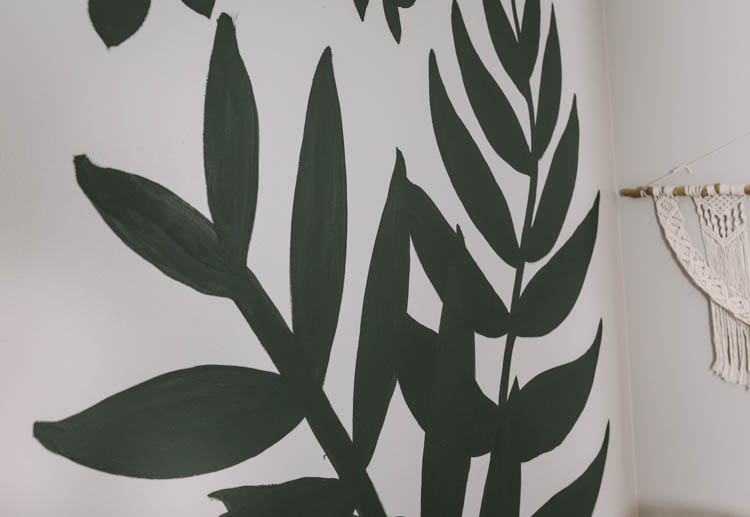
This was such a fun project you guys. I know this is crazy, but I actually free handed it. I think I’d love to get myself a little projector for my phone one day but in the meantime, freehand it is! I sketched out a mockup and freehanded with that beside me as an example. I started with a foam brush thinking it would give me nice clean lines but it just couldn’t hold the paint, so I switched to a much thicker brush. The thicker brush was really great for getting the outline on the wall in a hurry but I couldn’t do much detail work with it. I used the larger brush to fill in the leaves to make them nice and opaque before switching to details.

DIY Botanical Mural - a simple version with a timelapse video of the process. Good tips for a beginner too!

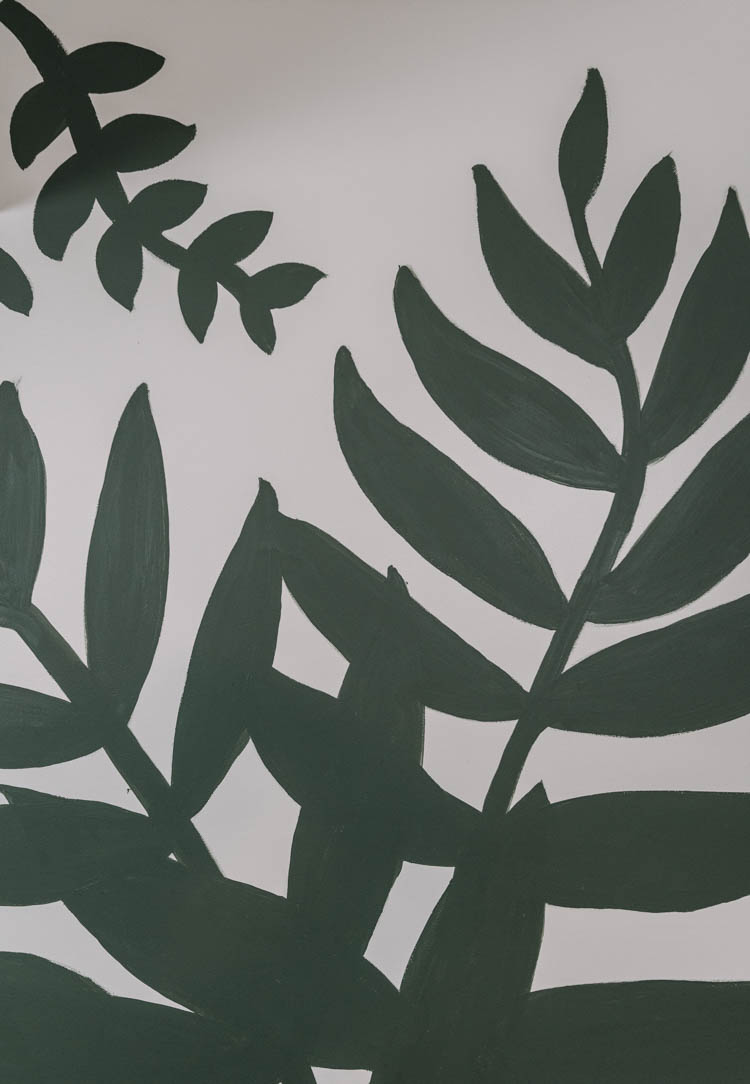
For the edges, a flat paint brush worked best. I got a fairly stiff one and that worked perfectly for outlining with nice crisp lines. It’s definitely not perfect- but I’m so happy with how it turned out!

After I painted the design most of the way, I stepped back and wasn’t totally satisfied with it. I took a photo with my iPad and sketched on top of it to see where I wanted to fill in gaps. This was SO HELPFUL for me to visualize where I was going with the design. I added an extra vine, thickened up some of the leaves to fill space, added some movement to the leaves by extending/curving them and added an extra leaf.

DIY Botanical Mural - a simple version with a timelapse video of the process. Good tips for a beginner too!

DIY Botanical Mural - a simple version with a timelapse video of the process. Good tips for a beginner too!

This took me just one afternoon (not including painting the wall grey) and it’s going to be something that adds fun to this playroom for quite a while. That sounds like a perfect DIY to me! I’m so grateful for inspiring blogs and websites like the Bravo TV Home +Design content to continue to inspire me to DIY in my home to make it my own! I’d love to hear… have you ever created a project you’ve seen on a website or blog? Share in the comments!

PS. If you haven’t already… you should probably check out the boho dream that is Chelsea Meissner’s home tour!

Category: Lifestyle
Facebook0Tweet0Pin0LinkedIn0
Previous Post: ← DIY Macrame Garland for a Christmas tree... or just for your house! DIY Macrame Garland – Spiral Knot Tutorial
Next Post: Design Plans! Our Garage Workshop Garage Interior Design Plans & Inspiration (with sources!) →

Reader Interactions

Leave a Reply Cancel reply

Your email address will not be published. Required fields are marked *

Sidebar

WOOHOO!

Check your email to confirm!

(+ get your freebies + discounts)


Thanks for dropping by!
I’m Colleen: wife; mom to 4 wild ones; and DIY blogger behind Lemon Thistle. You can expect to see rad DIY, modern home decor, renovations, hand lettering and the occasional party on Lemon Thistle. Read More…

email facebook youtube instagram pinterest

Unless otherwise noted, all content and images are mine. Full posts may not be shared without express written consent. But I love when you share! Feel free to share, without altering, one image with proper credit and a link to the original post. All free printables are for personal use only.

Everyone loves proper credit- if you ever notice something improperly credited, please please shoot me an email and I’ll fix it lightning fast.

Find all my policies right here.
This includes my privacy policy, info on the GDRP compliance and information on affiliate links (Including Amazon Affiliates).

Visit Colleen Pastoor’s profile on Pinterest.

colleenpastoor

My house is never this clean
-
DIY + Home Decor Blogger
Mama of 4 👶🏼🧒🏼👦🏼👧🏼
Renovating our 🏠 the DIY way
🖤 Lettering & ☕️
-
✉️[email protected]

colleen pastoor/lemon thistle
Who has DIY projects on their mind this year?! @ry Who has DIY projects on their mind this year?! @ryobi_canada and I want to help you start knocking those projects off your list by giving away a new nailer and battery set! #ad 
This tool is what we used for this accent wall and all the trim in our home. It’s the one I used to trim out my built in shelving and add the decorative moulding to my geometric barn door. What I’m saying is this thing is a workhorse and I want you to have one too 😉
To enter:
✨Follow me @colleenpastoor and @ryobi_canada 
✨like and save this photo 
✨ tag some friends who’d love to win in the comments! One tag per comment, each is an entry. 
✨ share to your stories for a bonus 5 entries!

Open to Canadians only this time (sorry US friends!) and not associated with Instagram. Closes Friday Jan 22 at noon PST!
Let’s talk about coffee! This is my coffee ‘st Let’s talk about coffee! This is my coffee ‘station’ and the second photo is my dads! I’m talking aaaall about them over on YT today!
Also... see how nice that fresh silicone looks?! 😉 IYKYK
The hallway is finally finished and I’m so stink The hallway is finally finished and I’m so stinking happy! 

It’s felt like such a long time coming for such a small space. Since we moved in 2.5 years ago, this space has seen new doors and hardware, new trim, new floors... twice😅, we changed the boob light to a pot light and I hated it and now it’s got the most beautiful flush mount fixture I’m in love with (thanks @mymitzi!). It finally got some fresh paint and now frames on walls and last but not least... After this weekend, the new floors look like they were here all along (no door jamb gaps!) which was the last thing really bugging me since our flood last year. 

All this to say that home takes time and sometimes getting it right might take a couple tries. Also- the spaces we don’t really think about (hallways) can totally help a house feel like home with some love (and family photos 🥰)
ps. I partnered with #mymitzi to create a tiktok for This makeover... are you following me over there yet?! I’d love if you popped over and said hi!
It’s done! It works! And I’m calling it a grea It’s done! It works! And I’m calling it a great use of my afternoon the other day. Did you catch the stories? These projects both cost me under $10 by using pieces I already had in my home (yay for scraps!) and one package of drawer slides).
You can find the full video about these two kitchen organization projects over on YouTube in collaboration with my friend @love_create_celebrate and her #scrapsmademodern challenge! But for now... I’m rejoicing this coffee maker is off my counter for good 🎉
How’s your January going? Full speed or are you How’s your January going? Full speed or are you taking it a bit slow too? 

I’m not going to lie, I’m easing into this new year thing pretty slowly. All my decorations are still up (we always leave them up til Ukrainian Christmas which is later this week) and I I’ve yet to respond to my emails since before Christmas 😅
I’m enjoying the slowness of it all.
Happy Christmas Eve from our fam to yours 🥰 Happy Christmas Eve from our fam to yours 🥰
Yes, I made the paper bag snowflakes too. Have you Yes, I made the paper bag snowflakes too. Have you? 😅
This year has been one of a kind and I know so man This year has been one of a kind and I know so many people who are taking this year as the push they’ve been waiting for to start a side hustle, start an new career altogether or to just get creative about how they’re making money. So today I’m excited to partner with @kregjig to share some rad projects to make and sell this year! 
Like this rolling storage system I made for my office, that rad dollhouse and the gorgeous bath toy storage. All of these projects are things that I’d personally love to buy for our family and look like they’d be a great return on your time making them! And yes, all of them use #Kreg tools to make them easy to assemble and quick to make! Plus, they’re having a great sale on right now with deals on their K4 and K5 jigs, Rip-Cut and even a hardware jig bundle! There’s never been a better time to get your workshop set up!  #sponsored
Just a peaceful moment and then a real life moment Just a peaceful moment and then a real life moment for ya 🙃 
My #holidayhometour is on the blog and YouTube (I’ll put links in my stories) as part of the #seasonalsimplicity holiday home tour series. I’ll share those too so you don’t miss any!
Load More... Follow on Instagram

Copyright © 2021 · Lemon Thistle · All Rights Reserved · Powered by Mai Theme