• Skip to main content
  • Skip to header left navigation
  • Skip to header right navigation
  • Skip to site footer
  • Shop
  • Get The Email
  • Work With Me
  • About
  • Search

  • DIY
    • DIY Home Decor
    • With Power Tools
    • Renovation
    • For Kids
    • For Parties
    • Wearable
    • Organization
    • Cricut Crafts
  • Home Decor
    • Room Reveals
    • Kid Friendly
    • DIY Home Decor
    • Renovation
  • Lettering
    • Hand Lettered Printables
    • Free Practice Sheets
    • Handlettered DIY
    • Free Brush Lettering Quickstart Guide
    • Learn Brush Lettering E-Course SALE
Lemon Thistle

Lemon Thistle

Rad DIY, Lettering and Design for Real People

  • Printables
    • For Cricut
    • Party Printables
    • Home Decor Printables
    • Bachelor Bingos
    • Free Monthly Wallpapers
    • Handlettering Practice Sheets
    • All Free Printables
  • Entertain
    • Party Printables
    • Party DIY
    • Tablescapes
    • Dinner Party
    • Kids Parties
    • Party Eats
    • Baby Showers
    • Wedding + Showers
  • Blog

Simple DIY Holiday Wreath with Fresh Greens (and an announcement!)

Nov 07

I LOVE these simple hoop wreaths with fresh greenery. The perfect amount of Christmas without being over the top. DIY holiday wreath

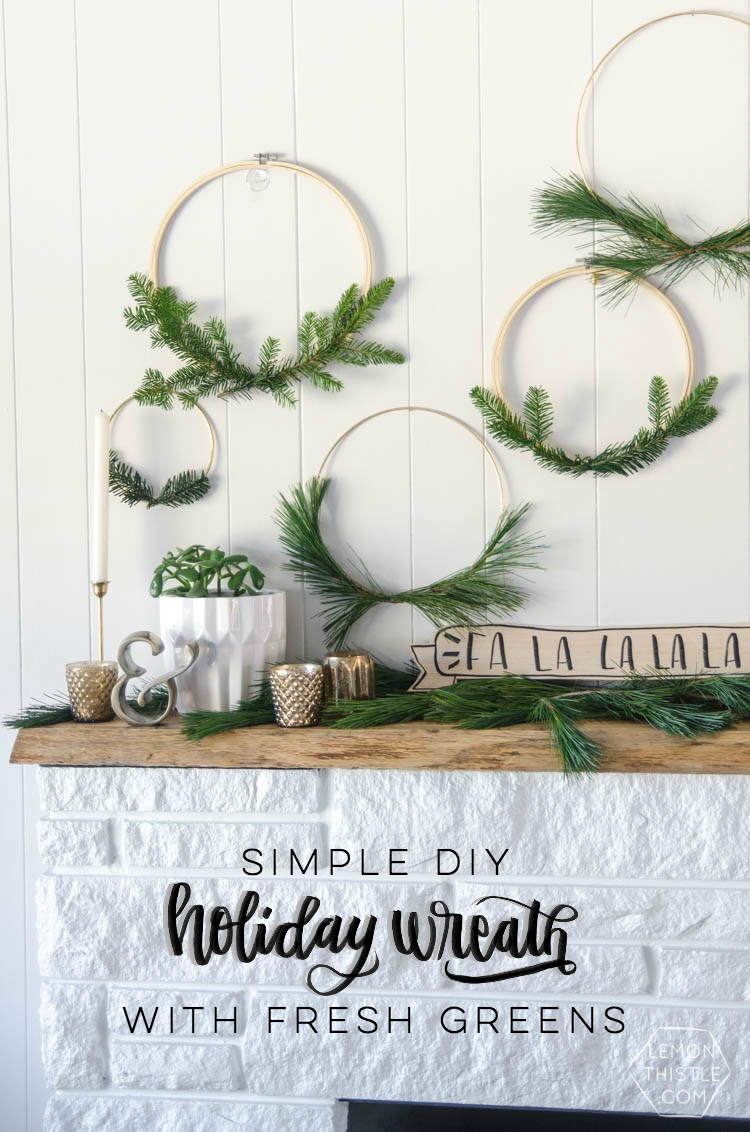
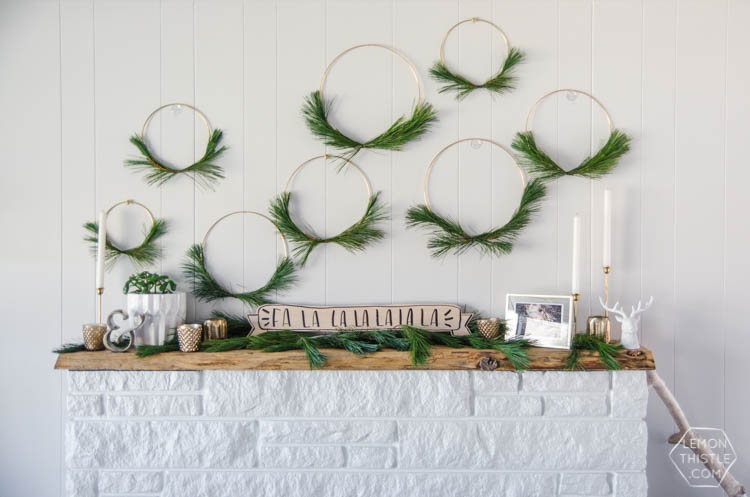
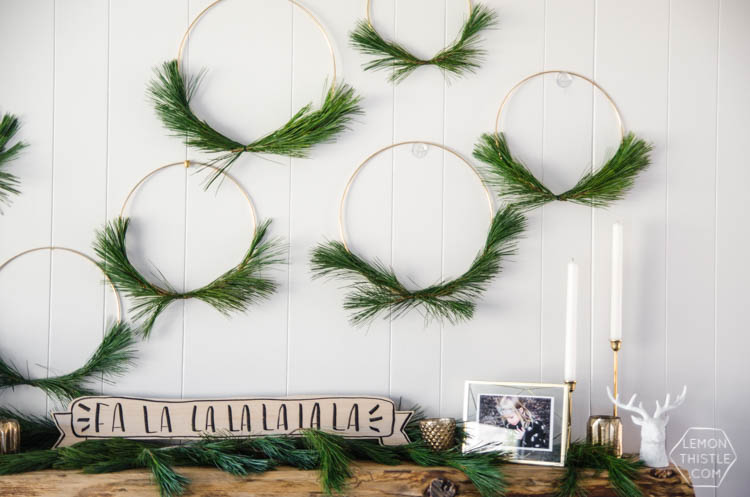
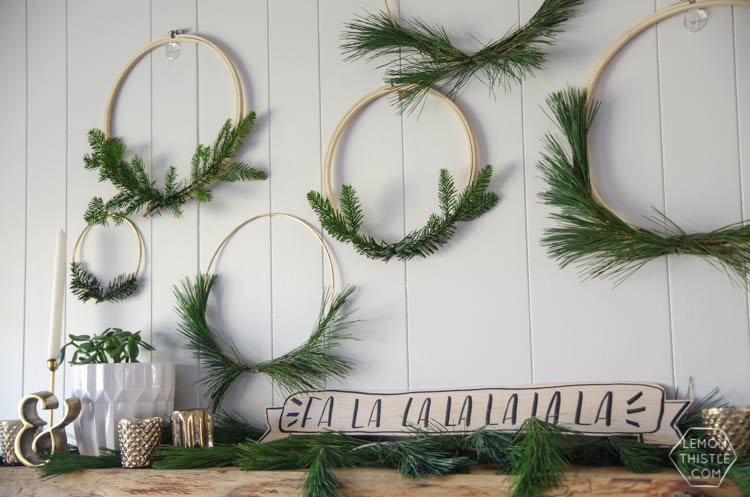
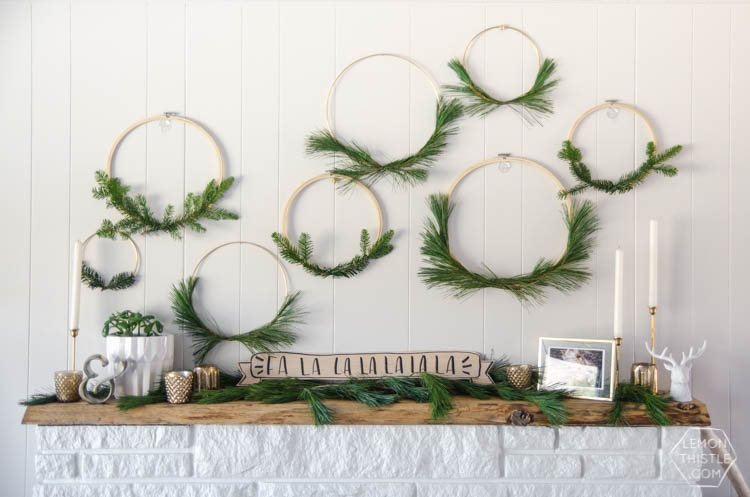
Halloween is officially over so, yeah… I’m going there ;) The holidays are coming and it’s time to start thinking about them! I couldn’t be more excited, the twins are even more aware of holidays now and are already asking questions about Christmas. They also told me that, ‘that looks really pretty mom, I like it’ when I was putting these up, so of course I want to decorate the whole house now. I actually pulled this whole mantle together without pulling out our holiday decorations. I love that the fresh greens are perfectly suited to my every day decor, then I whipped up that sign to add a bit of holiday cheer. That DIY will be coming out soon, pinky swear.

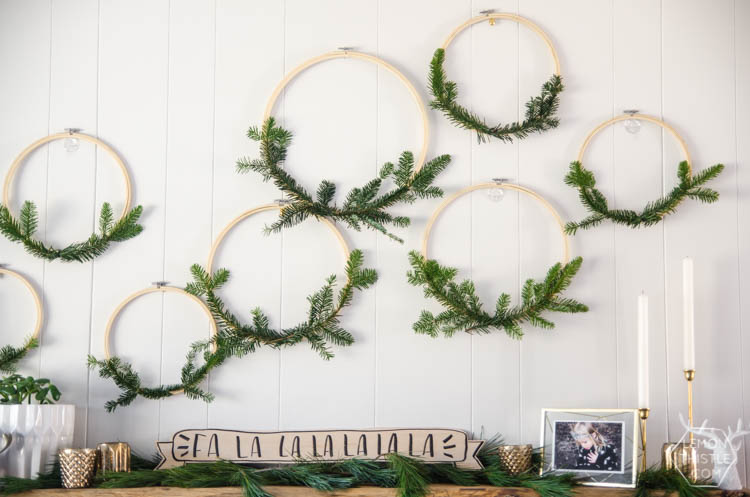
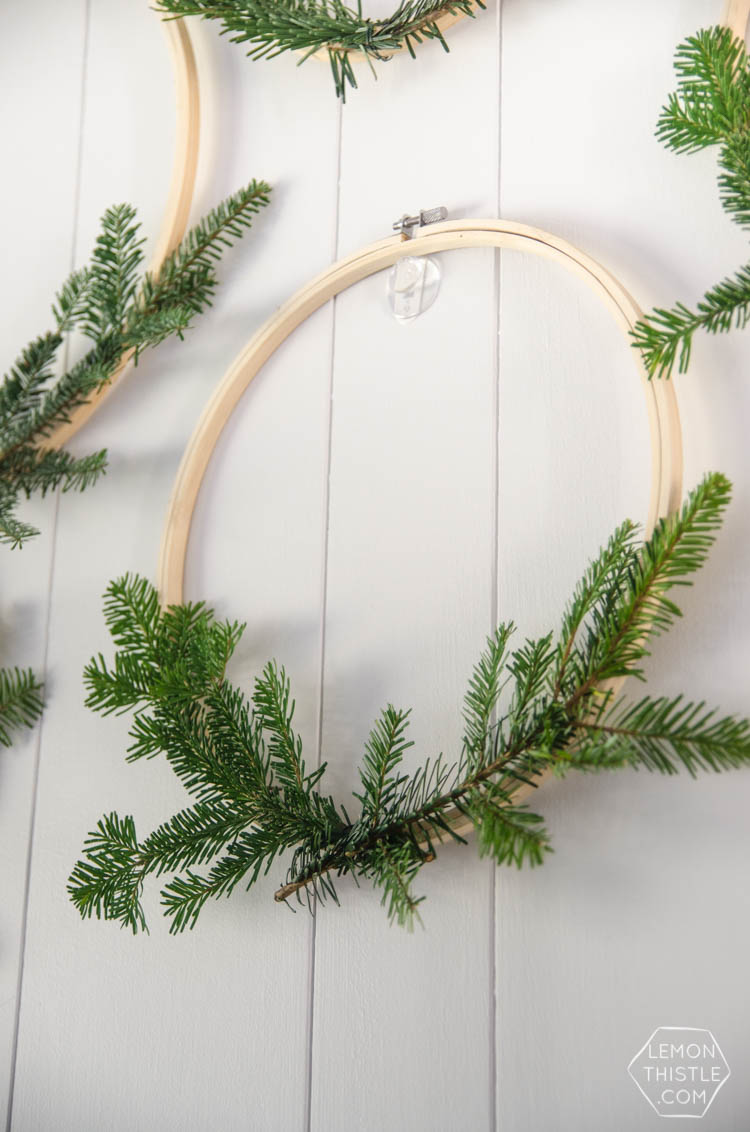
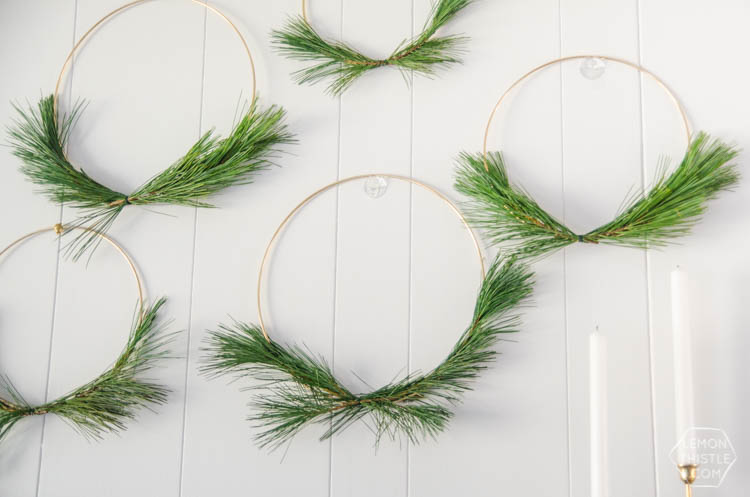
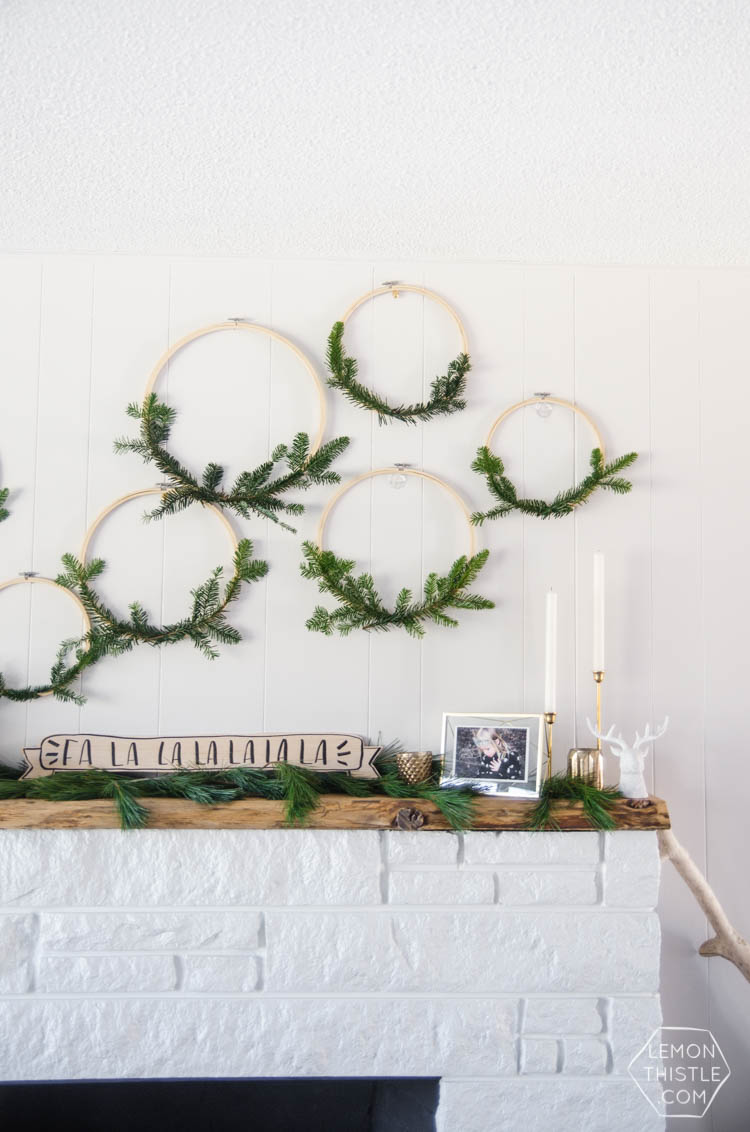
These holiday wreaths are perfectly minimal. I’m all about simplicity and neutrals for holiday decor and these wreaths are a great balance of decorative without being over the top. I actually made them a few ways. I’m not totally sure which is my favourite though! Maybe you guys can help me decide. I made the brass ones with pine (that’s the long needles) and while I love, love, love them the most… as soon as I put them up on the wall they look kind of whiskery because of gravity. Maybe I will need to go back and wire them some more. Then I did fir on the embroidery hoops and I really love the darker color on the light wood. I decided to mix a couple up and do a collection of both the hoops above my mantle and I think that ties in my brass and gold decor with the natural wood tones of the mantle the best. But I’m still undecided. See both the other ones right here:

I LOVE these simple hoop wreaths with fresh greenery. The perfect amount of Christmas without being over the top. DIY holiday wreath

I LOVE these simple hoop wreaths with fresh greenery. The perfect amount of Christmas without being over the top. DIY holiday wreath

Okay, let me spill the news. I really, really love these wreaths and think you will too. So I’m excited to be partnering again with MakeShift (Kamloops) to bring a DIY workshop! We’ll be making three of these babies and sipping cocoa and eating cookies. It will be the perfect night to get you into the holiday spirit (November 17th). You can check out all the details and find registration info over at Makeshift.  I’ll be sharing some fun variations of these guys over social media in the next few days (minimal ain’t your mama’s style? Bring on the baubles!) if you’re local and on the fence!

But if you aren’t local (or you aren’t up for a night out) I’ve got the whole DIY for you! They’re really simple, you guys. My style of DIY!

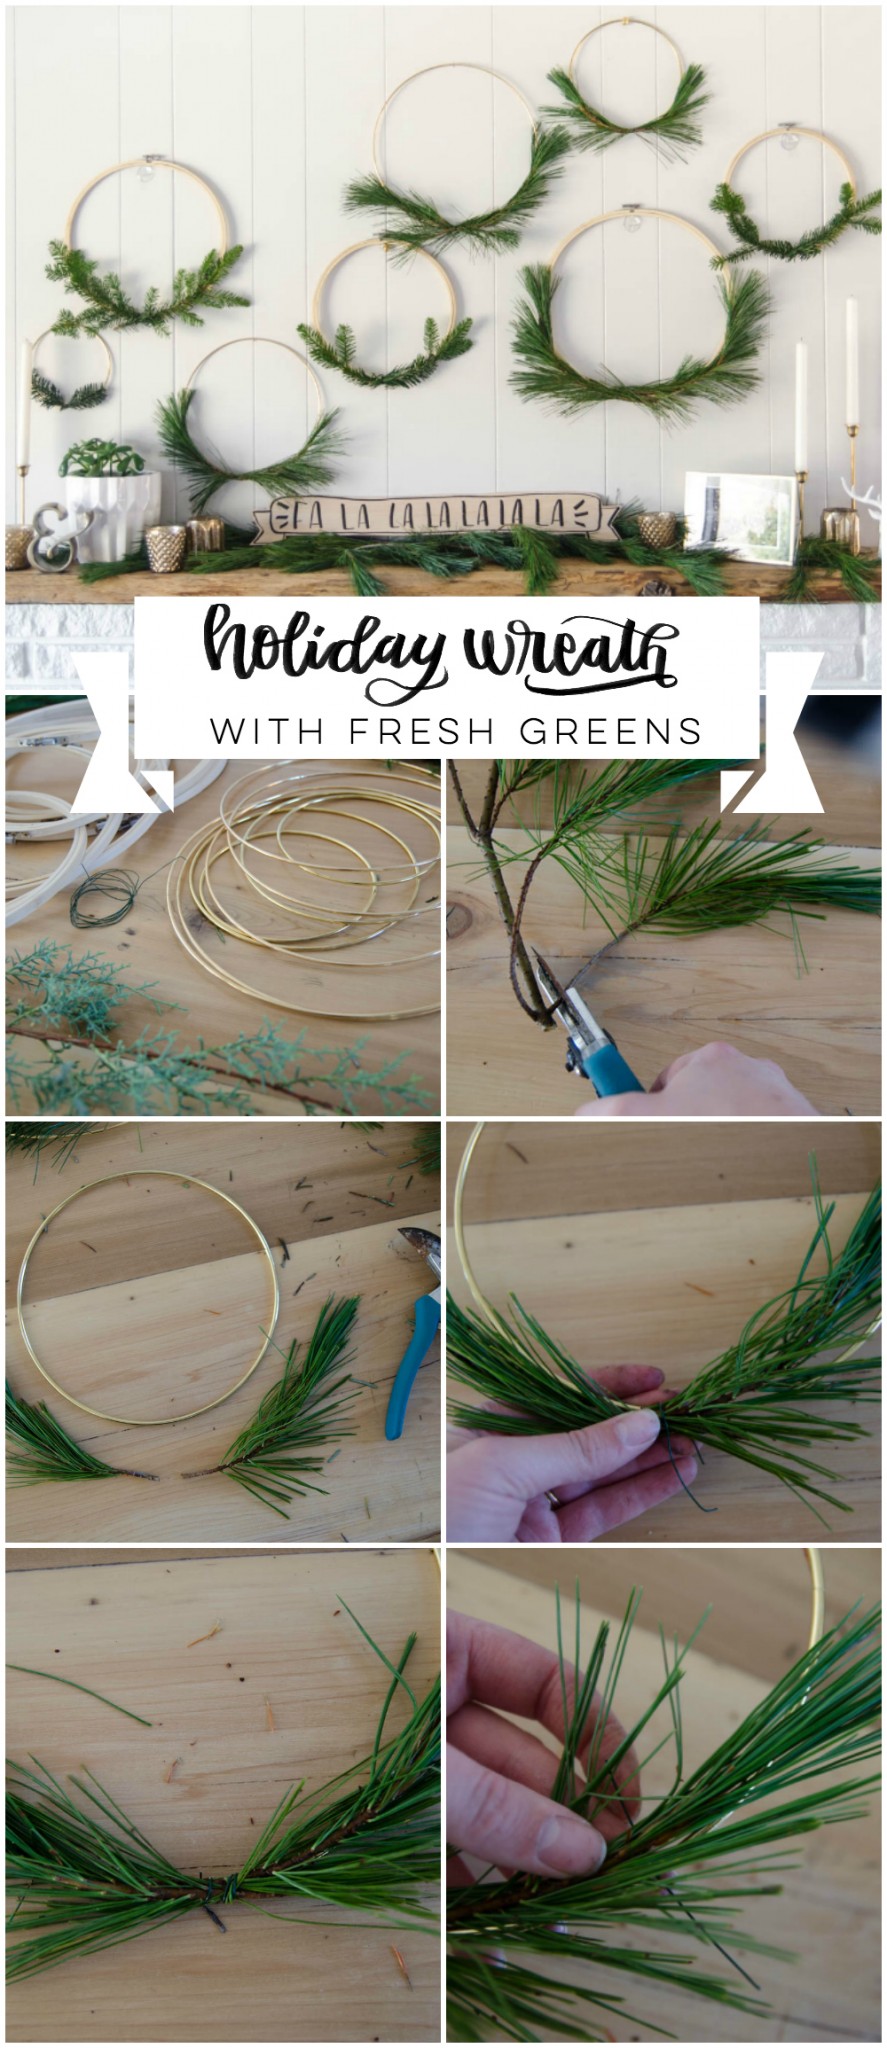
To make your own simple hoop holiday wreath with fresh greens, you’ll need:

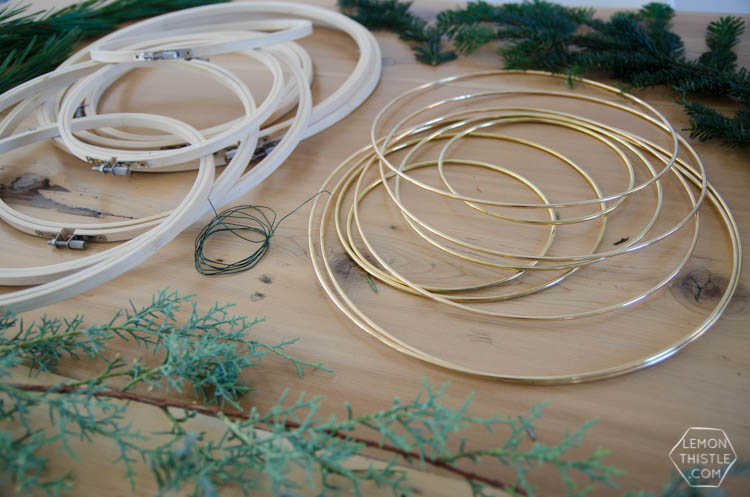
  • Hoops of your choice- I used both bamboo embroidery hoops and brass macrame hoops. Both should be available from craft stores. The largest I have is 14″ and the smallest 4″
  • Floral Wire
  • Fresh Greens (I used pine and fir)
  • Gardening Sheers (and if you’re protective over them, get wire cutters too!)

I LOVE these simple hoop wreaths with fresh greenery. The perfect amount of Christmas without being over the top. DIY holiday wreath

Get ready for this, it’s super complicated.

I LOVE these simple hoop wreaths with fresh greenery. The perfect amount of Christmas without being over the top. DIY holiday wreath

I LOVE these simple hoop wreaths with fresh greenery. The perfect amount of Christmas without being over the top. DIY holiday wreath

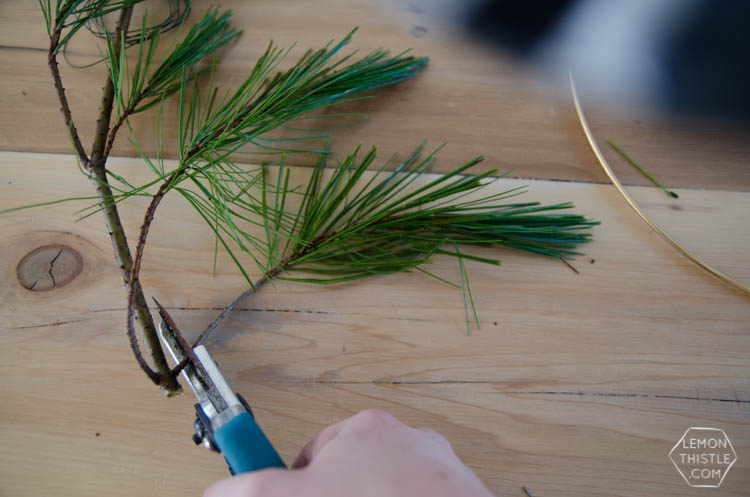
Cut your boughs down to size. Find matching sized pieces. Wire them on.

I LOVE these simple hoop wreaths with fresh greenery. The perfect amount of Christmas without being over the top. DIY holiday wreath

I LOVE these simple hoop wreaths with fresh greenery. The perfect amount of Christmas without being over the top. DIY holiday wreath

I LOVE these simple hoop wreaths with fresh greenery. The perfect amount of Christmas without being over the top. DIY holiday wreath

I LOVE these simple hoop wreaths with fresh greenery. The perfect amount of Christmas without being over the top. DIY holiday wreath

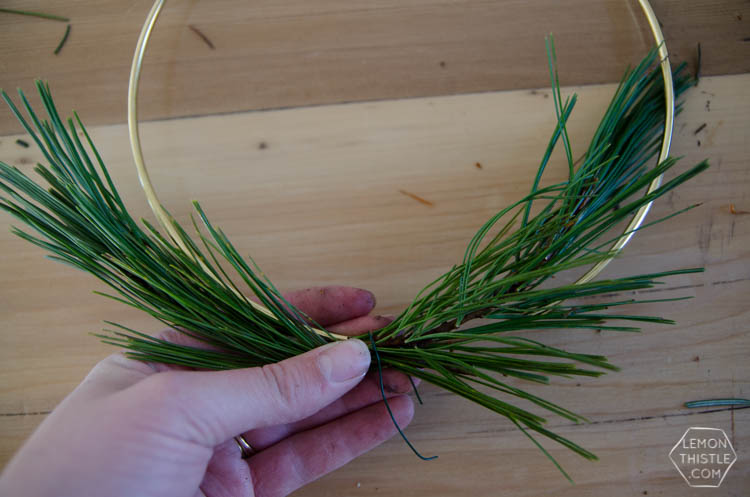
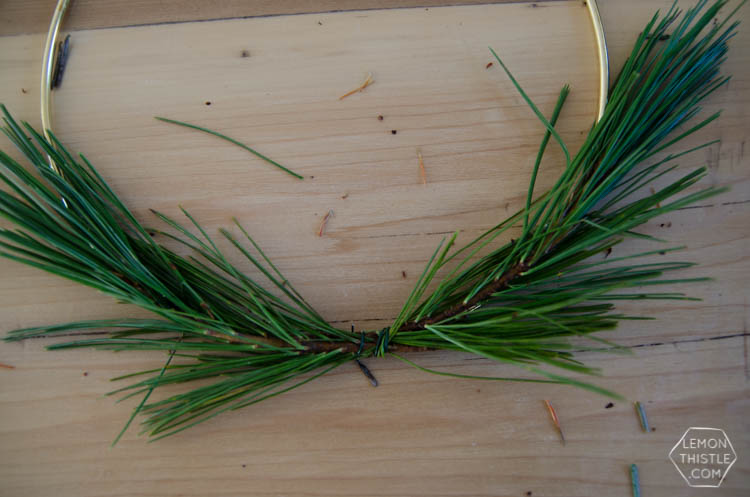
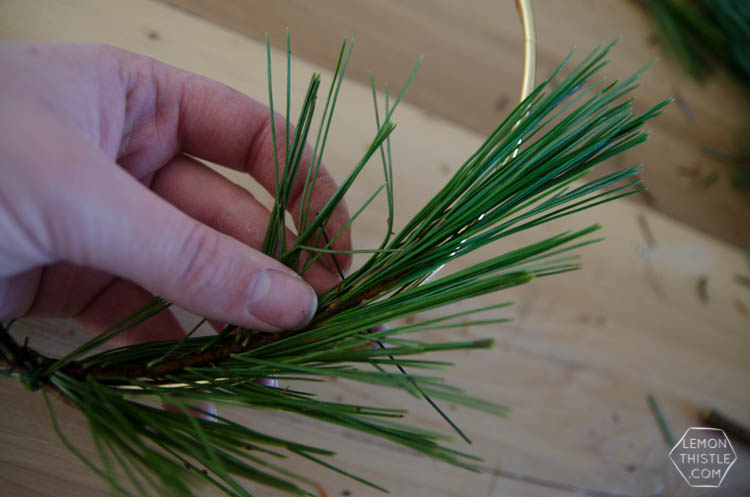
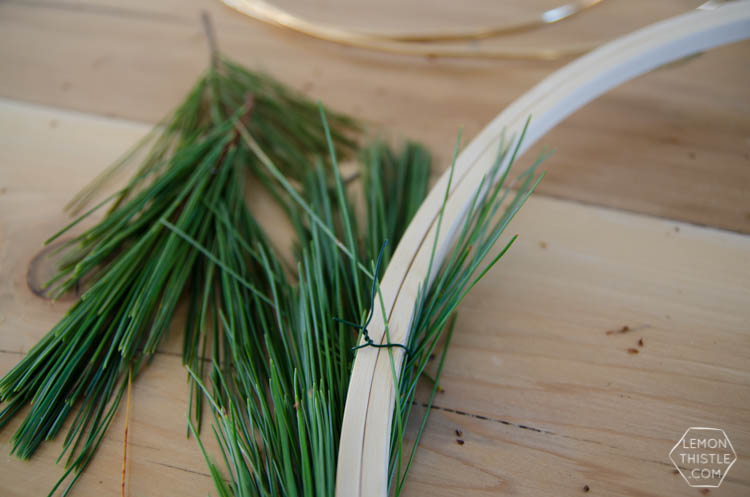
Seriously, that’s it. But there’s a few tips I have for you. If you’re using fresh greens, start by cutting the end of the branch off before you do anything else. Those things leak pitch like crazy and it will save your hands/ table/ whatever. I always unwrap my bundle, cut all the ends off, then get to breaking them down. I tried to keep the branches only on the bottom half of the hoops. I overlapped the two branches at the bottom and wired those on first. I made sure they were super tight before adding a wire to each of the ends to wrap them up the hoop. You can kind of hide the wire by wiring close to the branch itself instead of overtop of all the needles (see photos above).

I LOVE these simple hoop wreaths with fresh greenery. The perfect amount of Christmas without being over the top. DIY holiday wreath

I LOVE these simple hoop wreaths with fresh greenery. The perfect amount of Christmas without being over the top. DIY holiday wreath

Ta-da! They’re so simple but I am in love with them in a collection like this! I’m going to try styling a couple solo and I’ll be updating the post. But really… you should probably just make a bunch ;)

I LOVE these simple hoop wreaths with fresh greenery. The perfect amount of Christmas without being over the top. DIY holiday wreath

I LOVE these simple hoop wreaths with fresh greenery. The perfect amount of Christmas without being over the top. DIY holiday wreath

I LOVE these simple hoop wreaths with fresh greenery. The perfect amount of Christmas without being over the top. DIY holiday wreath

I LOVE these simple hoop wreaths with fresh greenery. The perfect amount of Christmas without being over the top. DIY holiday wreath

So- what do you think? Could you get in on the simple style of this holiday wreath DIY or are you all about bling around the holidays? And if you do make this DIY I would LOVE to see a shot! Email me or tag me on social @colleenpastoor

LIKE IT? PIN IT!

I LOVE these simple hoop wreaths with fresh greenery. The perfect amount of Christmas without being over the top. DIY holiday wreath

Category: DIY, Home DecorTag: Christmas, Decorations, DIY Home Decor, Florals, Holiday DIY, Holidays, Metallics, Rustic, Winter, Wood, Wreath
Facebook0Tweet0Pin0LinkedIn0
Previous Post: ← 20 Rad DIY gifts worth pulling out the powertools for. I love these suggestions! Ideas for everyone on my holiday gift list. 20 Rad DIY gifts worth bringing out the power tools for
Next Post: Why I Started Brush Lettering (and why it rocks) →

Reader Interactions

Comments

  1. Havalah Turner

    Nov 09 at 3:32 pm

    Ohh!! I absolutely love this!!

    Reply
    • Colleen Pastoor

      Nov 15 at 3:42 pm

      Thanks so much Havalah! I’m really happy with how they turned out :)

      Reply
  2. Katrin

    Nov 23 at 9:52 pm

    I love these, they are brilliant and so simple!!!

    Reply
    • Colleen Pastoor

      Nov 23 at 10:23 pm

      Thanks so much Katrin! I’m so happy with how they turned out (even though they’re not extravagant!)

      Reply
  3. Susanna

    Nov 15 at 6:54 am

    These are lovely! Do you have any idea how long they will stay fresh and prett? I want to make some but worry about them lasting past Christmas.

    Reply
    • Colleen Pastoor

      Dec 02 at 6:39 pm

      Hi Susanna, apologies for the slow response! You left this the day we had a baby ;) Caring for them properly- spray them daily, once a week wrap the stems in a warm damp cloth- will make a big difference. I had needles falling by Christmas but they still looked nice (provided you didn’t touch!)

      Reply
  4. Aimee

    Dec 09 at 2:05 pm

    These are do simple and lovely. How did you fasten themto your wall?

    Reply
    • Colleen Pastoor

      May 19 at 1:38 pm

      Hello! I know I’m SUPER late to respond (new baby!) but, I use command hooks or tiny nails :)

      Reply

Leave a Reply Cancel reply

Your email address will not be published. Required fields are marked *

Sidebar

WOOHOO!

Check your email to confirm!

(+ get your freebies + discounts)


Thanks for dropping by!
I’m Colleen: wife; mom to 4 wild ones; and DIY blogger behind Lemon Thistle. You can expect to see rad DIY, modern home decor, renovations, hand lettering and the occasional party on Lemon Thistle. Read More…

email facebook youtube instagram pinterest

Unless otherwise noted, all content and images are mine. Full posts may not be shared without express written consent. But I love when you share! Feel free to share, without altering, one image with proper credit and a link to the original post. All free printables are for personal use only.

Everyone loves proper credit- if you ever notice something improperly credited, please please shoot me an email and I’ll fix it lightning fast.

Find all my policies right here.
This includes my privacy policy, info on the GDRP compliance and information on affiliate links (Including Amazon Affiliates).

Visit Colleen Pastoor’s profile on Pinterest.

colleenpastoor

My house is never this clean
-
DIY + Home Decor Blogger
Mama of 4 👶🏼🧒🏼👦🏼👧🏼
Renovating our 🏠 the DIY way
🖤 Lettering & ☕️
-
✉️[email protected]

colleen pastoor/lemon thistle
Who has DIY projects on their mind this year?! @ry Who has DIY projects on their mind this year?! @ryobi_canada and I want to help you start knocking those projects off your list by giving away a new nailer and battery set! #ad 
This tool is what we used for this accent wall and all the trim in our home. It’s the one I used to trim out my built in shelving and add the decorative moulding to my geometric barn door. What I’m saying is this thing is a workhorse and I want you to have one too 😉
To enter:
✨Follow me @colleenpastoor and @ryobi_canada 
✨like and save this photo 
✨ tag some friends who’d love to win in the comments! One tag per comment, each is an entry. 
✨ share to your stories for a bonus 5 entries!

Open to Canadians only this time (sorry US friends!) and not associated with Instagram. Closes Friday Jan 22 at noon PST!
Let’s talk about coffee! This is my coffee ‘st Let’s talk about coffee! This is my coffee ‘station’ and the second photo is my dads! I’m talking aaaall about them over on YT today!
Also... see how nice that fresh silicone looks?! 😉 IYKYK
The hallway is finally finished and I’m so stink The hallway is finally finished and I’m so stinking happy! 

It’s felt like such a long time coming for such a small space. Since we moved in 2.5 years ago, this space has seen new doors and hardware, new trim, new floors... twice😅, we changed the boob light to a pot light and I hated it and now it’s got the most beautiful flush mount fixture I’m in love with (thanks @mymitzi!). It finally got some fresh paint and now frames on walls and last but not least... After this weekend, the new floors look like they were here all along (no door jamb gaps!) which was the last thing really bugging me since our flood last year. 

All this to say that home takes time and sometimes getting it right might take a couple tries. Also- the spaces we don’t really think about (hallways) can totally help a house feel like home with some love (and family photos 🥰)
ps. I partnered with #mymitzi to create a tiktok for This makeover... are you following me over there yet?! I’d love if you popped over and said hi!
It’s done! It works! And I’m calling it a grea It’s done! It works! And I’m calling it a great use of my afternoon the other day. Did you catch the stories? These projects both cost me under $10 by using pieces I already had in my home (yay for scraps!) and one package of drawer slides).
You can find the full video about these two kitchen organization projects over on YouTube in collaboration with my friend @love_create_celebrate and her #scrapsmademodern challenge! But for now... I’m rejoicing this coffee maker is off my counter for good 🎉
How’s your January going? Full speed or are you How’s your January going? Full speed or are you taking it a bit slow too? 

I’m not going to lie, I’m easing into this new year thing pretty slowly. All my decorations are still up (we always leave them up til Ukrainian Christmas which is later this week) and I I’ve yet to respond to my emails since before Christmas 😅
I’m enjoying the slowness of it all.
Happy Christmas Eve from our fam to yours 🥰 Happy Christmas Eve from our fam to yours 🥰
Yes, I made the paper bag snowflakes too. Have you Yes, I made the paper bag snowflakes too. Have you? 😅
This year has been one of a kind and I know so man This year has been one of a kind and I know so many people who are taking this year as the push they’ve been waiting for to start a side hustle, start an new career altogether or to just get creative about how they’re making money. So today I’m excited to partner with @kregjig to share some rad projects to make and sell this year! 
Like this rolling storage system I made for my office, that rad dollhouse and the gorgeous bath toy storage. All of these projects are things that I’d personally love to buy for our family and look like they’d be a great return on your time making them! And yes, all of them use #Kreg tools to make them easy to assemble and quick to make! Plus, they’re having a great sale on right now with deals on their K4 and K5 jigs, Rip-Cut and even a hardware jig bundle! There’s never been a better time to get your workshop set up!  #sponsored
Just a peaceful moment and then a real life moment Just a peaceful moment and then a real life moment for ya 🙃 
My #holidayhometour is on the blog and YouTube (I’ll put links in my stories) as part of the #seasonalsimplicity holiday home tour series. I’ll share those too so you don’t miss any!
Load More... Follow on Instagram

Copyright © 2021 · Lemon Thistle · All Rights Reserved · Powered by Mai Theme