You guyyys! This one is a big one and it makes me so crazy happy to have it done. It’s really exciting to finally be at the stage of our renovation where we’re finishing rooms- not just bits and pieces of them. I have a few great reveals coming down the pipe… but today? Let there be laundry!
So if you haven’t checked out the ‘before’ of our house… hop over there and do that. It’s the unfinished junkroom of a basement. And there wasn’t even enough power run to the house to have a dryer. Seriously! So other than the obvious upgrade of the electrical panel (hiding behind the cabinet door)… we also added a real laundry space. And now that we’re finishing up the rest of the basement, it’s so wonderful to be able to go down there with laundry and not have to put shoes on and hope you don’t drop any of the clean clothes! It’s the little things, right ;)
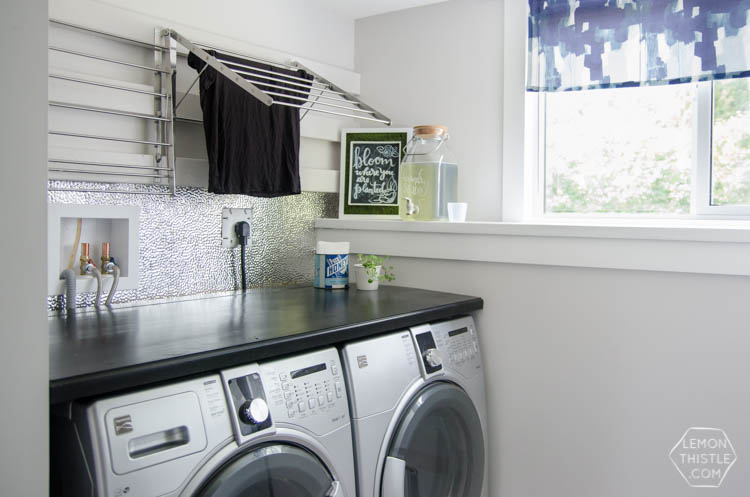
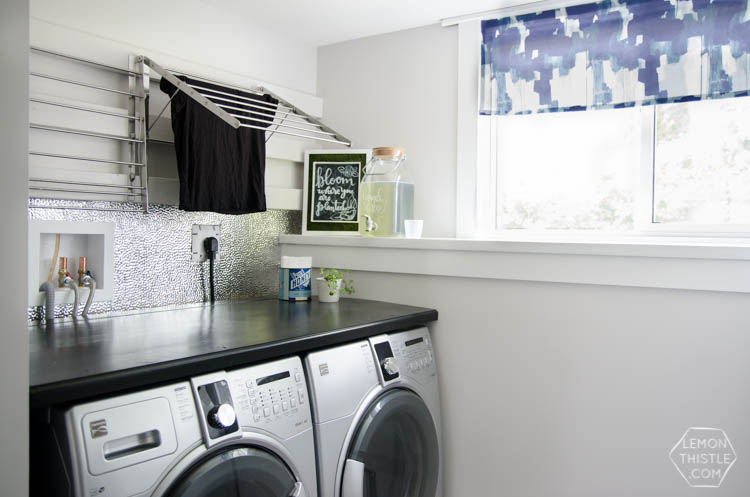
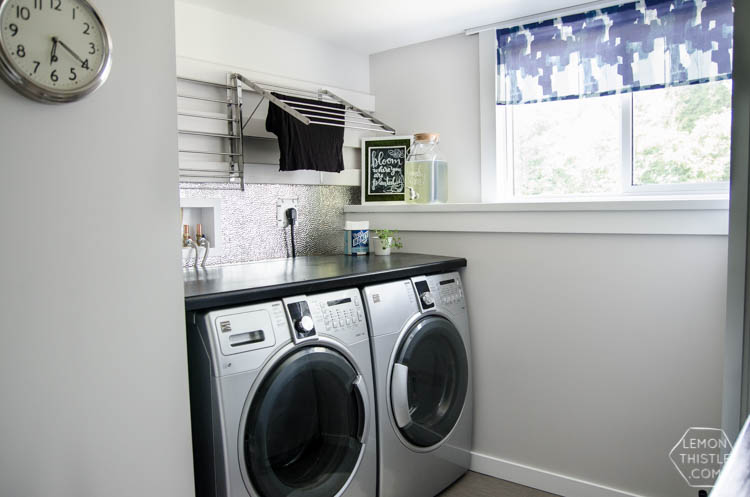
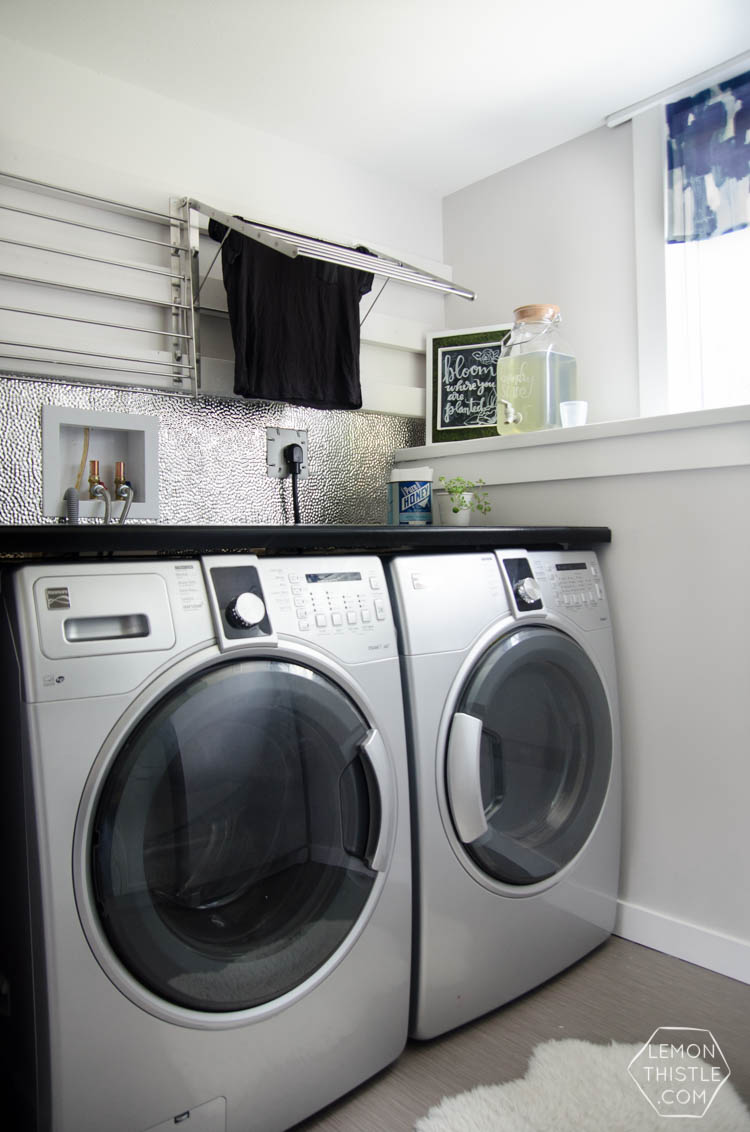
We started by replacing the window and framing the room in. It has a ledge around the outside walls as the foundation is thicker than the studs on top. We chose to frame that into a ledge so we could maximize every inch of storage in here and a ledge= good storage for laundry soaps and such. We didn’t have much of a choice on where to put the washer and dryer. All the plumbing is in behind that wall so it made sense. In a perfect world, we would have loved a laundry room sink (so much), but it would have meant breaking up the concrete to get the proper slope on drainage and that expense just wasn’t possible for us.
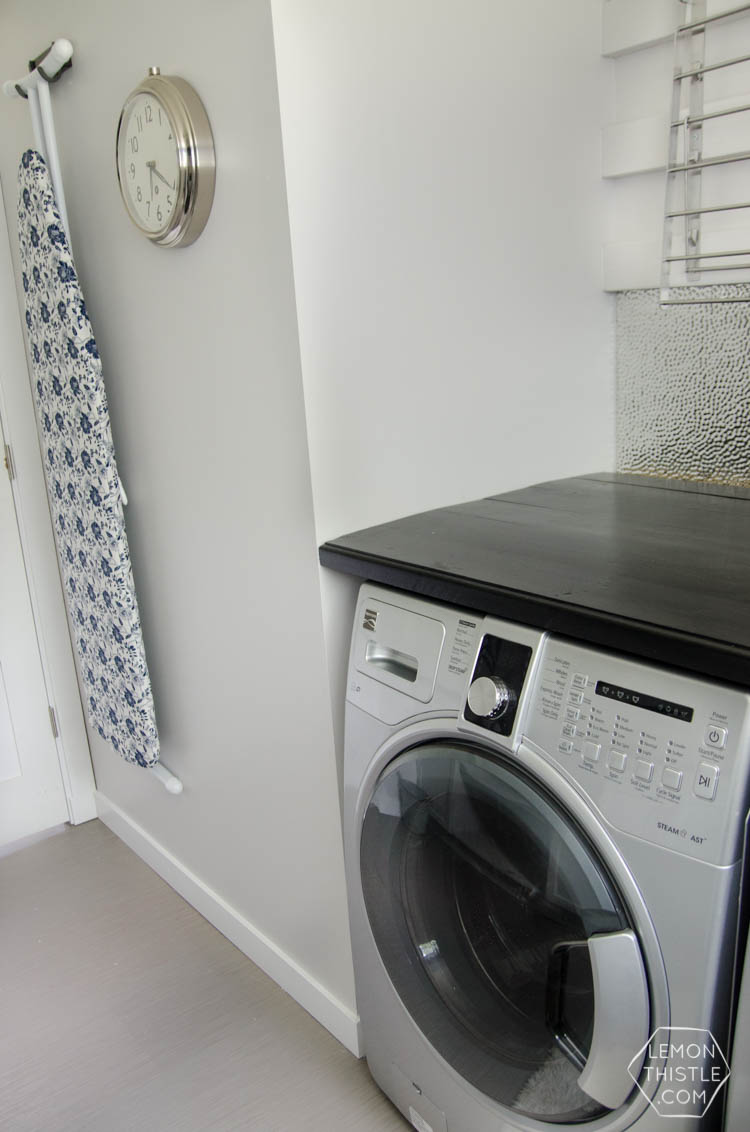
The walls are painted a the same colour as the rest of the house (it’s a custom grey, you guys I’m sorry!) and we added farmhouse trim and shaker style doors to the space. The floor is a vinyl interlocking tile that we did in the whole basement. You can read more about my installation tips and what we think of it in this post, but the short is that we really love it (less than $2 a SF! and it’s warm on the feet without underlay). We did splurge on a new washer/ dryer set when we moved in a couple years back, since we do a lot of laundry with three kids under the age of three (they’re pretty darn messy). I’m so glad we did as these guys are work horses! The stand up freezer was a gift from my mama, so we needed to accommodate it in the space as well.
Other than framing it in and getting the drywall painted and flooring down… we didn’t have much money for the space. It was finished enough to be used, but it wasn’t being used efficiently (or enjoyably). We decided we wanted to get the job done right though, so pulled together some cash to officially finish it up.
CABINETS
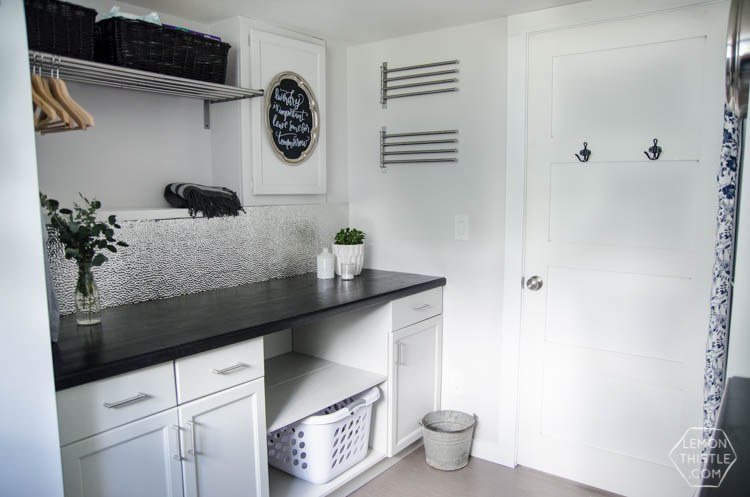
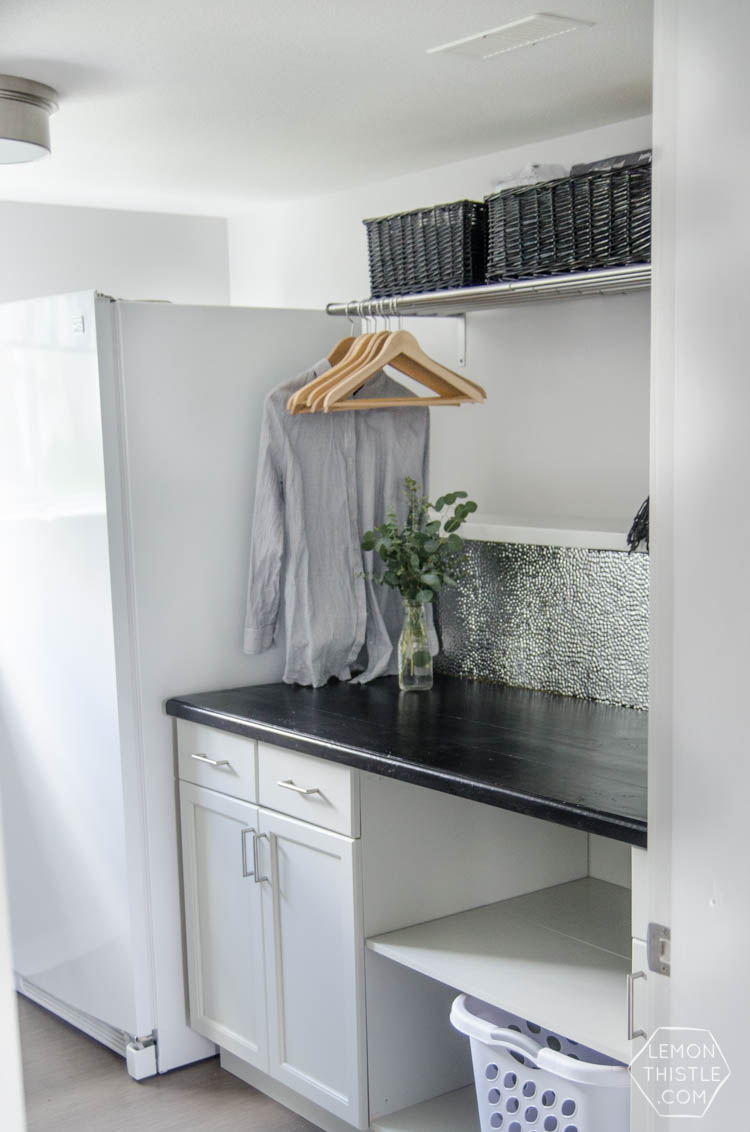
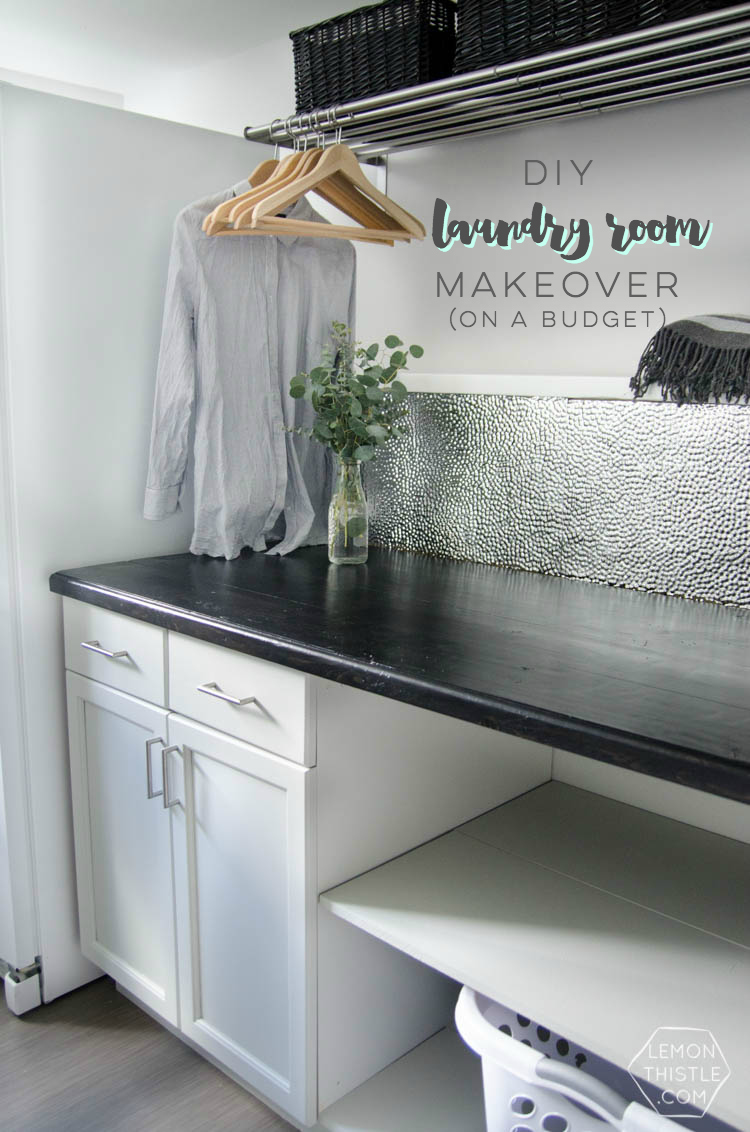
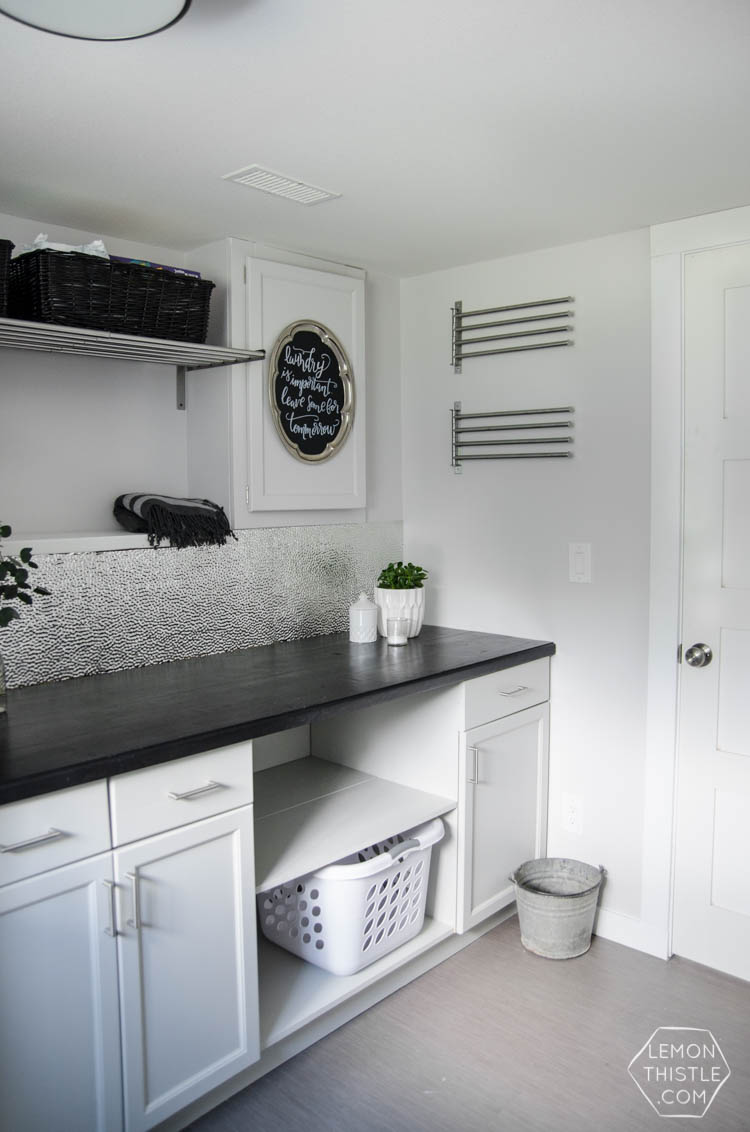
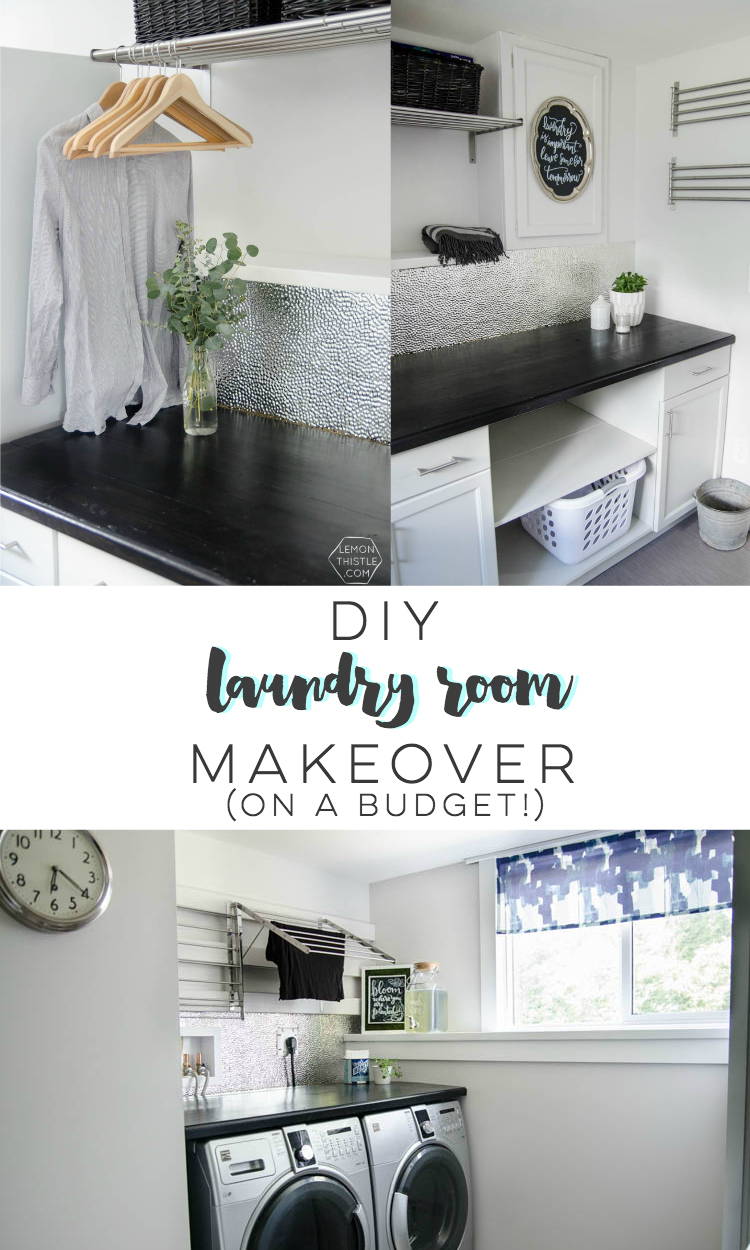
The cabinets are hand me downs from my dad’s old kitchen. We split the two and built shelves for laundry baskets in between using MDF shelving. We ripped a piece of plywood to use as a kick so they look like one unit and painted them all.
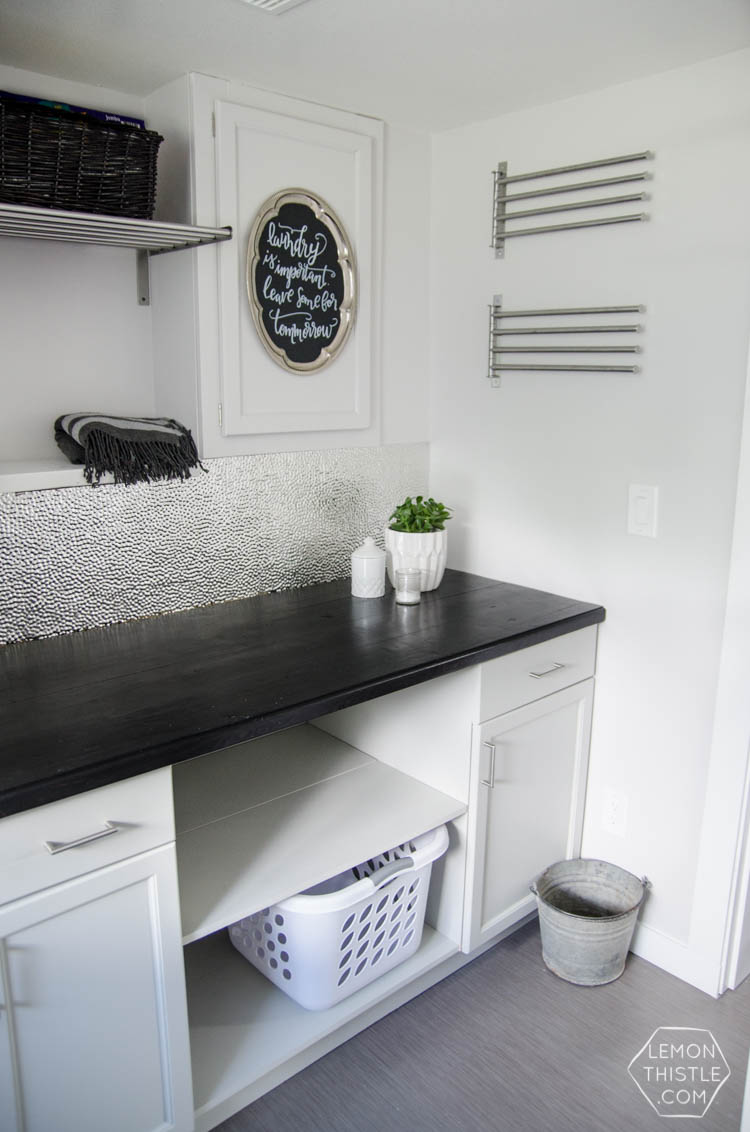
This was my first time painting cabinets, you guys! I used Para Ultra Cabinet Paint and it was really awesome- I only did two coats! I was impressed with how it leveled- so smooth. The color I chose is called ‘Designers Choice’ by Para Paints (P521334D) and is a bit of a muddier (that’s a term) gray than the wall color we have. I really like how it tied in the darker counter tops and floors. I will also tell you that although it’s only been about two months with the cabinets painted, they hold up well! I’ve erased LOTS of toddler drawings from them (if blogs had emoticons, this one would have the monkey covering his face. Because, ugh.), witnessed plenty of ‘fixing’ (hitting them with tools), and had toys dragged all over them. So far… not a lasting mark! I’m calling it a success and can’t wait to try painting more cabinets and furniture with this stuff.
We finished the cabinets off with these simple satin pulls from D. Lawless– the hardware the cabinets had before was preeeeetty awful, so this feels like a complete upgrade. I ordered them before we decided exactly what direction we wanted to take decor in there and I love how simple they are which helps them fit with any kind of decor.
COUNTERTOPS
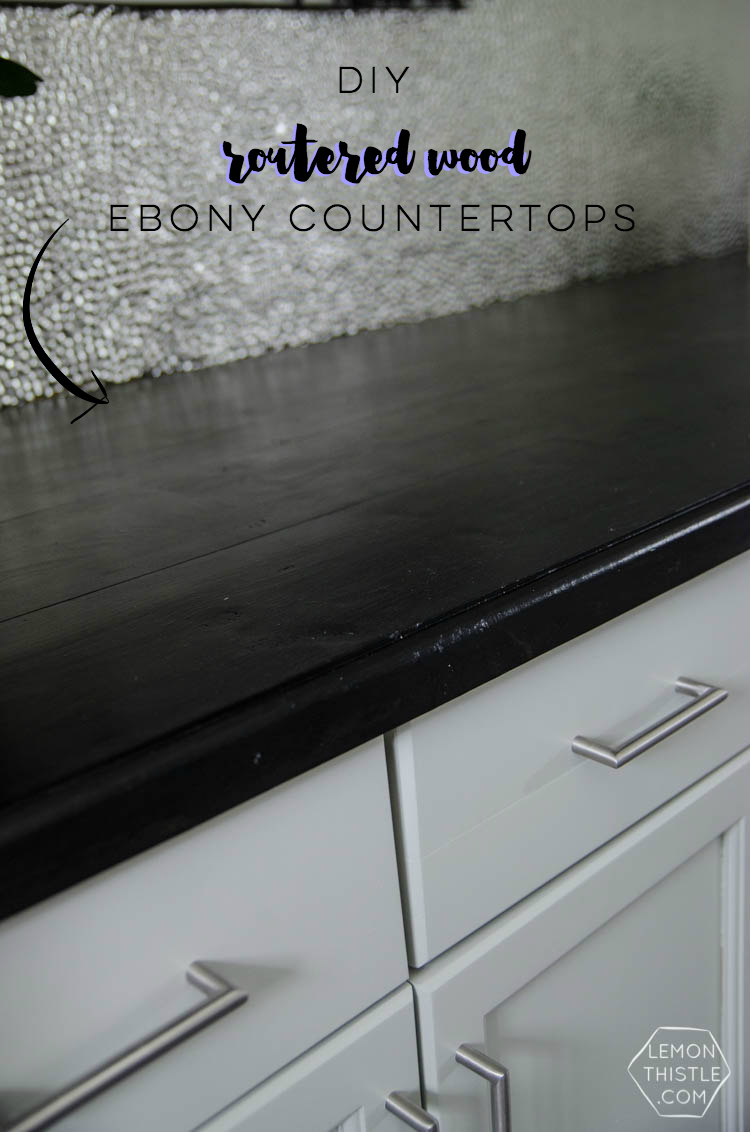
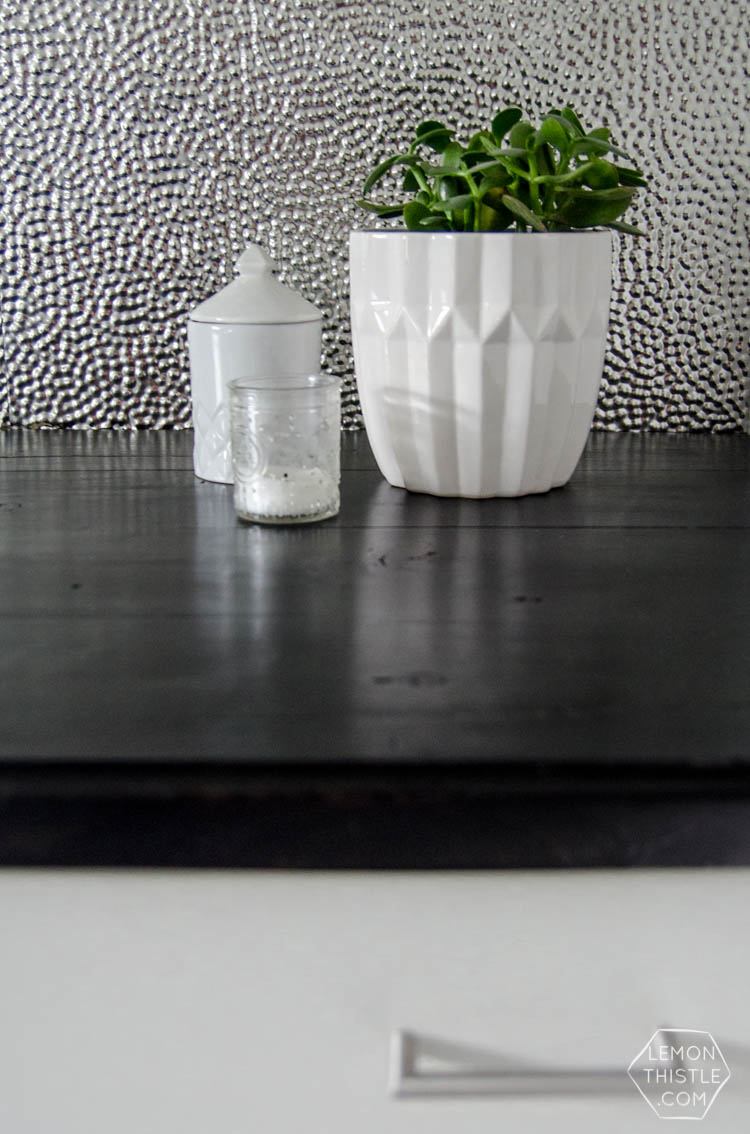
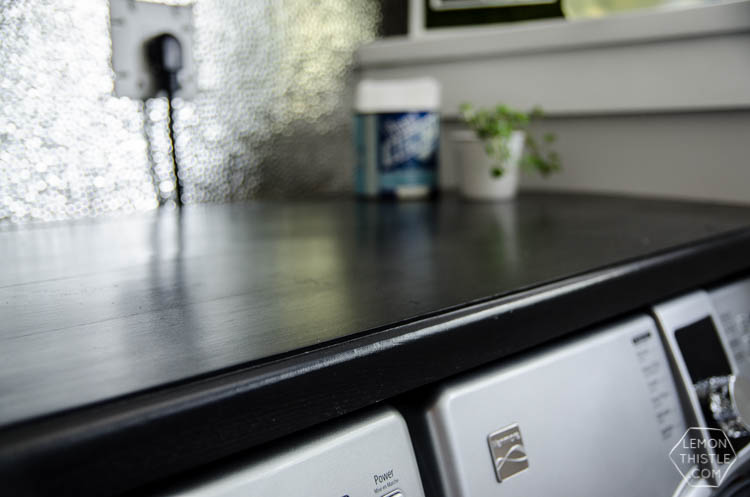
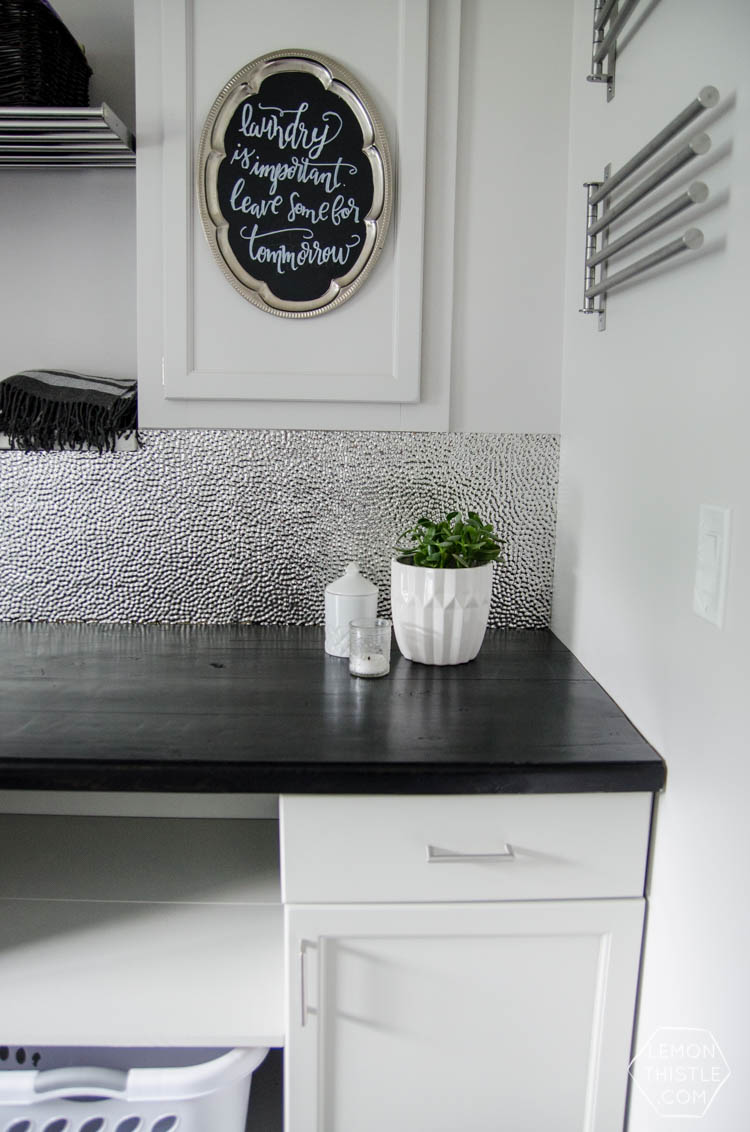
The countertops were a labour of love (and frugality). They’re made of 2x6s and I have to say that I’m totally in love with them! I didn’t take process photos so won’t be doing a tutorial post but will do my best to describe the process in a few sentences. We used a table saw to rip the edges of each 2×6 off (y’know the curved corners), then laminated them together using wood glue and a Kreg jig (pocket holes). We sanded the whole thing level with a belt sander, then routered the front edges (my favourite feature of them!). We stained them a dark stain (Ebony from Minwax) and sealed them with 6 or 7 (seriously) coats of Varathane Crystal Clear in Satin. The countertops are mounted over the washer and dryer leaving a gap at the back for cords and hoses by using Utility L Brackets.
DETAILS & DECOR
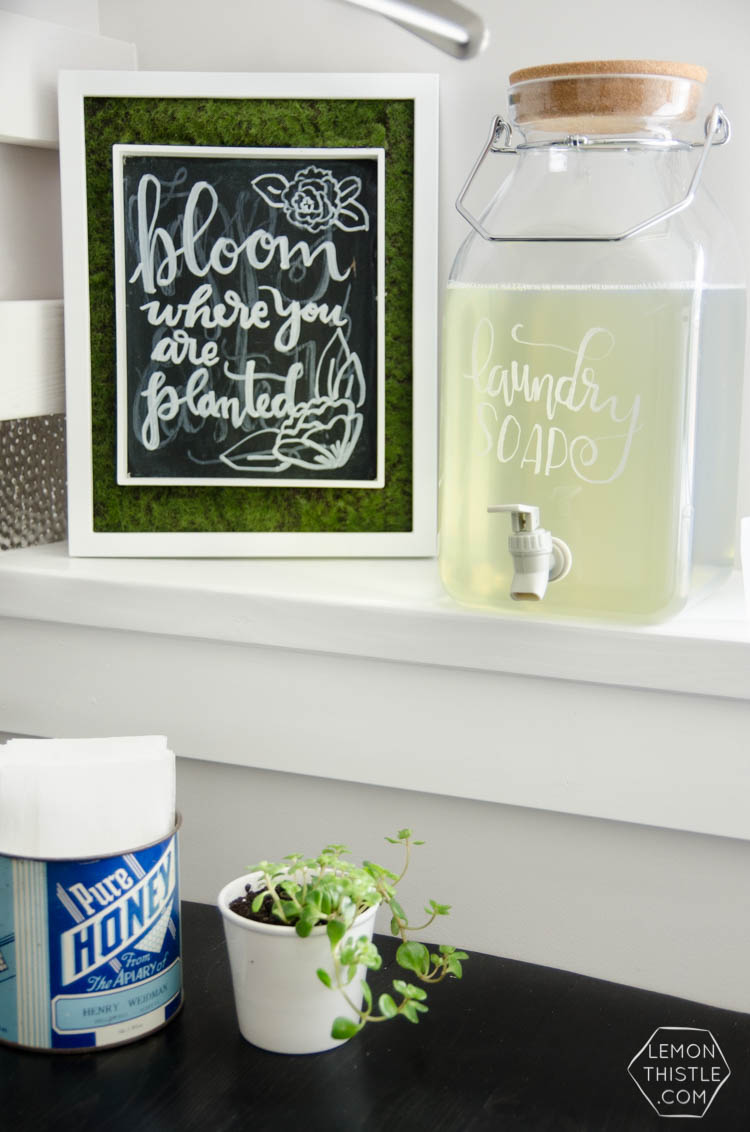
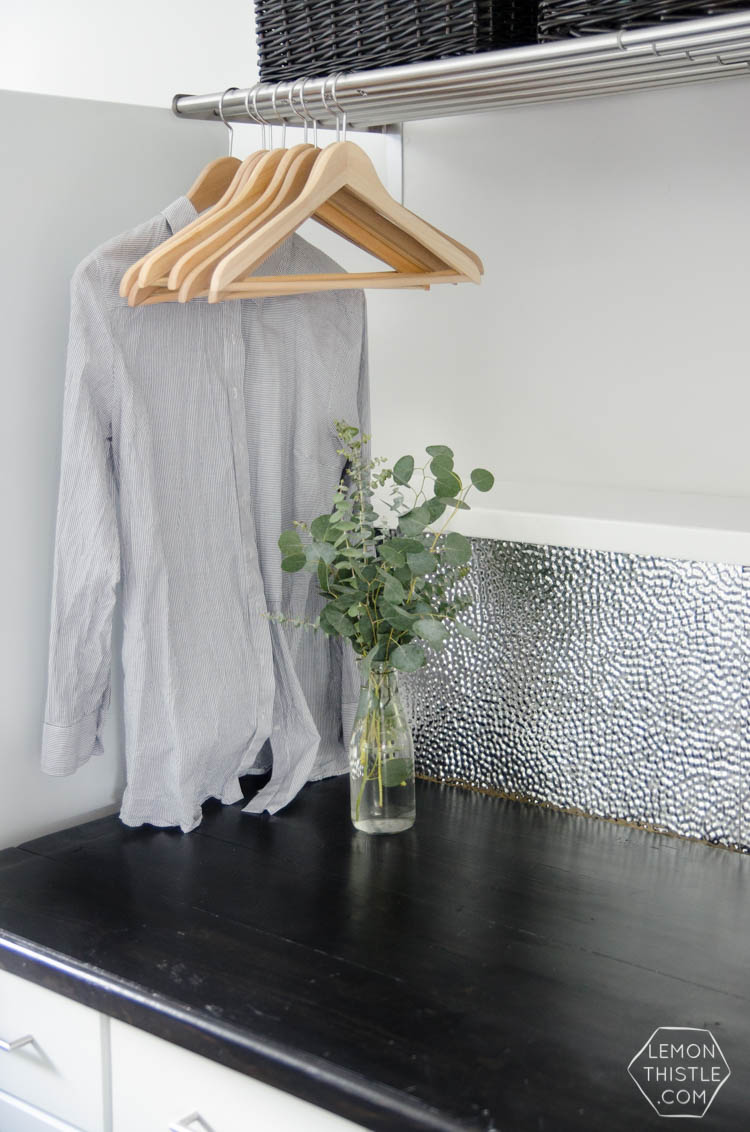
This post is turning super long, super quick so let me try to speed things up. Almost all of the shelves and hooks are from Ikea (of course), including the double hook that the ironing board is hung on. The clock is Debbie Travis from Canadian Tire, but I scored it on Facebook for $2! We also moved our detergents into drink dispensers which I lettered using a chalk pen. I really love the way these work but chose the cheapest ones at the store ($12) and the flow is pretty darn slow with the thicker liquid in them. I used a vintage tin to hold dryer sheets. It’s nice to have everything we use for each load of laundry up on the counters and ledges so I’m not digging in cupboards for every wash. I have the stain removers and iron and such in the cabinets. I also brought down a couple plants, eucalyptus, and a candle for some life. I used the silver framed chalkboard as well as the moss framed chalkboard I DIYed as some decoration. The silver one now says, ‘laundry today or naked tomorrow’ which makes me laugh.
That window shade is just a fabric valance over mini blinds. We love the affordability of mini blinds ($10 a window, you guys!) but don’t love the look of them, so the valance hides them while they’re up, and it’s rare we put them all the way down for privacy. The fabric is a bit difficult to see here, but it’s a beautiful brush stroke print I had gotten from Minted to make throw pillows with.
BACKSPLASH
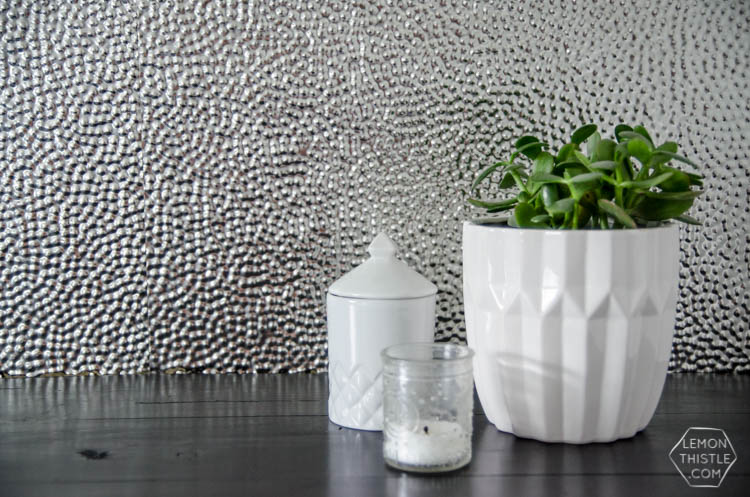
Last but not least, that backsplash is made of ceiling tiles! I am sharing the full DIY tutorial for it today over at Remodelaholic (including a video!), so you can hop over there and check it out if you’re interested.
I am so happy with how this turned out, you guys. It feels like we’re using every inch of space in there to the fullest. All the hooks and shelves and hangers just make it completely functional. And now that it’s a ‘finished’ space… it’s officially the cleanest room in the house. I sort of want to hide in there from the mess that is the rest of our home right now! #truestory
I’d love to hear what you think! Would you try wood countertops? What are your tricks to a functional laundry space?
 Sweet Dreams Coloring Sheet
I love the backsplash. I have to say that if I had a laundry room like this I would LOVE doing laundry haha.
Ahhh yes! I definitely enjoy it more now. I brought down a baby seat and Windsor and I have dates down there now ;)
Okay, I totally love this laundry room! Mine is currently in an unfinished part of the basement and I’ve screwed a large piece of bamboo up to hang clothes from to dry… It is soo not what I want… I am going to take all these photos and try to pretty much copy this when I redo my laundry room. (fingers crossed that happens later this year…)
I’m so glad you found some inspiration! It feels SO good to have it all done. I would love to see photos when you get to it!
I love that counter and how it contrast so nicely with the cabinets! Good job!
Thanks so much Havalah! Shane actually suggested black for the countertop and I’m so glad we went with that!
Oh my gosh!!!! It’s absolutely perfect! LOVE that backsplash, the counter top and all that glorious storage space!
Thanks SO much Kristi! It is such a dream having it done :)
Your laundry room turned out great! I am getting ready to work on mine. I would love to know where you got the metal shelf that you can use to hang clothes that need to air dry. Thanks!
Thanks so much Cathy! I got all those metal shelves from Ikea :)
love your ceiling tiles. Where did you get the and what was the name of the pattern. thanks
Amazing job Colleen and Shane. Love reading your blog and seeing the amazing work you do.
Thanks so much Val!
Were you able to buy individual pieces of the metal ceiling tiles? Or did you have to buy an entire case??
I just ordered by the tile :)
A girl has to ask… if the grey is a custom colour, did you happen to keep the can or do some fancy smart way of keeping the mixing dye numbers and ratios? I would love to know!I am in love with the dark contrast id the wood shelf. I have a too light grey in my laundry room and was going to spend the $$$$ on walnut, but you inspire to reasscess that idea. What a smart ans simple solution! I kept thinking we would have to get a planer to do a counter myself!
The light gray is almost an exact match to Para Paint Cloud grey!
Hi Colleen, I just discovered your post on Pinterest. I love your laundry. I’ve been trying to think of a way to fix up mine, the only problem is that I have the hot water take and all those water lines to deal with as well as the dryer vent hose. Would like your opinion as to how to hide these. Thanks so much
Can you please post the links to the items used? I would like to know where you found the metal bar shelf between cabinets.
That one is IKEA!
Hi. I have a textured backsplash…. Do you think this would work over that. It is just slightly textured. I want to do something to get me through until a more serious remodel.
I can send a picture.
Thank you
Christine
The silicone adhesive will totally stick to even a textured backsplash! I think it would be a great solution!