• Skip to main content
  • Skip to header left navigation
  • Skip to header right navigation
  • Skip to site footer
  • Shop
  • Get The Email
  • Work With Me
  • About
  • Search

  • DIY
    • DIY Home Decor
    • With Power Tools
    • Renovation
    • For Kids
    • For Parties
    • Wearable
    • Organization
    • Cricut Crafts
  • Home Decor
    • Room Reveals
    • Kid Friendly
    • DIY Home Decor
    • Renovation
  • Lettering
    • Hand Lettered Printables
    • Free Practice Sheets
    • Handlettered DIY
    • Free Brush Lettering Quickstart Guide
    • Learn Brush Lettering E-Course SALE
Lemon Thistle

Lemon Thistle

Rad DIY, Lettering and Design for Real People

  • Printables
    • For Cricut
    • Party Printables
    • Home Decor Printables
    • Bachelor Bingos
    • Free Monthly Wallpapers
    • Handlettering Practice Sheets
    • All Free Printables
  • Entertain
    • Party Printables
    • Party DIY
    • Tablescapes
    • Dinner Party
    • Kids Parties
    • Party Eats
    • Baby Showers
    • Wedding + Showers
  • Blog

A Super Fun Graphic Kid’s Nook

Apr 22

An under stairs nook for kids to play! I love the hand stamped 'wallpaper'. Click through for full tutorial

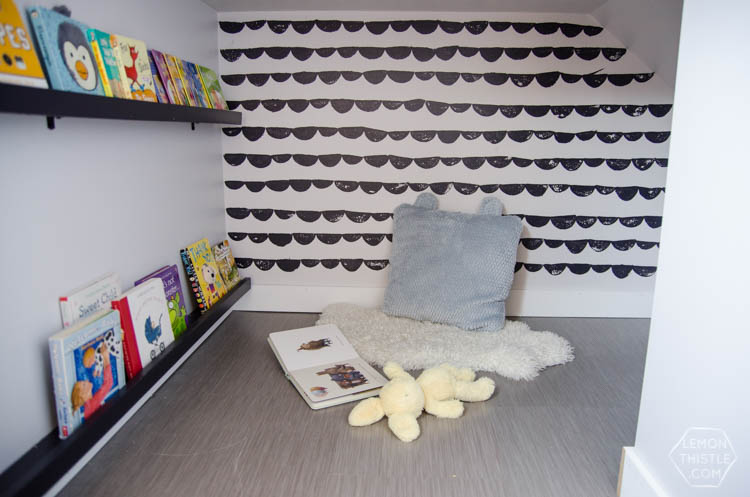
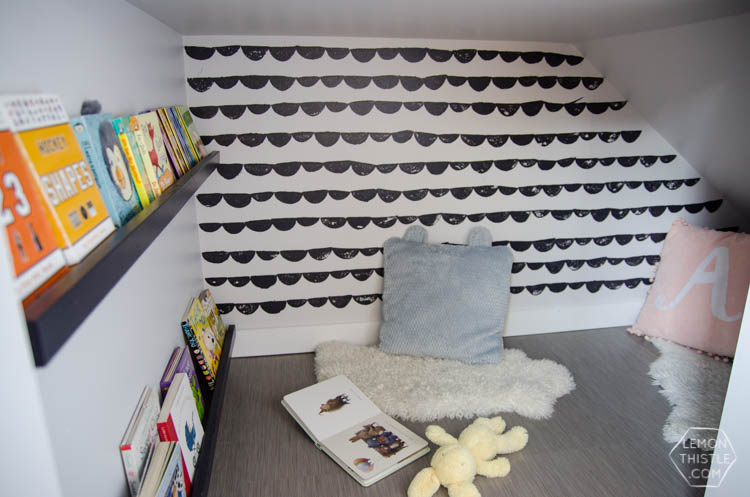
This is such a fun post to be sharing! Now that we’ve finished our built in shelving, our basement is becoming a usable space. The kids have been calling this under the stairs nook their ‘play closet’ for a while now, so I thought I would make it a bit more fun for them with a hand stamped wall.

This year (although I’m off to a late start #ihadababy), I’m partnering with the fabulous Para Paints (they’re Canadian too!) to bring some paint projects to the blog. This isn’t hard for me… because if you haven’t noticed- I paint a lot of stuff. The biggest perk for me (I’m going to sound like such a nerd here) is that I have my own fan deck so I can pick colours without standing in the store for hours. Anyone else take that long? I swear the hardware stores I frequent know me by name. I chose this beautiful charcoal, almost black colour called ‘On the Runway’ in a semi-gloss for this project and painted those DIY book ledges to match.

An under stairs nook for kids to play! I love the hand stamped 'wallpaper'. Click through for full tutorial

I tried to get a photo around the corner, but there is literally 0 light in here. I’m sure you can picture what an ‘under stairs’ space looks like though. We have a push on and off light that I just bought I will mount to the ceiling for the kids. No cords to keep it safe.

When I was dreaming up what to do down here, I knew I wanted a ledge for books (there’s the perfect spot for it with the way the wall juts), lots of pillows, and something fun that is ‘all kid’. When we finished the basement, we drywalled the under stairs space in half- the bigger half for storage and this half height spot for the kids. I thought it was a small enough space that I could wallpaper it and was really inspired by some of the fancy kids spaces you see on Instagram (you know the ones) but even then… wallpaper can get pricey. I decided this pattern was simple enough I could stamp it myself and I am so thrilled with how it turned out.

An under stairs nook for kids to play! I love the hand stamped 'wallpaper'. Click through for full tutorial

An under stairs nook for kids to play! I love the hand stamped 'wallpaper'. Click through for full tutorial

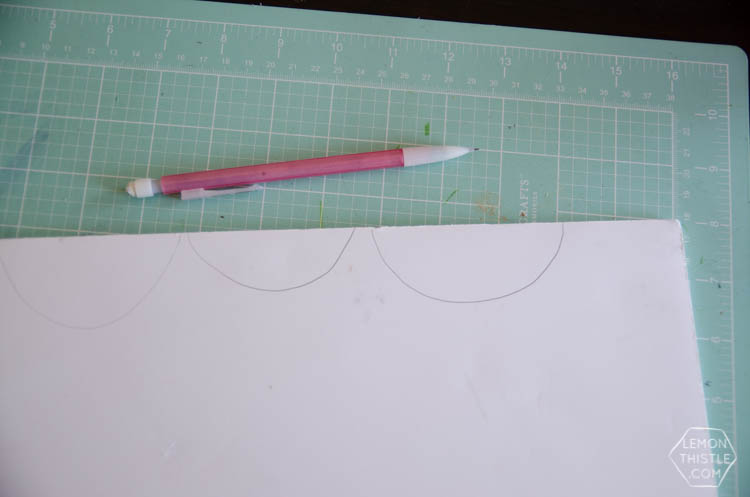
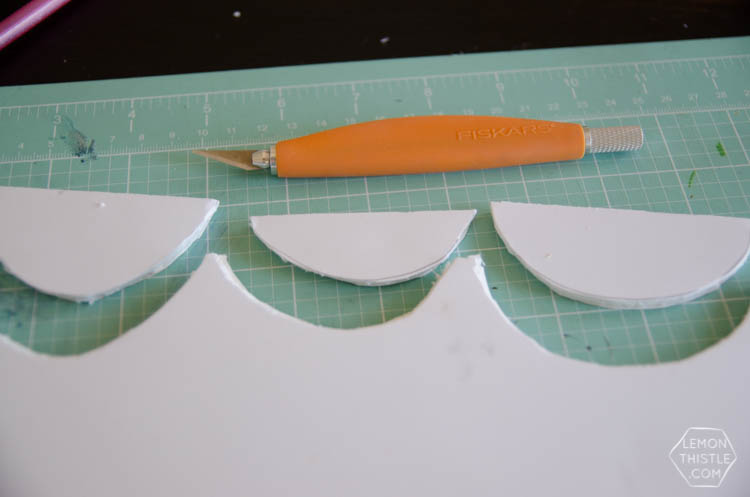
I cut out three different size scallops out of craft foam (I wish I’d done one more, though) and simply painted the stamp and stamped it on. I eyeballed the lines and left some of the stamps without enough paint. I love the way it gave it a playful, handmade look. I was originally going to fill them in but like it so much better this way.

An under stairs nook for kids to play! I love the hand stamped 'wallpaper'. Click through for full tutorial

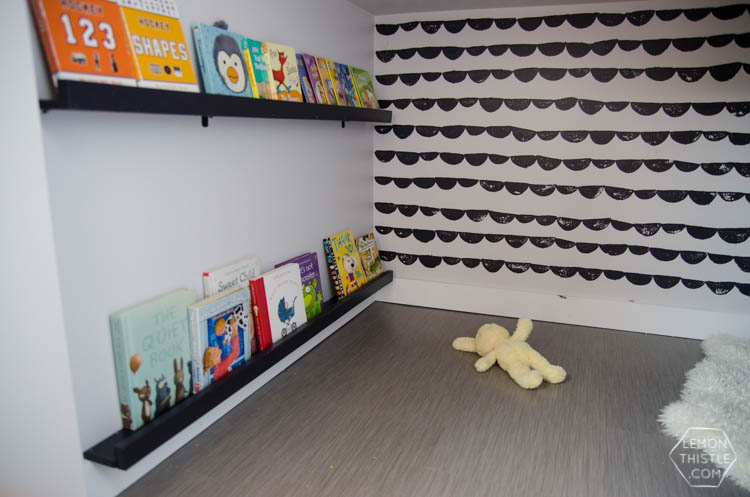
Those ledges are also DIY. I didn’t write a tutorial for them because they were so simple (and sometimes it’s nice to just build without stopping to take photos). We used a 1×3 for the base and a 1×2 for the edge. I used PL (my fave) and brad nails to attach them. I used PL and brad nails to put them on the wall but then got worried that my kids would climb them and added mini L brackets on studs to make them extra strong. The sweet girls at Classy Clutter have more detailed instructions (and theirs have a backing making them easier to attach to the wall) if you like. Our space was so limited that I didn’t want to add bulk with backing and this is just as secure.

An under stairs nook for kids to play! I love the hand stamped 'wallpaper'. Click through for full tutorial

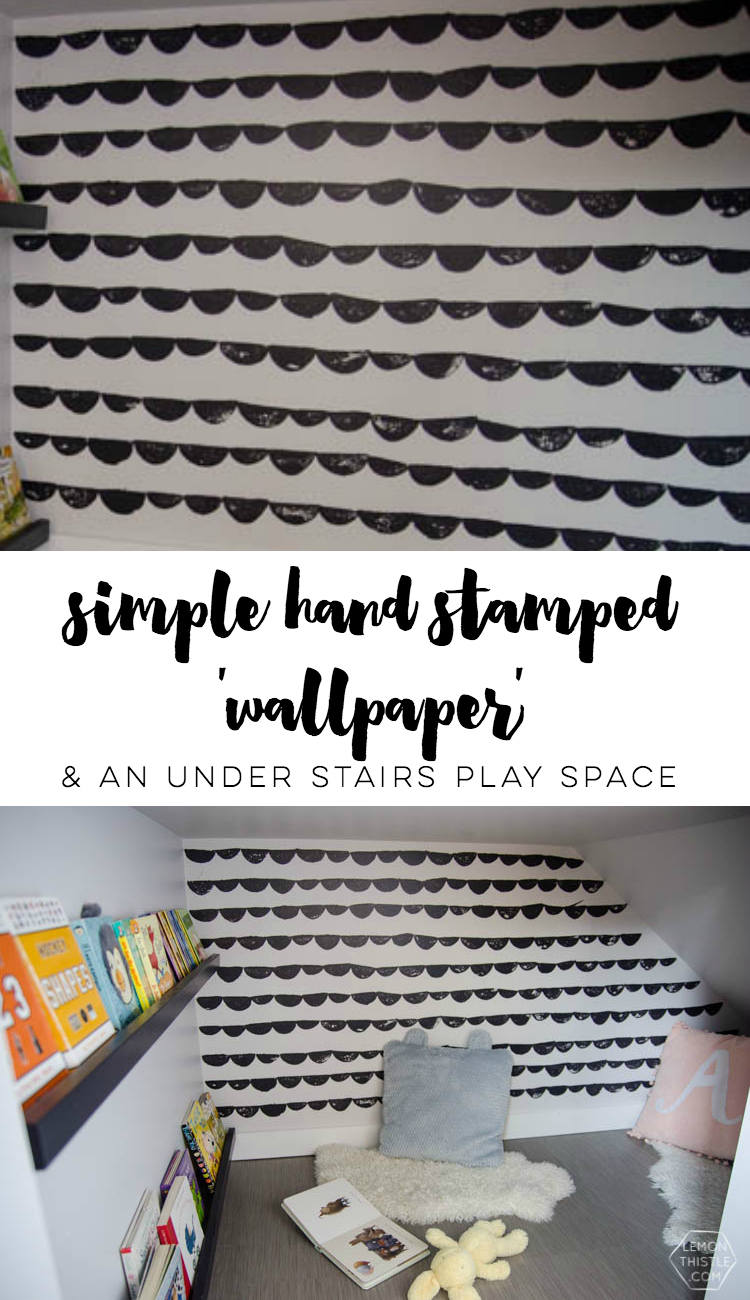
So that’s all there is to it! It’s officially my kids favourite room in the house (and the smallest). We’re busy working on the rest of the basement (filling and painting trim seems to take foreeeeever) and I can’t wait to share the whole shebang with you guys. Now that I’ve tried a hand stamped wall (paper), I am dreaming up all the other spaces I could give a touch of pattern to. Also #spoileralert I actually went ahead and got some bright colours. And one other gray… but there’s some bold hues coming your way and I can’t wait.


Category: DIY, Home DecorTag: DIY Home Decor, Kid Friendly Home, Kids, Kids Rooms, Organization, Our Home, Paint, Room Reveal, Sponsored, Storage, Wall Decor, Wall Treatment
Facebook0Tweet0Pin0LinkedIn0
Previous Post: ← DIY Hand Lettered Name Cut Outs DIY Hand Lettered Name Cut Outs
Next Post: Host a Crafternoon (with free invitations) How to host a crafternoon! And free printable invitations →

Reader Interactions

Comments

  1. Jen @ RamblingRenovators

    Apr 22 at 10:48 am

    This is so cute! Love the playful quality of the handstamped wallpaper. I hope your kids get lots of fun out of it. We have an under the stairs nook too and sadly it gets used less every passing day. I’ll be sad when we turn it back into a storage closet.

    Reply
    • Colleen Pastoor

      Apr 25 at 8:37 am

      Thanks so much Jen! They are loving it so far. I’m sure one day they’ll outgrow it and I know it will be sad for me!

      Reply
  2. Trisha H.

    Aug 09 at 2:03 pm

    It is a very cute and chic design, but probably something that they may outgrow. You could always let them fill it in with colors if they’re old enough, to keep it fresh, and give them a nice project they can work on and be proud of. Thank you for sharing!

    Reply
    • Colleen Pastoor

      Aug 17 at 8:16 am

      Thanks so much Trisha! Great idea :)

      Reply

Leave a Reply Cancel reply

Your email address will not be published. Required fields are marked *

Sidebar

WOOHOO!

Check your email to confirm!

(+ get your freebies + discounts)


Thanks for dropping by!
I’m Colleen: wife; mom to 4 wild ones; and DIY blogger behind Lemon Thistle. You can expect to see rad DIY, modern home decor, renovations, hand lettering and the occasional party on Lemon Thistle. Read More…

email facebook youtube instagram pinterest

Unless otherwise noted, all content and images are mine. Full posts may not be shared without express written consent. But I love when you share! Feel free to share, without altering, one image with proper credit and a link to the original post. All free printables are for personal use only.

Everyone loves proper credit- if you ever notice something improperly credited, please please shoot me an email and I’ll fix it lightning fast.

Find all my policies right here.
This includes my privacy policy, info on the GDRP compliance and information on affiliate links (Including Amazon Affiliates).

Visit Colleen Pastoor’s profile on Pinterest.

colleenpastoor

My house is never this clean
-
DIY + Home Decor Blogger
Mama of 4 👶🏼🧒🏼👦🏼👧🏼
Renovating our 🏠 the DIY way
🖤 Lettering & ☕️
-
✉️[email protected]monthistle.com

colleen pastoor/lemon thistle
The hallway is finally finished and I’m so stink The hallway is finally finished and I’m so stinking happy! 

It’s felt like such a long time coming for such a small space. Since we moved in 2.5 years ago, this space has seen new doors and hardware, new trim, new floors... twice😅, we changed the boob light to a pot light and I hated it and now it’s got the most beautiful flush mount fixture I’m in love with (thanks @mymitzi!). It finally got some fresh paint and now frames on walls and last but not least... After this weekend, the new floors look like they were here all along (no door jamb gaps!) which was the last thing really bugging me since our flood last year. 

All this to say that home takes time and sometimes getting it right might take a couple tries. Also- the spaces we don’t really think about (hallways) can totally help a house feel like home with some love (and family photos 🥰)
ps. I partnered with #mymitzi to create a tiktok for This makeover... are you following me over there yet?! I’d love if you popped over and said hi!
It’s done! It works! And I’m calling it a grea It’s done! It works! And I’m calling it a great use of my afternoon the other day. Did you catch the stories? These projects both cost me under $10 by using pieces I already had in my home (yay for scraps!) and one package of drawer slides).
You can find the full video about these two kitchen organization projects over on YouTube in collaboration with my friend @love_create_celebrate and her #scrapsmademodern challenge! But for now... I’m rejoicing this coffee maker is off my counter for good 🎉
How’s your January going? Full speed or are you How’s your January going? Full speed or are you taking it a bit slow too? 

I’m not going to lie, I’m easing into this new year thing pretty slowly. All my decorations are still up (we always leave them up til Ukrainian Christmas which is later this week) and I I’ve yet to respond to my emails since before Christmas 😅
I’m enjoying the slowness of it all.
Happy Christmas Eve from our fam to yours 🥰 Happy Christmas Eve from our fam to yours 🥰
Yes, I made the paper bag snowflakes too. Have you Yes, I made the paper bag snowflakes too. Have you? 😅
This year has been one of a kind and I know so man This year has been one of a kind and I know so many people who are taking this year as the push they’ve been waiting for to start a side hustle, start an new career altogether or to just get creative about how they’re making money. So today I’m excited to partner with @kregjig to share some rad projects to make and sell this year! 
Like this rolling storage system I made for my office, that rad dollhouse and the gorgeous bath toy storage. All of these projects are things that I’d personally love to buy for our family and look like they’d be a great return on your time making them! And yes, all of them use #Kreg tools to make them easy to assemble and quick to make! Plus, they’re having a great sale on right now with deals on their K4 and K5 jigs, Rip-Cut and even a hardware jig bundle! There’s never been a better time to get your workshop set up!  #sponsored
Just a peaceful moment and then a real life moment Just a peaceful moment and then a real life moment for ya 🙃 
My #holidayhometour is on the blog and YouTube (I’ll put links in my stories) as part of the #seasonalsimplicity holiday home tour series. I’ll share those too so you don’t miss any!
My holiday home tour will be up tomorrow, but for My holiday home tour will be up tomorrow, but for tonight... I’m just enjoying the lights. And possibly a hallmark movie with some more custom order lettering 😅 what are your plans?
#christmasdecor #christmastree #holidaylights
We finished decorating yesterday and I’m just si We finished decorating yesterday and I’m just sitting here enjoying every minute of it 🤩 have you decorated yet?
Ps... talking more about hand lettering in my stories tonight!
Load More... Follow on Instagram

Copyright © 2021 · Lemon Thistle · All Rights Reserved · Powered by Mai Theme