• Skip to main content
  • Skip to header left navigation
  • Skip to header right navigation
  • Skip to site footer
  • Shop
  • Get The Email
  • Work With Me
  • About
  • Search

  • DIY
    • DIY Home Decor
    • With Power Tools
    • Renovation
    • For Kids
    • For Parties
    • Wearable
    • Organization
    • Cricut Crafts
  • Home Decor
    • Room Reveals
    • Kid Friendly
    • DIY Home Decor
    • Renovation
  • Lettering
    • Hand Lettered Printables
    • Free Practice Sheets
    • Handlettered DIY
    • Free Brush Lettering Quickstart Guide
    • Learn Brush Lettering E-Course SALE
Lemon Thistle

Lemon Thistle

Rad DIY, Lettering and Design for Real People

  • Printables
    • For Cricut
    • Party Printables
    • Home Decor Printables
    • Bachelor Bingos
    • Free Monthly Wallpapers
    • Handlettering Practice Sheets
    • All Free Printables
  • Entertain
    • Party Printables
    • Party DIY
    • Tablescapes
    • Dinner Party
    • Kids Parties
    • Party Eats
    • Baby Showers
    • Wedding + Showers
  • Blog

DIY Paint Dipped Silverware (That you can Wash!)

Mar 16

DIY Paint Dipped Silverware (That You can Actually Wash!)

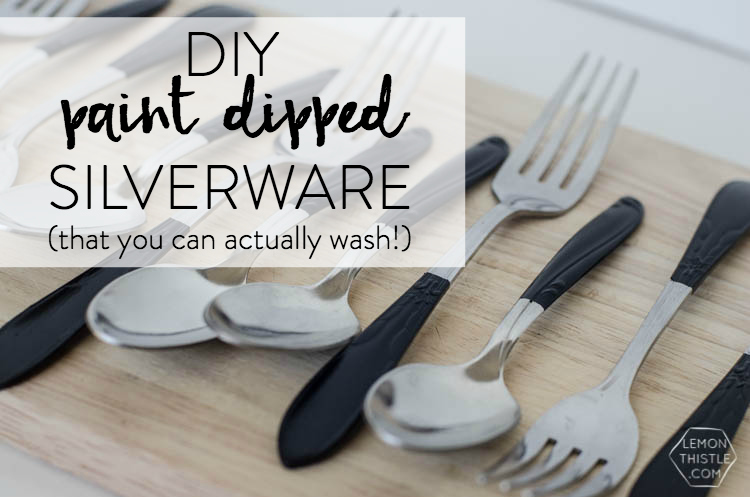
Guys! Before I start talking about this DIY, I want to thank you all so much for your massive support last week on our DIY Saint Patrick’s Day Party. It was so much fun to put together for you, and I’m still pretty giddy at how awesome it turned out. I definitely want to do another DIY party in the future- so if you have any ideas or requests, please let me know! If you missed any of the fun, you can check out the whole party along with links to the DIYs from the party right here. You may have noticed the fun silverware we used for the party. Today I wanted to share how to DIY your own paint dipped silverware!

If you remember, a while back I shared how to paint disposable silverware with bright colours to match your party. I have actually washed up and held onto those because I love them so much. This concept is pretty much the same- but on real silverware. My Grandma gave me a bag of cutlery she had used in her camping trailer. I couldn’t resist trying the process out on something that wasn’t plastic and I’m so happy I did! We have washed these babies a few times and other than a few knicks and scratches (our kids use these things, y’know), they are holding up SO WELL. 

DIY Paint Dipped Silverware (That You can Actually Wash!)

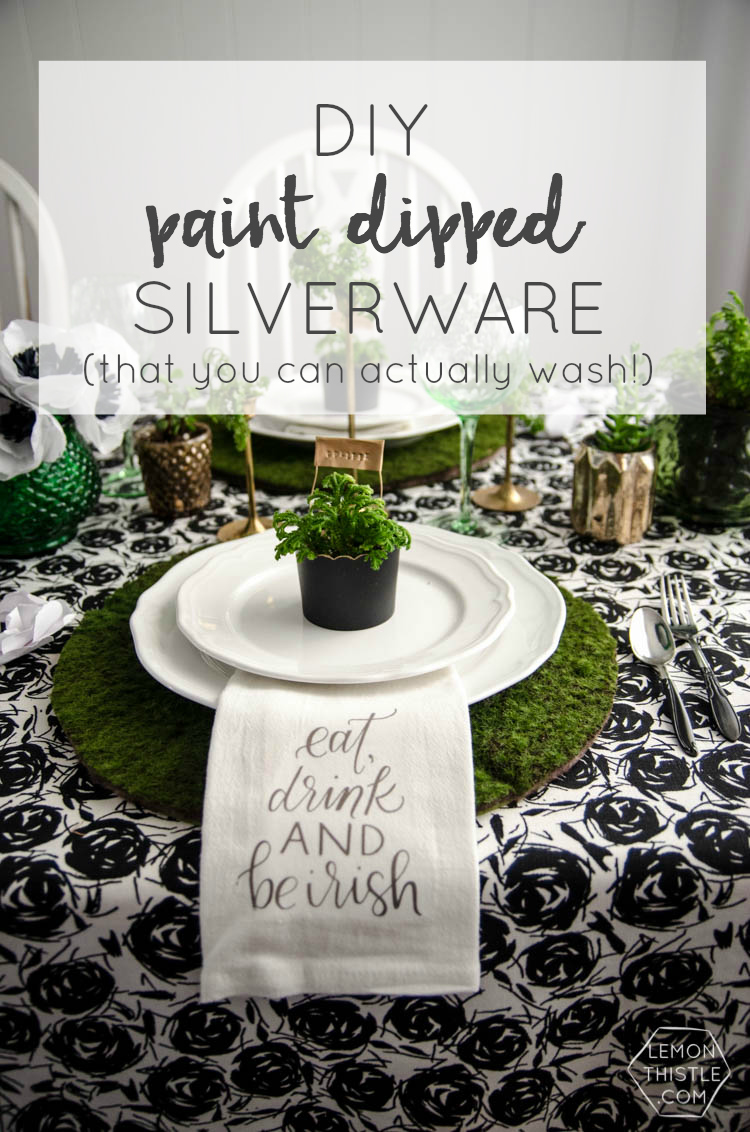
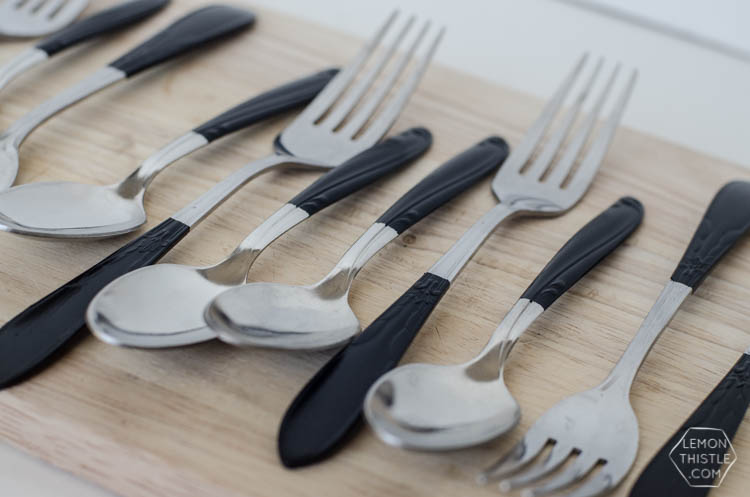
See… look how cute they look on the table there! Anyways, the reason they’re okay to wash is because of the type of paint. Multi-surface craft paint (the kind you would use on ceramics) is supposed to be dishwasher safe on ceramics after 21 days. I haven’t put these in the dishwasher because they’re not ceramic, they’re metal… but if you were willing to re-paint them should it not work, go right ahead and try that out (and tell us how it worked!). The hardest part was letting these sit without touching them for 21 days. UGH, I’m not a very patient crafter.

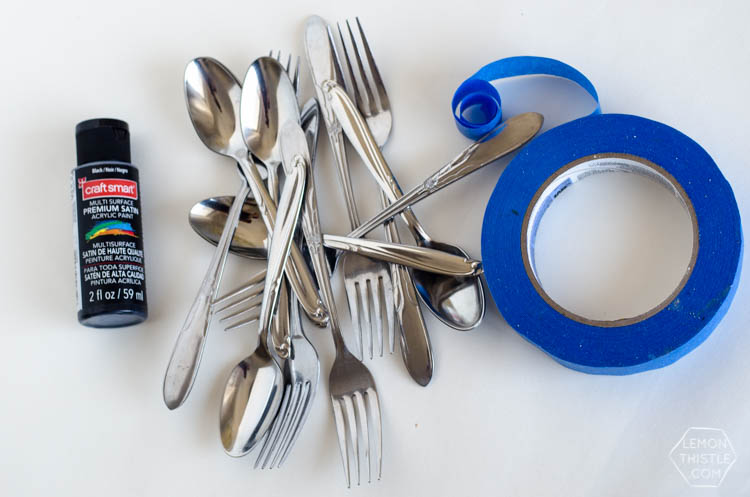
Here’s What You’ll Need to Make Your Own:

  • Multi-Surface Craft Paint
  • Painters Tape
  • Paint Brush
  • Silverware
  • Craft Knife
  • Patience (JK, I’m sure you already have that)

DIY Paint Dipped Silverware (That You can Actually Wash!)

DIY Paint Dipped Silverware (That You can Actually Wash!)

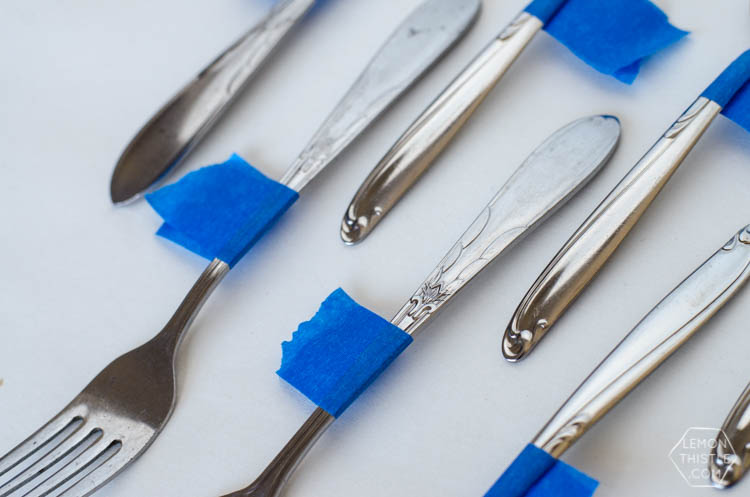
Start by cleaning your cutlery until it shines. Use a cotton swab with rubbing alcohol to prepare them for the paint, then go ahead and tape them off. Make sure to press the tape firmly into all the grooves to prevent any bleeding. I chose to tape off right below any designs on the silverware.

DIY Paint Dipped Silverware (That You can Actually Wash!)

DIY Paint Dipped Silverware (That You can Actually Wash!)

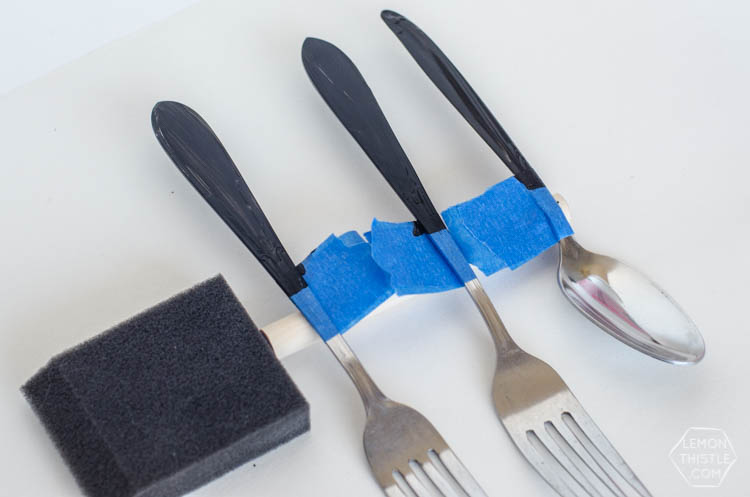
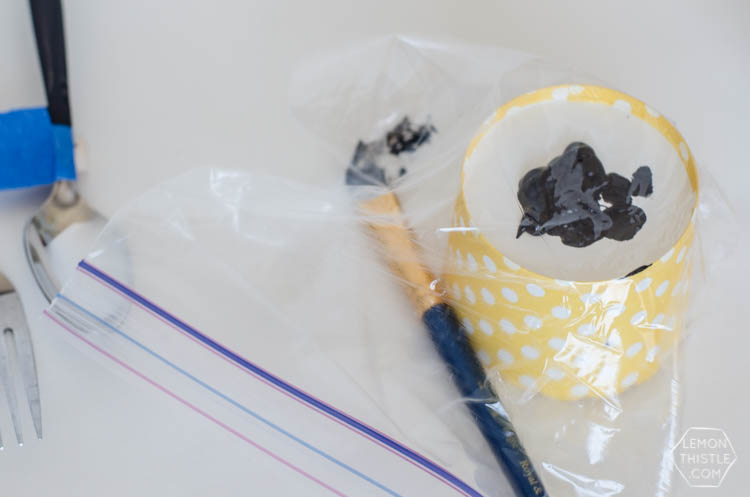
Now, it’s time to paint. As with the plastic cutlery, it’s best to drag your paint brush from the tape towards the rest of the painted surface, to avoid bleeding. It will take a couple coats, and again- you’ll have to use your patience because trying to add a coat before the other is fully dried just makes a mess. Not that I would know from experience or anything… I used a foam paint brush (but a wooden spoon would work too) to prop the cutlery up so I could do front and back all at once. This was a huge timesaver! Oh, and I took a photo of how I save my paint between coats when I need to wait an hour or more for each coat to dry- I just seal it all up in a baggy. I’m not sure if this is standard practice, but it keeps my brush from getting hard and excess paint from being wasted (and it saves my lazy butt from washing the brush between every coat).

DIY Paint Dipped Silverware (That You can Actually Wash!)

DIY Paint Dipped Silverware (That You can Actually Wash!)

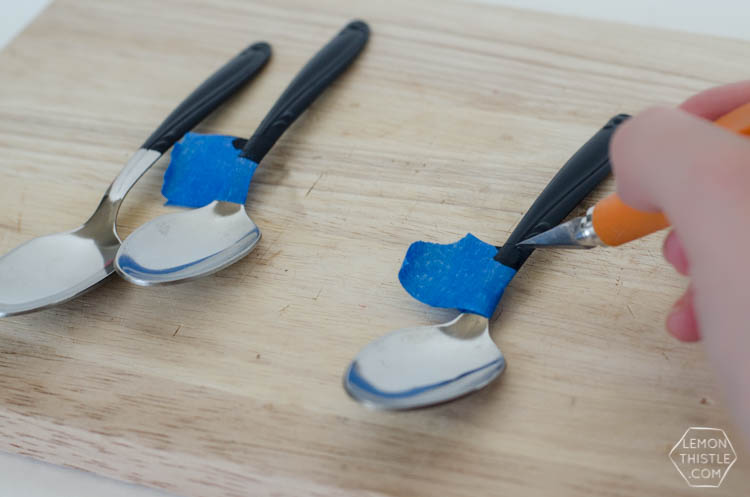
Now you’re ready to take your tape off! Use your sharp craft knife to separate the tape from the painted area, this will let you pull back the tape without damaging the edges of the paint. Look at those clean lines!

Easy peasy, right? I’m so happy with them, Shane and I have put them into rotation for every day use. I have seen painted silverware done with spraypaint as well- I’m not sure how foodsafe (although I wouldn’t eat off the painted ends of these either) that is, or how well it stands up under washing. But I’m very happy with this method! So, tell me- would you ever paint silverware? What colour would you choose? I love the satin finish black we chose- gloss would look lovely too though!

Category: DIY, Entertain, Home DecorTag: Craft, Dining Room, Dinner Party, DIY Home Decor, Paint, Party DIY, Tablescapes
Facebook0Tweet0Pin0LinkedIn0
Previous Post: ← DIY Candy Coated Grocery Store Cake Makeover DIY Candy Coated Cake Makeover (Gilded Topper)
Next Post: Easter is For… Printables! Awesome hand lettered free printable for easter →

Reader Interactions

Comments

  1. Bre Paulson

    Mar 21 at 4:01 pm

    This is such a great idea for all of the lonely silverware at the thrift stores! I think I found my next project :)

    Reply
    • Colleen Pastoor

      Mar 25 at 10:09 pm

      Yes! That was exactly my thought too. It’s so darn cheap- and I’m tired of my boring silverware we have.

      Reply
  2. haydee

    Mar 27 at 11:46 am

    what a great idea/project—thank you so much for sharing

    Reply
    • Colleen Pastoor

      Mar 27 at 7:34 pm

      Thanks so much Haydee! It is a fun way to dress up old cutlery- I’m so glad you like it.

      Reply
  3. Heather

    Dec 10 at 5:49 am

    I have been looking and looking to find the best way to redo my silverware… I could kiss you!! This DIY is fantastic, and I prefer this option over spray paint. Thank you so much for sharing this excellent technique with the rest of us!

    Much love,
    Heather

    Reply
  4. Kelsey D

    Mar 11 at 8:34 am

    When you say wash, are you washing by hand or dishwasher?

    Reply
    • Colleen Pastoor

      May 26 at 6:44 pm

      I’d recommend by hand :)

      Reply

Leave a Reply Cancel reply

Your email address will not be published. Required fields are marked *

Sidebar

WOOHOO!

Check your email to confirm!

(+ get your freebies + discounts)


Thanks for dropping by!
I’m Colleen: wife; mom to 4 wild ones; and DIY blogger behind Lemon Thistle. You can expect to see rad DIY, modern home decor, renovations, hand lettering and the occasional party on Lemon Thistle. Read More…

email facebook youtube instagram pinterest

Unless otherwise noted, all content and images are mine. Full posts may not be shared without express written consent. But I love when you share! Feel free to share, without altering, one image with proper credit and a link to the original post. All free printables are for personal use only.

Everyone loves proper credit- if you ever notice something improperly credited, please please shoot me an email and I’ll fix it lightning fast.

Find all my policies right here.
This includes my privacy policy, info on the GDRP compliance and information on affiliate links (Including Amazon Affiliates).

Visit Colleen Pastoor’s profile on Pinterest.

colleenpastoor

My house is never this clean
-
DIY + Home Decor Blogger
Mama of 4 👶🏼🧒🏼👦🏼👧🏼
Renovating our 🏠 the DIY way
🖤 Lettering & ☕️
-
✉️[email protected]

colleen pastoor/lemon thistle
Who has DIY projects on their mind this year?! @ry Who has DIY projects on their mind this year?! @ryobi_canada and I want to help you start knocking those projects off your list by giving away a new nailer and battery set! #ad 
This tool is what we used for this accent wall and all the trim in our home. It’s the one I used to trim out my built in shelving and add the decorative moulding to my geometric barn door. What I’m saying is this thing is a workhorse and I want you to have one too 😉
To enter:
✨Follow me @colleenpastoor and @ryobi_canada 
✨like and save this photo 
✨ tag some friends who’d love to win in the comments! One tag per comment, each is an entry. 
✨ share to your stories for a bonus 5 entries!

Open to Canadians only this time (sorry US friends!) and not associated with Instagram. Closes Friday Jan 22 at noon PST!
Let’s talk about coffee! This is my coffee ‘st Let’s talk about coffee! This is my coffee ‘station’ and the second photo is my dads! I’m talking aaaall about them over on YT today!
Also... see how nice that fresh silicone looks?! 😉 IYKYK
The hallway is finally finished and I’m so stink The hallway is finally finished and I’m so stinking happy! 

It’s felt like such a long time coming for such a small space. Since we moved in 2.5 years ago, this space has seen new doors and hardware, new trim, new floors... twice😅, we changed the boob light to a pot light and I hated it and now it’s got the most beautiful flush mount fixture I’m in love with (thanks @mymitzi!). It finally got some fresh paint and now frames on walls and last but not least... After this weekend, the new floors look like they were here all along (no door jamb gaps!) which was the last thing really bugging me since our flood last year. 

All this to say that home takes time and sometimes getting it right might take a couple tries. Also- the spaces we don’t really think about (hallways) can totally help a house feel like home with some love (and family photos 🥰)
ps. I partnered with #mymitzi to create a tiktok for This makeover... are you following me over there yet?! I’d love if you popped over and said hi!
It’s done! It works! And I’m calling it a grea It’s done! It works! And I’m calling it a great use of my afternoon the other day. Did you catch the stories? These projects both cost me under $10 by using pieces I already had in my home (yay for scraps!) and one package of drawer slides).
You can find the full video about these two kitchen organization projects over on YouTube in collaboration with my friend @love_create_celebrate and her #scrapsmademodern challenge! But for now... I’m rejoicing this coffee maker is off my counter for good 🎉
How’s your January going? Full speed or are you How’s your January going? Full speed or are you taking it a bit slow too? 

I’m not going to lie, I’m easing into this new year thing pretty slowly. All my decorations are still up (we always leave them up til Ukrainian Christmas which is later this week) and I I’ve yet to respond to my emails since before Christmas 😅
I’m enjoying the slowness of it all.
Happy Christmas Eve from our fam to yours 🥰 Happy Christmas Eve from our fam to yours 🥰
Yes, I made the paper bag snowflakes too. Have you Yes, I made the paper bag snowflakes too. Have you? 😅
This year has been one of a kind and I know so man This year has been one of a kind and I know so many people who are taking this year as the push they’ve been waiting for to start a side hustle, start an new career altogether or to just get creative about how they’re making money. So today I’m excited to partner with @kregjig to share some rad projects to make and sell this year! 
Like this rolling storage system I made for my office, that rad dollhouse and the gorgeous bath toy storage. All of these projects are things that I’d personally love to buy for our family and look like they’d be a great return on your time making them! And yes, all of them use #Kreg tools to make them easy to assemble and quick to make! Plus, they’re having a great sale on right now with deals on their K4 and K5 jigs, Rip-Cut and even a hardware jig bundle! There’s never been a better time to get your workshop set up!  #sponsored
Just a peaceful moment and then a real life moment Just a peaceful moment and then a real life moment for ya 🙃 
My #holidayhometour is on the blog and YouTube (I’ll put links in my stories) as part of the #seasonalsimplicity holiday home tour series. I’ll share those too so you don’t miss any!
Load More... Follow on Instagram

Copyright © 2021 · Lemon Thistle · All Rights Reserved · Powered by Mai Theme