• Skip to main content
  • Skip to header left navigation
  • Skip to header right navigation
  • Skip to site footer
  • Shop
  • Get The Email
  • Work With Me
  • About
  • Search

  • DIY
    • DIY Home Decor
    • With Power Tools
    • Renovation
    • For Kids
    • For Parties
    • Wearable
    • Organization
    • Cricut Crafts
  • Home Decor
    • Room Reveals
    • Kid Friendly
    • DIY Home Decor
    • Renovation
  • Lettering
    • Hand Lettered Printables
    • Free Practice Sheets
    • Handlettered DIY
    • Free Brush Lettering Quickstart Guide
    • Learn Brush Lettering E-Course SALE
Lemon Thistle

Lemon Thistle

Rad DIY, Lettering and Design for Real People

  • Printables
    • For Cricut
    • Party Printables
    • Home Decor Printables
    • Bachelor Bingos
    • Free Monthly Wallpapers
    • Handlettering Practice Sheets
    • All Free Printables
  • Entertain
    • Party Printables
    • Party DIY
    • Tablescapes
    • Dinner Party
    • Kids Parties
    • Party Eats
    • Baby Showers
    • Wedding + Showers
  • Blog

DIY Monogrammed Velvet Napkin Rings (and Bunting)

Nov 05

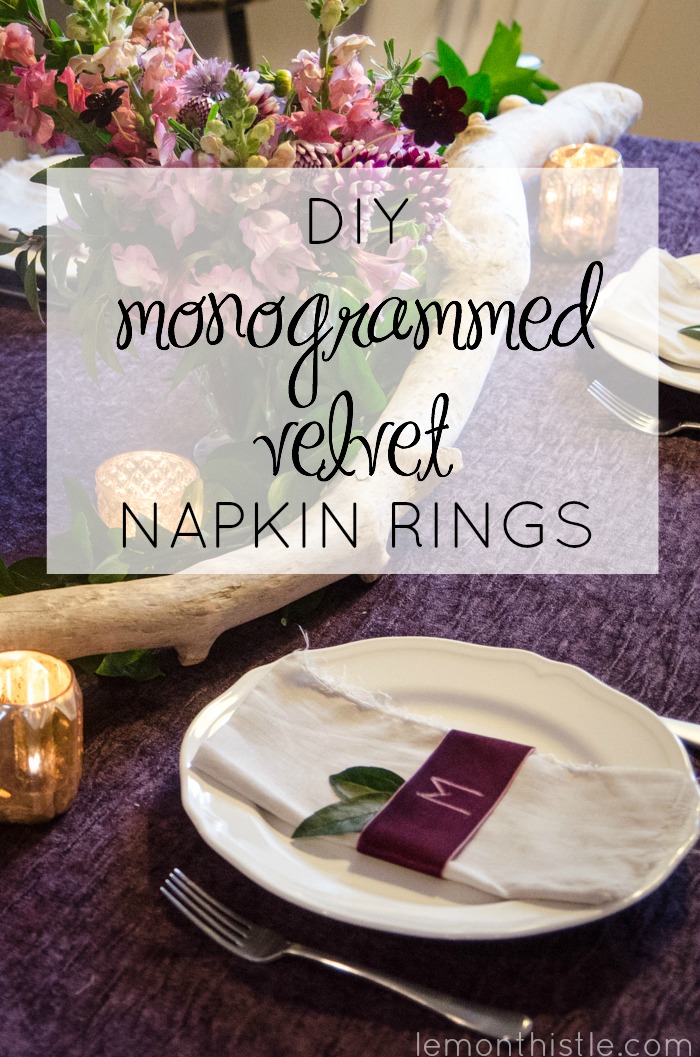
I’m back from Vancouver and am so excited to tell you that our Diploma team won first place in their case competition! So now that I’m back, I’m bringing another DIY from my birthday party a couple weeks back! Today I’m talking about the Monogrammed Velvet Napkin Rings and how to make a simple bunting. Next week I’m sharing how to make the easiest floral crowns and leaf garland (it’s way easier and quicker than I imagined). Should we start with the napkin rings? I love these things and all of them cost me less than $2 total.

So cool! DIY Monogrammed Velvet Napkin Rings

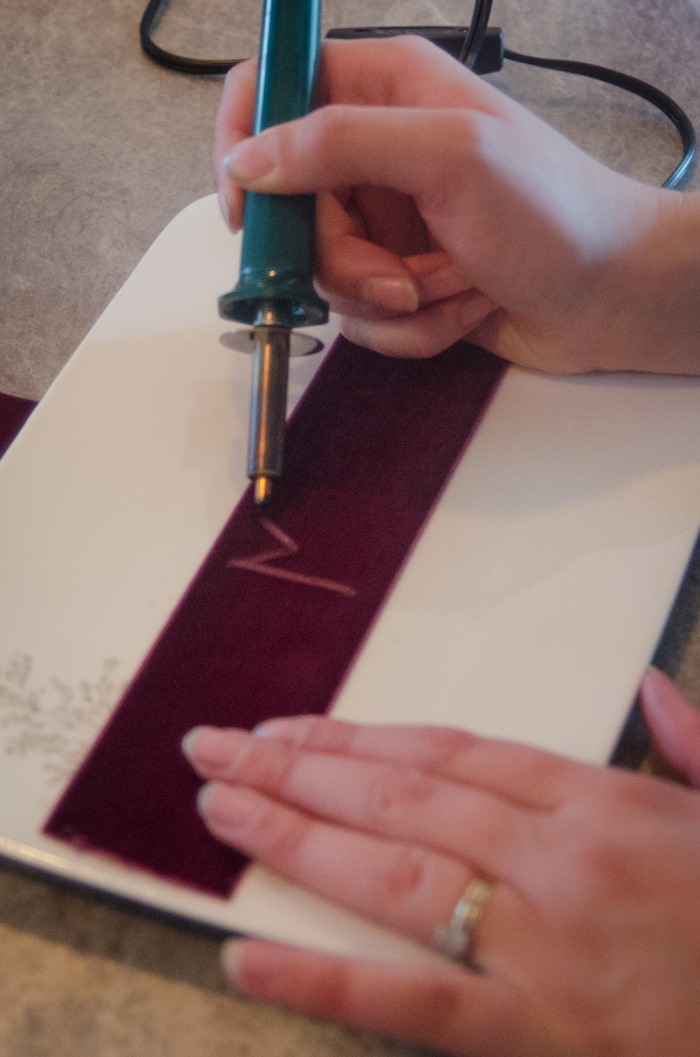
To make the napkin rings, you’ll need velvet ribbon (mine was less than $2 at the fabric store), scissors, and a woodburner. I switched out the tip on my woodburner to be the rounded one- this allowed it to glide on the ribbon, not scrape. I folded my napkins for the table, then measured how long I needed my ribbon to be to wrap around. I didn’t actually secure them closed, I just wrapped them around, but if you wanted to, you could use iron on hemming tape. Turn the woodburner on and on a test piece of ribbon, check the heat. When it’s hot enough to impress the letters, go ahead and write your monograms on the ribbon. After a while it will get too hot for fabric (as a woodburner should) and you can turn it back off until it cools down a bit. If you let it get too hot, it will just burn your ribbon and melted material will stick to the woodburner (just a big mess).

DIY Monogrammed Velvet Napkin Rings

DIY Monogrammed Velvet Napkin Rings

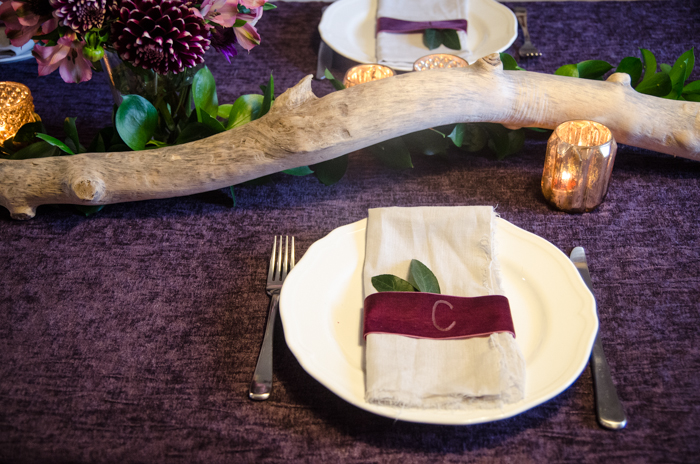
Would you believe that’s it? Then tuck a bit of greenery in and you have a beautiful place setting- in no time and costing only pennies! So now that we have that mystery solved, should we talk about bunting? I’ve made bunting a bunch of times, but never put the time into making it properly. I was so proud of myself, I actually pulled out the sewing machine for this one, guys. And it’s not hard. Real, proper bunting would be double sided so you could hang it over a table, but I just sewed the edges over on mine so I could get more bang for my buck. I bought these materials in the discount section of the fabric store, so they cost just a few dollars each. The ribbon I used cost less than two dollars per colour.

DIY Handsewn Simple Bunting

DIY Handsewn Simple Bunting

DIY Handsewn Simple Bunting

DIY Handsewn Simple Bunting

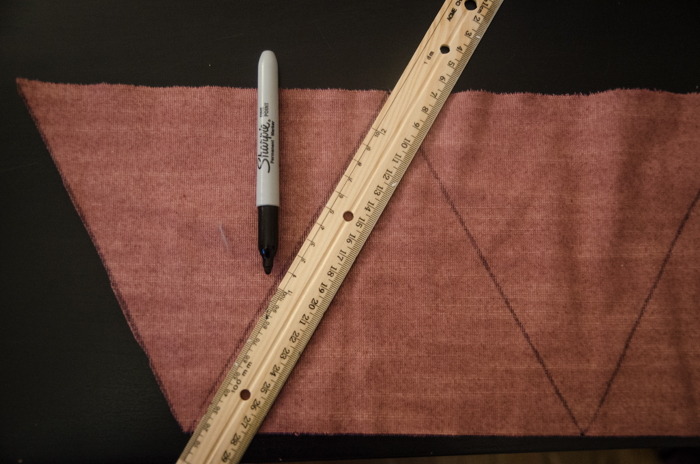
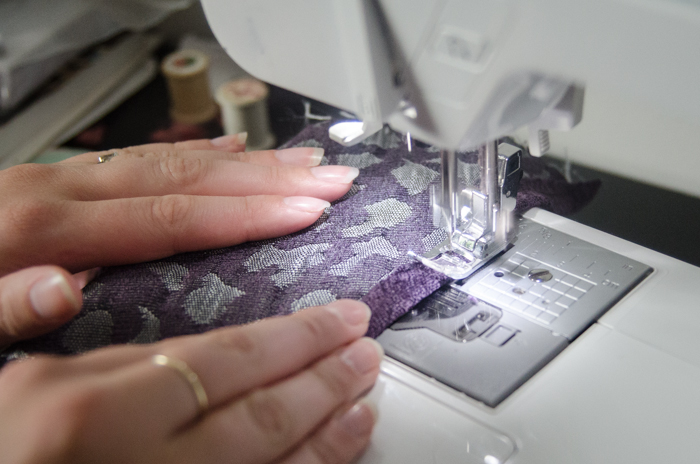
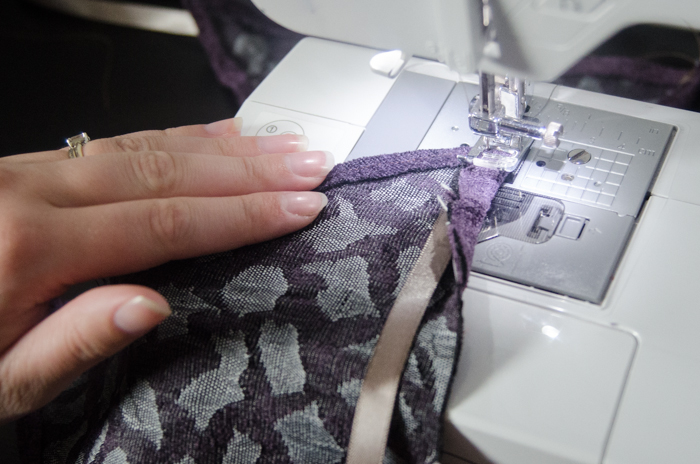
I got started by cutting the material into strips the height I wanted the bunting to be (plus a little bit to account for edging). Then, I drew out the triangles in a zigzag pattern. Once they were cut out, I got to sewing. I actually tried using iron on hemming tape first, but the material was so thick, it took forever to iron it enough for the tape to hold. Sewing was actually faster. I started from a top corner and sewed towards the bottom, and back up the other side. This left the top edge. I folded the ribbon under and sewed the ribbon into the bunting. This saved me the step of attaching the triangles to the ribbon later on. To sew the corners, you need to cut them off or else they’re too bulky and don’t make a clean corner.

DIY Handsewn Simple Bunting

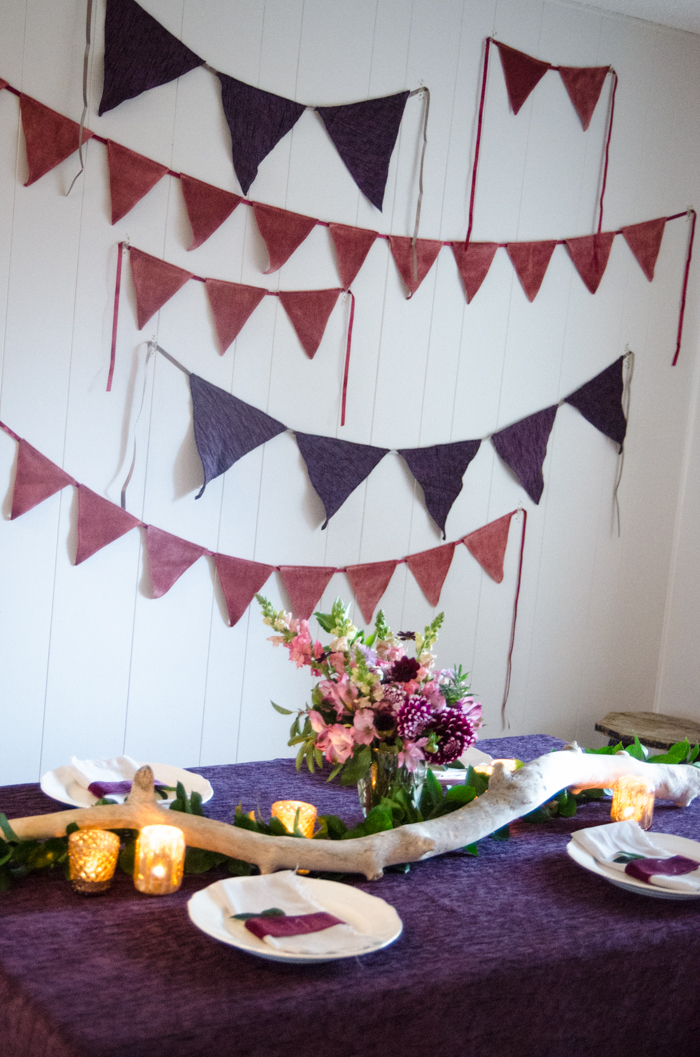
And that’s it! I made different lengths to use on the wall as a backdrop and I love how it turned out. It’s a bit different as traditional bunting with just a couple long strings, but is still the loveable shape of bunting.

What do you guys think? I can’t get enough of the velvet ‘burning’. If you had nice hand lettering, you could do something really special!

Category: DIY, EntertainTag: Birthday, Decorations, Dinner Party, Garland, Party, Party Decor, Party DIY, Tablescapes
Facebook0Tweet0Pin0LinkedIn0
Previous Post: ← 101 Dalmations Halloween Costumes- from the babies to Cruella to Jasper, such a fun family costume! Around Here 06
Next Post: Before and After: DIY Kitchen Renovation Why I always start with my dishes on open shelving in the kitchen →

Reader Interactions

Comments

  1. Sarah Nenni Daher

    Nov 06 at 9:17 pm

    Props to you, Colleen, but there is no way I’m putting myself near something called a “woodburner” when I do lasting damage with only hot glue. My hubs is probably thankful for that, too.

    I am, however, obsessed – OBSESSED – with velvet ribbon. I have yards and yards of it in my ribbon stash – it’s one of those craft supplies I hoard, which is silly, isn’t it? Maybe I’ll whip out some red velvet ribbon and pop out a holiday craft soon. Look at that – you’ve inspired me! ;)

    Reply
    • Colleen Pastoor

      Nov 10 at 8:22 pm

      Haha! I know, I know- it sounds scary but they’re SO MUCH FUN! Maybe wear an ov’glove ;) With so much velvet ribbon kicking around… you really should try it!! I also used velvet ribbon to tie up the cutlery at our Thanksgiving… maybe you should whip some out for that!?

      Reply
  2. Shelly

    Nov 10 at 9:40 pm

    HI Colleen! These velvet accessories are gorgeous! I love the richness they add to the table setting and are highly appropriate for Thanksgiving. SO pretty! Thank you so much for sharing them with us at On Display Thursday!

    -Shelly

    Reply
    • Colleen Pastoor

      Nov 10 at 9:55 pm

      Thanks Shelly! They would be PERFECT for thanksgiving!

      Reply
  3. [email protected] the Moments.net

    Nov 11 at 5:22 am

    Beautiful table. The colors are so elegant and I like the idea of monogramming.napkin rings. Thanks!

    Reply
    • Colleen Pastoor

      Nov 13 at 11:42 am

      Thanks so much Elisabeth! Maybe next time I’ll try get a bit more creative/fancy with the monogram :)

      Reply

Leave a Reply Cancel reply

Your email address will not be published. Required fields are marked *

Sidebar

WOOHOO!

Check your email to confirm!

(+ get your freebies + discounts)


Thanks for dropping by!
I’m Colleen: wife; mom to 4 wild ones; and DIY blogger behind Lemon Thistle. You can expect to see rad DIY, modern home decor, renovations, hand lettering and the occasional party on Lemon Thistle. Read More…

email facebook youtube instagram pinterest

Unless otherwise noted, all content and images are mine. Full posts may not be shared without express written consent. But I love when you share! Feel free to share, without altering, one image with proper credit and a link to the original post. All free printables are for personal use only.

Everyone loves proper credit- if you ever notice something improperly credited, please please shoot me an email and I’ll fix it lightning fast.

Find all my policies right here.
This includes my privacy policy, info on the GDRP compliance and information on affiliate links (Including Amazon Affiliates).

Visit Colleen Pastoor’s profile on Pinterest.

colleenpastoor

My house is never this clean
-
DIY + Home Decor Blogger
Mama of 4 👶🏼🧒🏼👦🏼👧🏼
Renovating our 🏠 the DIY way
🖤 Lettering & ☕️
-
✉️[email protected]

colleen pastoor/lemon thistle
The hallway is finally finished and I’m so stink The hallway is finally finished and I’m so stinking happy! 

It’s felt like such a long time coming for such a small space. Since we moved in 2.5 years ago, this space has seen new doors and hardware, new trim, new floors... twice😅, we changed the boob light to a pot light and I hated it and now it’s got the most beautiful flush mount fixture I’m in love with (thanks @mymitzi!). It finally got some fresh paint and now frames on walls and last but not least... After this weekend, the new floors look like they were here all along (no door jamb gaps!) which was the last thing really bugging me since our flood last year. 

All this to say that home takes time and sometimes getting it right might take a couple tries. Also- the spaces we don’t really think about (hallways) can totally help a house feel like home with some love (and family photos 🥰)
ps. I partnered with #mymitzi to create a tiktok for This makeover... are you following me over there yet?! I’d love if you popped over and said hi!
It’s done! It works! And I’m calling it a grea It’s done! It works! And I’m calling it a great use of my afternoon the other day. Did you catch the stories? These projects both cost me under $10 by using pieces I already had in my home (yay for scraps!) and one package of drawer slides).
You can find the full video about these two kitchen organization projects over on YouTube in collaboration with my friend @love_create_celebrate and her #scrapsmademodern challenge! But for now... I’m rejoicing this coffee maker is off my counter for good 🎉
How’s your January going? Full speed or are you How’s your January going? Full speed or are you taking it a bit slow too? 

I’m not going to lie, I’m easing into this new year thing pretty slowly. All my decorations are still up (we always leave them up til Ukrainian Christmas which is later this week) and I I’ve yet to respond to my emails since before Christmas 😅
I’m enjoying the slowness of it all.
Happy Christmas Eve from our fam to yours 🥰 Happy Christmas Eve from our fam to yours 🥰
Yes, I made the paper bag snowflakes too. Have you Yes, I made the paper bag snowflakes too. Have you? 😅
This year has been one of a kind and I know so man This year has been one of a kind and I know so many people who are taking this year as the push they’ve been waiting for to start a side hustle, start an new career altogether or to just get creative about how they’re making money. So today I’m excited to partner with @kregjig to share some rad projects to make and sell this year! 
Like this rolling storage system I made for my office, that rad dollhouse and the gorgeous bath toy storage. All of these projects are things that I’d personally love to buy for our family and look like they’d be a great return on your time making them! And yes, all of them use #Kreg tools to make them easy to assemble and quick to make! Plus, they’re having a great sale on right now with deals on their K4 and K5 jigs, Rip-Cut and even a hardware jig bundle! There’s never been a better time to get your workshop set up!  #sponsored
Just a peaceful moment and then a real life moment Just a peaceful moment and then a real life moment for ya 🙃 
My #holidayhometour is on the blog and YouTube (I’ll put links in my stories) as part of the #seasonalsimplicity holiday home tour series. I’ll share those too so you don’t miss any!
My holiday home tour will be up tomorrow, but for My holiday home tour will be up tomorrow, but for tonight... I’m just enjoying the lights. And possibly a hallmark movie with some more custom order lettering 😅 what are your plans?
#christmasdecor #christmastree #holidaylights
We finished decorating yesterday and I’m just si We finished decorating yesterday and I’m just sitting here enjoying every minute of it 🤩 have you decorated yet?
Ps... talking more about hand lettering in my stories tonight!
Load More... Follow on Instagram

Copyright © 2021 · Lemon Thistle · All Rights Reserved · Powered by Mai Theme