• Skip to main content
  • Skip to header left navigation
  • Skip to header right navigation
  • Skip to site footer
  • Shop
  • Get The Email
  • Work With Me
  • About
  • Search

  • DIY
    • DIY Home Decor
    • With Power Tools
    • Renovation
    • For Kids
    • For Parties
    • Wearable
    • Organization
    • Cricut Crafts
  • Home Decor
    • Room Reveals
    • Kid Friendly
    • DIY Home Decor
    • Renovation
  • Lettering
    • Hand Lettered Printables
    • Free Practice Sheets
    • Handlettered DIY
    • Free Brush Lettering Quickstart Guide
    • Learn Brush Lettering E-Course SALE
Lemon Thistle

Lemon Thistle

Rad DIY, Lettering and Design for Real People

  • Printables
    • For Cricut
    • Party Printables
    • Home Decor Printables
    • Bachelor Bingos
    • Free Monthly Wallpapers
    • Handlettering Practice Sheets
    • All Free Printables
  • Entertain
    • Party Printables
    • Party DIY
    • Tablescapes
    • Dinner Party
    • Kids Parties
    • Party Eats
    • Baby Showers
    • Wedding + Showers
  • Blog

DIY Hand Stamped Gold Place Markers

Mar 11

DIY hand stamped Gold Place Markers for a classy Saint Patrick's Day Party... I love these!

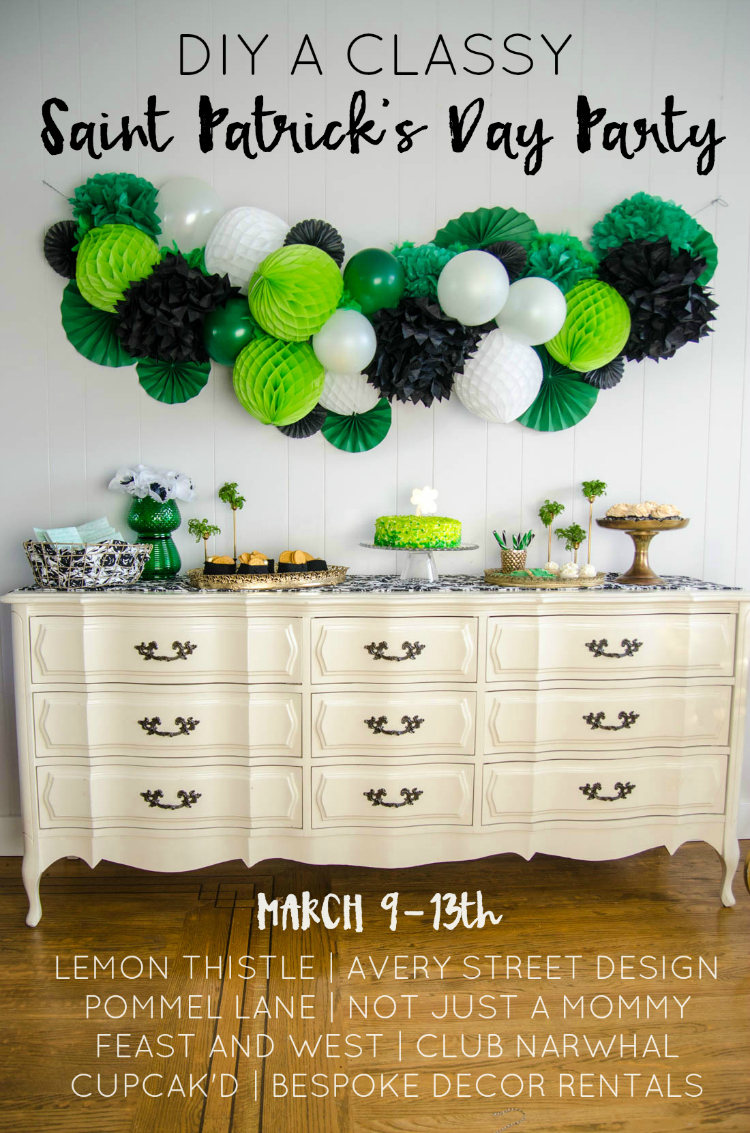
Happy Wednesday, friends- have you been enjoying our crazy week of Saint Patrick’s Day Party madness? If you missed my post on Monday– This week I’ve teamed up with seven of my favourite party people on the internet to bring you a DIY (but classy!) Saint Patrick’s Day Party. Each day this week, we’ll be taking turns sharing DIYs, free printables, recipes and tutorials from this party. We hope that it will inspire you to class up your Saint Patrick’s Day Party this year (the DIY way, of course!). You can find all the photos from the party as well as the links to other DIYs, recipes and printables here.  I’m so excited to share the tutorial to make these DIY Gold Stamped Place Markers with you.

DIY hand stamped Gold Place Markers for a classy Saint Patrick's Day Party... I love these!

DIY hand stamped Gold Place Markers for a classy Saint Patrick's Day Party... I love these!

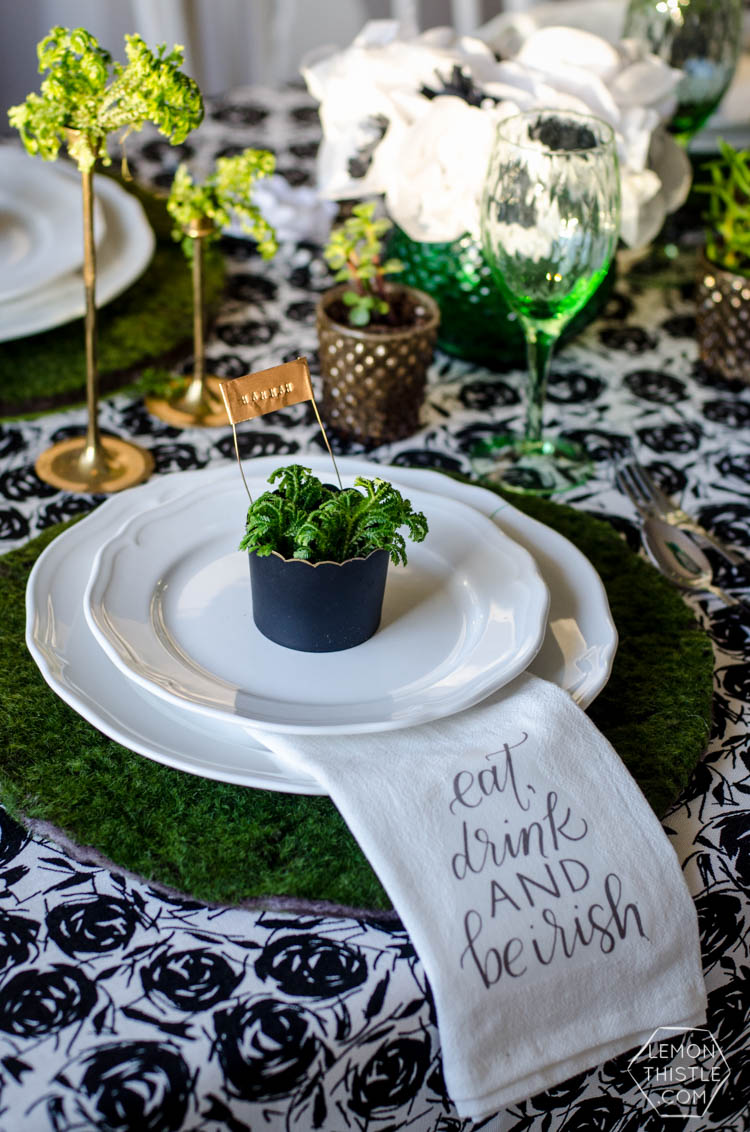
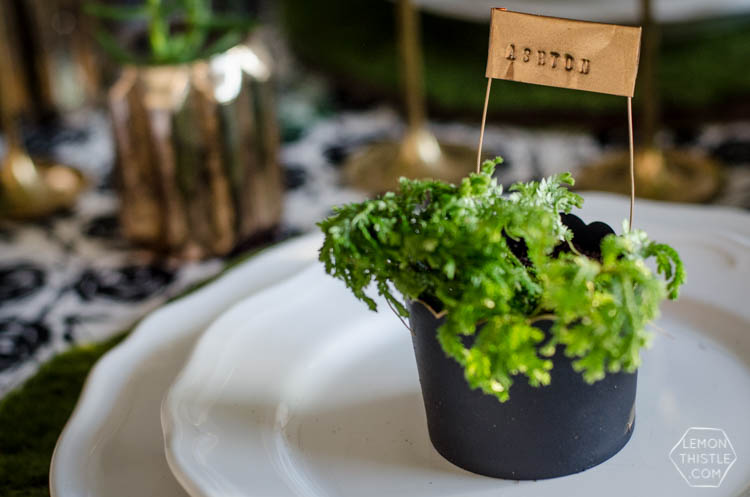
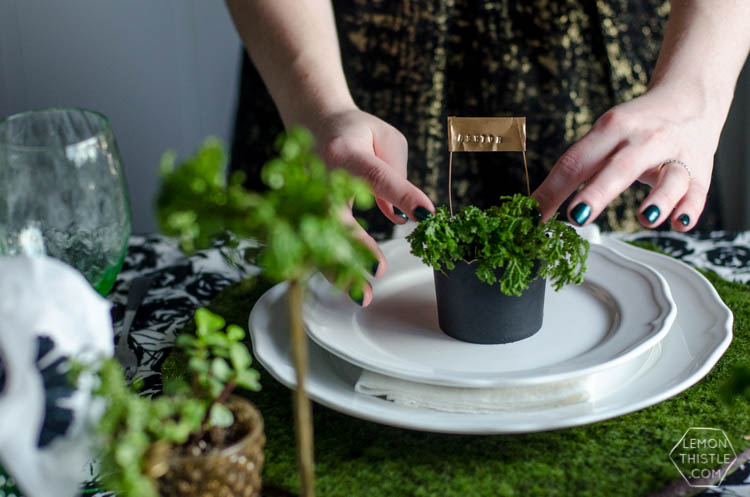
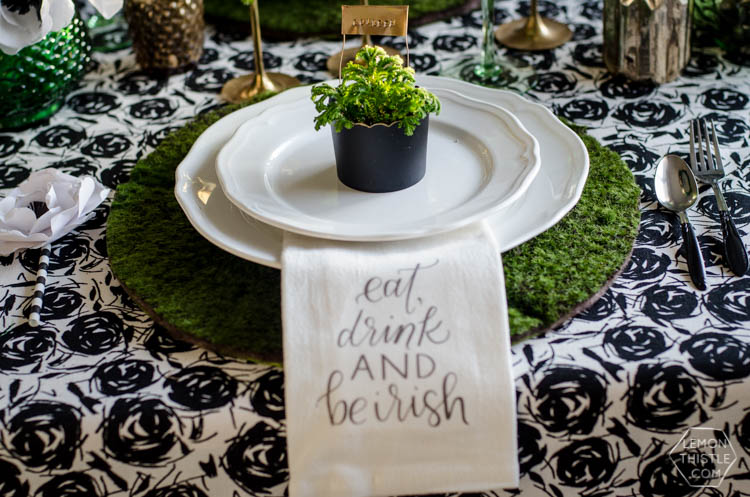
I’m so in love with these little markers, I have the one with my name in one of those little gold plants on my kitchen window sill and it makes me so happy! I often get asked about my creative process (how I decide what to make) so I thought I’d share my twisted web of creative thoughts with you. Over Christmas break, I spotted this post that uses pop cans to create garden marker tags. I don’t garden (I wish I was a green thumb!) but I thought it was a clever idea. When I was reading Bespoke’s blog post on vintage crates in January and spotted those gorgeous copper escort cards and hopped over to that post, I learned that they were actually garden markers- something clicked. When we were talking about how to integrate greenery into the Saint Patrick’s Day Party and we hadn’t come up with a place card yet, all those random things I’d filed in the back of my mind came together. Those little cups they’re in? Those are the snack cups from my kiddos’ first birthday party, spray painted with flat black paint and edged with a gold paint pen.

Here’s what you’ll need to make your own:

  • One pop can
  • Craft knife (or utility knife would probably work better) & Cutting board
  • Metal ruler
  • Tape
  • Flat pliers
  • Wire & Wire Cutters
  • Gold Spray Paint (I swear by this stuff)
  • Metal stamping kit & Hammer (I ordered mine from here)
  • Mechanical (or really well sharpened) pencil

DIY hand stamped Gold Place Markers for a classy Saint Patrick's Day Party... I love these!

DIY hand stamped Gold Place Markers for a classy Saint Patrick's Day Party... I love these!

DIY hand stamped Gold Place Markers for a classy Saint Patrick's Day Party... I love these!

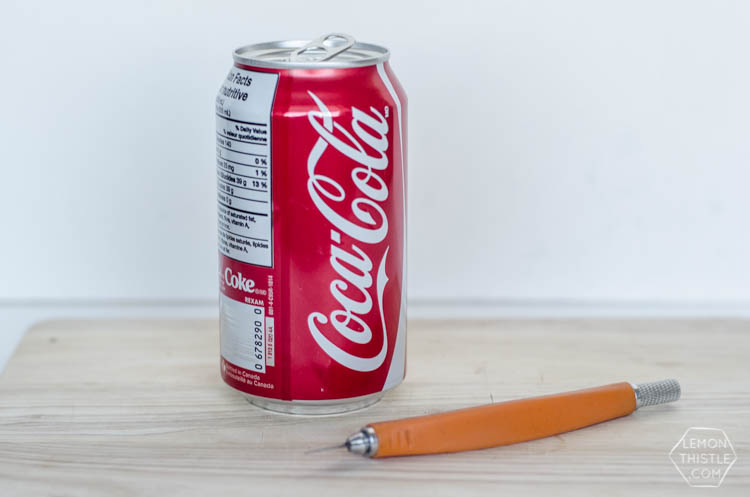
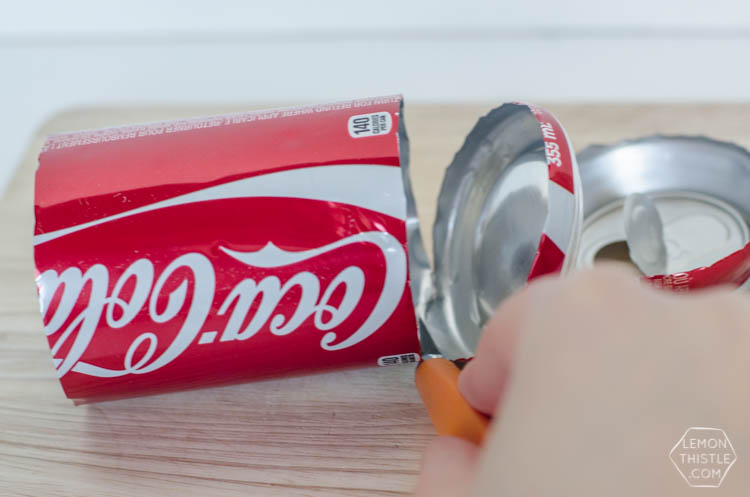
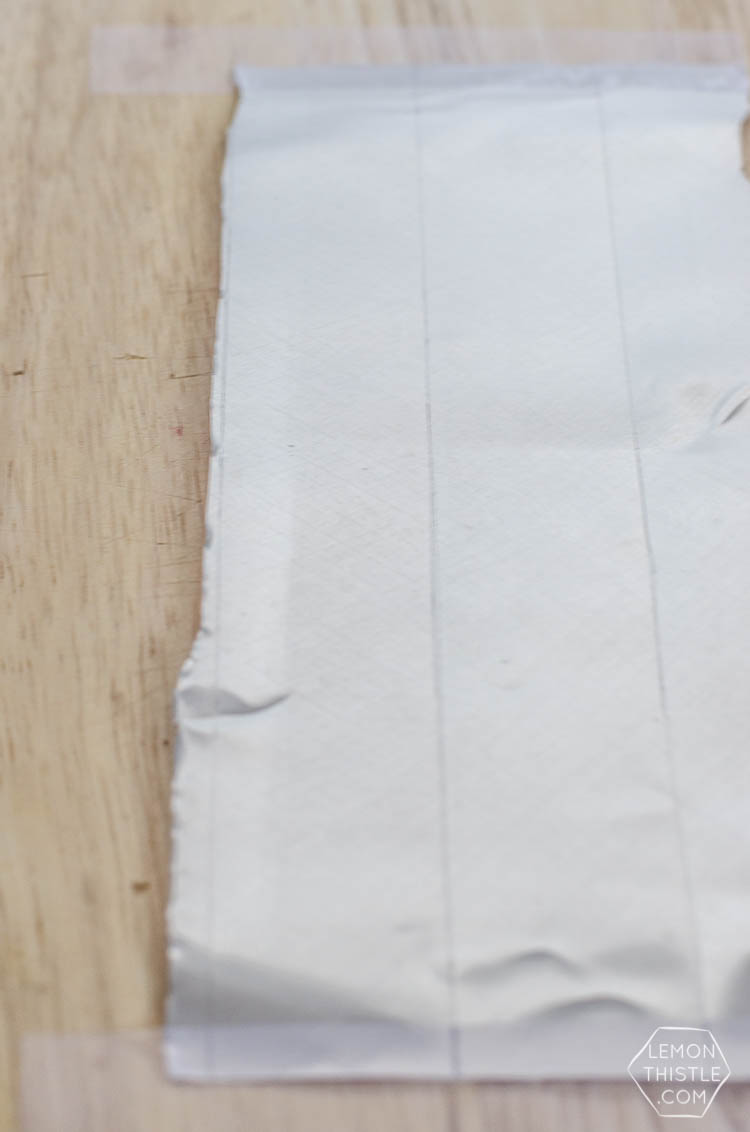
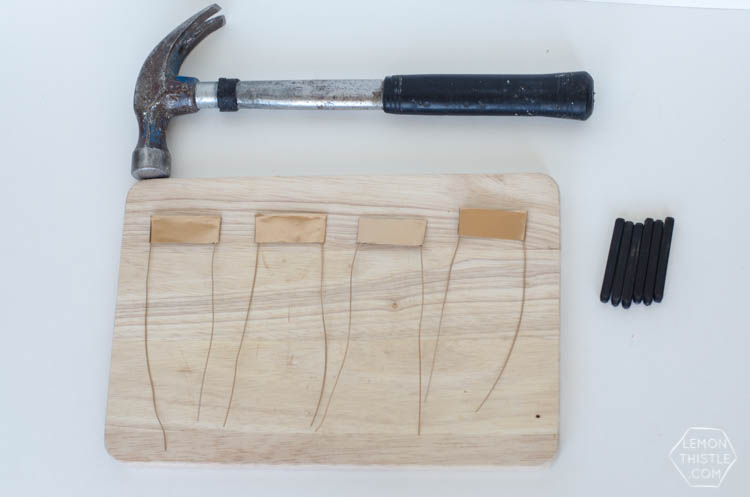
Get started by cutting open your soda can. I cut the ends off first, then cut a slit down one side so I had a flat rectangle to work with. Tape this piece down to your cutting surface.

DIY hand stamped Gold Place Markers for a classy Saint Patrick's Day Party... I love these!

DIY hand stamped Gold Place Markers for a classy Saint Patrick's Day Party... I love these!

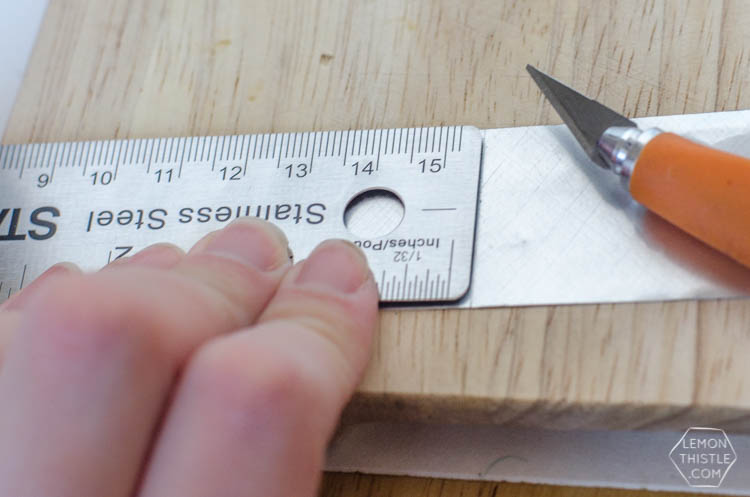
Next, using your craft/utility knife, score straight lines using your ruler. I used the width of my ruler for this. Bend along your line to break the can easily. Once you have strips, decide how wide your tags need to be by laying out your metal stamps with the longest name you have. How big of a piece you need will depend not only on what you’re stamping, but the size of your stamps. Add one inch to your desired length and cut (score and bend).

DIY hand stamped Gold Place Markers for a classy Saint Patrick's Day Party... I love these!

DIY hand stamped Gold Place Markers for a classy Saint Patrick's Day Party... I love these!

DIY hand stamped Gold Place Markers for a classy Saint Patrick's Day Party... I love these!

DIY hand stamped Gold Place Markers for a classy Saint Patrick's Day Party... I love these!

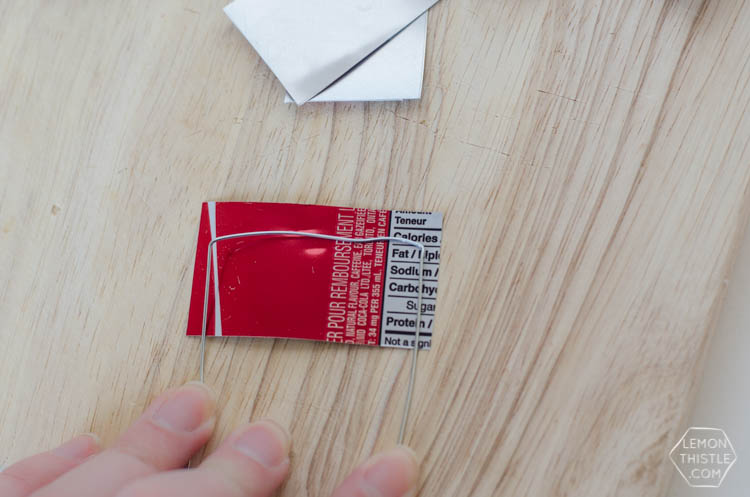
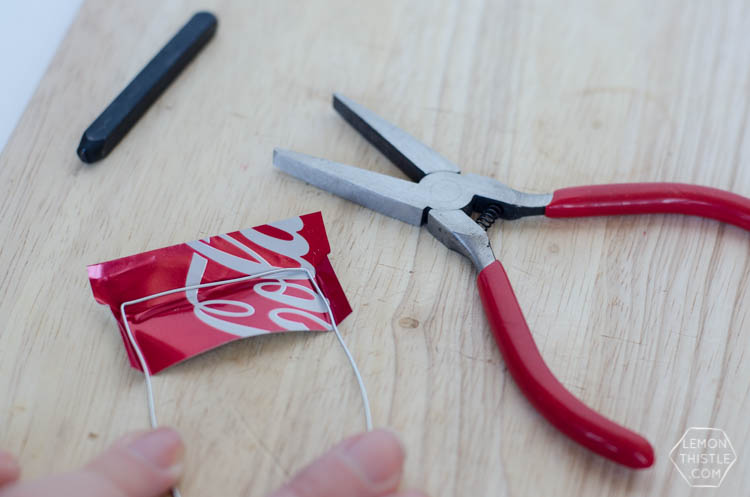
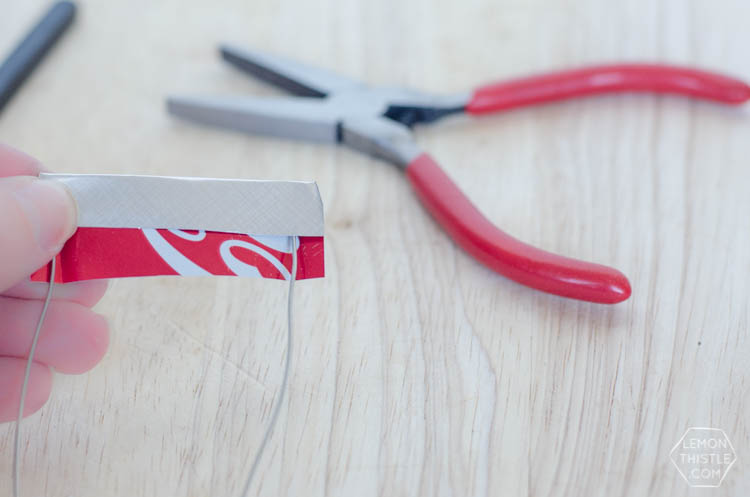
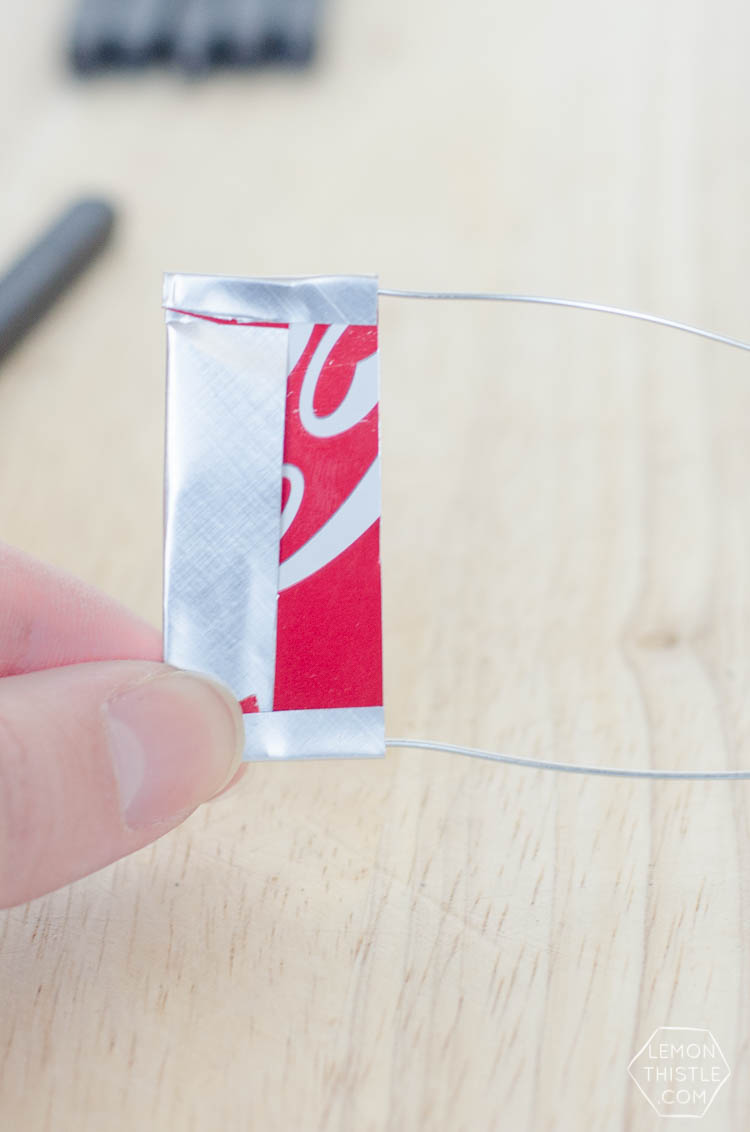
Now that you have your pieces cut to size, cut a length of wire and using your flat pliers, bend it to fit a half inch inside the edge of your cut piece (see photo). Then, use your flat pliers (no ridges to mark the can), bend the can where you will be folding it over. Use your fingers to fold over the top first, and sides second.

DIY hand stamped Gold Place Markers for a classy Saint Patrick's Day Party... I love these!

DIY hand stamped Gold Place Markers for a classy Saint Patrick's Day Party... I love these!

DIY hand stamped Gold Place Markers for a classy Saint Patrick's Day Party... I love these!

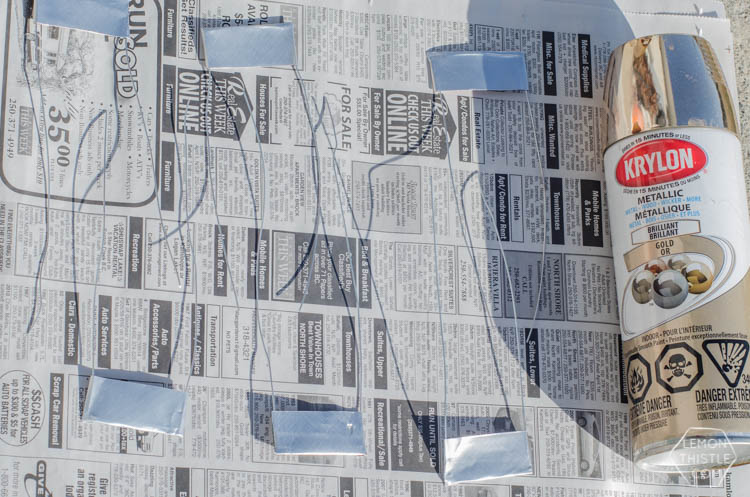
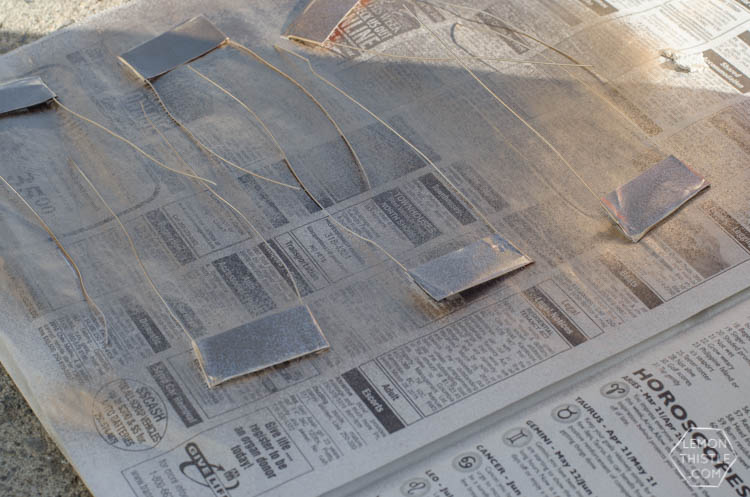
Take those markers somewhere well ventilated to spray paint them. Since the surface doesn’t soak up any of the paint, be sure to mist light coats of the spray instead of thick coats. It will make a huuuuge difference in the finish of your paint. Make sure to spray both sides and the wires. As I mentioned in the supply list… I love this gold spray paint. The colour isn’t too yellow or too champagne and it dries in a hurry (and I’m impatient).

DIY hand stamped Gold Place Markers for a classy Saint Patrick's Day Party... I love these!

DIY hand stamped Gold Place Markers for a classy Saint Patrick's Day Party... I love these!

DIY hand stamped Gold Place Markers for a classy Saint Patrick's Day Party... I love these!

DIY hand stamped Gold Place Markers for a classy Saint Patrick's Day Party... I love these!

DIY hand stamped Gold Place Markers for a classy Saint Patrick's Day Party... I love these!

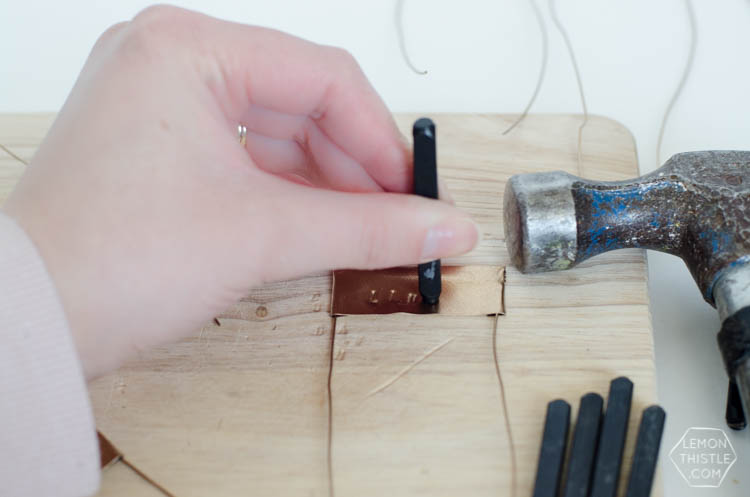
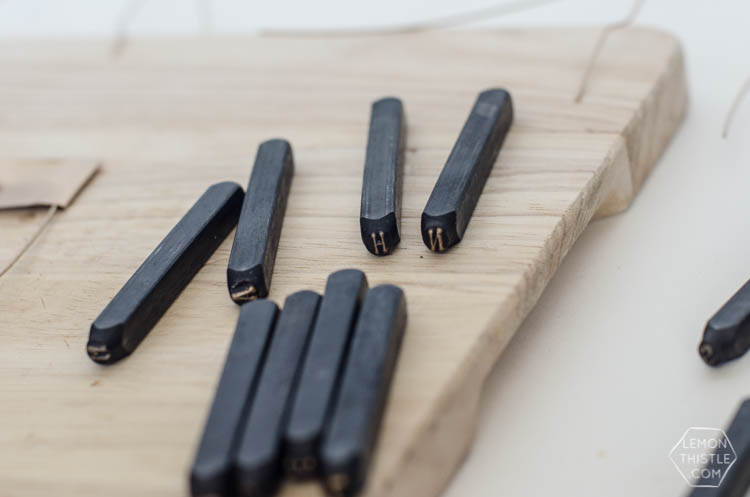
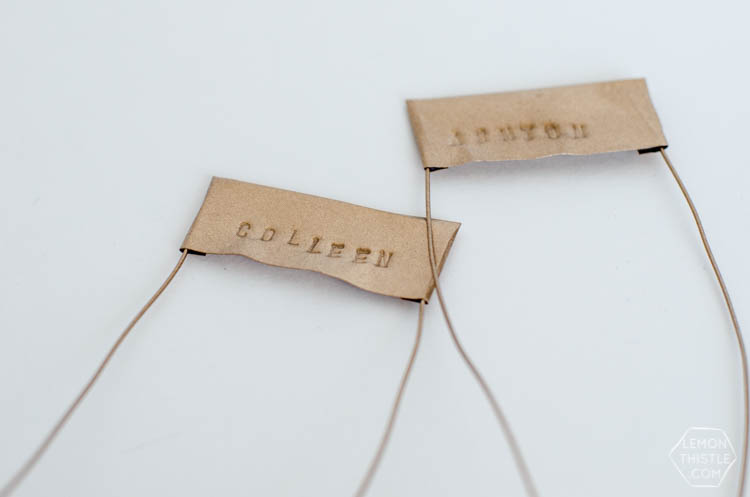
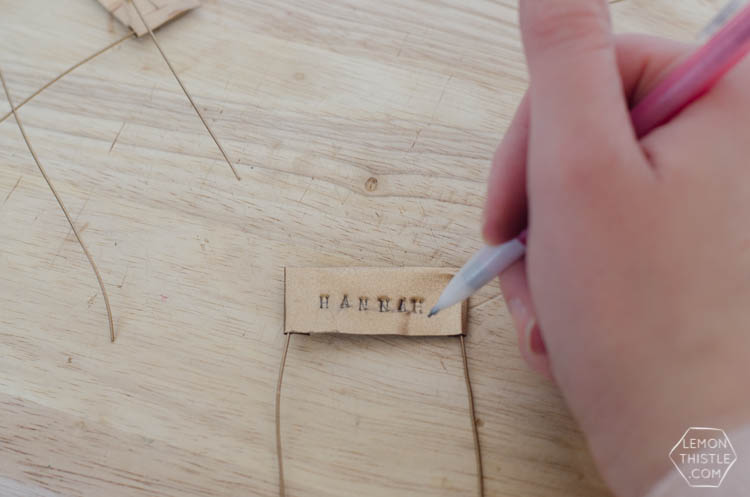
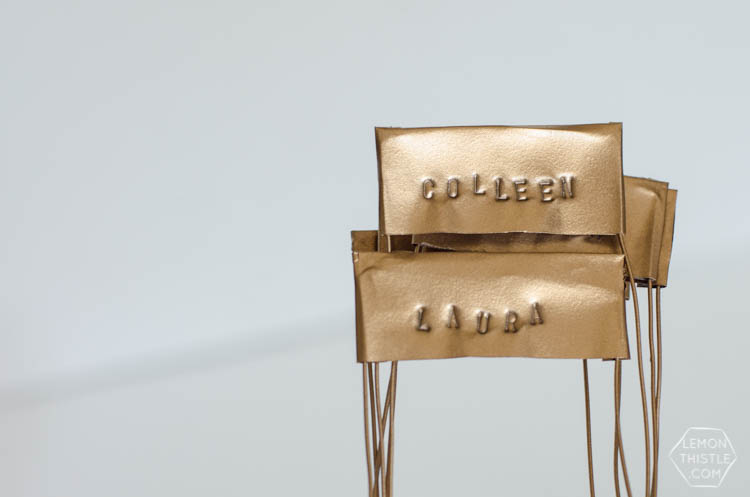
At this point they’re starting to look really awesome. All that’s left is to stamp your names in! I’ve done some metal stamping before (like these spoons) and it’s way harder than I’d expected. BUT stamping soda cans? Ohmygoodness it’s amazing it’s so easy. The tin is way lighter weight so it doesn’t take much effort to stamp them at all. Line up your letters one at a time and give them ONE solid hit with your hammer. I’ve read that a sharpie works good to darken the imprints, but thought it looked too artifical on the gold, so I found that a fine tip pencil worked best to darken the stamped letters just a little bit.

DIY hand stamped Gold Place Markers for a classy Saint Patrick's Day Party... I love these!

DIY hand stamped Gold Place Markers for a classy Saint Patrick's Day Party... I love these!

Since I had all the supplies on hand, these cost me zip, zilch, nada. If you had to buy everything, here’s how it would break down: Soda Can $1, Wire $1, Metal Stamping Kit $50 (but think of all the amazing things you could do with it!), Spray Paint $6.

DIY your way to a classy Saint Patrick's Day Party!

I’d love to hear what you think of this project in the comments! Are you a fan of these Gold Place Markers? I’d also love to hear if you’ve checked out any of the other DIYs from this party! What’s your favourite so far?

 Sources: Dresses: Vero Moda | Cupcakes: Cupcak’d | Baby Guinness Irish Coffee Jell-O Shots: Feast & West | Tissue Paper Garland, Candy Coated Cake, Paint Dipped Silverware, Table Cloths, & Dresser: Lemon Thistle | Candy Bag Toppers, Napkin Transfers: Pommel Lane | Chairs, Mirrored Trays, Barcart, Decanters, Trumpet, Dice, Green Vases, Moss Placemats, Wine Glasses, Gold Cake Stand: Bespoke Decor Rentals | Felt Cauldrons with Gold Cookies, Gold Glitter Champagne Bottles: Not Just a Mommy | Paper Poppies: Avery Street Design | Shamrock Sugar Cookies: Club Narwhal | All Photography by Lemon Thistle

Category: DIY, EntertainTag: Collaboration, Craft, Decorations, Dinner Party, Holiday Party, Holidays, Metallics, Paint, Party Decor, Party DIY, St. Patrick's, Tablescapes
Facebook0Tweet0Pin0LinkedIn0
Previous Post: ← DIY your way to a classy Saint Patrick's Day Party! DIY a Classy Saint Patrick’s Day Party! (Giant Honeycomb Garland)
Next Post: DIY Candy Coated Cake Makeover (Gilded Topper) DIY Candy Coated Grocery Store Cake Makeover →

Reader Interactions

Comments

  1. Tan of Squirrelly Minds

    Mar 11 at 12:21 pm

    Woah girl what a cool idea! Pinned!

    Reply
    • Colleen Pastoor

      Mar 15 at 2:55 pm

      Thanks so much Tan! You’re the best :)

      Reply
  2. deonna

    Mar 13 at 12:18 pm

    These are SO cool! pinning and thinking of all of the possibilities…haven’t used that spray paint yet but it looks so great. I’m thinking you could do necklaces and all kinds of fun things…might have to try it out and get one of those kits :)

    Reply
    • Colleen Pastoor

      Mar 15 at 3:01 pm

      Thanks so much Deonna! I love that spraypaint- and it’s one of the more affordable ones, which is always a selling point for me.

      Reply

Leave a Reply Cancel reply

Your email address will not be published. Required fields are marked *

Sidebar

WOOHOO!

Check your email to confirm!

(+ get your freebies + discounts)


Thanks for dropping by!
I’m Colleen: wife; mom to 4 wild ones; and DIY blogger behind Lemon Thistle. You can expect to see rad DIY, modern home decor, renovations, hand lettering and the occasional party on Lemon Thistle. Read More…

email facebook youtube instagram pinterest

Unless otherwise noted, all content and images are mine. Full posts may not be shared without express written consent. But I love when you share! Feel free to share, without altering, one image with proper credit and a link to the original post. All free printables are for personal use only.

Everyone loves proper credit- if you ever notice something improperly credited, please please shoot me an email and I’ll fix it lightning fast.

Find all my policies right here.
This includes my privacy policy, info on the GDRP compliance and information on affiliate links (Including Amazon Affiliates).

Visit Colleen Pastoor’s profile on Pinterest.

colleenpastoor

My house is never this clean
-
DIY + Home Decor Blogger
Mama of 4 👶🏼🧒🏼👦🏼👧🏼
Renovating our 🏠 the DIY way
🖤 Lettering & ☕️
-
✉️[email protected]

colleen pastoor/lemon thistle
Who has DIY projects on their mind this year?! @ry Who has DIY projects on their mind this year?! @ryobi_canada and I want to help you start knocking those projects off your list by giving away a new nailer and battery set! #ad 
This tool is what we used for this accent wall and all the trim in our home. It’s the one I used to trim out my built in shelving and add the decorative moulding to my geometric barn door. What I’m saying is this thing is a workhorse and I want you to have one too 😉
To enter:
✨Follow me @colleenpastoor and @ryobi_canada 
✨like and save this photo 
✨ tag some friends who’d love to win in the comments! One tag per comment, each is an entry. 
✨ share to your stories for a bonus 5 entries!

Open to Canadians only this time (sorry US friends!) and not associated with Instagram. Closes Friday Jan 22 at noon PST!
Let’s talk about coffee! This is my coffee ‘st Let’s talk about coffee! This is my coffee ‘station’ and the second photo is my dads! I’m talking aaaall about them over on YT today!
Also... see how nice that fresh silicone looks?! 😉 IYKYK
The hallway is finally finished and I’m so stink The hallway is finally finished and I’m so stinking happy! 

It’s felt like such a long time coming for such a small space. Since we moved in 2.5 years ago, this space has seen new doors and hardware, new trim, new floors... twice😅, we changed the boob light to a pot light and I hated it and now it’s got the most beautiful flush mount fixture I’m in love with (thanks @mymitzi!). It finally got some fresh paint and now frames on walls and last but not least... After this weekend, the new floors look like they were here all along (no door jamb gaps!) which was the last thing really bugging me since our flood last year. 

All this to say that home takes time and sometimes getting it right might take a couple tries. Also- the spaces we don’t really think about (hallways) can totally help a house feel like home with some love (and family photos 🥰)
ps. I partnered with #mymitzi to create a tiktok for This makeover... are you following me over there yet?! I’d love if you popped over and said hi!
It’s done! It works! And I’m calling it a grea It’s done! It works! And I’m calling it a great use of my afternoon the other day. Did you catch the stories? These projects both cost me under $10 by using pieces I already had in my home (yay for scraps!) and one package of drawer slides).
You can find the full video about these two kitchen organization projects over on YouTube in collaboration with my friend @love_create_celebrate and her #scrapsmademodern challenge! But for now... I’m rejoicing this coffee maker is off my counter for good 🎉
How’s your January going? Full speed or are you How’s your January going? Full speed or are you taking it a bit slow too? 

I’m not going to lie, I’m easing into this new year thing pretty slowly. All my decorations are still up (we always leave them up til Ukrainian Christmas which is later this week) and I I’ve yet to respond to my emails since before Christmas 😅
I’m enjoying the slowness of it all.
Happy Christmas Eve from our fam to yours 🥰 Happy Christmas Eve from our fam to yours 🥰
Yes, I made the paper bag snowflakes too. Have you Yes, I made the paper bag snowflakes too. Have you? 😅
This year has been one of a kind and I know so man This year has been one of a kind and I know so many people who are taking this year as the push they’ve been waiting for to start a side hustle, start an new career altogether or to just get creative about how they’re making money. So today I’m excited to partner with @kregjig to share some rad projects to make and sell this year! 
Like this rolling storage system I made for my office, that rad dollhouse and the gorgeous bath toy storage. All of these projects are things that I’d personally love to buy for our family and look like they’d be a great return on your time making them! And yes, all of them use #Kreg tools to make them easy to assemble and quick to make! Plus, they’re having a great sale on right now with deals on their K4 and K5 jigs, Rip-Cut and even a hardware jig bundle! There’s never been a better time to get your workshop set up!  #sponsored
Just a peaceful moment and then a real life moment Just a peaceful moment and then a real life moment for ya 🙃 
My #holidayhometour is on the blog and YouTube (I’ll put links in my stories) as part of the #seasonalsimplicity holiday home tour series. I’ll share those too so you don’t miss any!
Load More... Follow on Instagram

Copyright © 2021 · Lemon Thistle · All Rights Reserved · Powered by Mai Theme