• Skip to main content
  • Skip to header left navigation
  • Skip to header right navigation
  • Skip to site footer
  • Shop
  • Get The Email
  • Work With Me
  • About
  • Search

  • DIY
    • DIY Home Decor
    • With Power Tools
    • Renovation
    • For Kids
    • For Parties
    • Wearable
    • Organization
    • Cricut Crafts
  • Home Decor
    • Room Reveals
    • Kid Friendly
    • DIY Home Decor
    • Renovation
  • Lettering
    • Hand Lettered Printables
    • Free Practice Sheets
    • Handlettered DIY
    • Free Brush Lettering Quickstart Guide
Lemon Thistle

Lemon Thistle

Rad DIY, Lettering and Design for Real People

  • Printables
    • For Cricut
    • Party Printables
    • Home Decor Printables
    • Bachelor Bingo
    • Handlettering Practice Sheets
    • All Free Printables
  • Entertain
    • Party Printables
    • Party DIY
    • Tablescapes
    • Kids Parties
  • Blog

DIY Bumble Bee Party Hats and Cups

Oct 03

Super fun DIY Watercolour Bumble Bee Party Cups and Hats

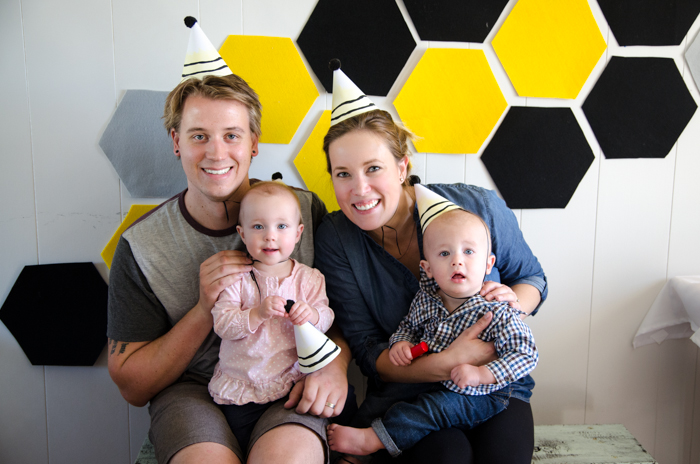
This is the last post from my kids’ First Beeday Party! I have mixed feelings: enough already! and a bit sad that they’re really one and I have to stop talking about it now. And to be honest, I probably could have included the instructions for these hats and cups in the party post because they’re so easy. But that post was already suuuper long and I wanted to drag out my kids ‘turning one’ for a little bit longer. #honestymoment So we’ll add this to the Felt Backdrop DIY/Printable Invite and the Bumble Bee Marshmallow Pops then we’ll let it be.

DIY Watercolour Party Hats and Cups for a Bumble Bee Party

DIY Watercolour Party Hats and Cups for a Bumble Bee Party

DIY Watercolour Party Hats and Cups for a Bumble Bee Party

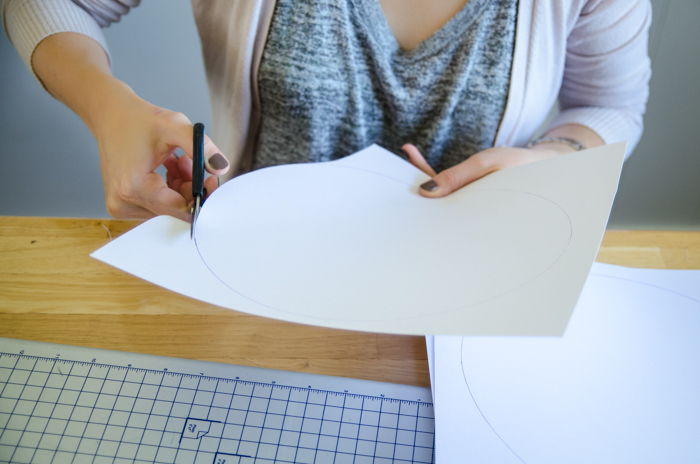
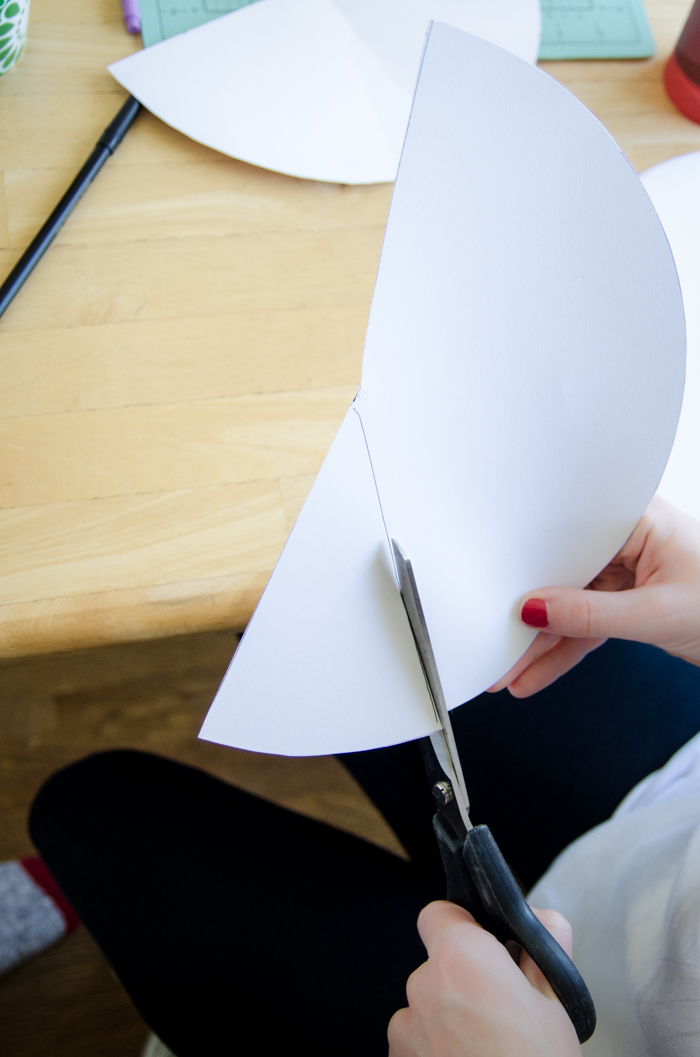
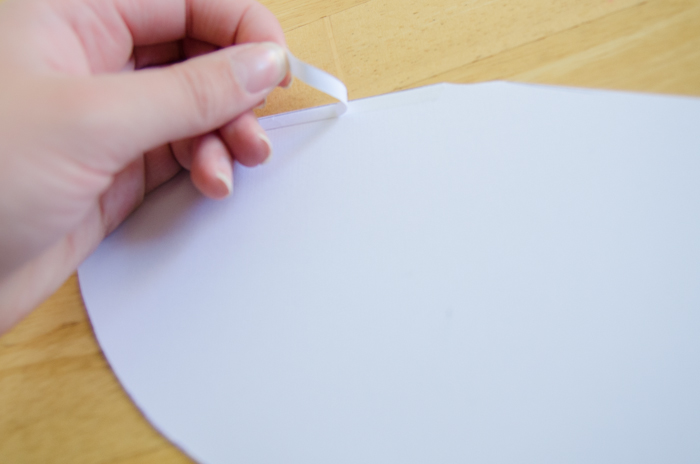
To get started, you’ll need to get plain white paper party cups, and white card stock (12×12 size). I started by tracing circles as large as I could fit on the sheets of paper and cutting those out. From each circle, you should be able to fit two party hats (and have a little triangle left over). Once your hats are cut, notch out a bit at the point of the hat, this will make it easier to assemble. I then took a piece of double sided tape and assembled the paper into cones.

DIY Watercolour Party Hats and Cups for a Bumble Bee Party

DIY Watercolour Party Hats and Cups for a Bumble Bee Party

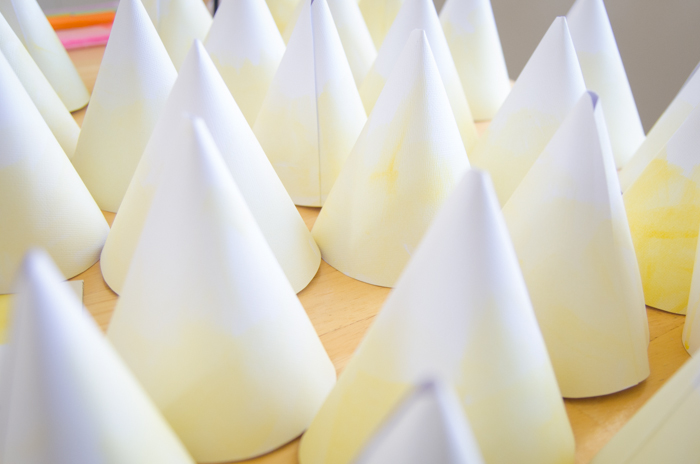
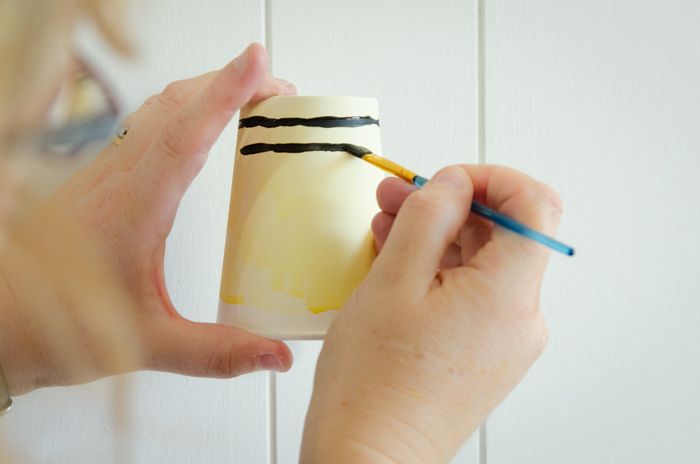
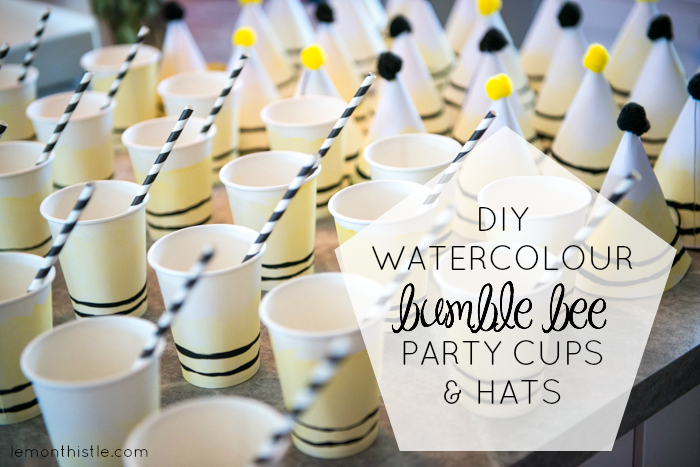
You might remember my posting Watercolour Party Cups before… and they worked so well that I used the same technique for these guys. So hop over there if you’d like more details, but essentially I watered down acrylic paint and had fun creating an ombre look using random brushstrokes. I did this on both the hats and the cups before letting them dry. Next, they were ready for their bumble bee stripes! I grabbed a smaller brush and painted two stripes around the bottoms of the cups and hats. I considered varying the number of stripes, but decided against it… two looked by far the best! I love the natural look of the lines, they’re not taped off-perfectly straight.

DIY Watercolour Party Hats and Cups for a Bumble Bee Party

DIY Watercolour Party Hats and Cups for a Bumble Bee Party

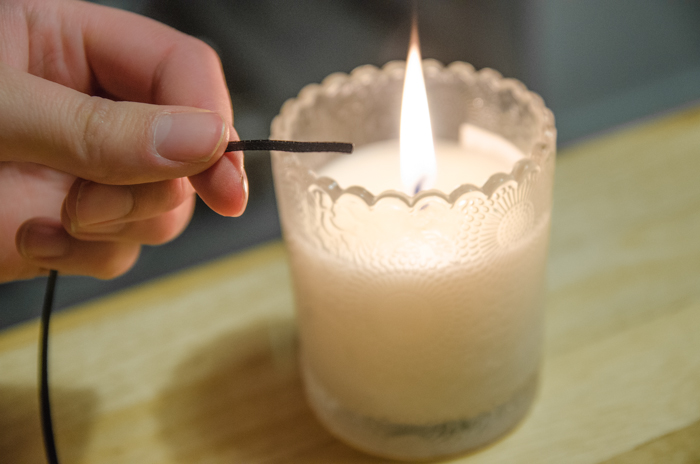
When the stripes were dry, the cups were done. To finish the hats off, I hot glued a pom pom on, as well as some ribbons to tie the hats on. To keep the ribbon edges from fraying, hold the ribbon close to a candle flame (but not in the flame) to melt the fibers just slightly. I’m pretty sure this is self explanatory, but I put the picture in there because this is how close/ far away it needs to be. If you hold it too close it will melt unevenly or too much and then you’ll feel a crispy end on your ribbon. Then, use a glue gun to attach those ribbons on. I was lazy at first and attached them with washi tape… this doesn’t work. You’re just setting yourself up for a very disappointed four year old who asks you to bobby pin the hat to their head. I fixed some for our family photos and glued the ribbons on properly… then they worked perfectly. Lesson learned.

DIY First Beeday Party

So that’s it, guys! Now you can go and make your own bumble bee themed party hats and cups and really anything else that you can put a paintbrush to. And I promise you to move on to some new party themes and leave the bees alone for a while. What do you think of painting plain party supplies? Would you do it or do you prefer to have them ready-made to fit your theme?

PS. You may have noticed four different sets of hands showing you how to make this craft. I have the best friends in the world, don’t I? So thank you to everyone who helped me craft for this bumble bee party- you guys rock :)

Category: DIY, EntertainTag: Babies, Birthday, Craft, Kids Parties, Paint, Party, Party DIY
Facebook0Tweet0Pin0LinkedIn0
Previous Post: « Sweet and Magical Little Girls Photo Shoot for a Birthday Present! Magical Little Girls’ Birthday Photoshoot
Next Post: DIY Chalkboard Dipped Plant Pots How fun are these!? DIY Chalkboard Dipped Plant Pots »

Reader Interactions

Comments

  1. Tan of Squirrelly Minds

    Oct 03 at 9:35 am

    Oh my goodness these are so sweet! I’m a huge fan of any DIY that’s easy and cute

    Reply
    • Colleen Pastoor

      Oct 05 at 9:24 pm

      Thanks so much Tan! Easy is my biggest criteria.

      Reply
  2. Kala

    Oct 05 at 5:32 pm

    I really love your obsession with water colors! Everything you make with it looks turns out so good. :)

    Reply
    • Colleen Pastoor

      Oct 05 at 9:55 pm

      Haha, leave it to you to point out that it’s an obsession! They’re just so darn beautiful! Thanks for the compliment, I know I’ve got a lot to learn!

      Reply
  3. Carmody

    Oct 06 at 8:03 am

    I love this ! The watercolor adds such sophistication to a white paper cup.

    Reply
    • Colleen Pastoor

      Oct 06 at 9:43 am

      Can paper cups be sophisticated? You’re so sweet Carmody! I appreciate your comments so much :)

      Reply
  4. Clemence

    Oct 07 at 7:51 am

    These are so adorable! Love the watercolor. Also, how gorgeous are you all? Such a beautiful family.

    Reply
    • Colleen Pastoor

      Oct 08 at 7:19 pm

      Thanks so much Clemence! You flatter me :) Thanks for stopping by, your comments always bring a smile to my face.

      Reply
  5. Kyla @HouseOfHipsters

    Oct 07 at 8:26 am

    Wow! These are great! Thanks for sharing! Found you on Carolyn’s Homework link up!

    Reply
    • Colleen Pastoor

      Oct 08 at 7:20 pm

      Thanks Kayla! I appreciate you popping over :)

      Reply
  6. Carissa Rasmussen

    Oct 07 at 2:25 pm

    OMG so cute! I love this! Crafts for parties are the best! I’d love you to share at our link party http://www.carissamiss.com/2014/10/outside-box-no-5.html

    Reply
    • Colleen Pastoor

      Oct 08 at 8:10 pm

      Thanks for stopping by Carissa- I stopped over and love your blog! I’ve added Outside the Box to my weekly list :)

      Reply
  7. Anita

    Dec 02 at 2:04 pm

    The family photo at the end absolutely melts my heart – Aub is so freaking adorable in that shot!

    Reply
    • Colleen Pastoor

      Dec 03 at 10:20 pm

      Ah, you melt my heart! Can’t wait to see you in TWO WEEKS!!! XO

      Reply

Leave a Reply Cancel reply

Your email address will not be published. Required fields are marked *

Sidebar

WOOHOO!

Check your email to confirm!

(+ get your freebies + discounts)


Thanks for dropping by!
I’m Colleen: wife; mom to 4 wild ones; and DIY blogger behind Lemon Thistle. You can expect to see rad DIY, modern home decor, renovations, hand lettering and the occasional party on Lemon Thistle. Read More…

email facebook youtube instagram pinterest

Unless otherwise noted, all content and images are mine. Full posts may not be shared without express written consent. But I love when you share! Feel free to share, without altering, one image with proper credit and a link to the original post. All free printables are for personal use only.

Everyone loves proper credit- if you ever notice something improperly credited, please please shoot me an email and I’ll fix it lightning fast.

Find all my policies right here.
This includes my privacy policy, info on the GDRP compliance and information on affiliate links (Including Amazon Affiliates).

Visit Colleen Pastoor’s profile on Pinterest.

colleenpastoor

My house is never this clean
-
DIY + Home Decor Blogger
Mama of 4 👶🏼🧒🏼👦🏼👧🏼
Renovating our 🏠 the DIY way
🖤 Lettering & ☕️
-
✉️[email protected]

colleen pastoor/lemon thistle
What’s next on your project list? Spring is teas What’s next on your project list? Spring is teasing us so we’re starting on outdoor projects around here!
$100 play room makeover is DONE! This room has se $100 play room makeover is DONE! 
This room has seen so much change over the past year (swipe over to see it 2 weeks ago, 10 months ago and 1 year ago!). I took this last week to make over this space with mostly pieces we already had and I’m so so happy with the results! It’s a good reminder that some hard work, creativity and of course paint can work magic.
I’m sharing all the details (and that under stairs space!) on YouTube today (link in my stories!) and so is my friend @thediymommy (she made over her daughters bedroom for $100!).
Do you think dried grasses are only for fall decor Do you think dried grasses are only for fall decor? I used to think so, but these bunny tail grasses are too cute to put in a bin until next year. Plus the name sounds like spring decor to me ;) What do you think?

Ps. Today’s going to be a full day of playroom progress! I’ll share as much as I can in stories as I go :)
Paint is honestly magic.✨ I am so excited to sha Paint is honestly magic.✨
I am so excited to share this kitchen makeover with you guys! These are the same cabinets, just painted (countertops too!) And some updated finishes. I blogged the full before and after if you’d like to check it out!
Big thank you to @schaubhardware and @wagnerspraytech for partnering to make this space possible!
Ps. Most of the work done here was by the homeowners so if you’re thinking about taking on a makeover in your own home, maybe this is the encouragement you need 😘
As I’m sitting here staring at the dishes on the As I’m sitting here staring at the dishes on the counter while I try to focus on editing a video, I thought it’s as good of time as any to share this reminder 😘
I feel like I’ve lucked into the best job out th I feel like I’ve lucked into the best job out there, but then I’m also so aware of the amount of work it took to get here. Today I chatted with two of my blog friends in an Instagram live about DIY blogging as a job and answered some questions we get asked all the time about our work and the balance of it all! I saved it as an IGTV so you can watch it if you missed 🥰

Big thanks to @love_create_celebrate and @thediymommy for chatting with me today! One of the biggest perks of this job is all the talented ladies I’ve had the privilege of meeting and calling friends- these two are top of that list!
I’m having some fun in stories with a little giv I’m having some fun in stories with a little giveaway guessing game. I’d love if you played along!

I put up a question box and you can guess my next room makeover and the guesses are all over the place. Some are projects on my dream list, some are rooms I wish to even have in my house and some are spaces we’ve already tackled! Like our main bathroom ✨ these photos are from my spring home tour I shared over on the blog earlier this week. Hung up a pennant and called it decked for spring 🐣
Who is ready for spring?! I know we totally are- w Who is ready for spring?!
I know we totally are- we’ve been soaking up outside time this week with the kids home on spring break but over on the blog... it’s spring home tour time! I am sharing my home all ready for spring along with some amazing bloggers as part of the #seasonalsimplicity spring series!
You know I love a touch of DIY decor in every spac You know I love a touch of DIY decor in every space in my home, so I’m so excited to be partnering with @HGTVCanada to celebrate #$aveMyReno being back TONIGHT! #partner
 
My favourite thing about $ave My Reno is that they encourage home owners to get involved and DIY to maximize budget. They even help kids get involved- it’s everything Shane and I work towards in our own projects. You can catch it every Tuesday at 9/9:30PM EP on @HGTVCanada or catch up on episodes on STACKTV through @primevideoca!
 
PS. I made those tie dye pillows, similar to the ones featured in tonight’s episode! You can catch my stories to see the super speedy how-to :)
Load More... Follow on Instagram

Copyright © 2021 · Lemon Thistle · All Rights Reserved · Powered by Mai Theme