• Skip to main content
  • Skip to header left navigation
  • Skip to header right navigation
  • Skip to site footer
  • Shop
  • Get The Email
  • Work With Me
  • About
  • Search

  • DIY
    • DIY Home Decor
    • With Power Tools
    • Renovation
    • For Kids
    • For Parties
    • Wearable
    • Organization
    • Cricut Crafts
  • Home Decor
    • Room Reveals
    • Kid Friendly
    • DIY Home Decor
    • Renovation
  • Lettering
    • Hand Lettered Printables
    • Free Practice Sheets
    • Handlettered DIY
    • Free Brush Lettering Quickstart Guide
Lemon Thistle

Lemon Thistle

Rad DIY, Lettering and Design for Real People

  • Printables
    • For Cricut
    • Party Printables
    • Home Decor Printables
    • Bachelor Bingo
    • Handlettering Practice Sheets
    • All Free Printables
  • Entertain
    • Party Printables
    • Party DIY
    • Tablescapes
    • Kids Parties
  • Blog

Giant Bumble Bee Marshmallow Pops

Sep 24

DIY Giant Bumble Bee Marshmallow Pops

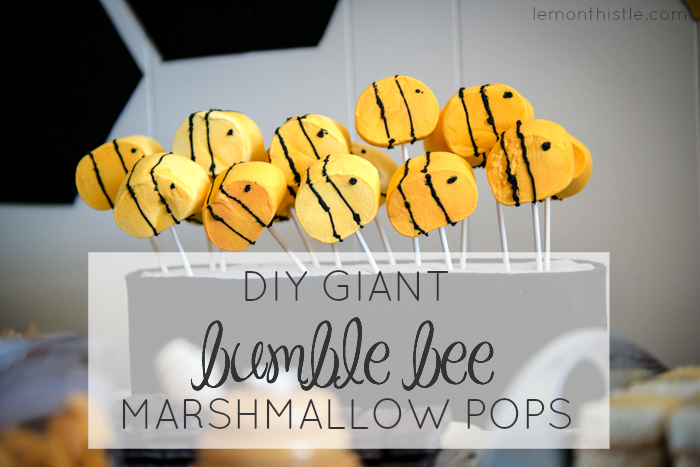
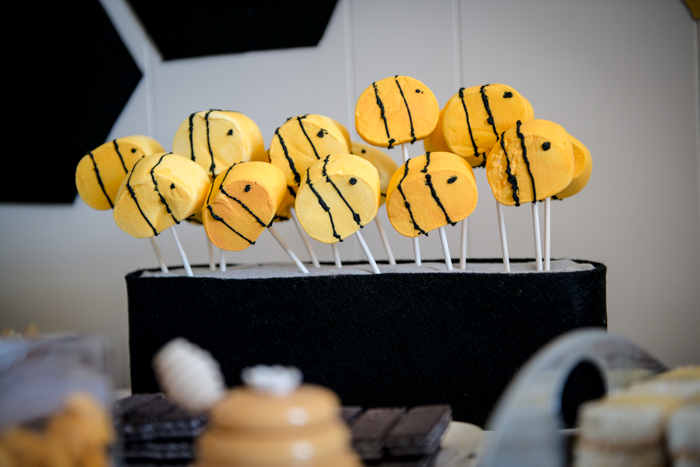
Do you ever plan something, thinking it will be just okay, then it turns out better than okay? Like, really really good. That was these marshmallows. I love the look of cake pops at parties, but I certainly don’t have the time/patience to make those. The alternative? Marshmallows! They look cute on sticks and have you seen those GIANT marshmallows you can get now? I picked up a bag, imagining these cute, perfectly round marshmallow pops only to open the bag up and realize they are definitely a little squished. Disappointed, I considered trashing the whole idea but after staring at them (frustrated… for longer than I’d care to admit) I realized they kind of look like a bee’s body. So I ran with it. And I’m happy I did.

DIY Giant Bumble Bee Marshmallow Pops

DIY Giant Bumble Bee Marshmallow Pops

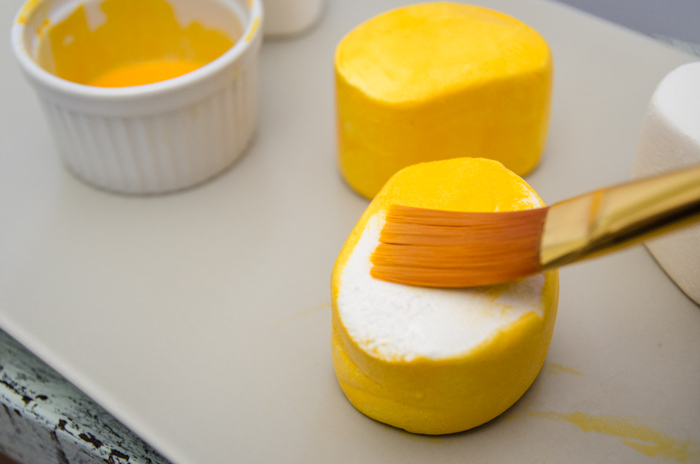
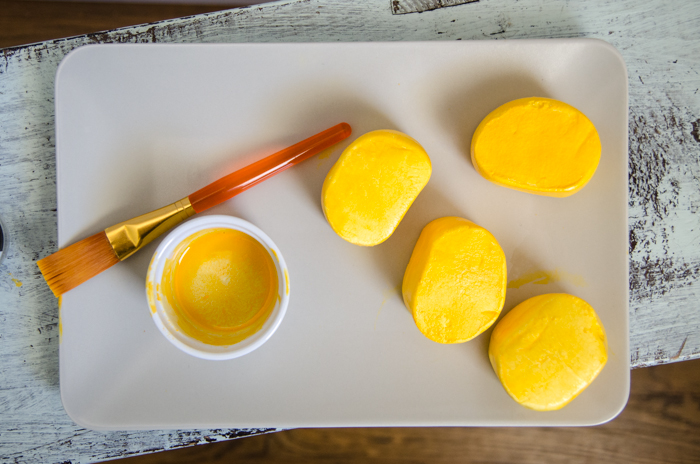
Did you know you could paint food? I didn’t, but there is this magical dust Wilton makes for decorating fondant and if you add an extract to this magic powder… it becomes a paint! So I got busy painting all of my marshmallows (doing one side and letting it dry, then flipping) bright yellow like bumble bees. There’s nothing tricky about this, after you mix in some extract (I used almond) with your powder, just paint it like you’d paint with real paint. Just remember to use a brand new paintbrush… no one wants to eat old paint flakes.

DIY Giant Bumble Bee Marshmallow Pops

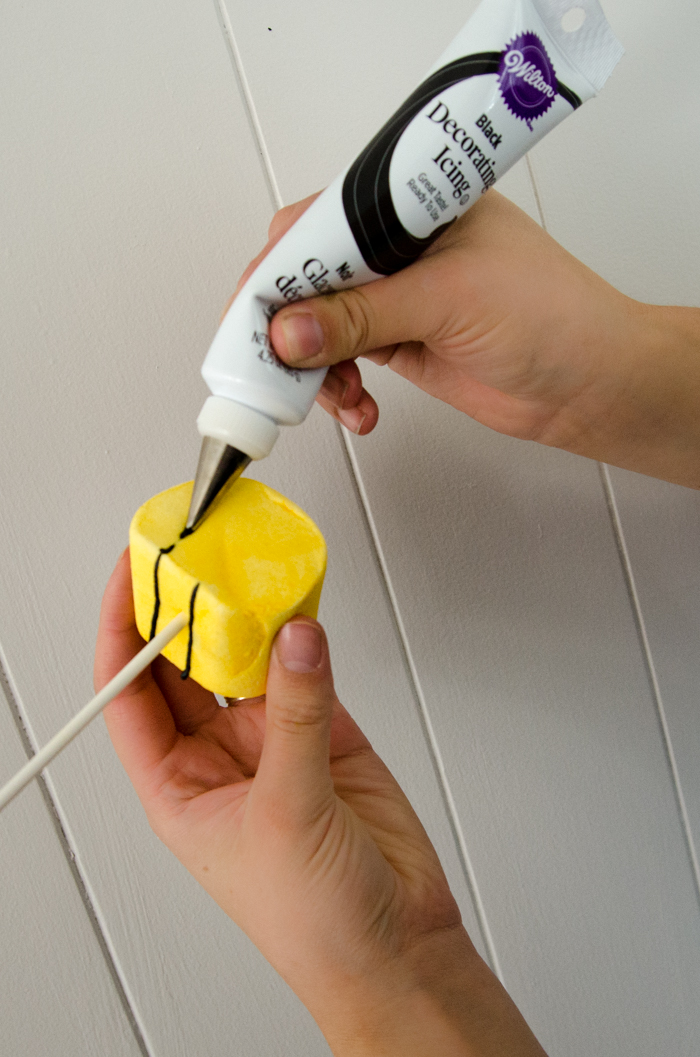
When they’re dry (not dried out, but not wet anymore) poke your lollipop sticks in and add your black stripes and eyes. I used ready made black icing (seriously, Wilton has everything) because it was an easy shortcut and have you ever tried to mix black icing? It takes so much dye it’s ridiculous. I had no problem paying the couple bucks to have that done for me. And it made clean up a lot easier too, you just add your decorating tip (I used a super fine one) right onto the tube. I took some cake decorating classes a few years ago and the clean-up is the one thing that keeps me from doing it more so this made me really happy.

GIANT DIY Bumble Bee Marshmallow Pops

So that’s it guys. It’s an easy DIY party sweet (without turning on your oven) and they’re so cute they double as a centerpiece. Aaand now that I know I can paint my sweets the options are endless. So that’s exciting. What do you think, would you try painting your sweets? I’d love to hear what you’d try painting (and if I’m the only one who didn’t know about this magic)!

Category: DIY, EntertainTag: Birthday, Decorations, Food, Kids, Kids Parties, Party, Party DIY, Party Food
Facebook0Tweet0Pin0LinkedIn0
Previous Post: « Such fun party cups for a DIY First Beeday Party It’s a First Beeday Party!
Next Post: BeeDay Backdrop and Invite: Free Printable Love this First Beeday Invitation - Free Printable »

Reader Interactions

Comments

  1. Shambray

    Sep 24 at 7:45 am

    I didn’t know about that either! I would totally paint my food. Now I need to come up with something to paint.

    Reply
    • Colleen Pastoor

      Sep 25 at 2:15 pm

      Paint all the things! Haha, might I recommend a marshmallow ;) It really is so much fun!

      Reply
  2. Sarah Nenni Daher

    Sep 24 at 8:25 am

    These turned out absolutely adorable, Colleen! And I love that they aren’t coated in candy like the cake pops because marshmallows are sugary enough. Pinning these precious little bees.

    Reply
    • Colleen Pastoor

      Sep 25 at 2:17 pm

      Thanks Sarah! Marshmallows are definitely sugary enough, they were definitely a hit with the kiddos (not mine… they got cake, I thought that was enough!)

      Reply
  3. Leia

    Oct 01 at 9:09 am

    Those are so cute, and easy! Thanks for sharing at On Display Thursday, come again!

    Reply
  4. Pauline Molinari

    Oct 02 at 4:52 pm

    These are so fun! Thanks for sharing your adorable bumble bees on the Monday Funday Party!

    Reply
    • Colleen Pastoor

      Oct 02 at 11:06 pm

      Thanks Pauline! Awesome party as always :)

      Reply
  5. suzy

    Oct 07 at 10:50 am

    I love that after you saw those marshmallows squished you decided to salvage them into something adorable. I seriously want to have a bumblebee themed party just to make those! Pinning and stumbling.

    Reply
    • Colleen Pastoor

      Oct 08 at 7:27 pm

      Aw, thank you so much Suzy! I was so disappointed when they were squished, I’m sure happy with the results though :)

      Also- THANK YOU for stumbling! I’ve yet to start on that platform, but it’s on my to do list. Thanks for giving me a jump start!

      Reply

Leave a Reply Cancel reply

Your email address will not be published. Required fields are marked *

Sidebar

WOOHOO!

Check your email to confirm!

(+ get your freebies + discounts)


Thanks for dropping by!
I’m Colleen: wife; mom to 4 wild ones; and DIY blogger behind Lemon Thistle. You can expect to see rad DIY, modern home decor, renovations, hand lettering and the occasional party on Lemon Thistle. Read More…

email facebook youtube instagram pinterest

Unless otherwise noted, all content and images are mine. Full posts may not be shared without express written consent. But I love when you share! Feel free to share, without altering, one image with proper credit and a link to the original post. All free printables are for personal use only.

Everyone loves proper credit- if you ever notice something improperly credited, please please shoot me an email and I’ll fix it lightning fast.

Find all my policies right here.
This includes my privacy policy, info on the GDRP compliance and information on affiliate links (Including Amazon Affiliates).

Visit Colleen Pastoor’s profile on Pinterest.

colleenpastoor

My house is never this clean
-
DIY + Home Decor Blogger
Mama of 4 👶🏼🧒🏼👦🏼👧🏼
Renovating our 🏠 the DIY way
🖤 Lettering & ☕️
-
✉️[email protected]

colleen pastoor/lemon thistle
What’s next on your project list? Spring is teas What’s next on your project list? Spring is teasing us so we’re starting on outdoor projects around here!
$100 play room makeover is DONE! This room has se $100 play room makeover is DONE! 
This room has seen so much change over the past year (swipe over to see it 2 weeks ago, 10 months ago and 1 year ago!). I took this last week to make over this space with mostly pieces we already had and I’m so so happy with the results! It’s a good reminder that some hard work, creativity and of course paint can work magic.
I’m sharing all the details (and that under stairs space!) on YouTube today (link in my stories!) and so is my friend @thediymommy (she made over her daughters bedroom for $100!).
Do you think dried grasses are only for fall decor Do you think dried grasses are only for fall decor? I used to think so, but these bunny tail grasses are too cute to put in a bin until next year. Plus the name sounds like spring decor to me ;) What do you think?

Ps. Today’s going to be a full day of playroom progress! I’ll share as much as I can in stories as I go :)
Paint is honestly magic.✨ I am so excited to sha Paint is honestly magic.✨
I am so excited to share this kitchen makeover with you guys! These are the same cabinets, just painted (countertops too!) And some updated finishes. I blogged the full before and after if you’d like to check it out!
Big thank you to @schaubhardware and @wagnerspraytech for partnering to make this space possible!
Ps. Most of the work done here was by the homeowners so if you’re thinking about taking on a makeover in your own home, maybe this is the encouragement you need 😘
As I’m sitting here staring at the dishes on the As I’m sitting here staring at the dishes on the counter while I try to focus on editing a video, I thought it’s as good of time as any to share this reminder 😘
I feel like I’ve lucked into the best job out th I feel like I’ve lucked into the best job out there, but then I’m also so aware of the amount of work it took to get here. Today I chatted with two of my blog friends in an Instagram live about DIY blogging as a job and answered some questions we get asked all the time about our work and the balance of it all! I saved it as an IGTV so you can watch it if you missed 🥰

Big thanks to @love_create_celebrate and @thediymommy for chatting with me today! One of the biggest perks of this job is all the talented ladies I’ve had the privilege of meeting and calling friends- these two are top of that list!
I’m having some fun in stories with a little giv I’m having some fun in stories with a little giveaway guessing game. I’d love if you played along!

I put up a question box and you can guess my next room makeover and the guesses are all over the place. Some are projects on my dream list, some are rooms I wish to even have in my house and some are spaces we’ve already tackled! Like our main bathroom ✨ these photos are from my spring home tour I shared over on the blog earlier this week. Hung up a pennant and called it decked for spring 🐣
Who is ready for spring?! I know we totally are- w Who is ready for spring?!
I know we totally are- we’ve been soaking up outside time this week with the kids home on spring break but over on the blog... it’s spring home tour time! I am sharing my home all ready for spring along with some amazing bloggers as part of the #seasonalsimplicity spring series!
You know I love a touch of DIY decor in every spac You know I love a touch of DIY decor in every space in my home, so I’m so excited to be partnering with @HGTVCanada to celebrate #$aveMyReno being back TONIGHT! #partner
 
My favourite thing about $ave My Reno is that they encourage home owners to get involved and DIY to maximize budget. They even help kids get involved- it’s everything Shane and I work towards in our own projects. You can catch it every Tuesday at 9/9:30PM EP on @HGTVCanada or catch up on episodes on STACKTV through @primevideoca!
 
PS. I made those tie dye pillows, similar to the ones featured in tonight’s episode! You can catch my stories to see the super speedy how-to :)
Load More... Follow on Instagram

Copyright © 2021 · Lemon Thistle · All Rights Reserved · Powered by Mai Theme