• Skip to main content
  • Skip to header left navigation
  • Skip to header right navigation
  • Skip to site footer
  • Shop
  • Get The Email
  • Work With Me
  • About
  • Search

  • DIY
    • DIY Home Decor
    • With Power Tools
    • Renovation
    • For Kids
    • For Parties
    • Wearable
    • Organization
    • Cricut Crafts
  • Home Decor
    • Room Reveals
    • Kid Friendly
    • DIY Home Decor
    • Renovation
  • Lettering
    • Hand Lettered Printables
    • Free Practice Sheets
    • Handlettered DIY
    • Free Brush Lettering Quickstart Guide
    • Learn Brush Lettering E-Course SALE
Lemon Thistle

Lemon Thistle

Rad DIY, Lettering and Design for Real People

  • Printables
    • For Cricut
    • Party Printables
    • Home Decor Printables
    • Bachelor Bingos
    • Free Monthly Wallpapers
    • Handlettering Practice Sheets
    • All Free Printables
  • Entertain
    • Party Printables
    • Party DIY
    • Tablescapes
    • Dinner Party
    • Kids Parties
    • Party Eats
    • Baby Showers
    • Wedding + Showers
  • Blog

BeeDay Backdrop and Invite: Free Printable

Sep 26

DIY First Beeday Party

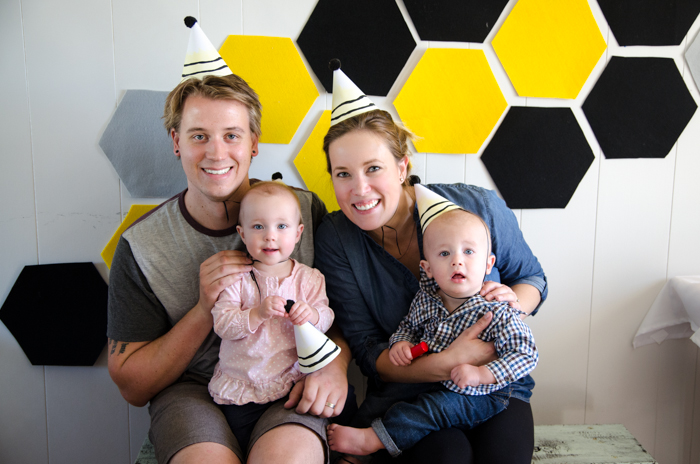
It’s turning out to bee a very bumble-bee-ee week. (Man, do you find me as funny as I find myself?!) First the Beeday Party, then the Bumble Bee Marshmallow Pops… I swear I do post things other than parties if you’re new. Today I’m bundling the back drop DIY (because it’s so easy, I couldn’t fill a whole post with the explanation) and the invite freebie is only one image, and I have a hard time hitting publish on a one image post. So that’s the why, now let’s get on with it!

I’ve updated the Beeday Invite (probably my favourite invite that I’ve ever made) with spaces for you to write or type in your own party information because I’m guessing you don’t have children named Emmitt and Aubrey that are turning one. Here’s what it looks like now:

Love this First Beeday Invitation - Free Printable

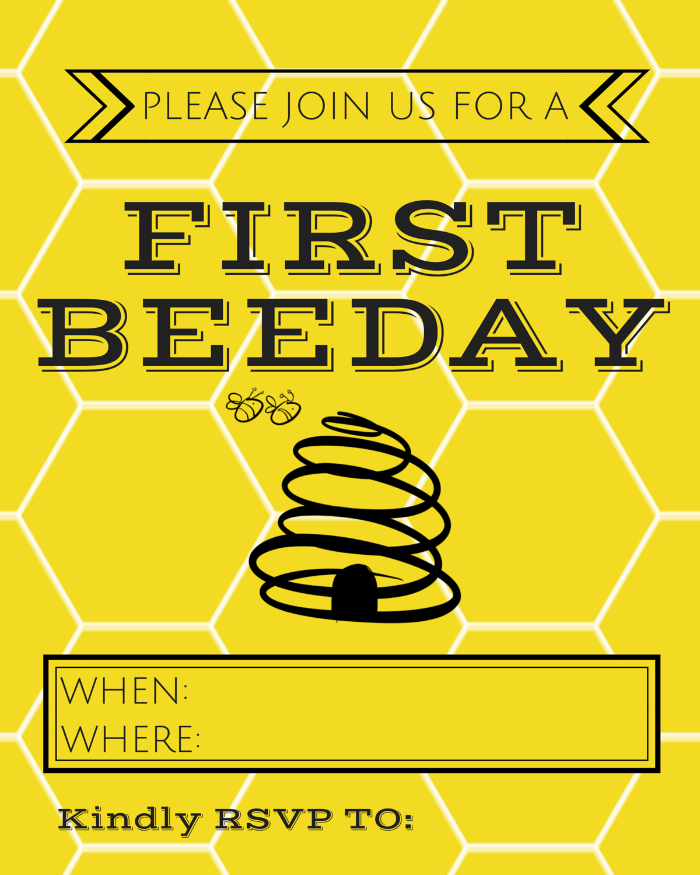
To make it your own, just click the link below, then save the file. Then open that file up in a photo editing program (if you don’t have one, you can use Pic Monkey for free online) and type in your information. Then it’s ready to print! I printed two per page.

Download the Invite

Love the way this looks! DIY First Beeday Party

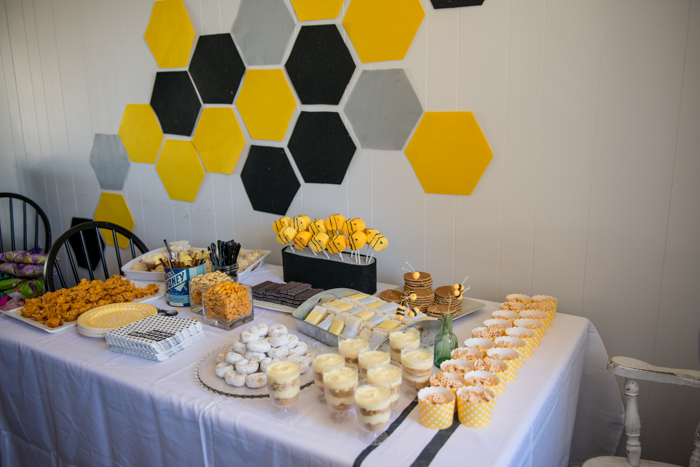
Now, on to the backdrop? Sure, let’s do that. I love this thing. We left it up all week until I had to take it down for filming on Tuesday (yes! More filming, I can’t wait to show you guys what we were working on). It’s so bright and fun, but not a banner or bunting (I’m over bunting, is that okay?). I really wanted something that would fill the space, but not be too fussy. It also couldn’t be too girly or boyish… I’m pretty happy with the results. So how did I make it?

Fun Felt Backdrop for a Beeday Party Fun Felt Backdrop for a Beeday Party

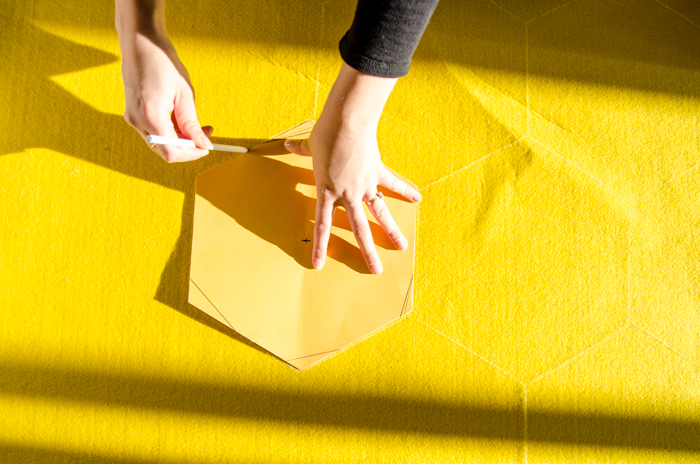
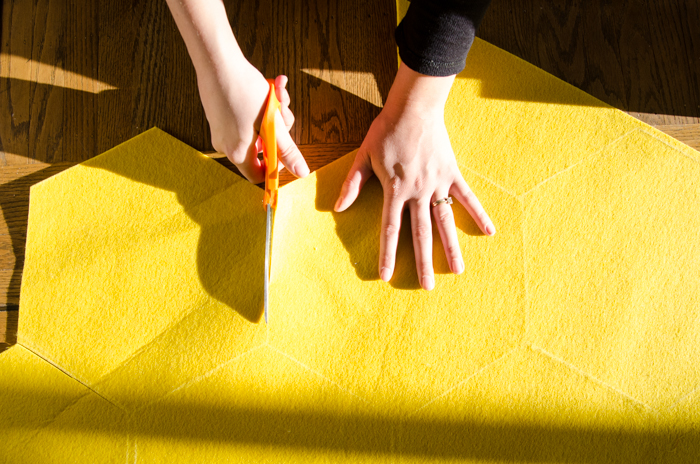
I picked up some medium weight felt (it’s SO much nicer than the cheap stuff from the dollar store, guys… I want to re-make my felt banners with this stuff it’s so nice) from the fabric store. I decided before hand that I’d like my hexagons to be 12 inches at their widest point (the size of a sheet of scrapbook paper) so I could calculate how big of a sheet I needed. I chose three colours, but you could choose as many as you like. I wish there was a couple greys, but the selection was a little limited.The only thing to be cautioned about with the thicker felt (you can see this in the photo above) it creases if you fold it. Roll it or leave if flat if possible to avoid this!

DIY First Beeday Party

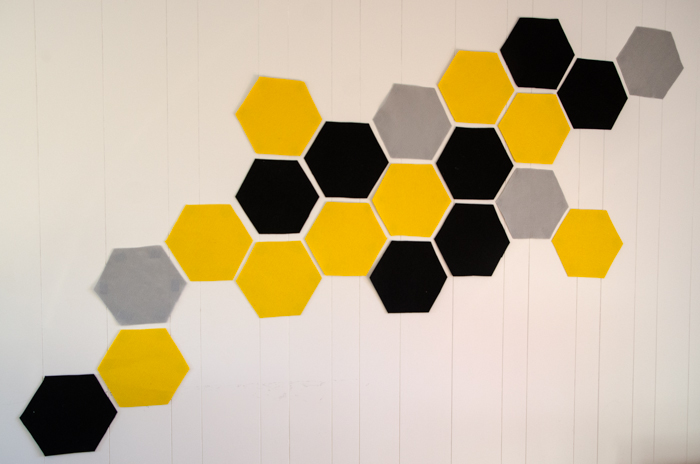
I made myself a hexagon template using a scrapbook sheet of paper, and got to work tracing. The easiest thing to use is a fabric marking pencil. Mine is white- the only downside is that felt wears down the pencil really quick so you’ll be sharpening a lot.  Once your lines are drawn, get cutting. Then put it up on the wall with painters tape, varying the colours so it doesn’t look like a checkerboard.

Fun Felt Backdrop for a Beeday Party

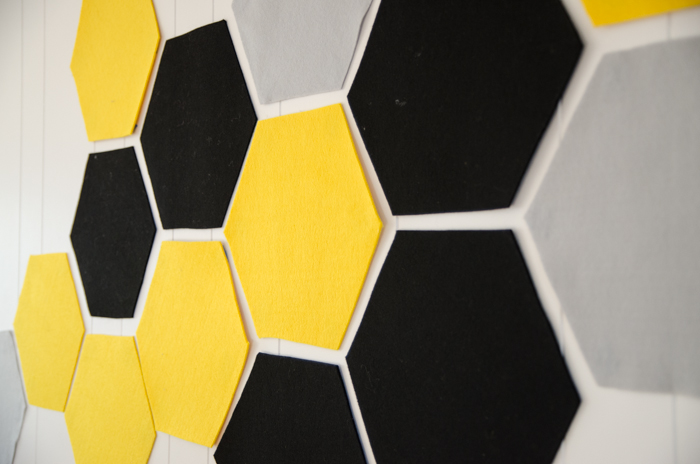
That’s it? Yup, that’s it. Now you see why I couldn’t post this in it’s own, it’s not a full DIY- it’s more of an idea. But I like to think it’s a good one, so it was still worth posting. What do you think? This idea could be used in so many different ways! Different shapes, colours, the possibilities are endless. Would you use a backdrop like this or are you more a fan of garlands?

*Also- I’m really excited to share with you a challenge next week- Thanksgiving is coming up (here in Canada) and it’s centered around being thankful. I hope you’ll stop by on Monday to find out more and that you join me on the challenge!*

Category: Entertain, PrintablesTag: Birthday, Cards, Freebie, Invitation, Kids, Kids Parties, Party Printables, Printable
Facebook0Tweet0Pin0LinkedIn0
Previous Post: ← GIANT DIY Bumble Bee Marshmallow Pops Giant Bumble Bee Marshmallow Pops
Next Post: #thankfulmail Challenge and Printable! →

Reader Interactions

Comments

  1. Megan

    Sep 26 at 9:01 am

    This is an adorable theme! The backdrop is so simple and makes a big impact. Happy Birthday to your little ones!

    Reply
    • Colleen Pastoor

      Sep 28 at 2:12 pm

      Thanks so much Megan! We had so much fun putting it together :)

      Reply
  2. Kara

    Sep 26 at 9:14 am

    First – Holy man, does Aubrey ever look like you and Emmitt like your hubby!

    I’m all for whatever is easy, and the felt background seems pretty gosh-darn easy to me! Right now I just have a cheapo banner from the dollar store; I’d love something with a little more “class,” lol.

    Reply
    • Colleen Pastoor

      Sep 28 at 2:14 pm

      Haha, we hear that all the time! And it’s so darn easy, you definitely could do it!

      Reply
  3. Shambray

    Sep 26 at 2:42 pm

    Once again…I love that backdrop. It is perfect for the theme and it is perfect for gender neutral. I love it!

    Reply
    • Colleen Pastoor

      Sep 28 at 2:17 pm

      Thanks Shambray! Gender neutral was way harder than I thought it would be!

      Reply
  4. Emily @ Table + Hearth

    Sep 30 at 6:41 pm

    This is adorable! My best friend’s baby turns one in December and she asked me to help her plan, definitely forwarding this to her!

    Reply
    • Colleen Pastoor

      Oct 02 at 7:34 am

      Please do! Thanks so much for stopping by Emily. I Checked out your blog and I totally love your style, can’t wait to see what you come up with!

      Reply
  5. Leia

    Oct 07 at 7:36 pm

    I love this idea! I noticed it in your bee-day posts last week. So super cute, I’m gonna have to make this for my house, somewhere… Thanks for sharing at On Display Thursday. :)

    Reply
    • Colleen Pastoor

      Oct 08 at 8:12 pm

      Thanks so much Leia! I’d love to see if you do- and as always, awesome party :)

      Reply
  6. SR

    Feb 07 at 4:29 am

    Hi
    How did you adhere felt to the wall?

    Reply
    • Colleen Pastoor

      Feb 27 at 9:36 pm

      Just with painters tape in loops!

      Reply
  7. Priya

    Jul 12 at 8:32 am

    Plz let me know Where can I get these kind of sheet other thn dollar shop? Bcz this sheet looks good.

    Reply
    • Colleen Pastoor

      Jul 21 at 9:58 am

      You can find it in rolls at the fabric store!

      Reply
    • Colleen Pastoor

      May 25 at 7:14 pm

      Fabric store! Sold by the meter :)

      Reply

Leave a Reply Cancel reply

Your email address will not be published. Required fields are marked *

Sidebar

WOOHOO!

Check your email to confirm!

(+ get your freebies + discounts)


Thanks for dropping by!
I’m Colleen: wife; mom to 4 wild ones; and DIY blogger behind Lemon Thistle. You can expect to see rad DIY, modern home decor, renovations, hand lettering and the occasional party on Lemon Thistle. Read More…

email facebook youtube instagram pinterest

Unless otherwise noted, all content and images are mine. Full posts may not be shared without express written consent. But I love when you share! Feel free to share, without altering, one image with proper credit and a link to the original post. All free printables are for personal use only.

Everyone loves proper credit- if you ever notice something improperly credited, please please shoot me an email and I’ll fix it lightning fast.

Find all my policies right here.
This includes my privacy policy, info on the GDRP compliance and information on affiliate links (Including Amazon Affiliates).

Visit Colleen Pastoor’s profile on Pinterest.

colleenpastoor

My house is never this clean
-
DIY + Home Decor Blogger
Mama of 4 👶🏼🧒🏼👦🏼👧🏼
Renovating our 🏠 the DIY way
🖤 Lettering & ☕️
-
✉️[email protected]

colleen pastoor/lemon thistle
Who has DIY projects on their mind this year?! @ry Who has DIY projects on their mind this year?! @ryobi_canada and I want to help you start knocking those projects off your list by giving away a new nailer and battery set! #ad 
This tool is what we used for this accent wall and all the trim in our home. It’s the one I used to trim out my built in shelving and add the decorative moulding to my geometric barn door. What I’m saying is this thing is a workhorse and I want you to have one too 😉
To enter:
✨Follow me @colleenpastoor and @ryobi_canada 
✨like and save this photo 
✨ tag some friends who’d love to win in the comments! One tag per comment, each is an entry. 
✨ share to your stories for a bonus 5 entries!

Open to Canadians only this time (sorry US friends!) and not associated with Instagram. Closes Friday Jan 22 at noon PST!
Let’s talk about coffee! This is my coffee ‘st Let’s talk about coffee! This is my coffee ‘station’ and the second photo is my dads! I’m talking aaaall about them over on YT today!
Also... see how nice that fresh silicone looks?! 😉 IYKYK
The hallway is finally finished and I’m so stink The hallway is finally finished and I’m so stinking happy! 

It’s felt like such a long time coming for such a small space. Since we moved in 2.5 years ago, this space has seen new doors and hardware, new trim, new floors... twice😅, we changed the boob light to a pot light and I hated it and now it’s got the most beautiful flush mount fixture I’m in love with (thanks @mymitzi!). It finally got some fresh paint and now frames on walls and last but not least... After this weekend, the new floors look like they were here all along (no door jamb gaps!) which was the last thing really bugging me since our flood last year. 

All this to say that home takes time and sometimes getting it right might take a couple tries. Also- the spaces we don’t really think about (hallways) can totally help a house feel like home with some love (and family photos 🥰)
ps. I partnered with #mymitzi to create a tiktok for This makeover... are you following me over there yet?! I’d love if you popped over and said hi!
It’s done! It works! And I’m calling it a grea It’s done! It works! And I’m calling it a great use of my afternoon the other day. Did you catch the stories? These projects both cost me under $10 by using pieces I already had in my home (yay for scraps!) and one package of drawer slides).
You can find the full video about these two kitchen organization projects over on YouTube in collaboration with my friend @love_create_celebrate and her #scrapsmademodern challenge! But for now... I’m rejoicing this coffee maker is off my counter for good 🎉
How’s your January going? Full speed or are you How’s your January going? Full speed or are you taking it a bit slow too? 

I’m not going to lie, I’m easing into this new year thing pretty slowly. All my decorations are still up (we always leave them up til Ukrainian Christmas which is later this week) and I I’ve yet to respond to my emails since before Christmas 😅
I’m enjoying the slowness of it all.
Happy Christmas Eve from our fam to yours 🥰 Happy Christmas Eve from our fam to yours 🥰
Yes, I made the paper bag snowflakes too. Have you Yes, I made the paper bag snowflakes too. Have you? 😅
This year has been one of a kind and I know so man This year has been one of a kind and I know so many people who are taking this year as the push they’ve been waiting for to start a side hustle, start an new career altogether or to just get creative about how they’re making money. So today I’m excited to partner with @kregjig to share some rad projects to make and sell this year! 
Like this rolling storage system I made for my office, that rad dollhouse and the gorgeous bath toy storage. All of these projects are things that I’d personally love to buy for our family and look like they’d be a great return on your time making them! And yes, all of them use #Kreg tools to make them easy to assemble and quick to make! Plus, they’re having a great sale on right now with deals on their K4 and K5 jigs, Rip-Cut and even a hardware jig bundle! There’s never been a better time to get your workshop set up!  #sponsored
Just a peaceful moment and then a real life moment Just a peaceful moment and then a real life moment for ya 🙃 
My #holidayhometour is on the blog and YouTube (I’ll put links in my stories) as part of the #seasonalsimplicity holiday home tour series. I’ll share those too so you don’t miss any!
Load More... Follow on Instagram

Copyright © 2021 · Lemon Thistle · All Rights Reserved · Powered by Mai Theme