
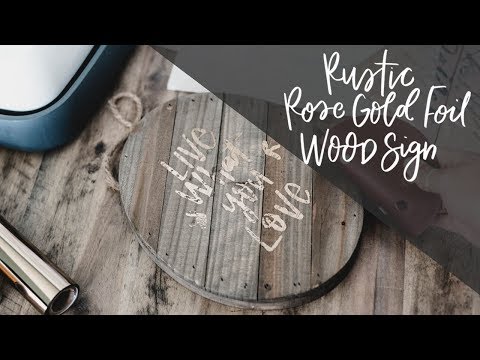
Today I’m excited to share a little wood sign DIY with you! It’s got rustic wood, rose gold foil and handlettering… all things that I totally love! This quote is one I’ve been wanting to put on a sign for a while, I love how simple it is and reminds me to make those things you love a priority and when your’e doing them, to remember that you love them. Like… renovations. We totally love them, that’s why we do them. But there are moments that get stressful and days where I’m not sure I love them as much as I thought I did. So this is a sweet little reminder for us in our home. I should just hang it in the kitchen as we’re drywalling ;)
But taking a break from the renovation talk (because that is ALL that I’ve been talking about lately), let’s talk about this sweet craft. It’s actually kind of a 2.0 project. I love the look of gold foil and have used Deco Foil to apply foil to pretty much every surface by now with a liquid adhesive. But as with any paint on… there’s so much room for error. I used the liquid with a stencil on a wood sign a while back and while I loved how it turned out, when I spotted that they came out with a Hot Melt Adhesive that could be cut with Cricut… I knew I needed to give it a shot!

So today I’m sharing not only how I made this sign (so shiny!), but some tips and tricks on working with the Hot Melt Adhesive and Deco Foil on wood. And the free printable file, of course. And a video tutorial. Ready? Let’s go!
To make this gold foil wood sign, you’ll need:
- Your wood blank- decide if you’d like a smooth finish or more rustic… more on that below! (this one is similar to mine)
- Hot Melt Adhesive
- Deco Foil in your color choice (I used Rose Gold)
- Cricut, other cutting machine, or a very steady hand and craft knife
- Iron (I used my Cricut EasyPress)
- Your design (you can download and use mine HERE but keep in mind it’s for personal use only!)
Here’s the video tutorial, but if you prefer to read about it, I’ve got that below!
The first thing you’ll need to do is upload your design into Cricut Design Space and cut it out. I have a whole tutorial on uploading designs into Cricut Design Space for cut if you are interested.


The Hot Melt Adhesive cuts like any iron-on material, so make sure to mirror your design. I used a light grip mat and a cardstock setting. It worked perfectly but did cut through both the adhesive and the backing (which I expected). So you need to place your letters individually. This might not be ideal for a super intricate design.

Once you’ve placed the pieces on your wood blank, it’s time to iron them on! Put a piece of parchment paper (included in the Hot Melt Adhesive kit) overtop to protect the design and your iron. I used my EasyPress for this. If you’re using really uneven wood like I did, try your best to get into all the nooks to transfer those pieces. That is where my design had the hardest time transferring, just because the heat from the iron couldn’t be directly applied there.


Then you can peel off the backing to reveal your adhesive. It’s not tacky at this point- so don’t panic if yours isn’t. Then cut a piece of your Deco Foil to size and iron that on top (color facing up!) with parchment to protect it again. Again, really try to get into all those nooks of uneven spots, applying pressure. I used my finger to apply some pressure on some of those lower spots after ironing just to make sure the adhesive grabbed the foil, then I peeled it back to reveal that beautiful rose gold shine!


It’s so shiny, you guys! I love it! Since there were a few spots that had a less than perfect edge thanks to the uneven surface, I ran with the ‘rustic’ feel and used some 120 grit sandpaper to rough up the transfers that were perfect. I really love the way this antiqued it a bit.
That’s it, that’s all! Next, I’m going to try this on a smoother wood finish. What will you try?!
 DIY Modern Closet Makeover
Leave a Reply