• Skip to main content
  • Skip to header left navigation
  • Skip to header right navigation
  • Skip to site footer
  • Shop
  • Get The Email
  • Work With Me
  • About
  • Search

  • DIY
    • DIY Home Decor
    • With Power Tools
    • Renovation
    • For Kids
    • For Parties
    • Wearable
    • Organization
    • Cricut Crafts
  • Home Decor
    • Room Reveals
    • Kid Friendly
    • DIY Home Decor
    • Renovation
  • Lettering
    • Hand Lettered Printables
    • Free Practice Sheets
    • Handlettered DIY
    • Free Brush Lettering Quickstart Guide
Lemon Thistle

Lemon Thistle

Rad DIY, Lettering and Design for Real People

  • Printables
    • For Cricut
    • Party Printables
    • Home Decor Printables
    • Bachelor Bingo
    • Handlettering Practice Sheets
    • All Free Printables
  • Entertain
    • Party Printables
    • Party DIY
    • Tablescapes
    • Kids Parties
  • Blog

XO DIY Applique Pillow

Oct 02

XO DIY Applique Pillow- cut with the Cricut Maker plus free pattern!

A couple months ago I got to fly to Salt Lake City and attend Cricut’s Mountain Make-a-Thon which was also the launch of their new Cricut Maker. I’ve had my Maker for a while now and am completely loving it but the one BIG thing that it is supposed to do ridiculously well… I hadn’t even touched! And that’s FABRIC. I’m just not much of a sewer and have been putting off pulling out my sewing machine. But the time has come and I’m excited to tell you that YES it is as good as they say it is. And I’m even more excited to partner with Cricut to share this DIY applique pillow tutorial and the free handlettered XO template with you all!

XO DIY Applique Pillow- cut with the Cricut Maker plus free pattern!

So I’ve had this idea for a pillow in my head for a while- hand lettered applique on a pillow. BUT when it came time to actually do it, I totally chickened out on doing a full phrase. Because I’m just not a confident seamstress and didn’t want to be sewing the applique on for days. So I’m starting simple and I feel like this went really well so I just might try something a bit more intricate net time! But there’s definitely a few things I learned along the way that will make next time better. Ready for the tips and the template?

XO DIY Applique Pillow- cut with the Cricut Maker plus free pattern!

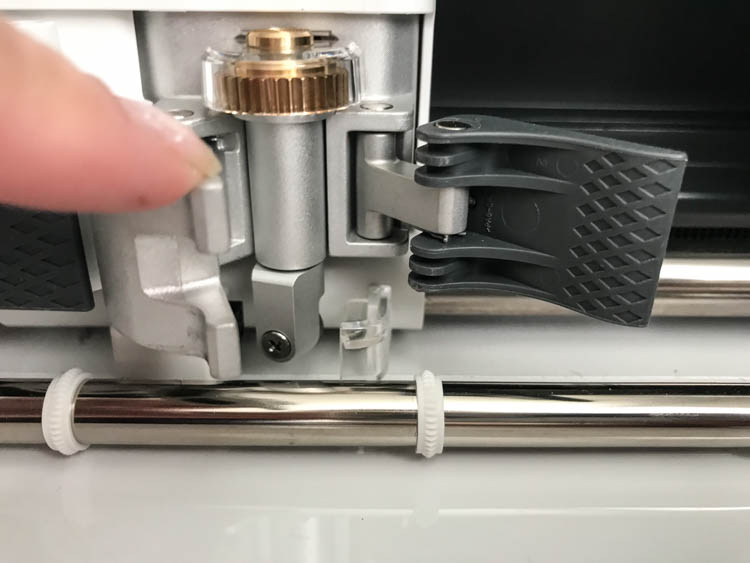
If you’re wondering about WHY the Maker can cut fabric and other machines can’t (I would never have known if someone didn’t show me…). In a nutshell… if you know nothing about cutting machines… The biggest difference is that the Maker has a rotary blade (whaaa) that you can switch in for your standard blade. It’s like hand cutting fabric or felt or leather or whatever with a craft/xacto knife (which I’ve totally done #theworst) vs a fabric rotary cutter. There’s no comparison-  it cuts fabric like a boss. It’s kind of amazing.

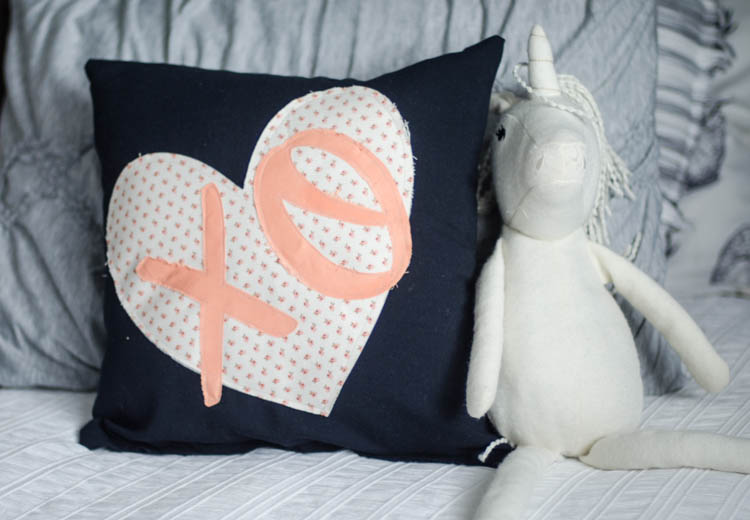
Alright… so I decided to use up this unbleachable pillow case I’d sewn for this crafternoon a couple years ago. The dark navy worked so well with the pretty peachy colours of this Cricut Apricot and Persimmon Designer Fabric sampler pack. Aubrey was pretty smitten with the pink flowers so she claimed it as her own before I even cut the XO. I had to explain to her that XOs meant hugs and kisses before she let me add the XO on to the pillowcase. She had just wanted that flowery heart, but eventually agreed that she gives me lots of hugs and kisses so the XO was good. Negotiating with a four year old is tough business.

XO DIY Applique Pillow- cut with the Cricut Maker plus free pattern!

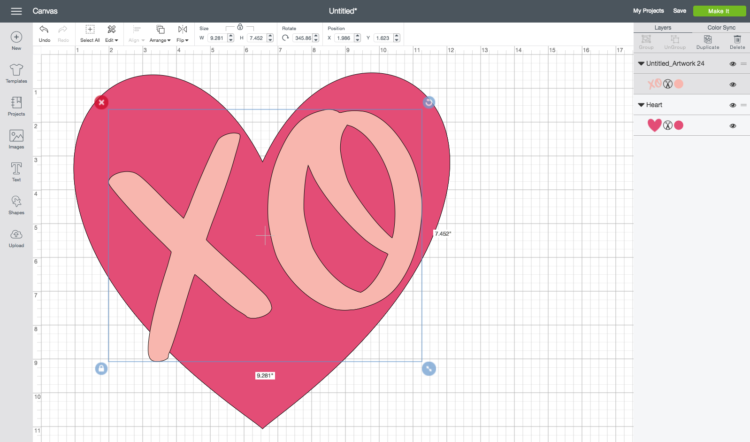
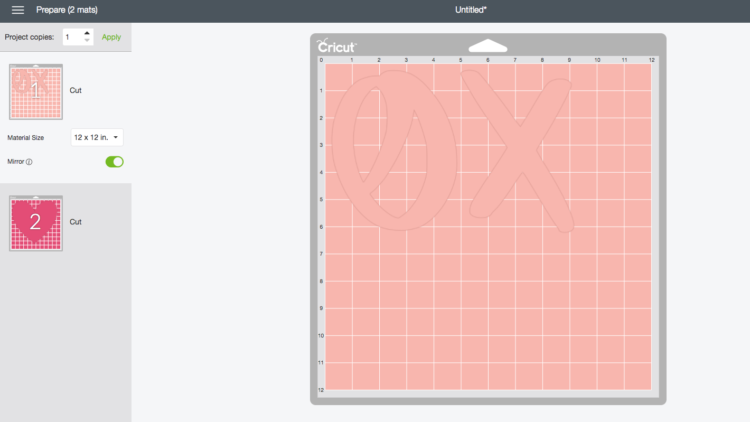
The first thing you’ll need to do is load your design into Design Space. You can grab the XO I lettered RIGHT HERE. This is for personal use only (as are all my freebies). To upload your own design to Cricut Design Space, you need to hit ‘upload’, and save it as a ‘simple’ file and ‘cut only’ design. This design is ready to go. Size it to the size of your pillow case and hit insert. I added the heart that is a standard shape in Design Space. You can then color these designs two different colours and when you hit ‘go’ it will automatically separate them onto the two mats.

XO DIY Applique Pillow- cut with the Cricut Maker plus free pattern!

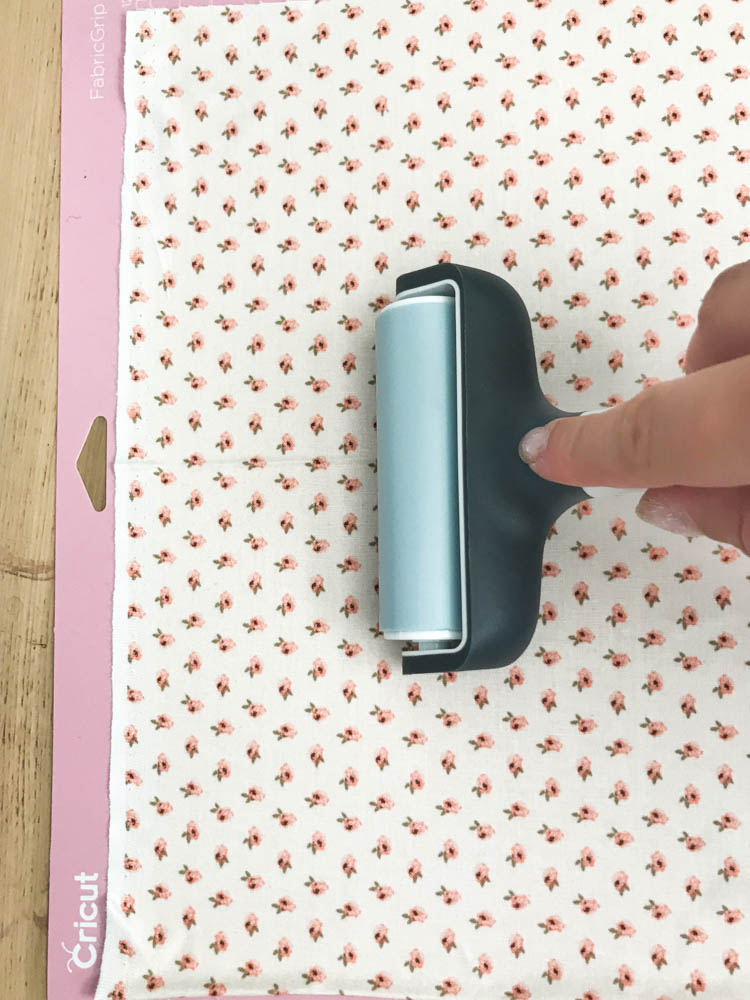
There is actually a new fabric specific mat for the Maker and a brayer you can get to go with it. I had never heard of a brayer before the Make-a-Thon but was told by some quilters that it’s totally a thing and I MUST get one. Who was I to tell them no? And honestly… it is amazing. It’s like a roller/applicator that smooths out all the wrinkles when you’re putting the fabric onto the mat. It’s like the scraper is to vinyl but for fabric.

XO DIY Applique Pillow- cut with the Cricut Maker plus free pattern!

XO DIY Applique Pillow- cut with the Cricut Maker plus free pattern!

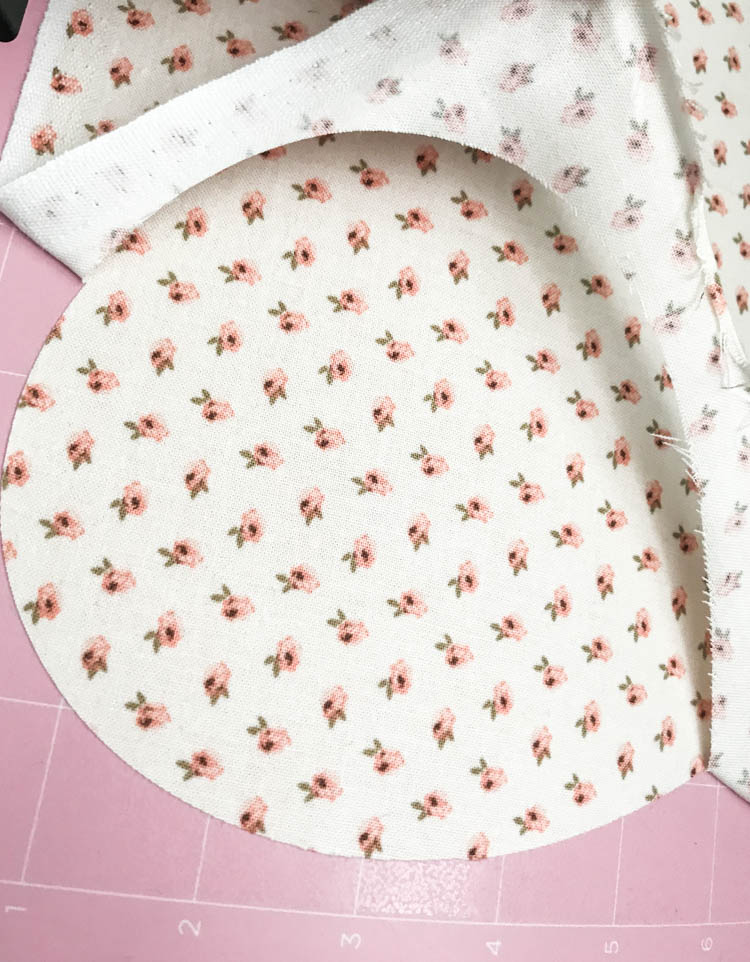
Before you hit GO… make sure to switch in your rotary blade (shown waaay above) and choose the right fabric setting for your material. Then watch it do it’s magic! Cutting fabric is deceiving because you can’t actually see where the cuts are until you start peeling back the excess fabric. Until then… you kind of wonder if it worked! But see how clean that cut is? Brilliant! I’m officially never cutting tedious fabric pieces by hand again. I’m looking at you plushies.

Swap out your fabric and hit go for your next cut (the XO).

XO DIY Applique Pillow- cut with the Cricut Maker plus free pattern!

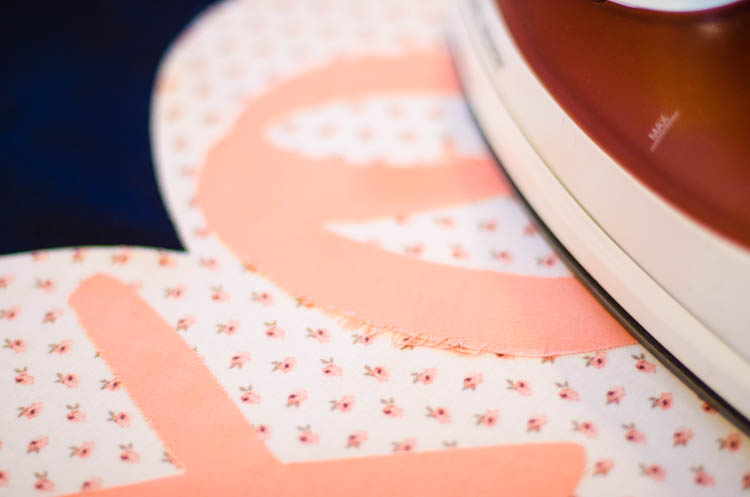
Let’s talk INTERFACING. Now, as a non-sewer… this was something I knew was out there but didn’t totally understand until I used it. And I actually didn’t use the right stuff BUT after asking lots of questions, can recommend to you exactly what you should be using for something like this. Interfacing is basically fabric stabilizer that sticks to other fabrics… to make everything easier to sew together without slipping around and dealing with pins. Which is really one of the worst parts of sewing (PIIIIINS). I did the heart with a cut/ fuse interfacing. Which is totally fine, but you need to be careful that none hangs over the edge (oops). I did the XO with a fusible spray which was AMAZING. But the one I used was actually meant for foils to fabric instead of fabric to fabric so it wouldn’t have lasted a wash without sewing. This stuff however is NO SEW so if you wanted to do an applique without sewing, its’ the stuff to use. Next time, I plan to spray the fabric BEFORE cutting it on the Maker. I think that will make pulling it off the mat without getting frayed edges easier. Ps. Fusible means iron-on (shown).

XO DIY Applique Pillow- cut with the Cricut Maker plus free pattern!

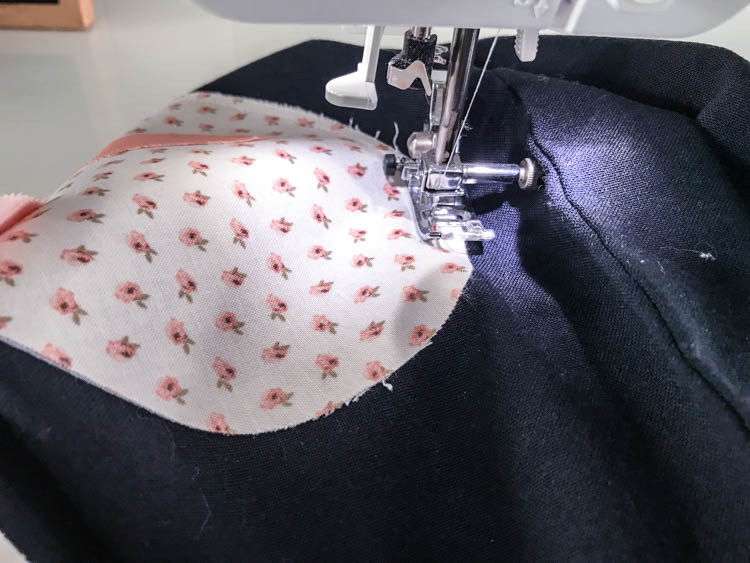
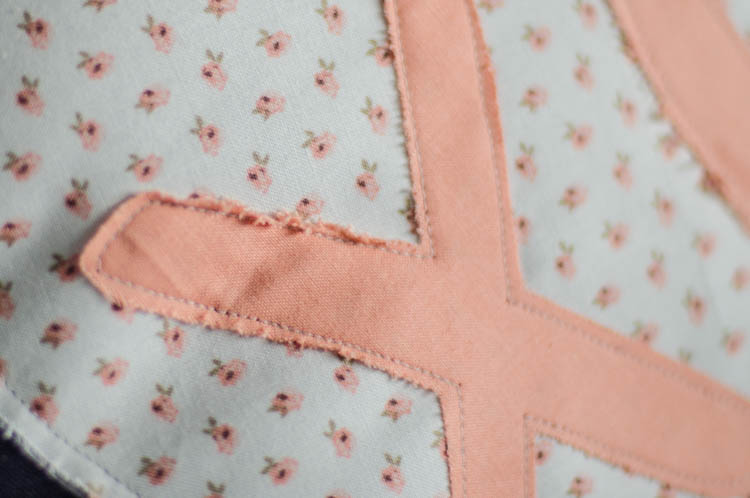
Then… you can stitch around all the edges! If you look closely, you can definitely tell that I’m not the best at keeping my margin (is that the right word?) between the edge of the fabric and the stitch. And corners are a bit wonky. BUT it’s pretty darn good for my first applique and I’ve gotta say that I’m proud of it. And Aubrey thinks it’s amazing, so that helps. She’s also four…

I started to ‘fray’ the edges of the XO fabric using my fingernail and really love how that edge is looking (the close up at the top of this post). But think it might be easier just to toss it in the wash to let it fray naturally. I’m going to try that instead.

XO DIY Applique Pillow- cut with the Cricut Maker plus free pattern!

So that’s it! What do you think… would you try doing a fabric applique like this? Now that I’ve done one… I’m definitely less intimidated at the thought of doing another. And now that I know there is such a thing as no-sew fusible spray… I might try a no sew one and see how it holds up. I do love this alternative to vinyl for decorating a pillow. It just seems so much cozier to snuggle in a bed. I’m already thinking of how cute this would be on pyjamas too.

And if you are interested in hearing more about the differences between the Maker and other cutting machines, I do have a post planned where I’m doing the same project on BOTH my Maker and my Explore Air just to show what they’re capable of.


This is a sponsored conversation written by me on behalf of Cricut. The opinions and text are all mine.


Category: DIY, Home DecorTag: Cricut, Handlettered DIY, Handlettered Printables, Pillow, Sewing, Sponsored
Facebook0Tweet0Pin0LinkedIn0
Previous Post: « Let's do what we love and do it a lot- new free printables every month Let’s Do What We Love- October Tech Wallpapers
Next Post: DIY Autumn Sign and Fall Themed SVG Bundle DIY Handlettered Autumn Sign in Matte Foils »

Reader Interactions

Leave a Reply Cancel reply

Your email address will not be published. Required fields are marked *

Sidebar

WOOHOO!

Check your email to confirm!

(+ get your freebies + discounts)


Thanks for dropping by!
I’m Colleen: wife; mom to 4 wild ones; and DIY blogger behind Lemon Thistle. You can expect to see rad DIY, modern home decor, renovations, hand lettering and the occasional party on Lemon Thistle. Read More…

email facebook youtube instagram pinterest

Unless otherwise noted, all content and images are mine. Full posts may not be shared without express written consent. But I love when you share! Feel free to share, without altering, one image with proper credit and a link to the original post. All free printables are for personal use only.

Everyone loves proper credit- if you ever notice something improperly credited, please please shoot me an email and I’ll fix it lightning fast.

Find all my policies right here.
This includes my privacy policy, info on the GDRP compliance and information on affiliate links (Including Amazon Affiliates).

Visit Colleen Pastoor’s profile on Pinterest.

colleenpastoor

My house is never this clean
-
DIY + Home Decor Blogger
Mama of 4 👶🏼🧒🏼👦🏼👧🏼
Renovating our 🏠 the DIY way
🖤 Lettering & ☕️
-
✉️[email protected]

colleen pastoor/lemon thistle
What’s next on your project list? Spring is teas What’s next on your project list? Spring is teasing us so we’re starting on outdoor projects around here!
$100 play room makeover is DONE! This room has se $100 play room makeover is DONE! 
This room has seen so much change over the past year (swipe over to see it 2 weeks ago, 10 months ago and 1 year ago!). I took this last week to make over this space with mostly pieces we already had and I’m so so happy with the results! It’s a good reminder that some hard work, creativity and of course paint can work magic.
I’m sharing all the details (and that under stairs space!) on YouTube today (link in my stories!) and so is my friend @thediymommy (she made over her daughters bedroom for $100!).
Do you think dried grasses are only for fall decor Do you think dried grasses are only for fall decor? I used to think so, but these bunny tail grasses are too cute to put in a bin until next year. Plus the name sounds like spring decor to me ;) What do you think?

Ps. Today’s going to be a full day of playroom progress! I’ll share as much as I can in stories as I go :)
Paint is honestly magic.✨ I am so excited to sha Paint is honestly magic.✨
I am so excited to share this kitchen makeover with you guys! These are the same cabinets, just painted (countertops too!) And some updated finishes. I blogged the full before and after if you’d like to check it out!
Big thank you to @schaubhardware and @wagnerspraytech for partnering to make this space possible!
Ps. Most of the work done here was by the homeowners so if you’re thinking about taking on a makeover in your own home, maybe this is the encouragement you need 😘
As I’m sitting here staring at the dishes on the As I’m sitting here staring at the dishes on the counter while I try to focus on editing a video, I thought it’s as good of time as any to share this reminder 😘
I feel like I’ve lucked into the best job out th I feel like I’ve lucked into the best job out there, but then I’m also so aware of the amount of work it took to get here. Today I chatted with two of my blog friends in an Instagram live about DIY blogging as a job and answered some questions we get asked all the time about our work and the balance of it all! I saved it as an IGTV so you can watch it if you missed 🥰

Big thanks to @love_create_celebrate and @thediymommy for chatting with me today! One of the biggest perks of this job is all the talented ladies I’ve had the privilege of meeting and calling friends- these two are top of that list!
I’m having some fun in stories with a little giv I’m having some fun in stories with a little giveaway guessing game. I’d love if you played along!

I put up a question box and you can guess my next room makeover and the guesses are all over the place. Some are projects on my dream list, some are rooms I wish to even have in my house and some are spaces we’ve already tackled! Like our main bathroom ✨ these photos are from my spring home tour I shared over on the blog earlier this week. Hung up a pennant and called it decked for spring 🐣
Who is ready for spring?! I know we totally are- w Who is ready for spring?!
I know we totally are- we’ve been soaking up outside time this week with the kids home on spring break but over on the blog... it’s spring home tour time! I am sharing my home all ready for spring along with some amazing bloggers as part of the #seasonalsimplicity spring series!
You know I love a touch of DIY decor in every spac You know I love a touch of DIY decor in every space in my home, so I’m so excited to be partnering with @HGTVCanada to celebrate #$aveMyReno being back TONIGHT! #partner
 
My favourite thing about $ave My Reno is that they encourage home owners to get involved and DIY to maximize budget. They even help kids get involved- it’s everything Shane and I work towards in our own projects. You can catch it every Tuesday at 9/9:30PM EP on @HGTVCanada or catch up on episodes on STACKTV through @primevideoca!
 
PS. I made those tie dye pillows, similar to the ones featured in tonight’s episode! You can catch my stories to see the super speedy how-to :)
Load More... Follow on Instagram

Copyright © 2021 · Lemon Thistle · All Rights Reserved · Powered by Mai Theme