• Skip to main content
  • Skip to header left navigation
  • Skip to header right navigation
  • Skip to site footer
  • Shop
  • Get The Email
  • Work With Me
  • About
  • Search

  • DIY
    • DIY Home Decor
    • With Power Tools
    • Renovation
    • For Kids
    • For Parties
    • Wearable
    • Organization
    • Cricut Crafts
  • Home Decor
    • Room Reveals
    • Kid Friendly
    • DIY Home Decor
    • Renovation
  • Lettering
    • Hand Lettered Printables
    • Free Practice Sheets
    • Handlettered DIY
    • Free Brush Lettering Quickstart Guide
    • Learn Brush Lettering E-Course SALE
Lemon Thistle

Lemon Thistle

Rad DIY, Lettering and Design for Real People

  • Printables
    • For Cricut
    • Party Printables
    • Home Decor Printables
    • Bachelor Bingos
    • Free Monthly Wallpapers
    • Handlettering Practice Sheets
    • All Free Printables
  • Entertain
    • Party Printables
    • Party DIY
    • Tablescapes
    • Dinner Party
    • Kids Parties
    • Party Eats
    • Baby Showers
    • Wedding + Showers
  • Blog

Woodburning Tips from a Beginner

Oct 08

*This post is sponsored by Walnut Hollow. I take care to only partner with companies I love! Find all my policies here. 

Wood Burning Tips from a Beginner

A few years ago I bought myself a wood burner and made a wood burned quote for the holidays. I loved it and I think that over the years my script lettering has improved enough that I’ve been wanting to give it a go again. All I remember from that is that I had NO clue what I was doing. But it was a fun experiment. I thought that since it’s really my second time wood burning and I’m a total beginner at the art (and it is an ART) that I’d put together a little post sharing some of the tips that I have found the most helpful. I hope you find them useful and that you’re encouraged to give wood burning a try because it really is SO much fun! I don’t think it’s something you need to be an expert at (hardly!) to give it a try and be happy with your results.

Wood Burning Tips from a Beginner

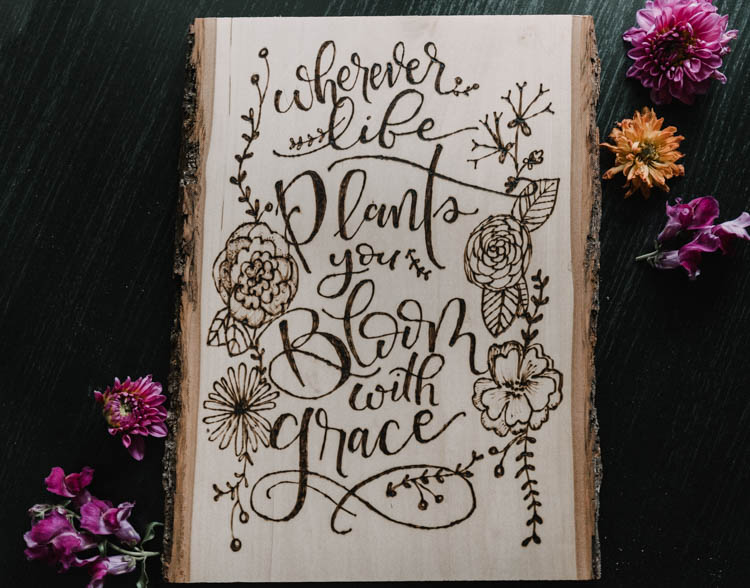
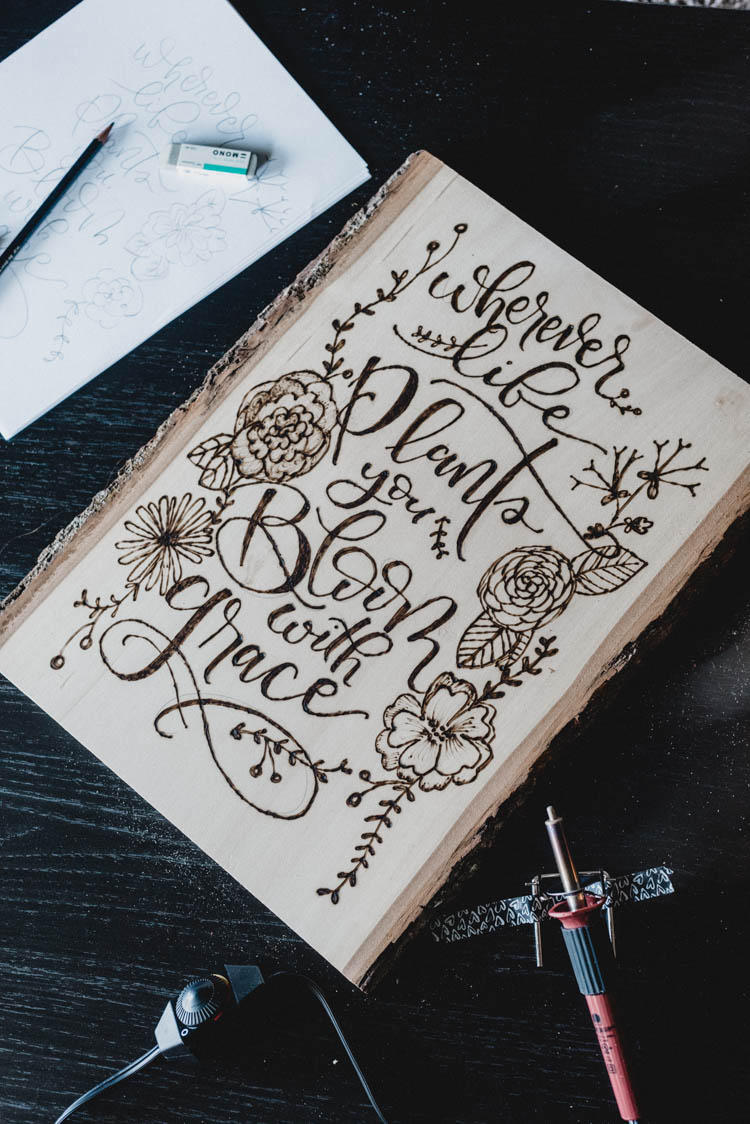
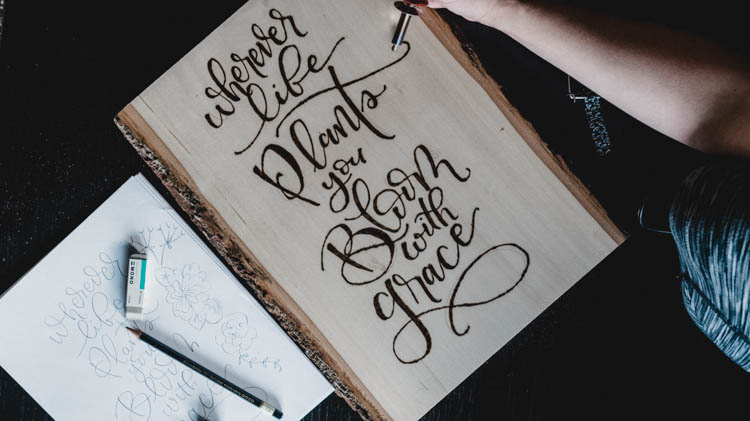
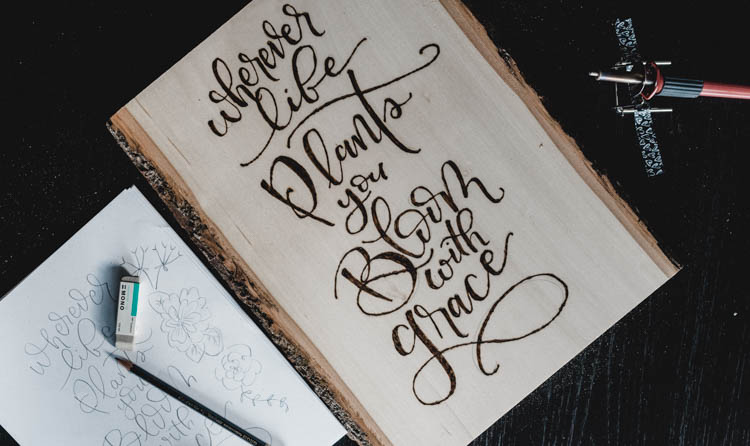
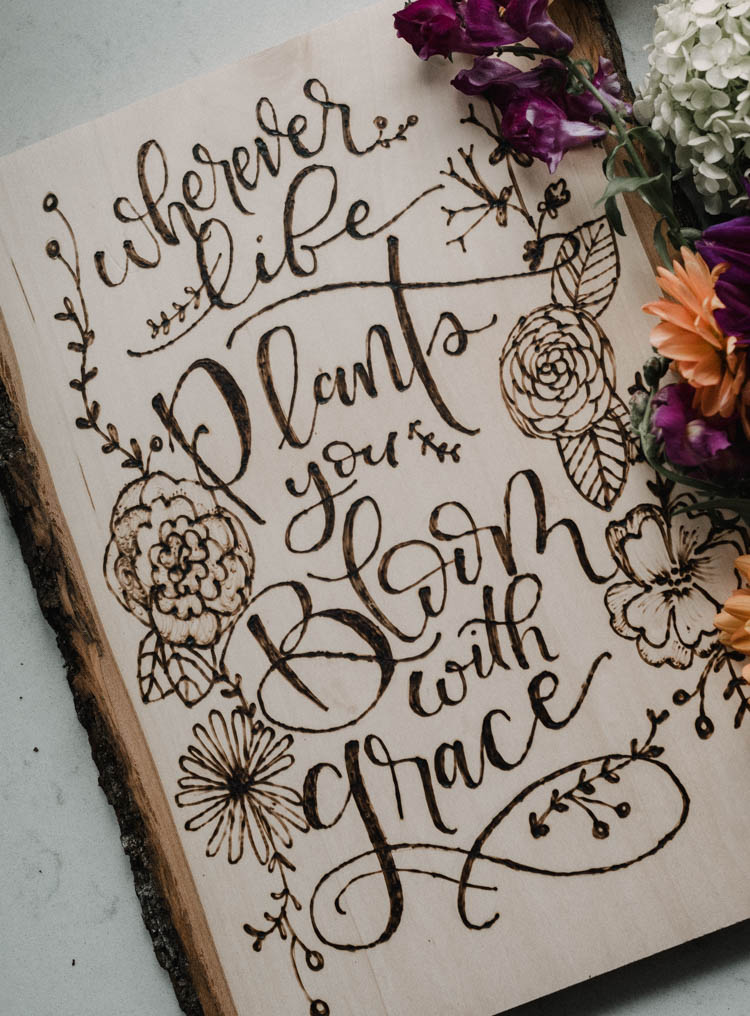
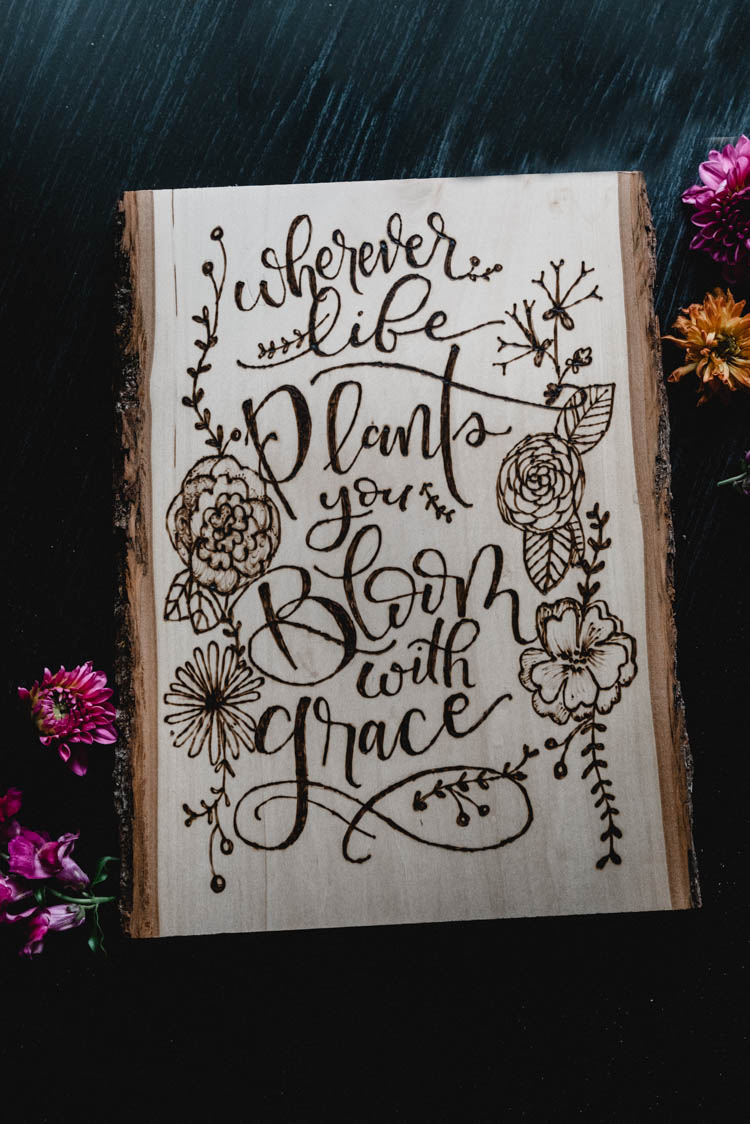
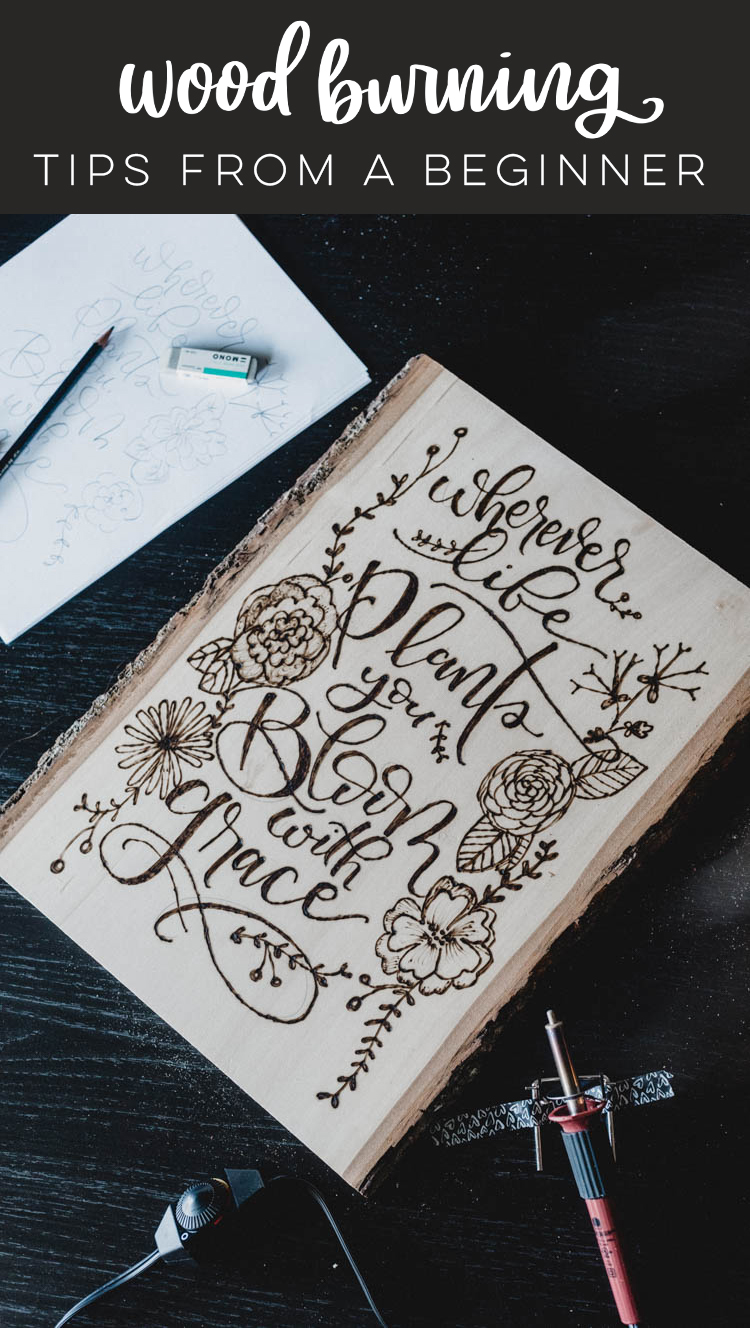
For this project I used one of these gorgeous Basswood Planks from Walnut Hollow. Recognize it? I made one of these babies into a sign for our bathroom last fall when we took on the One Room Challenge (we’re crazy enough to do the ORC again this year too!). It’s funny because in that bathroom remodel, the thing that has gotten the most comments and questions is that little sign! For that one, I cut out heat transfer vinyl and ironed it on to the wood (which I explain how to do here) but this time I wanted to give wood burning another try. I’m really happy with how it turned out! I know it’s not my greatest talent, but it’s totally addicting and I know I’m going to keep working at it. This piece is going to find it’s home on our wall somewhere in our home because I just love this quote so much. The quote reads, ‘Wherever life plants you, Bloom with grace’ and I’ve been wanting to put this quote on something for SO so long. This was the perfect opportunity!

Ready for the tips?

Wood Burning Tips from a Beginner

USE AN ADJUSTABLE HEAT WOOD BURNER

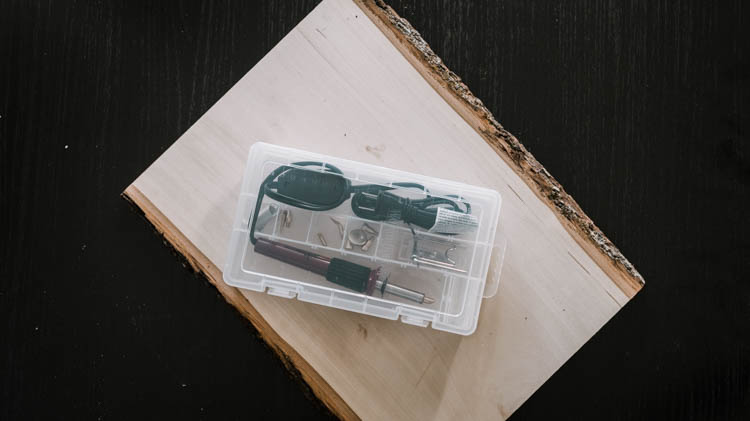
Okay the FIRST tip I have for you is to get a woodburner that you can adjust the temperature on. The one I bought years ago did not have this. This time, I used this woodburner from Walnut Hollow and it had a temperature gauge. It made all the difference! I did have to play a bit to get it just right, but I found the other one would get too hot, so I’d turn it off until it cooled down enough… then in seconds it was too cold and I’d turn it back on until it got too hot again. It was a cycle that was a pain but I didn’t know any better. Now I do and it’s gold, friends. Get one with a dial!

Wood Burning Tips from a Beginner

SKETCH IT IN PENCIL FIRST

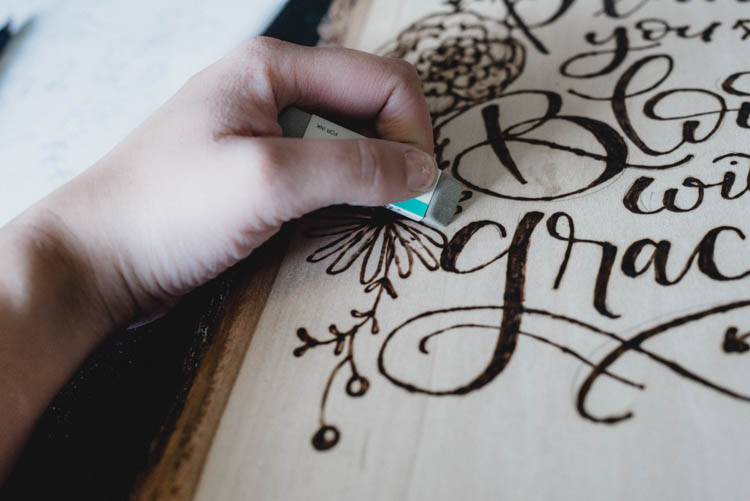
Did you know that you can write on wood and erase it after? Yep! No problemo. So sketch out your design and don’t worry if your wood burning takes a different turn and you are left with pencil marks. I erased them after I was done and you don’t see them at all now! Just make sure not to press TOO hard with your pencil because you can’t erase an indent out of the wood.
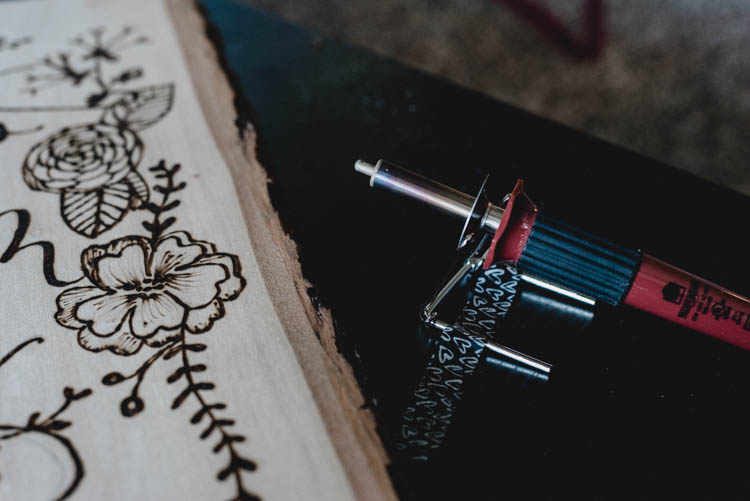
Wood Burning Tips from a Beginner

USE THE BULLET NIB

There are SO many different tips for a wood burner, you guys! I tried so many when I made my sign a few years ago and settled on the bullet as my fave. When I was reading through the instructions on the Walnut Hollow wood burner that I used for this project- they suggested that for script lettering, so I’m passing that tip along to you guys. It was definitely my favourite because it doesn’t get stuck in the wood grain like some of the sharper or pointier nibs.

Wood Burning Tips from a Beginner

USE LIGHT PRESSURE

This one is important because the wood has grain and that grain can totally grab your wood burner and take you off of the line you want to be burning. If you are applying more pressure, I found that I would go off track easier than if I was just brushing over the surface of the wood with a super light pressure. Does that make sense? It’s like when your bike tire gets caught in the crack between the sidewalk and the curb. Not that I’ve had that happen to me… as an adult… or anything like that.

Wood Burning Tips from a Beginner

GO SLOW

So I recommend this one with ALL kinds of lettering but it’s just good sense. The slower you go, the more in-control you are and the more likely you are to love your piece. Just go slow, friends.

Wherever Life Plants You Bloom With Grace- DIY Wood burned quote art

Wherever Life Plants You Bloom With Grace- DIY Wood burned quote art

Wherever Life Plants You Bloom With Grace- DIY Wood burned quote art

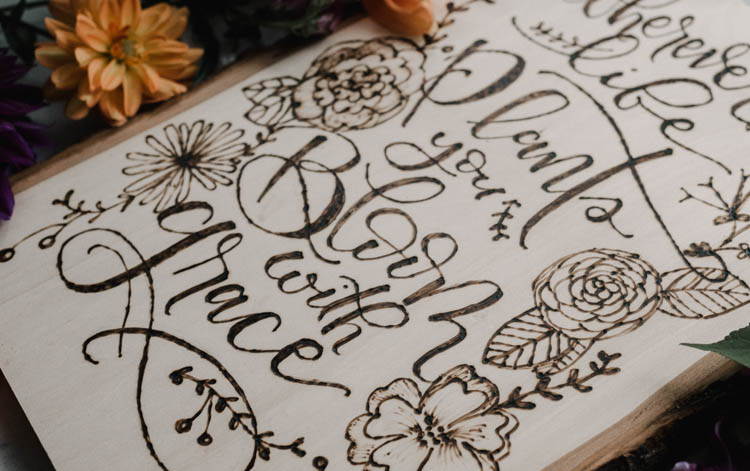
That’s it! It’s seriously fun to play with, but that’s what it is… play! I can’t wait to continue to play with this technique and make some fun things for around our home. In the meantime, this pretty plaque is sitting on top of my piano because the quote just makes me so happy. Do you have any great tips for wood burning script lettering? I would love to hear them below! Also… has anyone tried this wire wood burner?! I’m totally intrigued. I would love to hear if you have!

Wood Burning Tips from a Beginner

Category: DIY, LetteringTag: Craft, Handlettered DIY, Handlettering, Tips and Tricks, Wood
Facebook0Tweet0Pin0LinkedIn0
Previous Post: ← Master Closet Makeover - Before and After Walk In Closet Makeover | Tips for Maximizing Storage
Next Post: Designing a Room With Your Kids (not just for them) – ORC Week 2 →

Reader Interactions

Comments

  1. Jen burns

    Apr 20 at 4:38 pm

    Hello! I’m a newbie as well… I can’t seem to find a bullet nib ? Does it go by another name? Thanks and thanks for the tips!

    Reply
    • Colleen Pastoor

      Jul 11 at 12:12 am

      Hi Jen! I’m not sure- it just came in the kit of the wood burner I purchased!

      Reply
  2. Colleen

    Apr 26 at 10:44 am

    This is lovely! Do you have a template to share for the design?

    Reply
    • Colleen Pastoor

      Jul 11 at 12:16 am

      Thank you so much! I didn’t make a template for this design, no- but feel free to take the image and print it for a template! I use pencil rubbings to transfer designs to wood from printouts :)

      Reply

Leave a Reply Cancel reply

Your email address will not be published. Required fields are marked *

Sidebar

WOOHOO!

Check your email to confirm!

(+ get your freebies + discounts)


Thanks for dropping by!
I’m Colleen: wife; mom to 4 wild ones; and DIY blogger behind Lemon Thistle. You can expect to see rad DIY, modern home decor, renovations, hand lettering and the occasional party on Lemon Thistle. Read More…

email facebook youtube instagram pinterest

Unless otherwise noted, all content and images are mine. Full posts may not be shared without express written consent. But I love when you share! Feel free to share, without altering, one image with proper credit and a link to the original post. All free printables are for personal use only.

Everyone loves proper credit- if you ever notice something improperly credited, please please shoot me an email and I’ll fix it lightning fast.

Find all my policies right here.
This includes my privacy policy, info on the GDRP compliance and information on affiliate links (Including Amazon Affiliates).

Visit Colleen Pastoor’s profile on Pinterest.

colleenpastoor

My house is never this clean
-
DIY + Home Decor Blogger
Mama of 4 👶🏼🧒🏼👦🏼👧🏼
Renovating our 🏠 the DIY way
🖤 Lettering & ☕️
-
✉️[email protected]

colleen pastoor/lemon thistle
The hallway is finally finished and I’m so stink The hallway is finally finished and I’m so stinking happy! 

It’s felt like such a long time coming for such a small space. Since we moved in 2.5 years ago, this space has seen new doors and hardware, new trim, new floors... twice😅, we changed the boob light to a pot light and I hated it and now it’s got the most beautiful flush mount fixture I’m in love with (thanks @mymitzi!). It finally got some fresh paint and now frames on walls and last but not least... After this weekend, the new floors look like they were here all along (no door jamb gaps!) which was the last thing really bugging me since our flood last year. 

All this to say that home takes time and sometimes getting it right might take a couple tries. Also- the spaces we don’t really think about (hallways) can totally help a house feel like home with some love (and family photos 🥰)
ps. I partnered with #mymitzi to create a tiktok for This makeover... are you following me over there yet?! I’d love if you popped over and said hi!
It’s done! It works! And I’m calling it a grea It’s done! It works! And I’m calling it a great use of my afternoon the other day. Did you catch the stories? These projects both cost me under $10 by using pieces I already had in my home (yay for scraps!) and one package of drawer slides).
You can find the full video about these two kitchen organization projects over on YouTube in collaboration with my friend @love_create_celebrate and her #scrapsmademodern challenge! But for now... I’m rejoicing this coffee maker is off my counter for good 🎉
How’s your January going? Full speed or are you How’s your January going? Full speed or are you taking it a bit slow too? 

I’m not going to lie, I’m easing into this new year thing pretty slowly. All my decorations are still up (we always leave them up til Ukrainian Christmas which is later this week) and I I’ve yet to respond to my emails since before Christmas 😅
I’m enjoying the slowness of it all.
Happy Christmas Eve from our fam to yours 🥰 Happy Christmas Eve from our fam to yours 🥰
Yes, I made the paper bag snowflakes too. Have you Yes, I made the paper bag snowflakes too. Have you? 😅
This year has been one of a kind and I know so man This year has been one of a kind and I know so many people who are taking this year as the push they’ve been waiting for to start a side hustle, start an new career altogether or to just get creative about how they’re making money. So today I’m excited to partner with @kregjig to share some rad projects to make and sell this year! 
Like this rolling storage system I made for my office, that rad dollhouse and the gorgeous bath toy storage. All of these projects are things that I’d personally love to buy for our family and look like they’d be a great return on your time making them! And yes, all of them use #Kreg tools to make them easy to assemble and quick to make! Plus, they’re having a great sale on right now with deals on their K4 and K5 jigs, Rip-Cut and even a hardware jig bundle! There’s never been a better time to get your workshop set up!  #sponsored
Just a peaceful moment and then a real life moment Just a peaceful moment and then a real life moment for ya 🙃 
My #holidayhometour is on the blog and YouTube (I’ll put links in my stories) as part of the #seasonalsimplicity holiday home tour series. I’ll share those too so you don’t miss any!
My holiday home tour will be up tomorrow, but for My holiday home tour will be up tomorrow, but for tonight... I’m just enjoying the lights. And possibly a hallmark movie with some more custom order lettering 😅 what are your plans?
#christmasdecor #christmastree #holidaylights
We finished decorating yesterday and I’m just si We finished decorating yesterday and I’m just sitting here enjoying every minute of it 🤩 have you decorated yet?
Ps... talking more about hand lettering in my stories tonight!
Load More... Follow on Instagram

Copyright © 2021 · Lemon Thistle · All Rights Reserved · Powered by Mai Theme