• Skip to main content
  • Skip to header left navigation
  • Skip to header right navigation
  • Skip to site footer
  • Shop
  • Get The Email
  • Work With Me
  • About
  • Search

  • DIY
    • DIY Home Decor
    • With Power Tools
    • Renovation
    • For Kids
    • For Parties
    • Wearable
    • Organization
    • Cricut Crafts
  • Home Decor
    • Room Reveals
    • Kid Friendly
    • DIY Home Decor
    • Renovation
  • Lettering
    • Hand Lettered Printables
    • Free Practice Sheets
    • Handlettered DIY
    • Free Brush Lettering Quickstart Guide
    • Learn Brush Lettering E-Course SALE
Lemon Thistle

Lemon Thistle

Rad DIY, Lettering and Design for Real People

  • Printables
    • For Cricut
    • Party Printables
    • Home Decor Printables
    • Bachelor Bingos
    • Free Monthly Wallpapers
    • Handlettering Practice Sheets
    • All Free Printables
  • Entertain
    • Party Printables
    • Party DIY
    • Tablescapes
    • Dinner Party
    • Kids Parties
    • Party Eats
    • Baby Showers
    • Wedding + Showers
  • Blog

Walk In Closet Makeover | Tips for Maximizing Storage

Oct 05

Master Closet Makeover - Before and After

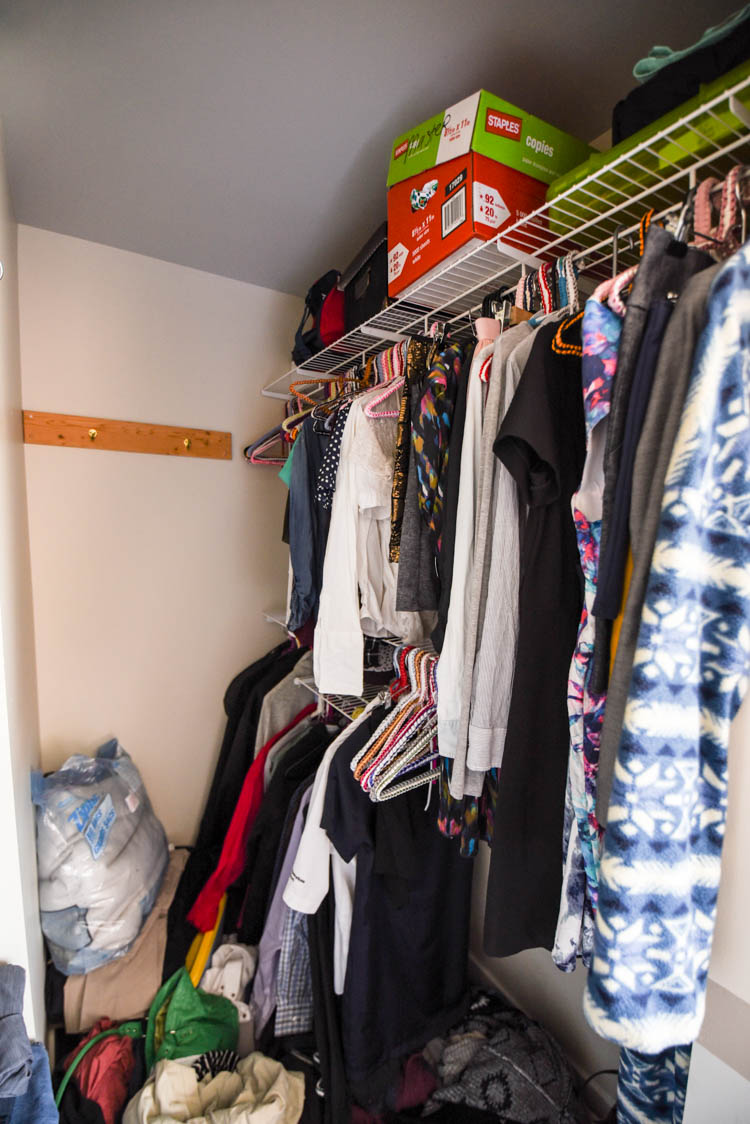
Can you believe it… I’m actually sharing an AFTER on a space in our new house!! But there’s a reason why. This DIY’er didn’t do it herself. Honestly, with everything else we are working on around our house… that we are doing OURSELVES… it was SO refreshing to have a space transform before our eyes.This closet was almost completely NON functional before. It was so bad, you guys. The wire shelves that were in there weren’t actually secure- they would actually tip off the supports they were zap strapped to when you hung things. They would also snag clothes like crazy because they had sharp ends. And nails sticking out of the walls to hold them on. So even though we had a regular ol’ non-walk-in-closet in our last house… this closet was LESS useful to us. There was heaps of things on the floor from falling off the shelves when we hung things up and we just gave up. But we couldn’t even close the door on it… because there was no door! Ha! Honestly, you guys… it was such a stress for us.

Master Closet Makeover - Before and After

I’m so excited to be able to partner with Imagine The Room Kamloops to make over this closet. It’s now our total dream closet and not only holds everything that was in there before more beautifully, but we were able to empty our dresser as well so we can give that to Aubrey for her room makeover. Pretty rad, right? I chalk it up to great design. When we were chatting about closet designs, I got some amazing tips from Imagine the Room that I asked if I could share with all of you. These tips were SO helpful for me to understand what really makes a closet work hard and if you’re planning one for yourself- I know they’re going to help you too! I have put ALL of those amazing tips as well as a time lapse of the closet install (I love watching people do what they’re great at, don’t you?) into a YouTube video below, but before we do that… want to see the ‘before’? Shield your eyes, friends.

Walk in Closet Before Photos

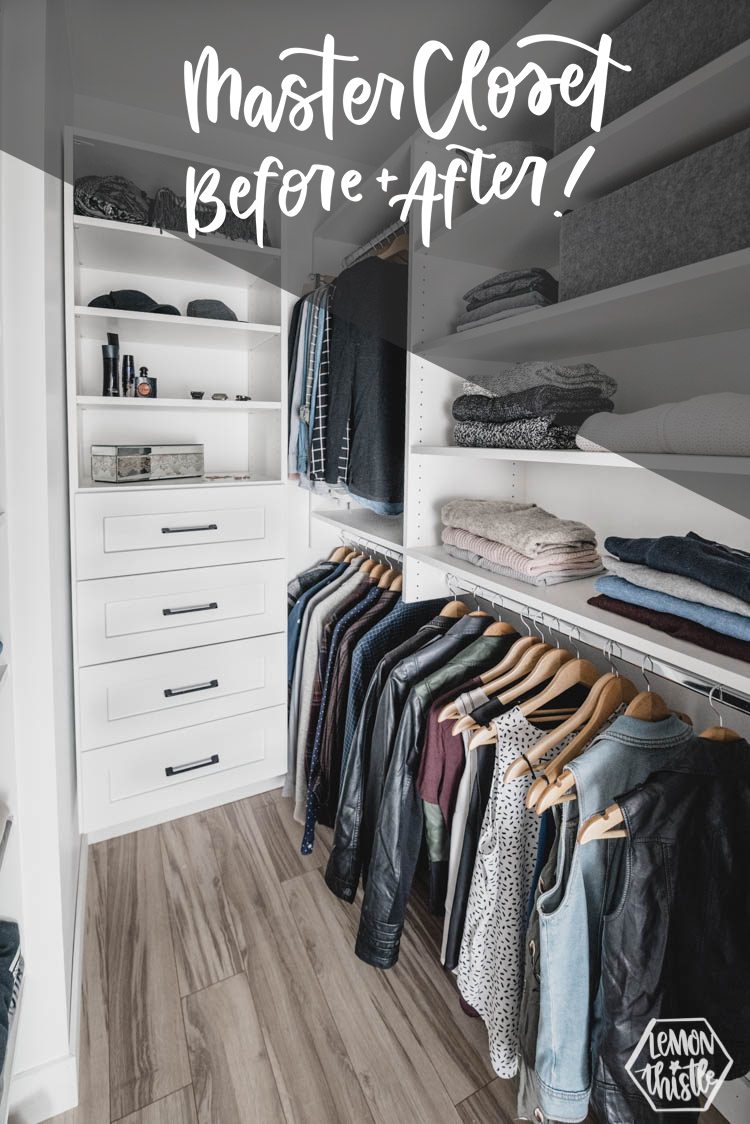
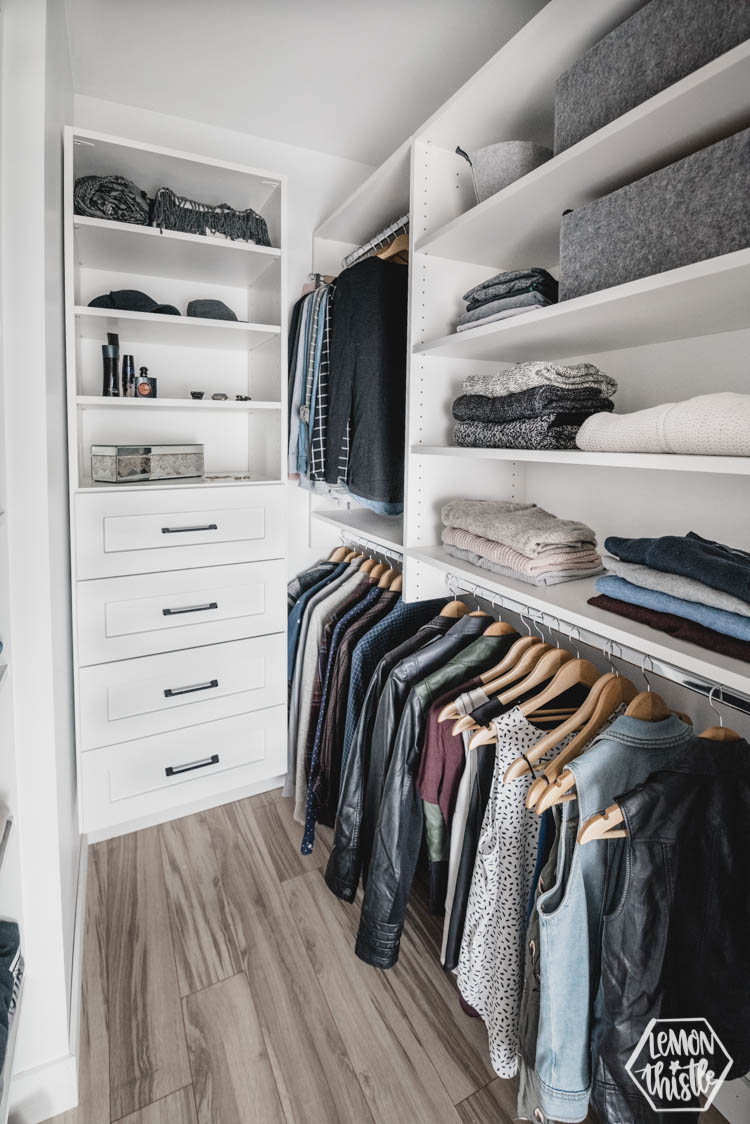
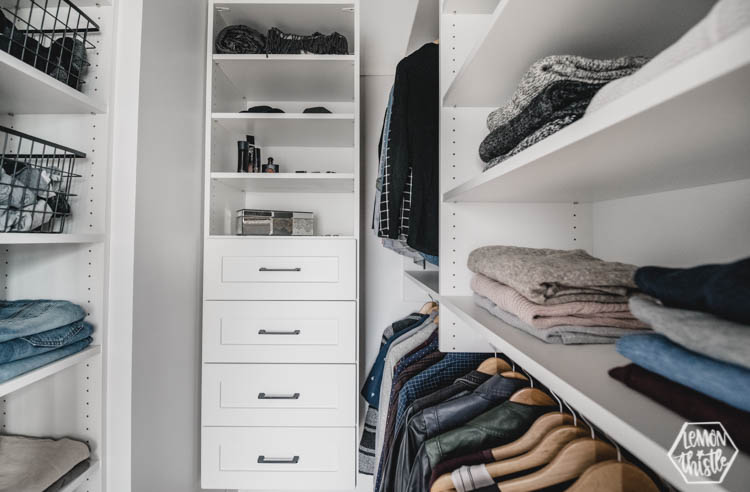
Night and day difference, right?! I’m so in love with how this closet turned out, you guys. And it was such a great feeling to have it go from an empty room to finished in an afternoon. Want to see the process and hear the tips yourself?

If you are at work or prefer to read, I’ve put the tips below for you as well! These really make so much sense in practice now that we are using the space. Also- I hope you liked seeing the closet how we’re currently using it! I know I’ve heard some of you say that it’s not as helpful when I ‘makeover’ a closet but only put the pretty stuff back in there so the video shows how we’re really using it with all of our stuff in there.

TIP 1: Don’t Use Corner Units

It seems kind of backwards, doesn’t it? I mean… I thought corner shelves were meant to maximize space. But I took their recommendation on it and am so impressed with how much more spacious the closet feels with running the hanging bars straight across the long wall. Corner shelves can be awkward to get things in and out of and end up being a poor use of space. The things at the back of the closet can be off season clothing so they don’t need to be super easy to access. It’s the perfect solution for us.

TIP 2: Put Pretty Things Where They Are Seen!

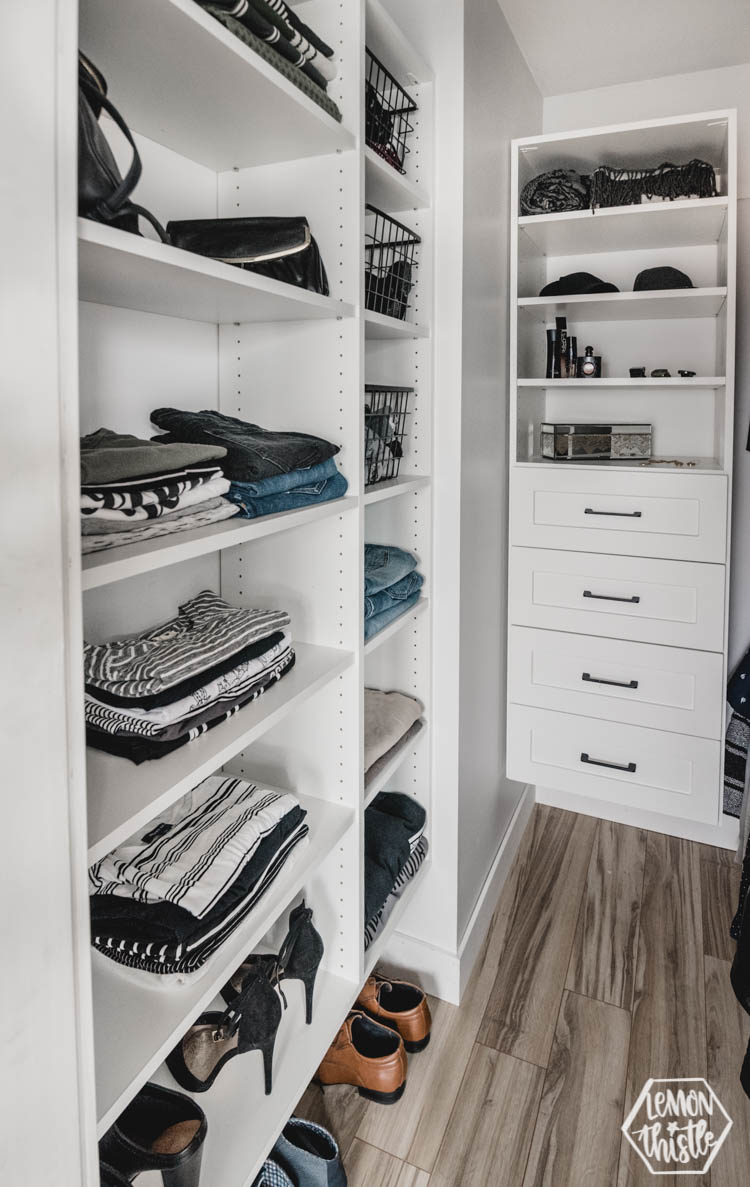
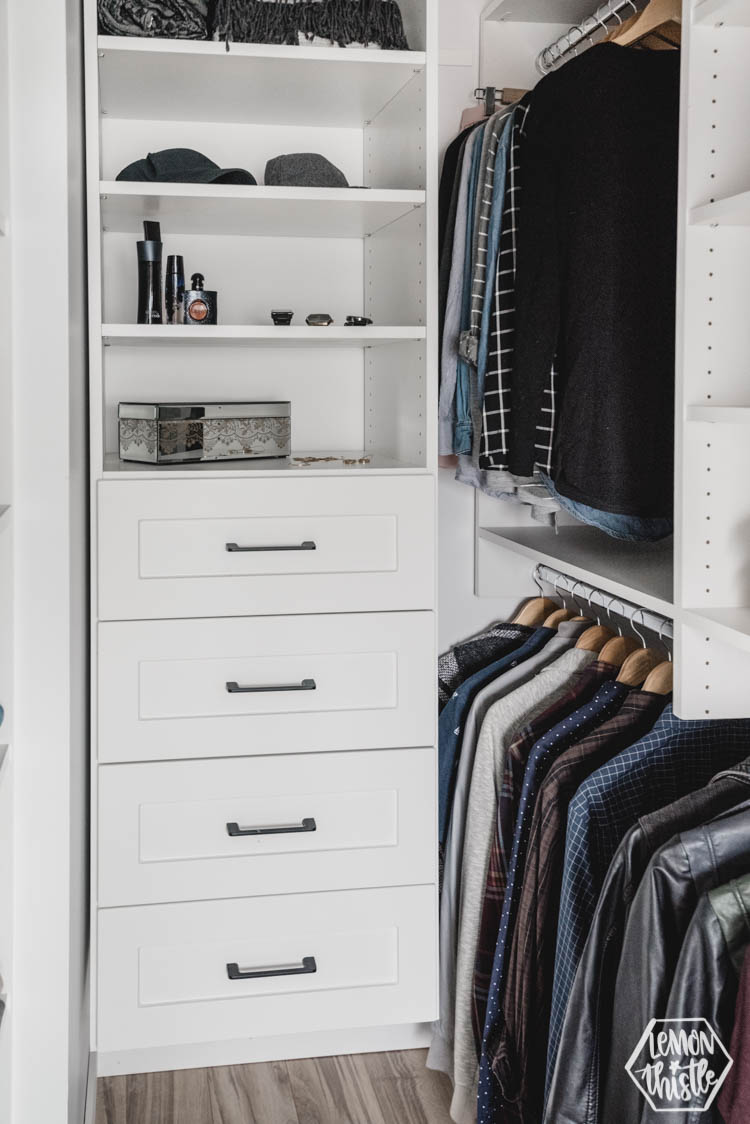
It seems logical, right?! Put the pretty things where you will ACTUALLY see them. More than that, put them where you’ll see them when the door is open. It shows off your investment (the drawers is what we featured by putting on the back wall) and it hides clutter by drawing attention to the clean lines.

TIP 3: Float the Shelves off the Floor

Floating the shelves off the floor not only saves you cash because you’re not paying for the materials to go down to the ground, but you don’t NEED them. The floor is essentially a shelf already… and it’s free. Plus- if you ever want to change your flooring, trim, whatever… you can without removing your closet organizer!

Bank of drawers in walk in closet

TIP 4: Avoid Hanging Where You Walk In

What the what? Where you walk in to the closet, your shoulder will generally brush against the top bar of hanging clothes. By avoiding using that section for hanging clothes, you make the closet feel SO MUCH MORE SPACIOUS. Honestly, I feel like this tip is the biggest game changer for how I’m going to plan any walk-in closet in the future. Shelves are narrower, you won’t bump things off walking in, and it opens up the eyesight to the closet.

TIP 5: Use as LITTLE Full Height Hanging as Possible

This is another one that seems really simple but I honestly never considered that a closet could go without it. Doesn’t every closet accommodate full height hanging? They challenged me on this and I’m SO glad that they did. I really don’t NEED it. I don’t own maxi dresses and my wedding dress has another home in our house. This made room for so much more hanging!

TIP 6: Save by Using Baskets Over Drawers

Look, drawers are dang gorgeous in closets. But they are also the easiest thing to cut if you’re wanting to save money. And baskets? They do the exact same thing by containing your stuff- but chances are… you already have baskets.

So many great tips on how to maximize storage in a small walk in closet! Master Closet Makeover - Before and After

Master Closet Makeover - Before and After

Alright, I so hope that you found this post useful and are inspired if you are planning your own closet makeover! I couldn’t recommend Imagine The Room in Kamloops more if you are in the area- they were so fabulous to work with from design to installation.

Other than the closet organizer- there are some other things that we did to the space. We took down all that old shelving, patched all the many many many holes (the worst!) and repainted. We put in new chunkier trim, new flooring (same as throughout the house) and A DOOOOOOR that we can close. We also put in a beautiful flush mount light fixture and swapped out the regular chrome drawer pulls for these modern matte black ones (the same ones we’re using in our kitchen!). I’ve put all the sources for these below!

SOURCE LIST:

  • Closet Design & Install: Imagine The Room
  • Paint: Expert White by General Paint
  • Drawer Pulls: Liberty Hardware North Dalston Pulls
  • Flush Mount Light: Verona by Globe Electric
  • Wood Hangers: Walmart
  • Felt Baskets: IKEA
Category: Home DecorTag: Closet, Design, Organization, Room Reveal, Sponsored, Storage
Facebook0Tweet0Pin0LinkedIn0
Previous Post: ← FREE PRINTABLE Moving Checklist - 10 other things to remember Free Printable Moving Checklist + Changing Smoke Alarms
Next Post: Woodburning Tips from a Beginner Wood Burning Tips from a Beginner →

Reader Interactions

Comments

  1. Bethany Birchridge

    Jan 21 at 11:57 am

    You made a great point when you said to use shelves that don’t have a shelf on the floor, as you can use the floor as a shelf already. My closet is pretty messy, so I’ve been wondering how I can spruce it up to look nice. Thanks for all the great tips on redesigning my closet to look nice.

    Reply
    • Colleen Pastoor

      Feb 27 at 9:43 pm

      Thanks so much! Hope it was helpful for you!

      Reply
  2. Oliver Ray

    Sep 20 at 11:38 am

    I am glad that you mentioned that you don’t use corner units or dressers. My wife seems to think that is the best option for a walk-in closet. I’ll have to show her your article and how it talks about a walk-in closet organization.

    Reply
  3. Corey

    Aug 18 at 12:08 am

    What a game changer! Hope you’re still loving that great space!
    Could you please share the dimensions of your closet? I think I may be working with a similar space, but it’s hard to tell.

    Reply

Leave a Reply Cancel reply

Your email address will not be published. Required fields are marked *

Sidebar

WOOHOO!

Check your email to confirm!

(+ get your freebies + discounts)


Thanks for dropping by!
I’m Colleen: wife; mom to 4 wild ones; and DIY blogger behind Lemon Thistle. You can expect to see rad DIY, modern home decor, renovations, hand lettering and the occasional party on Lemon Thistle. Read More…

email facebook youtube instagram pinterest

Unless otherwise noted, all content and images are mine. Full posts may not be shared without express written consent. But I love when you share! Feel free to share, without altering, one image with proper credit and a link to the original post. All free printables are for personal use only.

Everyone loves proper credit- if you ever notice something improperly credited, please please shoot me an email and I’ll fix it lightning fast.

Find all my policies right here.
This includes my privacy policy, info on the GDRP compliance and information on affiliate links (Including Amazon Affiliates).

Visit Colleen Pastoor’s profile on Pinterest.

colleenpastoor

My house is never this clean
-
DIY + Home Decor Blogger
Mama of 4 👶🏼🧒🏼👦🏼👧🏼
Renovating our 🏠 the DIY way
🖤 Lettering & ☕️
-
✉️[email protected]

colleen pastoor/lemon thistle
Who has DIY projects on their mind this year?! @ry Who has DIY projects on their mind this year?! @ryobi_canada and I want to help you start knocking those projects off your list by giving away a new nailer and battery set! #ad 
This tool is what we used for this accent wall and all the trim in our home. It’s the one I used to trim out my built in shelving and add the decorative moulding to my geometric barn door. What I’m saying is this thing is a workhorse and I want you to have one too 😉
To enter:
✨Follow me @colleenpastoor and @ryobi_canada 
✨like and save this photo 
✨ tag some friends who’d love to win in the comments! One tag per comment, each is an entry. 
✨ share to your stories for a bonus 5 entries!

Open to Canadians only this time (sorry US friends!) and not associated with Instagram. Closes Friday Jan 22 at noon PST!
Let’s talk about coffee! This is my coffee ‘st Let’s talk about coffee! This is my coffee ‘station’ and the second photo is my dads! I’m talking aaaall about them over on YT today!
Also... see how nice that fresh silicone looks?! 😉 IYKYK
The hallway is finally finished and I’m so stink The hallway is finally finished and I’m so stinking happy! 

It’s felt like such a long time coming for such a small space. Since we moved in 2.5 years ago, this space has seen new doors and hardware, new trim, new floors... twice😅, we changed the boob light to a pot light and I hated it and now it’s got the most beautiful flush mount fixture I’m in love with (thanks @mymitzi!). It finally got some fresh paint and now frames on walls and last but not least... After this weekend, the new floors look like they were here all along (no door jamb gaps!) which was the last thing really bugging me since our flood last year. 

All this to say that home takes time and sometimes getting it right might take a couple tries. Also- the spaces we don’t really think about (hallways) can totally help a house feel like home with some love (and family photos 🥰)
ps. I partnered with #mymitzi to create a tiktok for This makeover... are you following me over there yet?! I’d love if you popped over and said hi!
It’s done! It works! And I’m calling it a grea It’s done! It works! And I’m calling it a great use of my afternoon the other day. Did you catch the stories? These projects both cost me under $10 by using pieces I already had in my home (yay for scraps!) and one package of drawer slides).
You can find the full video about these two kitchen organization projects over on YouTube in collaboration with my friend @love_create_celebrate and her #scrapsmademodern challenge! But for now... I’m rejoicing this coffee maker is off my counter for good 🎉
How’s your January going? Full speed or are you How’s your January going? Full speed or are you taking it a bit slow too? 

I’m not going to lie, I’m easing into this new year thing pretty slowly. All my decorations are still up (we always leave them up til Ukrainian Christmas which is later this week) and I I’ve yet to respond to my emails since before Christmas 😅
I’m enjoying the slowness of it all.
Happy Christmas Eve from our fam to yours 🥰 Happy Christmas Eve from our fam to yours 🥰
Yes, I made the paper bag snowflakes too. Have you Yes, I made the paper bag snowflakes too. Have you? 😅
This year has been one of a kind and I know so man This year has been one of a kind and I know so many people who are taking this year as the push they’ve been waiting for to start a side hustle, start an new career altogether or to just get creative about how they’re making money. So today I’m excited to partner with @kregjig to share some rad projects to make and sell this year! 
Like this rolling storage system I made for my office, that rad dollhouse and the gorgeous bath toy storage. All of these projects are things that I’d personally love to buy for our family and look like they’d be a great return on your time making them! And yes, all of them use #Kreg tools to make them easy to assemble and quick to make! Plus, they’re having a great sale on right now with deals on their K4 and K5 jigs, Rip-Cut and even a hardware jig bundle! There’s never been a better time to get your workshop set up!  #sponsored
Just a peaceful moment and then a real life moment Just a peaceful moment and then a real life moment for ya 🙃 
My #holidayhometour is on the blog and YouTube (I’ll put links in my stories) as part of the #seasonalsimplicity holiday home tour series. I’ll share those too so you don’t miss any!
Load More... Follow on Instagram

Copyright © 2021 · Lemon Thistle · All Rights Reserved · Powered by Mai Theme