• Skip to main content
  • Skip to header left navigation
  • Skip to header right navigation
  • Skip to site footer
  • Shop
  • Get The Email
  • Work With Me
  • About
  • Search

  • DIY
    • DIY Home Decor
    • With Power Tools
    • Renovation
    • For Kids
    • For Parties
    • Wearable
    • Organization
    • Cricut Crafts
  • Home Decor
    • Room Reveals
    • Kid Friendly
    • DIY Home Decor
    • Renovation
  • Lettering
    • Hand Lettered Printables
    • Free Practice Sheets
    • Handlettered DIY
    • Free Brush Lettering Quickstart Guide
    • Learn Brush Lettering E-Course SALE
Lemon Thistle

Lemon Thistle

Rad DIY, Lettering and Design for Real People

  • Printables
    • For Cricut
    • Party Printables
    • Home Decor Printables
    • Bachelor Bingos
    • Free Monthly Wallpapers
    • Handlettering Practice Sheets
    • All Free Printables
  • Entertain
    • Party Printables
    • Party DIY
    • Tablescapes
    • Dinner Party
    • Kids Parties
    • Party Eats
    • Baby Showers
    • Wedding + Showers
  • Blog

Why you need to get Caulking! (and a video!)

Apr 04

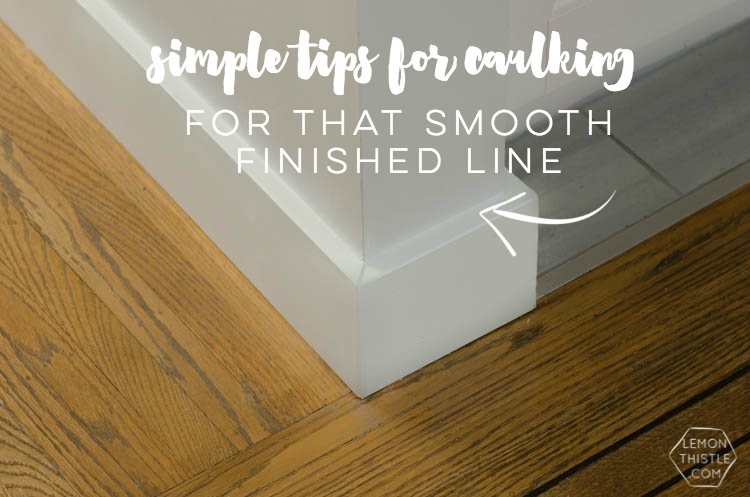
Happy Monday! Who’s ready for something really pretty and fancy to get your week started? Ha. Just kidding. Today I’m sharing a totally basic, down to business, style post. One of the less fabulous sides of remodelling and decorating… but boy, it makes such a huge difference! Calking. I originally shared all of my tips for caulking over at Remodelaholic LAST year so thought it was about time I shared it with all of you over here as well. I even have a little video for you.

Simple tips for caulking for a finished look in one step

Caulking is one of those steps that seems like a pain or even a waste of time after you’ve spent days/hours (weeks if you’re doing it in the evenings when you’re kids are asleep) replacing baseboards, windows, or trim BUT it can make such a huge difference in your space. It’s so often overlooked or skipped to save time/money (have you ever seen a rental with caulked trim? Me neither.) but it makes the whole room look finished.

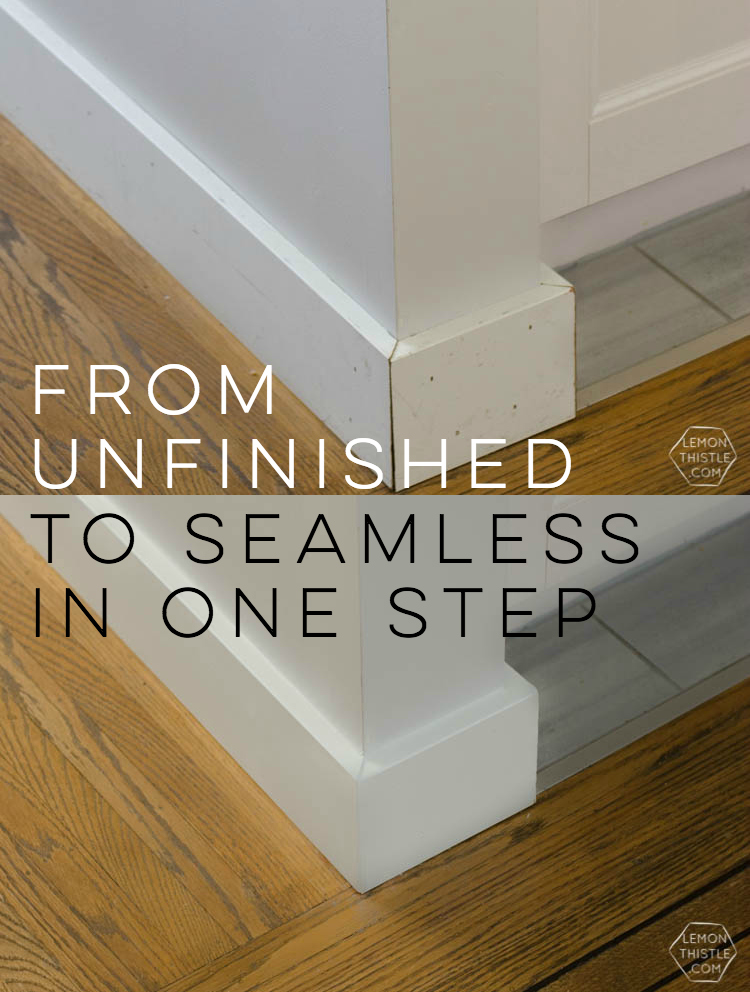
To prove my point… this little section of baseboard somehow got missed when we did the rest of the house when we moved in. It’s right in the middle of our living area- probably the highest foot traffic corner in our home- right beside our island. We refinished the floors, replaced doors, windows, painted walls, and put in new trim. We were antsy to get moved in to say the least. This one little stub wall has lasted ALL YEAR without being touched. Embarrassing, right? #reallife

SO if your window and door casings/trim haven’t been caulked, I encourage you to try it out! I’m almost positive you’ll be thrilled with the results. Caulking inside different levels of trim when it’s all being painted the same colour is the best place to start.

Simple tips for caulking for a finished look in one step

Before I dig in, a little bit of technical talk for you. “Silicone” strictly speaking of the name, is a non water soluble, super stinky product that plumbers use around sinks and tubs. It’s usually clear and is meant to create a water tight seal. You can’t paint over it or the paint would bead up and look terrible. It dries but stay cushiony and rubbery which is great for keeping water out of areas that expand and contract with heat and cold often (like a shower).

Caulk is a different product, although the words get used interchangeably all the time (like I do in the video- I just couldn’t help myself!). Caulk dries harder and many types are paintable. It’s meant more for finishing. The caulk that I use is actually caulk  plus silicone so it still has a bit of flexibility. The added silicone keeps the caulk from getting too hard and cracking. This is the stuff I get (I buy a bulk box at Home Depot- if you’re doing a whole house, it will save you some cash!) is also paintable and good for indoor/outdoor use.

There’s 100 different types of caulk and silicone products out there. I also use a grout silicone to finish off my tiling jobs (which can be found in the tiling section) and a clear silicone to seal along countertops and the drywall. They all are used with the same technique- they just react a little bit differently. I didn’t know there was so many different kinds before this house. And we’ve definitely used the wrong stuff and had to go back and scrape it off to use the right stuff. Which is why I’m giving you this boring background information… so you don’t have to spend your life scraping like we did.

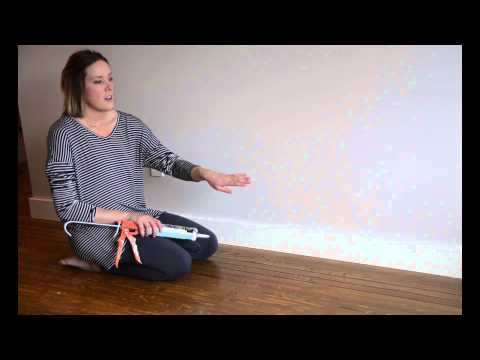
So I’ve created this little video for you sharing the basic tips that I found to be helpful when I started using a caulking gun, because it can be an intimidating task! The first time I tried it I was so frustrated I couldn’t figure out how to get it to stop coming out, I made such a mess. After caulking one room, I had a system down. It just takes some time and maybe a bit of wine to relax. I’m not a pro by any means, but in this house I’m the one that gets called when we need silicone or caulking done- and I’m darn proud of that! So with the disclaimer that I’m not a pro, let’s get to the video!


I should tell you that I did paint the baseboard after that video (did you see how dingy it was!), but the caulking process that you saw there filled the nail holes, corners, and top gap. It’s not a perfect process, but it works. When you get going, you really get into a groove and it goes quickly. I always like to start in a section of the room that’s less visible, like behind a door or in a closet just in case it takes me a minute to get going.

So let’s talk about some more options/ tips.

Taping is a great idea until you are comfortable with a caulking gun. Just tape both the wall and baseboard, leaving a small gap for your silicone. Smooth it with your finger or tool before you peel back the tape to see a nice crisp line. I stopped taping after the second bedroom in our house because I would have been spending all. day. taping. BUT if you’re only doing one room or maybe just one window- taping will help you get a nice straight line without lots of practice

Your caulking gun will really affect the way you work, especially if you are doing a large space. When we first bought one, we bought the cheapest gun we could find but it killed my hand. It broke after a couple bedrooms and we upgraded to the second cheapest gun and it has made a world of difference! Just keep that in mind when you’re buying.

I use my finger and a smooth damp rag to smooth out the silicone and caulk I apply. If you’re not into that- I get it, it does kill your fingers. My family swears by a caulking applicator like this one that can be used to get a nice corner instead of your finger. Just drag it along as you would your rag or finger. I’m all about efficiency (also known as impatient) so pulling this out every time I needed to smooth a line was too finicky for me. To be honest, unless I hit a bump or get gaps for some reason, I don’t even smooth it out. You will probably get into a rhythm and it will look amazing without smoothing it out.

The caulk I use takes two hours to dry- that’s if you have a nice thin line. I’ve filled gaps that are a bit deeper, so they take longer to dry. Make sure your silicone is completely dry before painting to avoid pulling it up.

Professional painters will push the caulking gun along the baseboard, but most of us will find it easier to pull or drag the caulking gun along, using the tip to smooth it as we go. Find out what works for you and go with that.


I hope this has helped you feel a little less intimidated by caulking! When we started the finishing at our house last year I was completely lost, I don’t know why I found it so scary- but I’m thinking I’m not the only one. This is just what I’ve learned in the past year, I’m sure there’s tons more tips and tricks and specifications that you could find if you searched for it.

Category: DIY, Home DecorTag: Renovation, Tips and Tricks, Video
Facebook0Tweet0Pin0LinkedIn0
Previous Post: ← Get in front of the camera! I love this shot by Troi Crombie of a busy working mama Hey Beautiful! Get in front of the camera
Next Post: Is a Brad Nailer on Your Wishlist? DIY X Leg Patio Table with Pipe Trestle →

Reader Interactions

Comments

  1. K Denny

    May 23 at 6:16 am

    Great information on types of caulk and application techniques. Every time I’m attacking big gaps in crown molding or chair rails I remember an old carpenter friend’s favorite saying – “Caulk and paint make it what it ain’t”.

    Reply
    • Colleen Pastoor

      Jun 17 at 10:04 am

      Such a clever saying! It really is the best fix.

      Reply
  2. Gary Jae

    Jan 27 at 9:57 pm

    Most helpful video Colleen Pastoor

    Thanks

    Reply

Leave a Reply Cancel reply

Your email address will not be published. Required fields are marked *

Sidebar

WOOHOO!

Check your email to confirm!

(+ get your freebies + discounts)


Thanks for dropping by!
I’m Colleen: wife; mom to 4 wild ones; and DIY blogger behind Lemon Thistle. You can expect to see rad DIY, modern home decor, renovations, hand lettering and the occasional party on Lemon Thistle. Read More…

email facebook youtube instagram pinterest

Unless otherwise noted, all content and images are mine. Full posts may not be shared without express written consent. But I love when you share! Feel free to share, without altering, one image with proper credit and a link to the original post. All free printables are for personal use only.

Everyone loves proper credit- if you ever notice something improperly credited, please please shoot me an email and I’ll fix it lightning fast.

Find all my policies right here.
This includes my privacy policy, info on the GDRP compliance and information on affiliate links (Including Amazon Affiliates).

Visit Colleen Pastoor’s profile on Pinterest.

colleenpastoor

My house is never this clean
-
DIY + Home Decor Blogger
Mama of 4 👶🏼🧒🏼👦🏼👧🏼
Renovating our 🏠 the DIY way
🖤 Lettering & ☕️
-
✉️[email protected]

colleen pastoor/lemon thistle
Who has DIY projects on their mind this year?! @ry Who has DIY projects on their mind this year?! @ryobi_canada and I want to help you start knocking those projects off your list by giving away a new nailer and battery set! #ad 
This tool is what we used for this accent wall and all the trim in our home. It’s the one I used to trim out my built in shelving and add the decorative moulding to my geometric barn door. What I’m saying is this thing is a workhorse and I want you to have one too 😉
To enter:
✨Follow me @colleenpastoor and @ryobi_canada 
✨like and save this photo 
✨ tag some friends who’d love to win in the comments! One tag per comment, each is an entry. 
✨ share to your stories for a bonus 5 entries!

Open to Canadians only this time (sorry US friends!) and not associated with Instagram. Closes Friday Jan 22 at noon PST!
Let’s talk about coffee! This is my coffee ‘st Let’s talk about coffee! This is my coffee ‘station’ and the second photo is my dads! I’m talking aaaall about them over on YT today!
Also... see how nice that fresh silicone looks?! 😉 IYKYK
The hallway is finally finished and I’m so stink The hallway is finally finished and I’m so stinking happy! 

It’s felt like such a long time coming for such a small space. Since we moved in 2.5 years ago, this space has seen new doors and hardware, new trim, new floors... twice😅, we changed the boob light to a pot light and I hated it and now it’s got the most beautiful flush mount fixture I’m in love with (thanks @mymitzi!). It finally got some fresh paint and now frames on walls and last but not least... After this weekend, the new floors look like they were here all along (no door jamb gaps!) which was the last thing really bugging me since our flood last year. 

All this to say that home takes time and sometimes getting it right might take a couple tries. Also- the spaces we don’t really think about (hallways) can totally help a house feel like home with some love (and family photos 🥰)
ps. I partnered with #mymitzi to create a tiktok for This makeover... are you following me over there yet?! I’d love if you popped over and said hi!
It’s done! It works! And I’m calling it a grea It’s done! It works! And I’m calling it a great use of my afternoon the other day. Did you catch the stories? These projects both cost me under $10 by using pieces I already had in my home (yay for scraps!) and one package of drawer slides).
You can find the full video about these two kitchen organization projects over on YouTube in collaboration with my friend @love_create_celebrate and her #scrapsmademodern challenge! But for now... I’m rejoicing this coffee maker is off my counter for good 🎉
How’s your January going? Full speed or are you How’s your January going? Full speed or are you taking it a bit slow too? 

I’m not going to lie, I’m easing into this new year thing pretty slowly. All my decorations are still up (we always leave them up til Ukrainian Christmas which is later this week) and I I’ve yet to respond to my emails since before Christmas 😅
I’m enjoying the slowness of it all.
Happy Christmas Eve from our fam to yours 🥰 Happy Christmas Eve from our fam to yours 🥰
Yes, I made the paper bag snowflakes too. Have you Yes, I made the paper bag snowflakes too. Have you? 😅
This year has been one of a kind and I know so man This year has been one of a kind and I know so many people who are taking this year as the push they’ve been waiting for to start a side hustle, start an new career altogether or to just get creative about how they’re making money. So today I’m excited to partner with @kregjig to share some rad projects to make and sell this year! 
Like this rolling storage system I made for my office, that rad dollhouse and the gorgeous bath toy storage. All of these projects are things that I’d personally love to buy for our family and look like they’d be a great return on your time making them! And yes, all of them use #Kreg tools to make them easy to assemble and quick to make! Plus, they’re having a great sale on right now with deals on their K4 and K5 jigs, Rip-Cut and even a hardware jig bundle! There’s never been a better time to get your workshop set up!  #sponsored
Just a peaceful moment and then a real life moment Just a peaceful moment and then a real life moment for ya 🙃 
My #holidayhometour is on the blog and YouTube (I’ll put links in my stories) as part of the #seasonalsimplicity holiday home tour series. I’ll share those too so you don’t miss any!
Load More... Follow on Instagram

Copyright © 2021 · Lemon Thistle · All Rights Reserved · Powered by Mai Theme