• Skip to main content
  • Skip to header left navigation
  • Skip to header right navigation
  • Skip to site footer
  • Shop
  • Get The Email
  • Work With Me
  • About
  • Search

  • DIY
    • DIY Home Decor
    • With Power Tools
    • Renovation
    • For Kids
    • For Parties
    • Wearable
    • Organization
    • Cricut Crafts
  • Home Decor
    • Room Reveals
    • Kid Friendly
    • DIY Home Decor
    • Renovation
  • Lettering
    • Hand Lettered Printables
    • Free Practice Sheets
    • Handlettered DIY
    • Free Brush Lettering Quickstart Guide
Lemon Thistle

Lemon Thistle

Rad DIY, Lettering and Design for Real People

  • Printables
    • For Cricut
    • Party Printables
    • Home Decor Printables
    • Bachelor Bingo
    • Handlettering Practice Sheets
    • All Free Printables
  • Entertain
    • Party Printables
    • Party DIY
    • Tablescapes
    • Kids Parties
  • Blog

Welcome DIY Wood Sign for Wreath

May 18

DIY Wood Sign for Wreath

Who doesn’t love a good wreath? I sure do and I can’t help but switch it up for the seasons. Today I’m sharing this Welcome DIY Wood Sign for a wreath as part of Remodelaholic’s Outdoor DIY Challenge. I kind of cheated though because this sign uses NO POWER TOOLS!

Back when we lived in an apartment– we didn’t have any tools other than a drill. I would bring my projects over to friends or family’s houses to use their tools but I was also known to saw through a dowel with a camp knife. You work with what you’ve got. That’s when I found balsa wood. Even though we have power tools now, I still love how quick and simple this wood is to make into a fun project.

DIY Wood Sign for Wreath

I made a sign like this for the holidays and really love the way it looks. This past year I put it in a wreath for my holiday decor and that made me love it that much more. I decided I should make a non seasonal one to have around all the time. It took me half the year to get around to it… but I finally did it!

*disclosure: Michaels was kind enough to send me a gift card to cover costs of this DIY*

I found this gorgeous faux greenery wreath at Michaels and loved the simplicity and how full it was- it was the perfect wreath to make this DIY a priority! I grabbed the balsa wood, fresh craft knife blades, and a paint marker while I was there as well. This DIY only took about 10 minutes for me start to finish. That said, if you’re new to drawing a banner or lettering- I’d totally allow more time.

DIY Wood Sign for Wreath

I put together a little video of the process for ya! If you love DIY and decor videos- I’d so love if you subscribed to my YouTube Channel!

I honestly don’t know what happened with the video quality of some of that video!? Any one have an idea why half of it would have done that? Either way… It’s a pretty simple process, so I’m sure it’s still good to follow :) If you’d prefer a photo tutorial, you can check out my holiday one for the cutting BUT there’s a couple things different in the finishing to make it suitable for the outdoors.

The first thing that you need is your wreath to know how big to make your sign. I really love mine- it’s not a seasonal one so it should be at Michaels for quite a while. Then you can mock up your banner! I drew the banner on the reverse of my balsa wood piece in pencil. This made it easy to cut and I just flipped it over before starting my outline and lettering.

I added a little sketch of how to draw the banner in the video but I suggest making the bottom of the banner the edge of your balsa wood strip- that takes care of one of the cuts for ya! The best way I’ve found to cut balsa wood is with a couple lighter passes with your craft knife instead of pressing hard. Since the wood is so easy to cut through, it’s also pretty easy to break. If you pull your knife through with too much force (especially accross the grain), you can definitely snap little pieces off.

Once it’s cut out, you can flip it over and get to outlining your banner! I really loved the look that the brush marker created on my holiday sign. Since the brush marker I used is water based, it would not have held up in the elements- the ink would have ran. I switched to a paint marker but imitated the look by darkening the strokes. I made the outline uneven to keep it looking organic and casual.

DIY Wood Welcome Banner for wreath

For the lettering, I just freehanded this. I practiced on a sheet of paper first and then went for it. I get that this is not everyone’s strategy (probably a wise choice). I have a welcome hand lettered template available for download in this post here if ya like. I also have this video showing how I hand letter on wood, including how I thicken the downstrokes to imitate brush lettering RIGHT HERE. Lastly! If you’re loving the look of brush lettering and want to rock it yourself, I have a full e-course on that. I’d love if you’d join me!

Alright… once you’re done that, you could totally hang it. BUT if you want to take it outdoors like me, you’ll want to go one step further and seal it. I love to use a matte clear spray paint for this. I give it a few good coats (spray paint goes on in a pretty thin coat) and I love that it doesn’t change the look of the wood like a gloss sealer would.

DIY Wood Welcome Banner for wreath

Then you’re ready to hang it! I just tucked the sign into the wreath but if you live in a windy place or wanted some extra security, you could totally hot glue it in or wire it in.

There you have it! I hope you enjoyed this DIY! If you did, make sure to pin it so you can make one yourself later! And if you’re ready to make your outdoors summer ready- hop around and check out all the posts in Remodelaholic’s Outdoor DIY Challenge!

Outdoor DIY and Decor Projects


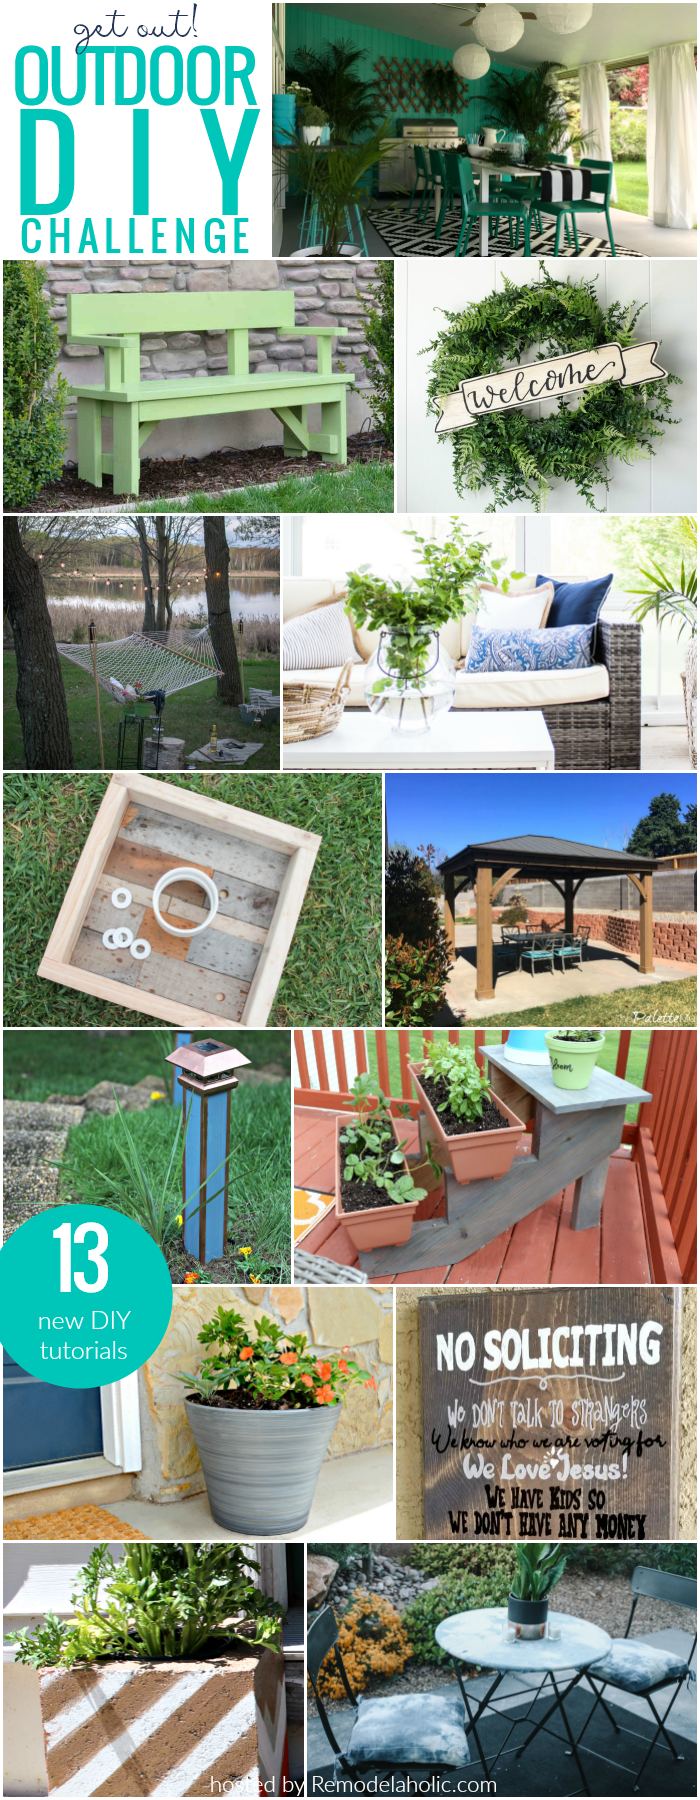
Covered Patio Outdoor Dining Area | Remodelaholic
DIY Outdoor Bench | Hertoolbelt
Wooden Welcome Sign Wreath | Lemon Thistle
Backyard Hammock Area | North Country Nest
Sunroom Makeover | Lantern Lane Designs
DIY Washer Toss Game | Everyday Party Magazine
How to Build a Gazebo (from a Kit) | The Palette Muse
DIY Solar Walkway Lights | Toolbox Divas
Tiered Vertical Planter Garden | Creative Ramblings
Simple DIY Tricks for a Covered Porch | Ugly Duckling House
Funny DIY No Soliciting Sign | Leap of Faith Crafting
Easy Cinder Block Garden Planters | Our Crafty Mom
Bistro Set Makeover | Practical & Pretty

Here’s all the videos in the challenge!

Category: DIY, Home Decor, LetteringTag: Collaboration, DIY Home Decor, Handlettered DIY, Sponsored, Video, Wood, Wreath
Facebook0Tweet0Pin0LinkedIn0
Previous Post: « Modern patio set up Cozy & Modern Patio Space
Next Post: Wood Veneer Art & Camping Bags for Kids | Outdoor SVG Bundle »

Reader Interactions

Comments

  1. laura

    May 18 at 9:35 pm

    love this! so pretty! laura

    Reply
  2. Sarah

    May 20 at 7:40 pm

    Great tips, it’s nice using a simple method like this and not breaking out the big saw for every project.

    Reply
  3. Molly

    May 22 at 2:07 pm

    This Ian so cool! I’ve always wondered how to handlettering on wood. It sounds like the missing piece for me was: sealing it! Your handwriting is gorgeous :)

    Reply

Leave a Reply Cancel reply

Your email address will not be published. Required fields are marked *

Sidebar

WOOHOO!

Check your email to confirm!

(+ get your freebies + discounts)


Thanks for dropping by!
I’m Colleen: wife; mom to 4 wild ones; and DIY blogger behind Lemon Thistle. You can expect to see rad DIY, modern home decor, renovations, hand lettering and the occasional party on Lemon Thistle. Read More…

email facebook youtube instagram pinterest

Unless otherwise noted, all content and images are mine. Full posts may not be shared without express written consent. But I love when you share! Feel free to share, without altering, one image with proper credit and a link to the original post. All free printables are for personal use only.

Everyone loves proper credit- if you ever notice something improperly credited, please please shoot me an email and I’ll fix it lightning fast.

Find all my policies right here.
This includes my privacy policy, info on the GDRP compliance and information on affiliate links (Including Amazon Affiliates).

Visit Colleen Pastoor’s profile on Pinterest.

colleenpastoor

My house is never this clean
-
DIY + Home Decor Blogger
Mama of 4 👶🏼🧒🏼👦🏼👧🏼
Renovating our 🏠 the DIY way
🖤 Lettering & ☕️
-
✉️[email protected]

colleen pastoor/lemon thistle
What’s next on your project list? Spring is teas What’s next on your project list? Spring is teasing us so we’re starting on outdoor projects around here!
$100 play room makeover is DONE! This room has se $100 play room makeover is DONE! 
This room has seen so much change over the past year (swipe over to see it 2 weeks ago, 10 months ago and 1 year ago!). I took this last week to make over this space with mostly pieces we already had and I’m so so happy with the results! It’s a good reminder that some hard work, creativity and of course paint can work magic.
I’m sharing all the details (and that under stairs space!) on YouTube today (link in my stories!) and so is my friend @thediymommy (she made over her daughters bedroom for $100!).
Do you think dried grasses are only for fall decor Do you think dried grasses are only for fall decor? I used to think so, but these bunny tail grasses are too cute to put in a bin until next year. Plus the name sounds like spring decor to me ;) What do you think?

Ps. Today’s going to be a full day of playroom progress! I’ll share as much as I can in stories as I go :)
Paint is honestly magic.✨ I am so excited to sha Paint is honestly magic.✨
I am so excited to share this kitchen makeover with you guys! These are the same cabinets, just painted (countertops too!) And some updated finishes. I blogged the full before and after if you’d like to check it out!
Big thank you to @schaubhardware and @wagnerspraytech for partnering to make this space possible!
Ps. Most of the work done here was by the homeowners so if you’re thinking about taking on a makeover in your own home, maybe this is the encouragement you need 😘
As I’m sitting here staring at the dishes on the As I’m sitting here staring at the dishes on the counter while I try to focus on editing a video, I thought it’s as good of time as any to share this reminder 😘
I feel like I’ve lucked into the best job out th I feel like I’ve lucked into the best job out there, but then I’m also so aware of the amount of work it took to get here. Today I chatted with two of my blog friends in an Instagram live about DIY blogging as a job and answered some questions we get asked all the time about our work and the balance of it all! I saved it as an IGTV so you can watch it if you missed 🥰

Big thanks to @love_create_celebrate and @thediymommy for chatting with me today! One of the biggest perks of this job is all the talented ladies I’ve had the privilege of meeting and calling friends- these two are top of that list!
I’m having some fun in stories with a little giv I’m having some fun in stories with a little giveaway guessing game. I’d love if you played along!

I put up a question box and you can guess my next room makeover and the guesses are all over the place. Some are projects on my dream list, some are rooms I wish to even have in my house and some are spaces we’ve already tackled! Like our main bathroom ✨ these photos are from my spring home tour I shared over on the blog earlier this week. Hung up a pennant and called it decked for spring 🐣
Who is ready for spring?! I know we totally are- w Who is ready for spring?!
I know we totally are- we’ve been soaking up outside time this week with the kids home on spring break but over on the blog... it’s spring home tour time! I am sharing my home all ready for spring along with some amazing bloggers as part of the #seasonalsimplicity spring series!
You know I love a touch of DIY decor in every spac You know I love a touch of DIY decor in every space in my home, so I’m so excited to be partnering with @HGTVCanada to celebrate #$aveMyReno being back TONIGHT! #partner
 
My favourite thing about $ave My Reno is that they encourage home owners to get involved and DIY to maximize budget. They even help kids get involved- it’s everything Shane and I work towards in our own projects. You can catch it every Tuesday at 9/9:30PM EP on @HGTVCanada or catch up on episodes on STACKTV through @primevideoca!
 
PS. I made those tie dye pillows, similar to the ones featured in tonight’s episode! You can catch my stories to see the super speedy how-to :)
Load More... Follow on Instagram

Copyright © 2021 · Lemon Thistle · All Rights Reserved · Powered by Mai Theme