• Skip to main content
  • Skip to header left navigation
  • Skip to header right navigation
  • Skip to site footer
  • Shop
  • Get The Email
  • Work With Me
  • About
  • Search

  • DIY
    • DIY Home Decor
    • With Power Tools
    • Renovation
    • For Kids
    • For Parties
    • Wearable
    • Organization
    • Cricut Crafts
  • Home Decor
    • Room Reveals
    • Kid Friendly
    • DIY Home Decor
    • Renovation
  • Lettering
    • Hand Lettered Printables
    • Free Practice Sheets
    • Handlettered DIY
    • Free Brush Lettering Quickstart Guide
Lemon Thistle

Lemon Thistle

Rad DIY, Lettering and Design for Real People

  • Printables
    • For Cricut
    • Party Printables
    • Home Decor Printables
    • Bachelor Bingo
    • Handlettering Practice Sheets
    • All Free Printables
  • Entertain
    • Party Printables
    • Party DIY
    • Tablescapes
    • Kids Parties
  • Blog

How to Install a Ceiling Fan on a Sloped Ceiling

Jul 27
Do you want to install a ceiling fan on a sloped ceiling? Intimidated by making it level? It’s SO much easier than you think! Sharing the very basics for a DIY install in this tutorial- plus I’m sharing an exciting project I’m working on (and it’s a surprise!).
 
How to install a ceiling fan on a sloped ceiling (the super simple explanation)

Today I’m excited to be back with the girls from the Modern Handmade Home series to take on another fun challenge- ceiling fans! If you’ve been reading Lemon Thistle for a while, you might remember that we used a ceiling fan from Emerson Fans in Aubrey’s bedroom makeover this past fall and we totally love it. In fact, I wrote a whole post to help talk through the decision making progress- fan or light in a bedroom!

How to install a ceiling fan on a sloped ceiling (the super simple explanation)

Fast forward to this spring when we were taking on our boys’ bedroom makeover, my sister-in-law asked me to save the old working but noisy fan that we had in their room for her to put in their farmhouse. We saved it… without much enthusiasm, but when this opportunity came up to partner again with Emerson Fans, I knew exactly what I wanted to take on… their bedroom! I told her about the fan (she’s not stopped gushing about how much they love it), but haven’t told her that I got carried away and now have a full scale bedroom makeover planned for her. Keep my secret, k? We did the fan first and the rest is coming in the next couple weeks… I can’t wait to share all that I have planned with you guys! Want to see the before?

Farmhouse bedroom BEFORE photos

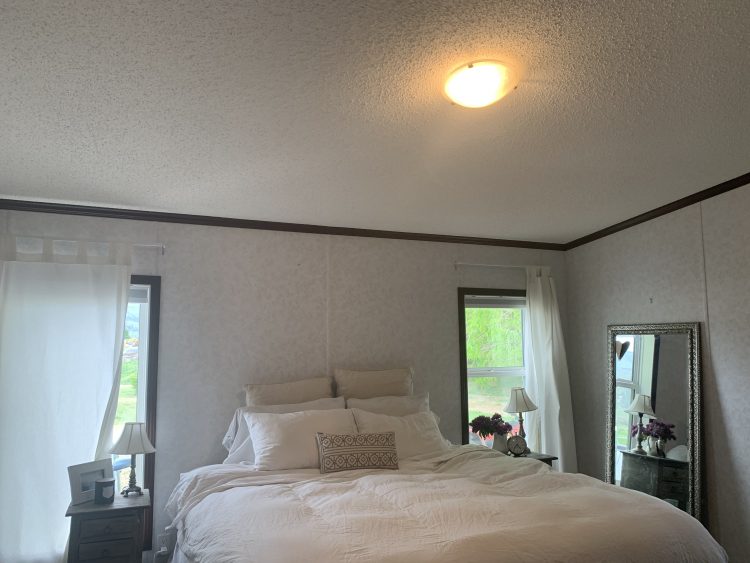
I was so sure that this is what we wanted to do but when we got out there and I saw that her ceiling was sloped, I totally panicked. How do you make it level?! This isn’t what I signed up for! Haha, but Shane looked at me like I was crazy- the only fans he’d installed are the Emerson ones and they are so much better than the old ones we used to have. So I thought that I’d write a whole post and create a whole video to simplify the process of installing a fan on a sloped ceiling and hopefully take the intimidation out of it completely! As Shane showed me how the fan mounts- I was so impressed and I’m sure you will be too! It’s really simple to use, you guys!

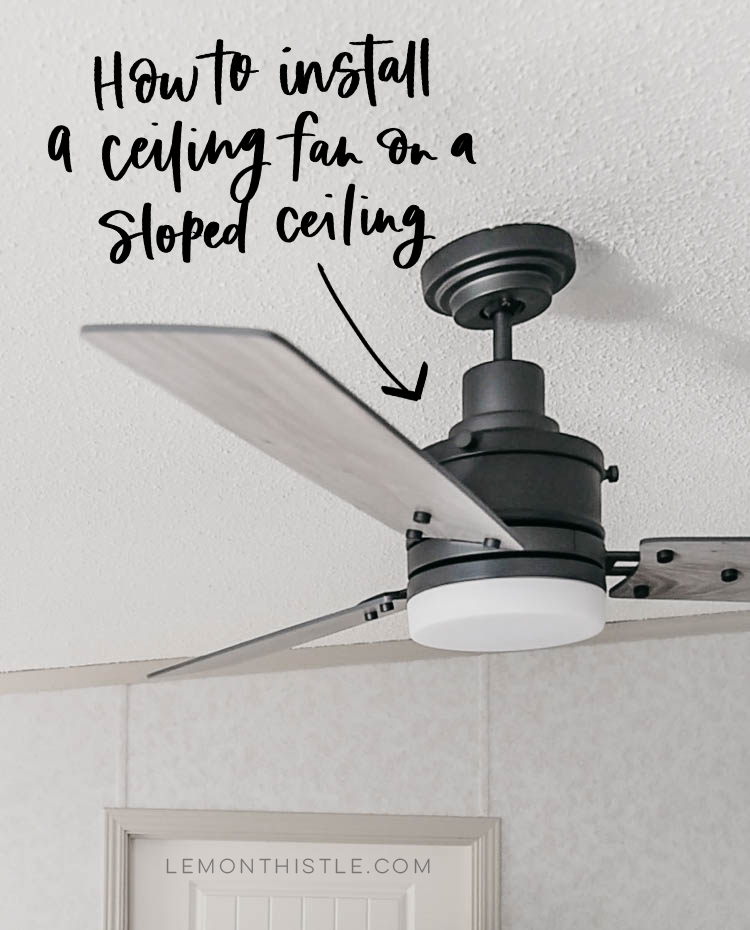
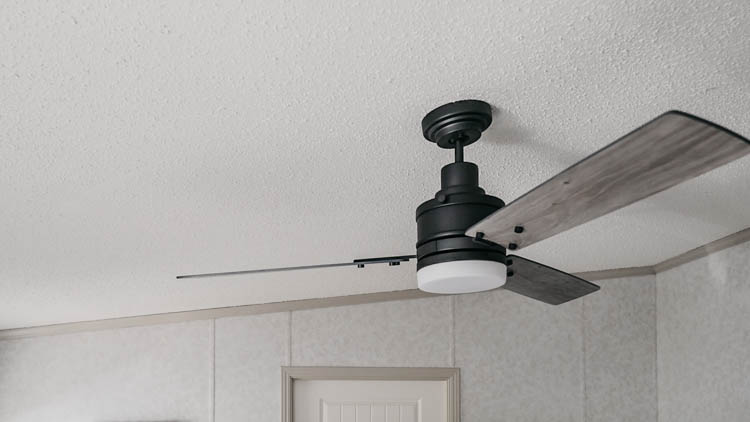
The fan that we used here is totally beautiful with a modern farmhouse look. It’s the Highpointe LED from Emerson Fans and we chose the carbon body and driftwood blades. It looks a bit different than the listed image on the website because we have a lower ceiling. We chose to use the shorter attachment which means you can’t use the decorative cables. We figured since it was over a bed and there are kids in the house (you know, the like to jump on beds sometimes!) that it was better to do the shorter option. 

Please note that we’re not electricians… or claiming to be. If you want electrical advice… go get an expert, K? Thanks, friends :) 

The first thing that you’ll want to do is switch off your breaker and then take down your old light. Then you’ll want to remove the old hanger bracket from the light and install the one that comes with the fan, screwing it into the outlet box in the ceiling. Since fans are heavier, you’ll want to make sure you use this. This hanger bracket is designed to leave room for the remote receiver behind it and has a space for the hanger ball to fit in. The what?! Stick with me… this is the magic. 

How to install a ceiling fan on a sloped ceiling

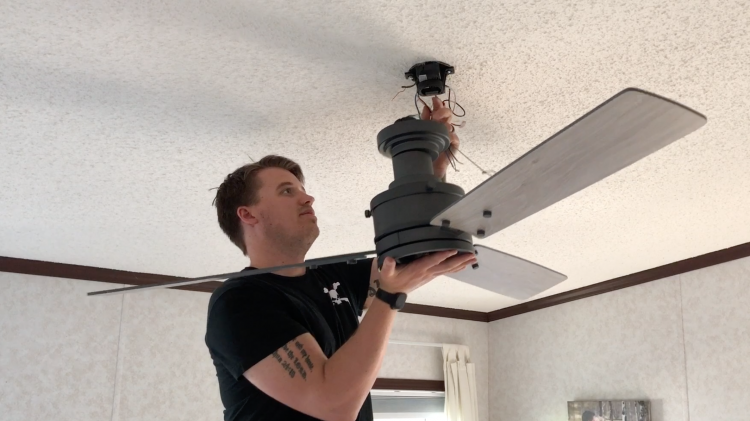
Shane likes to assemble most of the fan on the floor before lifting it up and hanging it. This will save you a lot of overhead work. Once you have all the blades on, lift it up and slide the ball hanger into the hanging bracket. The ball will have a vertical slot in one spot and the hanger bracket will have a tab. Line those up and as you lower the fan into the bracket, those will lock in place. You can see this more clearly in the video. But there you go… no screwing while holding a heavy fan up!

Once it’s hanging there, you can attach all your wiring and set your remote. Pairing the remote is simple, but we like to do it before we finish mounting the plate to the ceiling in case we need to move wires. One thing to note: Since the fan works on remote, it can’t use a dimmer switch. The remote will dim it for you- so swap out that switch if you need to! 

Once you have the fan and light working properly, time to get that plate attached. The mounting plate typically would have one small hole with a wire or maybe a chain running from it. On a pendant light for example, that plate would need to sit flush on the ceiling and only with a soft cord would the light hang straight (thanks to gravity). But a fan has a solid rod instead of chain. This is where I thought there might be some tweaking BUT… that ball that hooks in? Well… it’s a ball, so it hangs level regardless of how level (or not!) your ceiling is. This is so great for sloped ceilings but for any ceilings. No more rocking of the fan when it’s the slightest bit off level! So the cover plate is essentially decorative to hide the hanger bracket and all the wires. Just screw it into place! The bottom half of the ball hanger will show and give it a nice clean look, no matter the angle.

Beautiful farmhouse style fan on a sloped ceiling- great tips to install it on an angled ceiling

Isn’t installing a fan on a sloped ceiling simpler than expected?! I am so pleased with how easily this went up! Now I can’t wait to get back out there and get working on the full room makeover. It’s going to be such a transformation! 

Make sure to hop around and check out all the videos and blog posts in the Modern Handmade Home series in partnership with Emerson Fans! These ladies always create such beautiful spaces!

All about modern ceiling fans! Loving the function and style

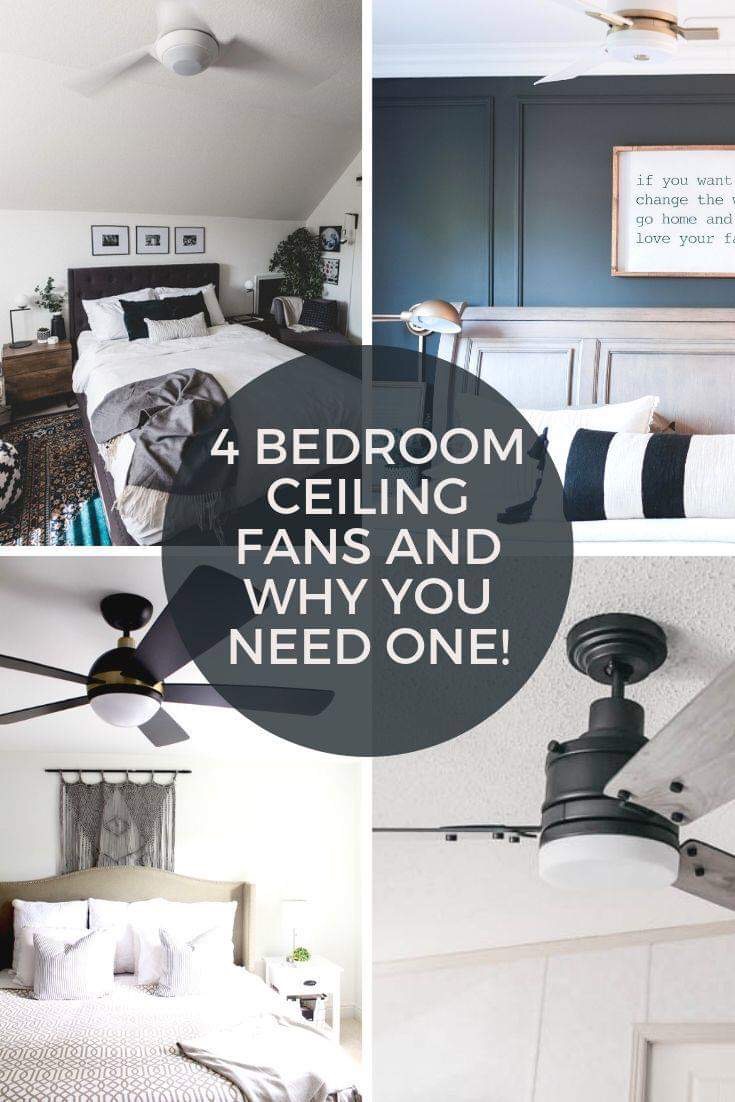
Left to Right; Top to Bottom

Simple Bedroom Update – Love Create Celebrate

Why We Love Having a Ceiling Fan in the Bedroom – The Learner Observer

Tips on Choosing a Ceiling Fan – Harlow and Thistle

Category: LifestyleTag: Bedroom, Handmade Modern Home, Modern Handmade Home, Renovation, Sponsored, Video
Facebook0Tweet0Pin0LinkedIn0
Previous Post: « Tablescape with cartoon buildings and word bubbles for superhero birthday party Modern Superhero Birthday Party (Windsor’s 3rd Birthday Party!)
Next Post: DIY Outdoor Toy Storage Chest Modern DIY Outdoor Toy Storage Chest - Free plans and DIY tutorial »

Reader Interactions

Comments

  1. Frank Ball

    Dec 11 at 8:54 am

    I liked your tip of assembling most of the fan on the floor before installing it on the ceiling. My wife and I are wanting to install a fan in our room and we were wondering what the best way of installing was. I’ll be sure to tell my wife that we should put a fan together on the floor before installing it on the ceiling.

    Reply

Leave a Reply Cancel reply

Your email address will not be published. Required fields are marked *

Sidebar

WOOHOO!

Check your email to confirm!

(+ get your freebies + discounts)


Thanks for dropping by!
I’m Colleen: wife; mom to 4 wild ones; and DIY blogger behind Lemon Thistle. You can expect to see rad DIY, modern home decor, renovations, hand lettering and the occasional party on Lemon Thistle. Read More…

email facebook youtube instagram pinterest

Unless otherwise noted, all content and images are mine. Full posts may not be shared without express written consent. But I love when you share! Feel free to share, without altering, one image with proper credit and a link to the original post. All free printables are for personal use only.

Everyone loves proper credit- if you ever notice something improperly credited, please please shoot me an email and I’ll fix it lightning fast.

Find all my policies right here.
This includes my privacy policy, info on the GDRP compliance and information on affiliate links (Including Amazon Affiliates).

Visit Colleen Pastoor’s profile on Pinterest.

colleenpastoor

My house is never this clean
-
DIY + Home Decor Blogger
Mama of 4 👶🏼🧒🏼👦🏼👧🏼
Renovating our 🏠 the DIY way
🖤 Lettering & ☕️
-
✉️[email protected]

colleen pastoor/lemon thistle
What’s next on your project list? Spring is teas What’s next on your project list? Spring is teasing us so we’re starting on outdoor projects around here!
$100 play room makeover is DONE! This room has se $100 play room makeover is DONE! 
This room has seen so much change over the past year (swipe over to see it 2 weeks ago, 10 months ago and 1 year ago!). I took this last week to make over this space with mostly pieces we already had and I’m so so happy with the results! It’s a good reminder that some hard work, creativity and of course paint can work magic.
I’m sharing all the details (and that under stairs space!) on YouTube today (link in my stories!) and so is my friend @thediymommy (she made over her daughters bedroom for $100!).
Do you think dried grasses are only for fall decor Do you think dried grasses are only for fall decor? I used to think so, but these bunny tail grasses are too cute to put in a bin until next year. Plus the name sounds like spring decor to me ;) What do you think?

Ps. Today’s going to be a full day of playroom progress! I’ll share as much as I can in stories as I go :)
Paint is honestly magic.✨ I am so excited to sha Paint is honestly magic.✨
I am so excited to share this kitchen makeover with you guys! These are the same cabinets, just painted (countertops too!) And some updated finishes. I blogged the full before and after if you’d like to check it out!
Big thank you to @schaubhardware and @wagnerspraytech for partnering to make this space possible!
Ps. Most of the work done here was by the homeowners so if you’re thinking about taking on a makeover in your own home, maybe this is the encouragement you need 😘
As I’m sitting here staring at the dishes on the As I’m sitting here staring at the dishes on the counter while I try to focus on editing a video, I thought it’s as good of time as any to share this reminder 😘
I feel like I’ve lucked into the best job out th I feel like I’ve lucked into the best job out there, but then I’m also so aware of the amount of work it took to get here. Today I chatted with two of my blog friends in an Instagram live about DIY blogging as a job and answered some questions we get asked all the time about our work and the balance of it all! I saved it as an IGTV so you can watch it if you missed 🥰

Big thanks to @love_create_celebrate and @thediymommy for chatting with me today! One of the biggest perks of this job is all the talented ladies I’ve had the privilege of meeting and calling friends- these two are top of that list!
I’m having some fun in stories with a little giv I’m having some fun in stories with a little giveaway guessing game. I’d love if you played along!

I put up a question box and you can guess my next room makeover and the guesses are all over the place. Some are projects on my dream list, some are rooms I wish to even have in my house and some are spaces we’ve already tackled! Like our main bathroom ✨ these photos are from my spring home tour I shared over on the blog earlier this week. Hung up a pennant and called it decked for spring 🐣
Who is ready for spring?! I know we totally are- w Who is ready for spring?!
I know we totally are- we’ve been soaking up outside time this week with the kids home on spring break but over on the blog... it’s spring home tour time! I am sharing my home all ready for spring along with some amazing bloggers as part of the #seasonalsimplicity spring series!
You know I love a touch of DIY decor in every spac You know I love a touch of DIY decor in every space in my home, so I’m so excited to be partnering with @HGTVCanada to celebrate #$aveMyReno being back TONIGHT! #partner
 
My favourite thing about $ave My Reno is that they encourage home owners to get involved and DIY to maximize budget. They even help kids get involved- it’s everything Shane and I work towards in our own projects. You can catch it every Tuesday at 9/9:30PM EP on @HGTVCanada or catch up on episodes on STACKTV through @primevideoca!
 
PS. I made those tie dye pillows, similar to the ones featured in tonight’s episode! You can catch my stories to see the super speedy how-to :)
Load More... Follow on Instagram

Copyright © 2021 · Lemon Thistle · All Rights Reserved · Powered by Mai Theme