• Skip to main content
  • Skip to header left navigation
  • Skip to header right navigation
  • Skip to site footer
  • Shop
  • Get The Email
  • Work With Me
  • About
  • Search

  • DIY
    • DIY Home Decor
    • With Power Tools
    • Renovation
    • For Kids
    • For Parties
    • Wearable
    • Organization
    • Cricut Crafts
  • Home Decor
    • Room Reveals
    • Kid Friendly
    • DIY Home Decor
    • Renovation
  • Lettering
    • Hand Lettered Printables
    • Free Practice Sheets
    • Handlettered DIY
    • Free Brush Lettering Quickstart Guide
Lemon Thistle

Lemon Thistle

Rad DIY, Lettering and Design for Real People

  • Printables
    • For Cricut
    • Party Printables
    • Home Decor Printables
    • Bachelor Bingo
    • Handlettering Practice Sheets
    • All Free Printables
  • Entertain
    • Party Printables
    • Party DIY
    • Tablescapes
    • Kids Parties
  • Blog

Gold and Glitter Feather Gift Toppers (or Ornaments!)

Dec 21

DIY gilded and glittered feather gift toppers... these would make cute christmas ornaments too!

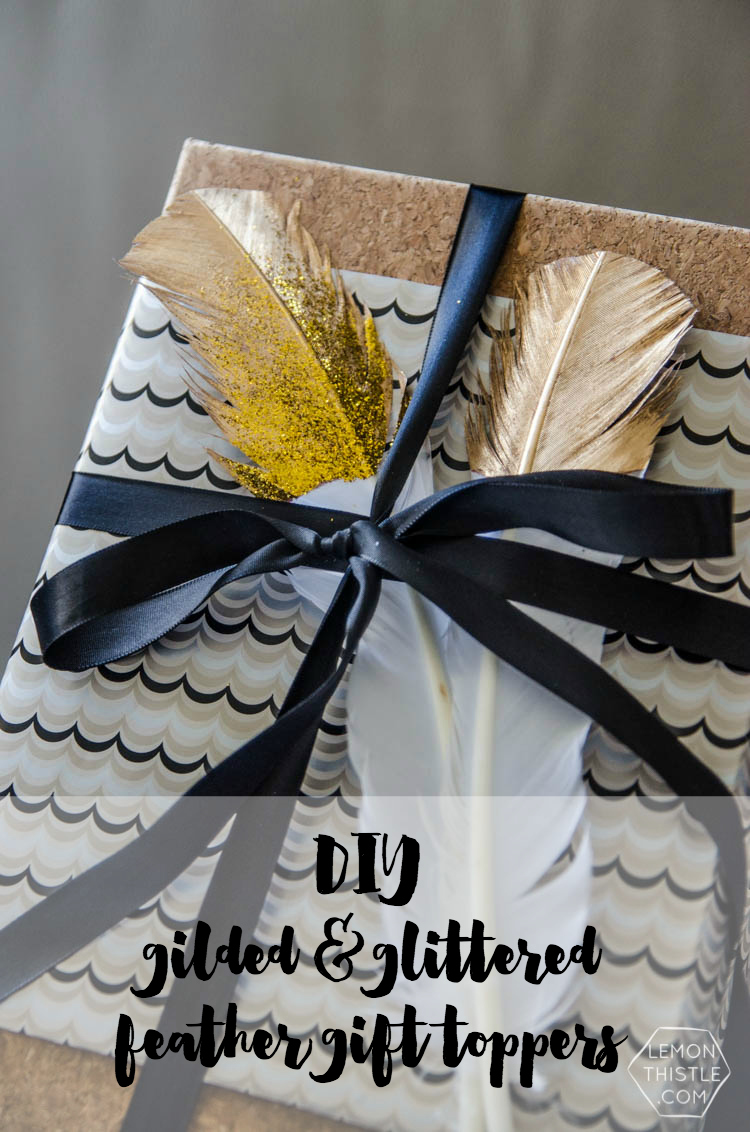
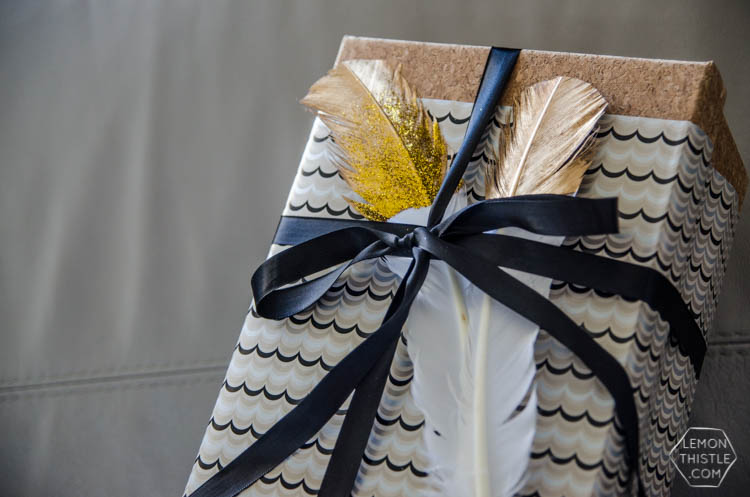
We’re just sneaking in holiday DIYs right down to the deadline here. But I’m sure you’re not done all your wrapping, are you? I don’t know that I’ve had a Christmas yet where I’m not wrapping the night before Christmas- no matter how planned and prepared I think I am. If you’re anything like me, this is a fun (and so speedy!) DIY to help dress up your gifts. Or- they can make a rad gift, strung with a ribbon to hang on a tree as an ornament. So really, I’m just giving you a solution for all your last minute holiday needs. Except for what to cook- I can’t help you there, I’m a dinner attendee not host when it comes to Christmas!

DIY gilded and glittered feather gift toppers... these would make cute christmas ornaments too!

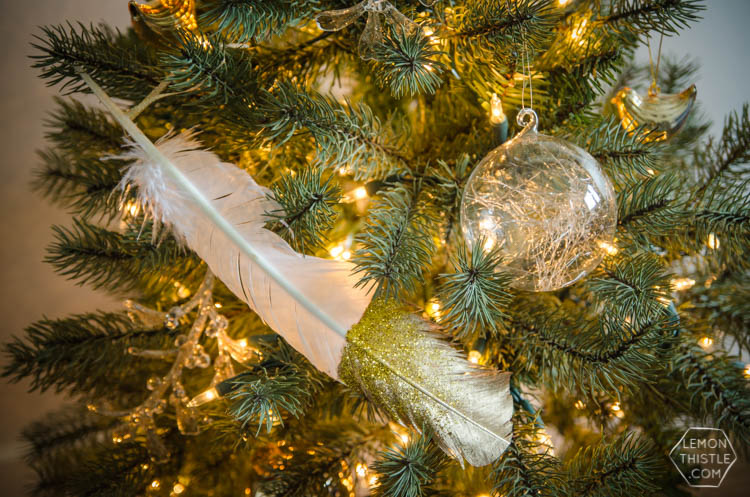
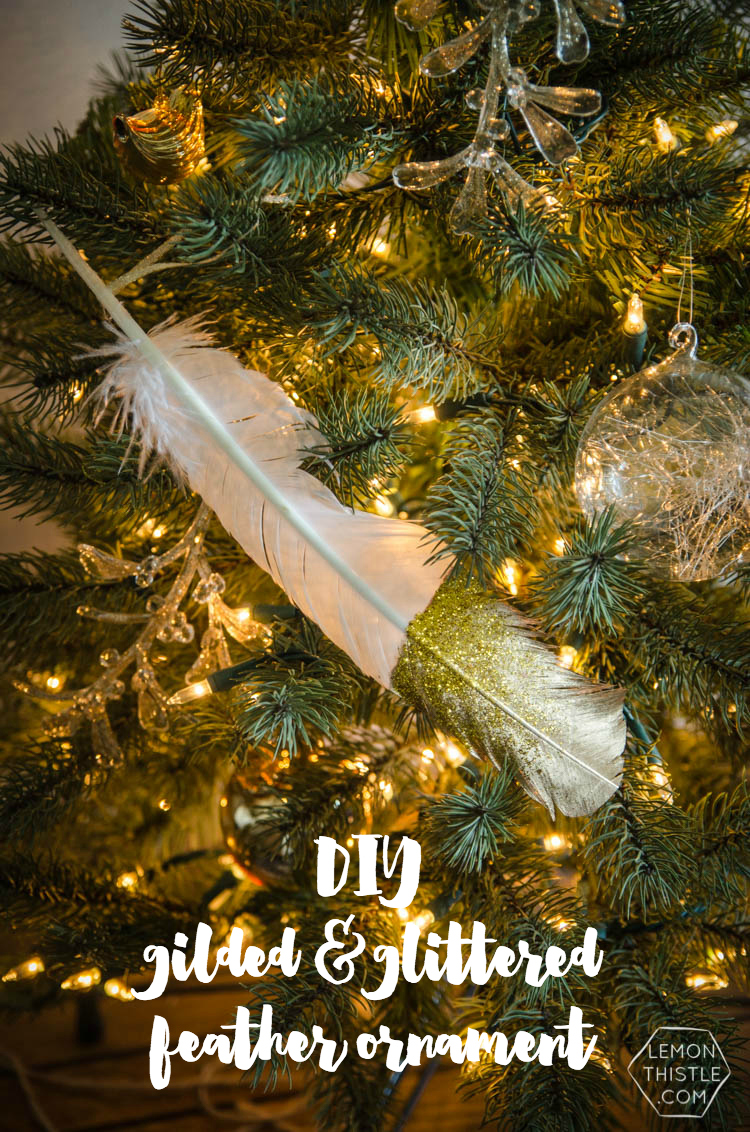
Now let’s talk a little bit about these gold and glitter feather gift toppers and ornaments. I had so much fun playing with different ways to dress up these lovely feathers. I gilded some, glittered some, and then my favourites- mixed gilding and glitter on some. But I don’t need to even talk about it, I can show you- because Shaw TV filmed the whole DIY for you. Let’s watch- shall we?

So simple, right! I love when a craft is as simple as I think it will be in my head. The hardest part of this whole thing was stringing the ones I did for ornaments- those feathers are TOUGH! Anyways, if you’re sitting at work- or the doctors office, and can’t watch the video right now, here’s the how-to.

To make these feather gift toppers and ornaments, you’ll need:

  • Stiff feathers (not the wispy ones… those would be meeeessssy) in your choice of colour
  • Liquid gold leaf (can you tell that I live by this stuff)
  • White glue
  • Paint brushes
  • Glitter
  • Ribbon and large needle to string into ornaments

For the gilded feathers, just get to painting! I painted both the front and the back of the feathers for this technique. I love how it gives the feathers a dipped look. You can stripe or dot or paint the whole thing- it’s all up to you. For the Glittered feathers… do the same thing but with white glue before sprinkling with glitter. Use your fingers to press the glitter into the glue. Last but not least… the mix (my favourite!). Gild them… THEN when it’s dry, paint glue over top and sprinkle with glitter. I did this kind of ombre- so there was more glitter at one end and it faded into the gilded look. I really love the way this one turned out and want to make a bunch that look just like this.

DIY gilded and glittered feather gift toppers... these would make cute christmas ornaments too!

DIY gilded and glittered feather gift toppers... these would make cute christmas ornaments too!

I also did some tribal looking ones in the video that I totally missed photographing. That’s the thing with gift toppers… you give them away with gifts and THEN you think about how rad it would have been to photograph them. C’est la vie. Are you still crafting for the holidays or have you put your feet up by now?

Category: DIYTag: Christmas, Craft, Decorations, Gifts, Holiday DIY, Holidays, Ornament
Facebook0Tweet0Pin0LinkedIn0
Previous Post: « DIY simple glitter tree skirt- I love this for a little more of a natural christmas DIY Natural Glittered Tree Skirt
Next Post: A Classic Gingerbread Party A simple gingerbread decorating party... I love this! The decorations are so classic but easy to accomplish »

Reader Interactions

Comments

  1. skd

    Jan 02 at 12:26 am

    Beautiful!

    Reply
  2. Quinn Caudill

    Jan 04 at 12:24 pm

    Very creative. Thanks for sharing with us at Throwback Thursday. Hope to see you again this week.

    Reply
  3. Kathleen

    Jan 05 at 5:38 pm

    LOVE these for both ornaments and gifts, maybe even as part of garlands and other projects! Wondering if you might share your source for those pristine, white feathers? Since we work on a November Christmas Bazaar all year long, I’d love to know now where I can get some … =).
    p.s. My first visit to your site, but certainly not my last: following you!

    Reply
    • Colleen Pastoor

      Jun 17 at 10:20 am

      Hi Kathleen, I’m sure I’m much too late to help you out on the white feathers, but they’re from Michaels! In the kids craft section (pom poms and such)

      Reply
  4. Linda

    Jan 07 at 12:24 pm

    I LOVE feathers. I was making feathers out of paper for years but I love this also.. gold feathers!! How fun is that? I pinned this to my gift wrap board. Thanks for inspiration. Happy New Year, Linda @Crafts a la mode

    Reply

Leave a Reply Cancel reply

Your email address will not be published. Required fields are marked *

Sidebar

WOOHOO!

Check your email to confirm!

(+ get your freebies + discounts)


Thanks for dropping by!
I’m Colleen: wife; mom to 4 wild ones; and DIY blogger behind Lemon Thistle. You can expect to see rad DIY, modern home decor, renovations, hand lettering and the occasional party on Lemon Thistle. Read More…

email facebook youtube instagram pinterest

Unless otherwise noted, all content and images are mine. Full posts may not be shared without express written consent. But I love when you share! Feel free to share, without altering, one image with proper credit and a link to the original post. All free printables are for personal use only.

Everyone loves proper credit- if you ever notice something improperly credited, please please shoot me an email and I’ll fix it lightning fast.

Find all my policies right here.
This includes my privacy policy, info on the GDRP compliance and information on affiliate links (Including Amazon Affiliates).

Visit Colleen Pastoor’s profile on Pinterest.

colleenpastoor

My house is never this clean
-
DIY + Home Decor Blogger
Mama of 4 👶🏼🧒🏼👦🏼👧🏼
Renovating our 🏠 the DIY way
🖤 Lettering & ☕️
-
✉️[email protected]

colleen pastoor/lemon thistle
What’s next on your project list? Spring is teas What’s next on your project list? Spring is teasing us so we’re starting on outdoor projects around here!
$100 play room makeover is DONE! This room has se $100 play room makeover is DONE! 
This room has seen so much change over the past year (swipe over to see it 2 weeks ago, 10 months ago and 1 year ago!). I took this last week to make over this space with mostly pieces we already had and I’m so so happy with the results! It’s a good reminder that some hard work, creativity and of course paint can work magic.
I’m sharing all the details (and that under stairs space!) on YouTube today (link in my stories!) and so is my friend @thediymommy (she made over her daughters bedroom for $100!).
Do you think dried grasses are only for fall decor Do you think dried grasses are only for fall decor? I used to think so, but these bunny tail grasses are too cute to put in a bin until next year. Plus the name sounds like spring decor to me ;) What do you think?

Ps. Today’s going to be a full day of playroom progress! I’ll share as much as I can in stories as I go :)
Paint is honestly magic.✨ I am so excited to sha Paint is honestly magic.✨
I am so excited to share this kitchen makeover with you guys! These are the same cabinets, just painted (countertops too!) And some updated finishes. I blogged the full before and after if you’d like to check it out!
Big thank you to @schaubhardware and @wagnerspraytech for partnering to make this space possible!
Ps. Most of the work done here was by the homeowners so if you’re thinking about taking on a makeover in your own home, maybe this is the encouragement you need 😘
As I’m sitting here staring at the dishes on the As I’m sitting here staring at the dishes on the counter while I try to focus on editing a video, I thought it’s as good of time as any to share this reminder 😘
I feel like I’ve lucked into the best job out th I feel like I’ve lucked into the best job out there, but then I’m also so aware of the amount of work it took to get here. Today I chatted with two of my blog friends in an Instagram live about DIY blogging as a job and answered some questions we get asked all the time about our work and the balance of it all! I saved it as an IGTV so you can watch it if you missed 🥰

Big thanks to @love_create_celebrate and @thediymommy for chatting with me today! One of the biggest perks of this job is all the talented ladies I’ve had the privilege of meeting and calling friends- these two are top of that list!
I’m having some fun in stories with a little giv I’m having some fun in stories with a little giveaway guessing game. I’d love if you played along!

I put up a question box and you can guess my next room makeover and the guesses are all over the place. Some are projects on my dream list, some are rooms I wish to even have in my house and some are spaces we’ve already tackled! Like our main bathroom ✨ these photos are from my spring home tour I shared over on the blog earlier this week. Hung up a pennant and called it decked for spring 🐣
Who is ready for spring?! I know we totally are- w Who is ready for spring?!
I know we totally are- we’ve been soaking up outside time this week with the kids home on spring break but over on the blog... it’s spring home tour time! I am sharing my home all ready for spring along with some amazing bloggers as part of the #seasonalsimplicity spring series!
You know I love a touch of DIY decor in every spac You know I love a touch of DIY decor in every space in my home, so I’m so excited to be partnering with @HGTVCanada to celebrate #$aveMyReno being back TONIGHT! #partner
 
My favourite thing about $ave My Reno is that they encourage home owners to get involved and DIY to maximize budget. They even help kids get involved- it’s everything Shane and I work towards in our own projects. You can catch it every Tuesday at 9/9:30PM EP on @HGTVCanada or catch up on episodes on STACKTV through @primevideoca!
 
PS. I made those tie dye pillows, similar to the ones featured in tonight’s episode! You can catch my stories to see the super speedy how-to :)
Load More... Follow on Instagram

Copyright © 2021 · Lemon Thistle · All Rights Reserved · Powered by Mai Theme