• Skip to main content
  • Skip to header left navigation
  • Skip to header right navigation
  • Skip to site footer
  • Shop
  • Get The Email
  • Work With Me
  • About
  • Search

  • DIY
    • DIY Home Decor
    • With Power Tools
    • Renovation
    • For Kids
    • For Parties
    • Wearable
    • Organization
    • Cricut Crafts
  • Home Decor
    • Room Reveals
    • Kid Friendly
    • DIY Home Decor
    • Renovation
  • Lettering
    • Hand Lettered Printables
    • Free Practice Sheets
    • Handlettered DIY
    • Free Brush Lettering Quickstart Guide
    • Learn Brush Lettering E-Course SALE
Lemon Thistle

Lemon Thistle

Rad DIY, Lettering and Design for Real People

  • Printables
    • For Cricut
    • Party Printables
    • Home Decor Printables
    • Bachelor Bingos
    • Free Monthly Wallpapers
    • Handlettering Practice Sheets
    • All Free Printables
  • Entertain
    • Party Printables
    • Party DIY
    • Tablescapes
    • Dinner Party
    • Kids Parties
    • Party Eats
    • Baby Showers
    • Wedding + Showers
  • Blog

Giant DIY Tassels for a Donut Party

Jun 02

DIY Giant Party Tassels

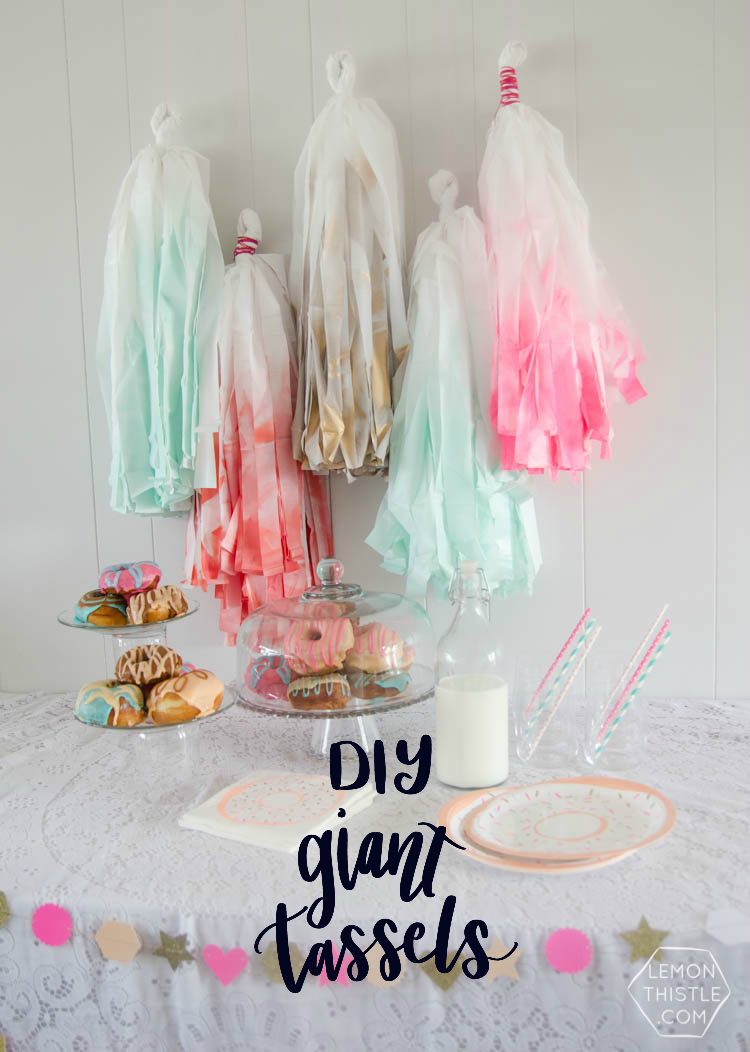
It’s fiiinally time for my donut project! Today I’m sharing these DIY giant tassels fit for a donut party. They’re big and fun and it just takes a few to make a rad party backdrop. Did I mention they’re pretty darned affordable? Scroll all the way down on this post to get the how-to!

If you haven’t caught on by now ;) Today is National Doughnut Day and to celebrate, Dawn of Revel and Glitter brought 10 of her favorite and oh-so-talented party and lifestyle bloggers together for a week long party blog hop bringing you crafts, parties and recipes everyday!

We are celebrating National Doughnut Day with a week long party blog hop!

A Bubbly Life | A Joyful Riot | Cupcakes + Cutlery | Giggles Galore | Grey Grey Designs | Lemon Thistle | Lulu The Baker | Lynlee’s | Modern Moments Designs | Salty Canary

If you are not familiar with these extremely talented women, head on over and check them out, you won’t be disappointed!

We also have an awesomely sweet pin board Always Time For Doughnuts, full of our favorite doughnut inspired ideas! Eventually, all of our projects will be there so be sure to follow it for lots of sweet inspiration.

Alas, all good things must come to an end (check out day 1 with our giveaway, day 2, day 3, and day 4 projects) and we are bringing you our final fabulous doughnut themed projects, please hop over and check them out for the full tutorials…

National Doughnut Day; DIY tassels for a doughnut party

DIY tassels for a doughnut party with Lemon Thistle (mine, scroll on down for the tutorial!)

National Doughnut Day; mini doughnut boxes

Mini doughnut boxes with A Joyful Riot

National Doughnut Day; pink doughnut Bundt cake

Pink doughnut Bundt cake with Lulu the Baker

Thank you for partying with us this week and don’t forget to enter our giveaway, it ends tonight at midnight, PT!

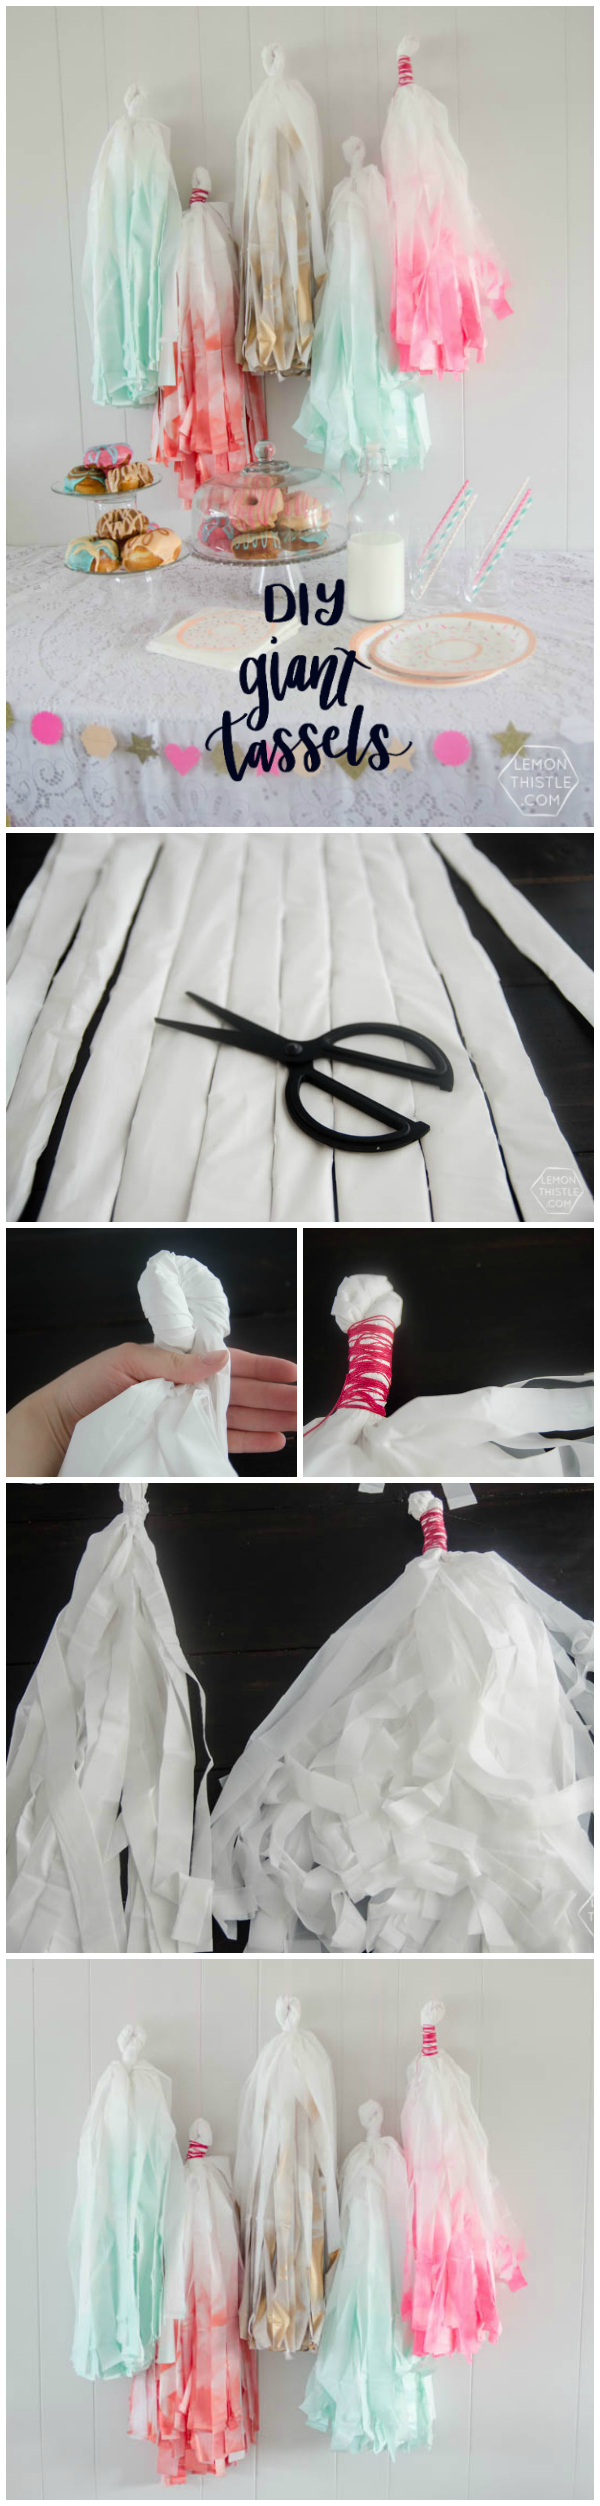
NOW FOR THE DIY GIANT TASSEL TUTORIAL!

DIY Giant Party Tassels

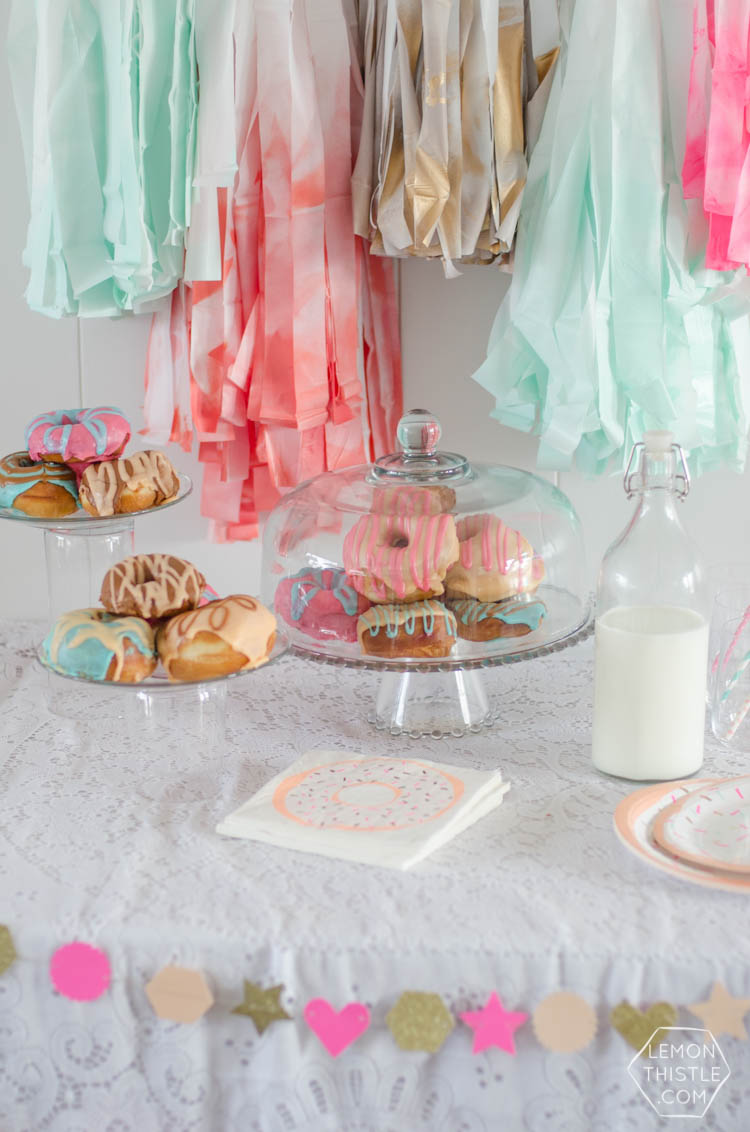
If you’re having a donut party (and I encourage you to) or any party that you’d want a backdrop for but don’t want to spend a ton of cash and hours of your time- these giant tassels are your best friend.  They make such a statement but are still totally affordable- made from dollar store table cloths!

I made these ones specifically to match my plates and napkins– which are also donut themed, of course! But you can make them any color ever. Then I also had the donuts made to match because I didnt know you could do that and it made my party-loving day.

DIY Giant Party Tassels

Ready to learn how?

To make the Giant Tassels, you’ll need:

  • Plastic table cloths from the dollar store (rectangular shaped)
  • Scissors
  • String or embroidery thread
  • Spraypaint and a drop cloth

DIY Giant Party Tassels

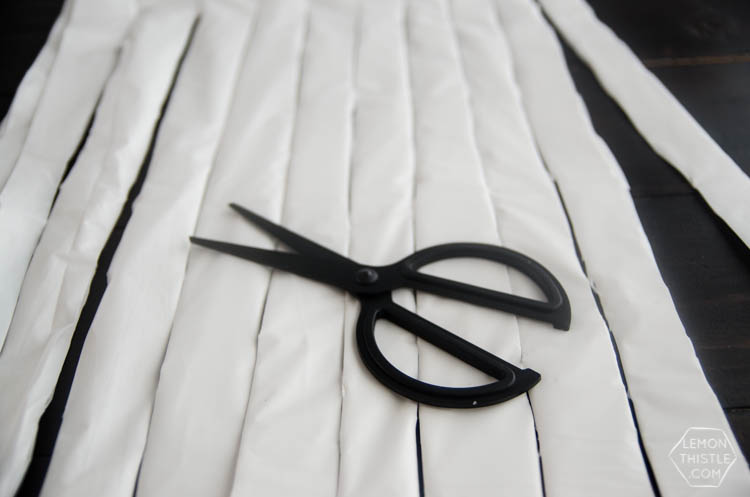
Start by folding your table cloth into long rectangles. They should be as long as you would like your tassel to be. You’ll need to cut the end closest to you so there is no folds. Then, cut fringe into the rectangle, leaving a few inches at the top.

DIY Giant Party Tassels

DIY Giant Party Tassels

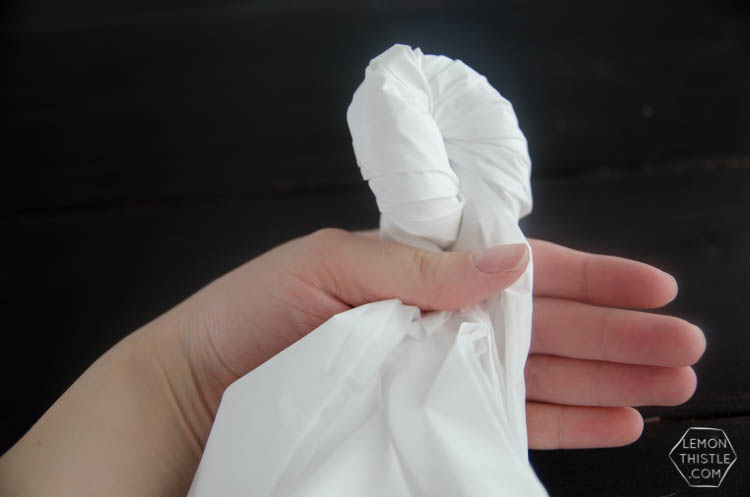
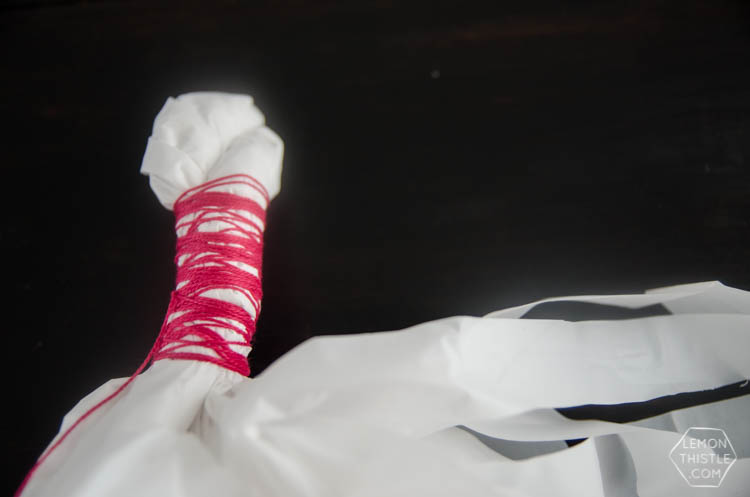
Now, take your rectangle and unfold it once, bunching the uncut part of the fringe and twist it to make a tassel as shown. Use your embroidery thread or string to wrap the tassel and tie off.

DIY Giant Party Tassels

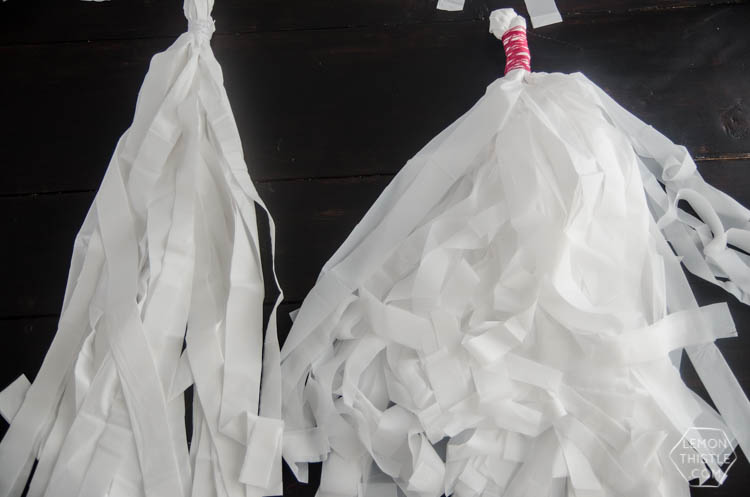
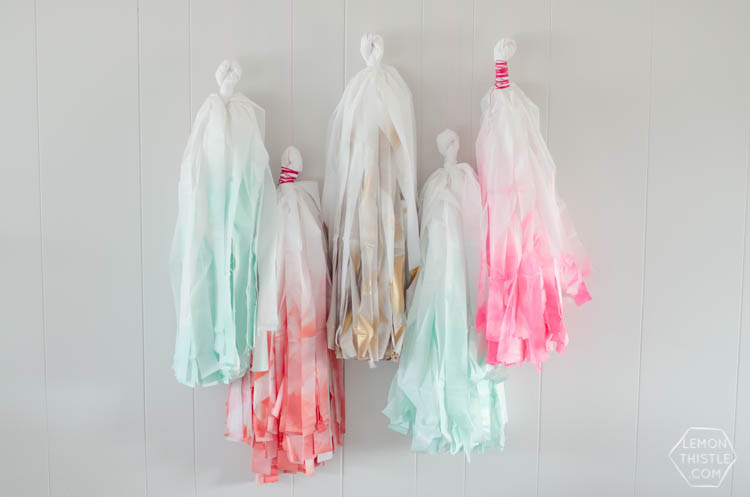
Now it looks like you’re done but this next part really makes a huge difference. ‘Fluffing’ the tassel will take it from the size of the tassel on the left to the one on the right… like double! Just make sure you pull each piece apart to separate the ones that were cut together.

DIY Giant Party Tassels

When you’re all done, lay them on a drop cloth and use spray paint to mist the bottom of the tassel to add a touch of color. My favorite ones are by far that mint color! It’s so soft that it blends to the white really nicely. I’d definitely recommend using a lighter color like the mint to get that nice blend. The one that worked the least is the fluorescent paint and that’s because it’s not really a finishing quality paint- I think it’s more meant for flagging (but the color is rad).

DIY Giant Party Tassels

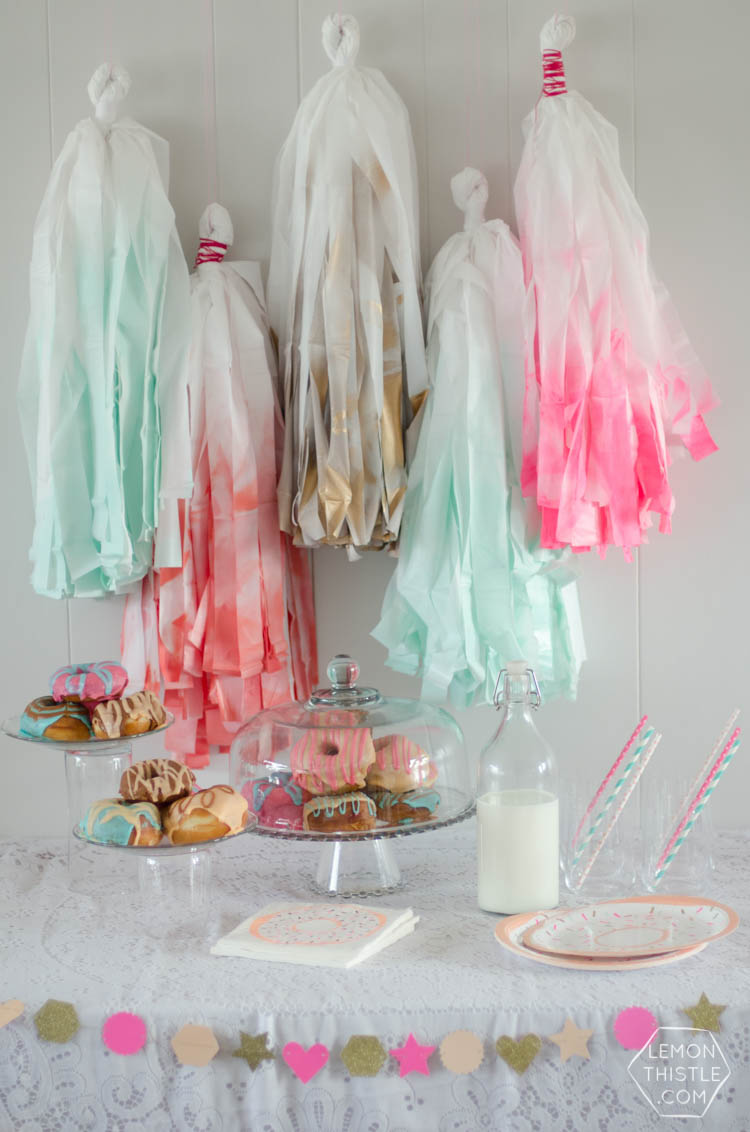
I actually really loved the mint ones so much I’ve kept them. I’m not sure where they’ll go yet- they were hanging in my office and now they’re in my son’s closet. They’re too fun to get rid of!

LIKE IT? PIN IT!

DIY Giant Party Tassels

Category: EntertainTag: Collaboration, Party, Party Decor, Party DIY
Facebook0Tweet0Pin0LinkedIn0
Previous Post: ← Canada 150 Art Installation Canada 150 Hand Lettered Installation
Next Post: Simpler is Sweeter June Tech Wallpapers →

Reader Interactions

Leave a Reply Cancel reply

Your email address will not be published. Required fields are marked *

Sidebar

WOOHOO!

Check your email to confirm!

(+ get your freebies + discounts)


Thanks for dropping by!
I’m Colleen: wife; mom to 4 wild ones; and DIY blogger behind Lemon Thistle. You can expect to see rad DIY, modern home decor, renovations, hand lettering and the occasional party on Lemon Thistle. Read More…

email facebook youtube instagram pinterest

Unless otherwise noted, all content and images are mine. Full posts may not be shared without express written consent. But I love when you share! Feel free to share, without altering, one image with proper credit and a link to the original post. All free printables are for personal use only.

Everyone loves proper credit- if you ever notice something improperly credited, please please shoot me an email and I’ll fix it lightning fast.

Find all my policies right here.
This includes my privacy policy, info on the GDRP compliance and information on affiliate links (Including Amazon Affiliates).

Visit Colleen Pastoor’s profile on Pinterest.

colleenpastoor

My house is never this clean
-
DIY + Home Decor Blogger
Mama of 4 👶🏼🧒🏼👦🏼👧🏼
Renovating our 🏠 the DIY way
🖤 Lettering & ☕️
-
✉️[email protected]

colleen pastoor/lemon thistle
Who has DIY projects on their mind this year?! @ry Who has DIY projects on their mind this year?! @ryobi_canada and I want to help you start knocking those projects off your list by giving away a new nailer and battery set! #ad 
This tool is what we used for this accent wall and all the trim in our home. It’s the one I used to trim out my built in shelving and add the decorative moulding to my geometric barn door. What I’m saying is this thing is a workhorse and I want you to have one too 😉
To enter:
✨Follow me @colleenpastoor and @ryobi_canada 
✨like and save this photo 
✨ tag some friends who’d love to win in the comments! One tag per comment, each is an entry. 
✨ share to your stories for a bonus 5 entries!

Open to Canadians only this time (sorry US friends!) and not associated with Instagram. Closes Friday Jan 22 at noon PST!
Let’s talk about coffee! This is my coffee ‘st Let’s talk about coffee! This is my coffee ‘station’ and the second photo is my dads! I’m talking aaaall about them over on YT today!
Also... see how nice that fresh silicone looks?! 😉 IYKYK
The hallway is finally finished and I’m so stink The hallway is finally finished and I’m so stinking happy! 

It’s felt like such a long time coming for such a small space. Since we moved in 2.5 years ago, this space has seen new doors and hardware, new trim, new floors... twice😅, we changed the boob light to a pot light and I hated it and now it’s got the most beautiful flush mount fixture I’m in love with (thanks @mymitzi!). It finally got some fresh paint and now frames on walls and last but not least... After this weekend, the new floors look like they were here all along (no door jamb gaps!) which was the last thing really bugging me since our flood last year. 

All this to say that home takes time and sometimes getting it right might take a couple tries. Also- the spaces we don’t really think about (hallways) can totally help a house feel like home with some love (and family photos 🥰)
ps. I partnered with #mymitzi to create a tiktok for This makeover... are you following me over there yet?! I’d love if you popped over and said hi!
It’s done! It works! And I’m calling it a grea It’s done! It works! And I’m calling it a great use of my afternoon the other day. Did you catch the stories? These projects both cost me under $10 by using pieces I already had in my home (yay for scraps!) and one package of drawer slides).
You can find the full video about these two kitchen organization projects over on YouTube in collaboration with my friend @love_create_celebrate and her #scrapsmademodern challenge! But for now... I’m rejoicing this coffee maker is off my counter for good 🎉
How’s your January going? Full speed or are you How’s your January going? Full speed or are you taking it a bit slow too? 

I’m not going to lie, I’m easing into this new year thing pretty slowly. All my decorations are still up (we always leave them up til Ukrainian Christmas which is later this week) and I I’ve yet to respond to my emails since before Christmas 😅
I’m enjoying the slowness of it all.
Happy Christmas Eve from our fam to yours 🥰 Happy Christmas Eve from our fam to yours 🥰
Yes, I made the paper bag snowflakes too. Have you Yes, I made the paper bag snowflakes too. Have you? 😅
This year has been one of a kind and I know so man This year has been one of a kind and I know so many people who are taking this year as the push they’ve been waiting for to start a side hustle, start an new career altogether or to just get creative about how they’re making money. So today I’m excited to partner with @kregjig to share some rad projects to make and sell this year! 
Like this rolling storage system I made for my office, that rad dollhouse and the gorgeous bath toy storage. All of these projects are things that I’d personally love to buy for our family and look like they’d be a great return on your time making them! And yes, all of them use #Kreg tools to make them easy to assemble and quick to make! Plus, they’re having a great sale on right now with deals on their K4 and K5 jigs, Rip-Cut and even a hardware jig bundle! There’s never been a better time to get your workshop set up!  #sponsored
Just a peaceful moment and then a real life moment Just a peaceful moment and then a real life moment for ya 🙃 
My #holidayhometour is on the blog and YouTube (I’ll put links in my stories) as part of the #seasonalsimplicity holiday home tour series. I’ll share those too so you don’t miss any!
Load More... Follow on Instagram

Copyright © 2021 · Lemon Thistle · All Rights Reserved · Powered by Mai Theme