This post is sponsored by the fabulous Walnut Hollow. I truly love to craft with their products. You can see all my policies right here.
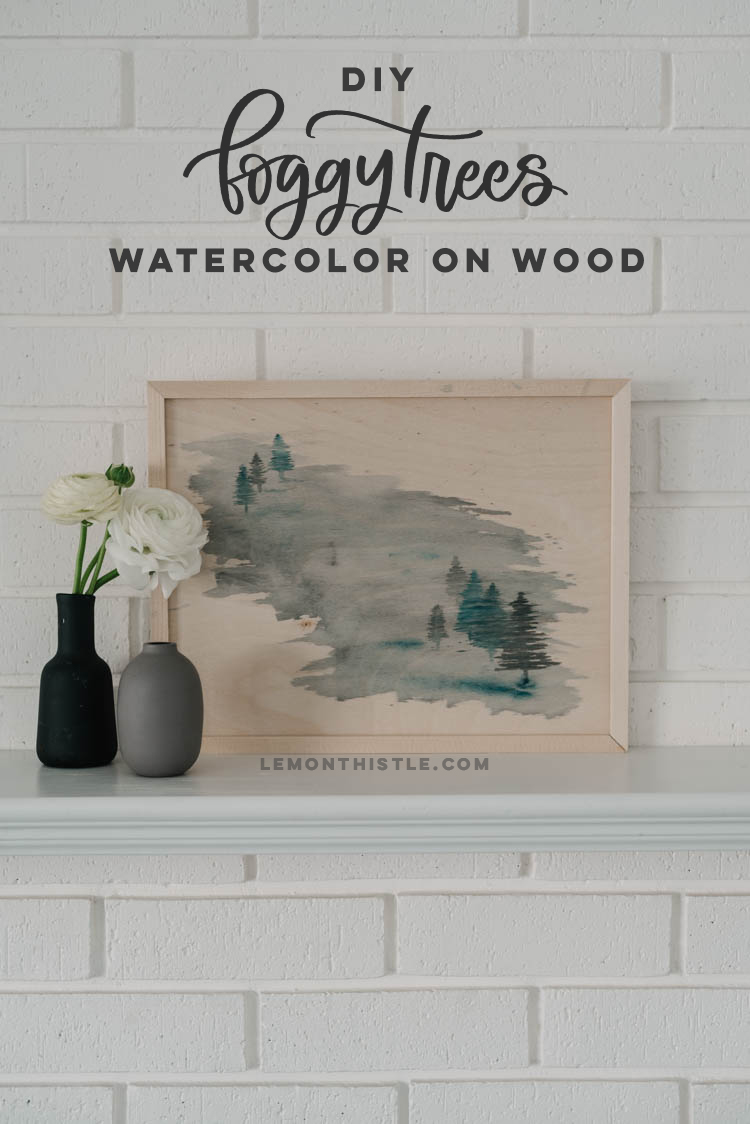
I’m such a sucker for foggy photos and foggy looking art. I mean, one look at the photos I have used the past few months for my tech wallpapers and that is more than clear. And remember that time we put a giant foggy trees scene on our bedroom wall? I’m borderline obsessed. So when I spotted these gorgeous wooden signs from Walnut Hollow and decided to try watercolour painting on them… it was no surprise that I’d pick foggy trees yet again to put on my walls!
These framed wood signs are so nice and lightweight and I love how thin the frame is- perfectly modern. Even better… it cuts one step out of my DIYing! And you know I’m all about shortcuts ;)

Today I’m going to share the tutorial on how to paint your own foggy trees painting like this (I’ve never painted fog or trees in my life, so this is beginner friendly!). I love how it turned out and the warmth the natural wood tones add. Plus… since I didn’t have to make the sign, this painting was really simple to create! Let’s get to it!

For this project, you’ll need:
- Wood sign (I used this one!)
- Large flat paint brush
- Small round paint brush (mine is actually a sword brush)
- Two watercolour paints (I chose a navy and a black from this Kuretake pallet)
- Water
- Pallet (or plastic!) to mix on
- Coffee is recommended but not necessary ;)

The first thing you’ll want to do is make your wash or your fog. I used just the two colours for my painting to keep it simple. I used a navy watercolour and a black watercolour from my Kuretake pallet (this one exactly), but honestly any black and either blue or green would be lovely!
If you’ve never used watercolour before, this video I made last year has some great tips! To pick up the paint, I dip my paint brush in the water, then onto the solid watercolour, mixing until I see the water has taken on the colour of paint. Then I take my paint brush to my pallet and paint little circles to transfer the paint there. This makes it easier to pick up when you’re painting. Then, I dipped my paint brush back in the water to lighten up what I had on my brush and painted it on to the canvas.
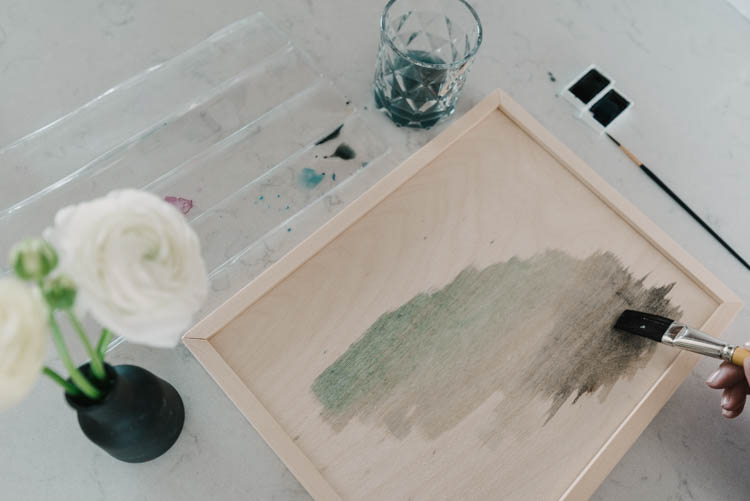

For the fog, I started really light with mostly water, then adding in the darker spots (by picking up paint from my pallet). I used a large flat brush for this.I stuck to an ombre type wash where I used blue on the top and faded to the black at the bottom. I kept it organic by using the edge of the brush to pull the paint out from the main wash. I switched to my small round brush to add in some darker details before letting it dry completely.

Make sure to let it dry completely before adding the trees. I took three shots at this painting. The first, I didn’t wait until it dried completely and the trees just blur into nothing. I layered blue and black trees, just keeping in mind that any wet space will blur (so layering trees should be done slowly if you want clarity). To paint the trees, I took the EASIEST way out there. I basically painted the cone of the tree with tiny little back and forth lines. Then, I dragged a wet paint brush from the top all the way to the bottom to create the centre line and stump. I went back in and added some irregular to the cone shape of the tree to keep with the organic feel of the trees.


I also added in some darker shadows underneath the trees. I like how this set them in the foggy scene. I slowly added more trees until I was happy with how it looked. I have to work really hard to NOT add too much (because then I don’t like it anymore!) but have so much fun painting that I often try to add more in to make it better. Keep in mind that the paint will lighten up a little bit as it dries though!
I added lettering on one of my signs. I love the way this ‘Be Still’ look but I’ve gifted that one and am keeping the plain foggy trees for myself!


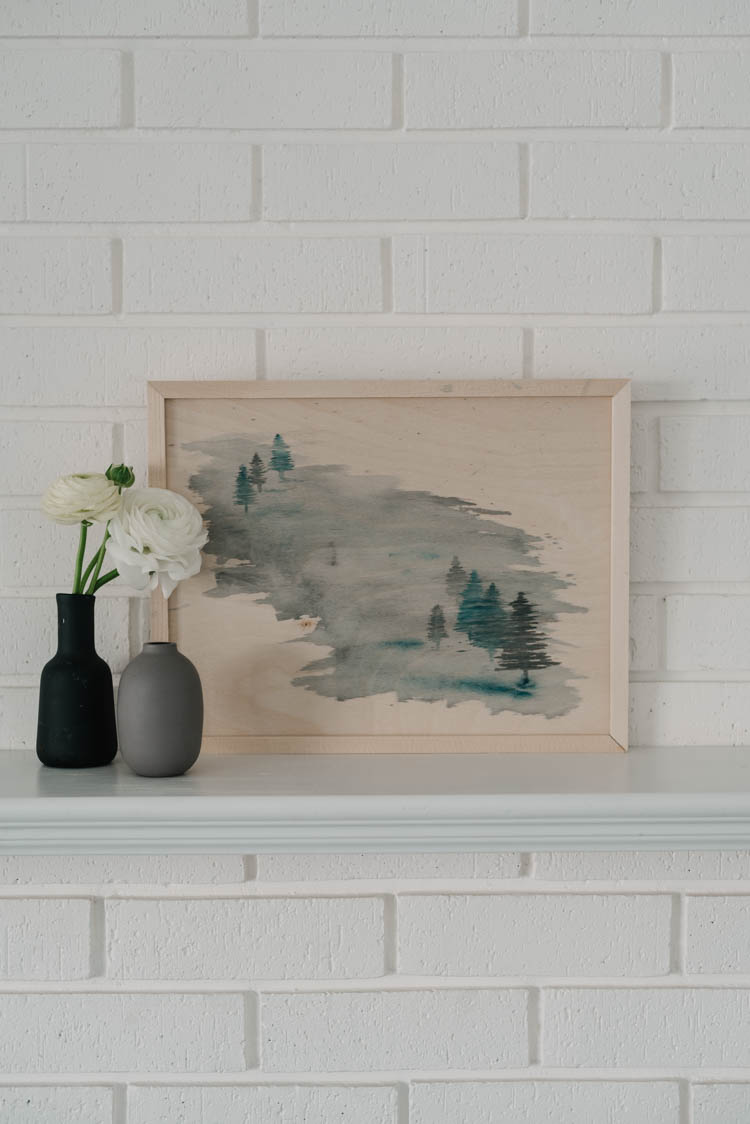
Alright… that’s it! I so hope that you enjoyed this tutorial- I had such a fun time playing with it to get it just how I liked it! I’ve moved this down to my office studio but since that space is dark and not very pretty right now- I photographed it up on my mantel. But tell me- what would you want to try painting on a wood sign like this? They also have some cute square ones!
PSST! Want to see the other projects I’ve made using Walnut Hollow wood products?! Check them all out here!
 Fresh Spring Home Tour
I was thinking of doing a version of your DIY Foggy Trees Watercolor on wood. I wanted to mask out letters with removable vinyl. Do you think the watercolor will bleed under the vinyl mask anyways?
Thanks for any advice! Very pretty design :)