• Skip to main content
  • Skip to header left navigation
  • Skip to header right navigation
  • Skip to site footer
  • Shop
  • Get The Email
  • Work With Me
  • About
  • Search

  • DIY
    • DIY Home Decor
    • With Power Tools
    • Renovation
    • For Kids
    • For Parties
    • Wearable
    • Organization
    • Cricut Crafts
  • Home Decor
    • Room Reveals
    • Kid Friendly
    • DIY Home Decor
    • Renovation
  • Lettering
    • Hand Lettered Printables
    • Free Practice Sheets
    • Handlettered DIY
    • Free Brush Lettering Quickstart Guide
Lemon Thistle

Lemon Thistle

Rad DIY, Lettering and Design for Real People

  • Printables
    • For Cricut
    • Party Printables
    • Home Decor Printables
    • Bachelor Bingo
    • Handlettering Practice Sheets
    • All Free Printables
  • Entertain
    • Party Printables
    • Party DIY
    • Tablescapes
    • Kids Parties
  • Blog

DIY Pocket Tees with Cricut

Sep 26

*This post is sponsored by Cricut, as always- I only share companies I truly love! Affiliate links in this post. See my policies here*

DIY Pocket Tees with Cricut

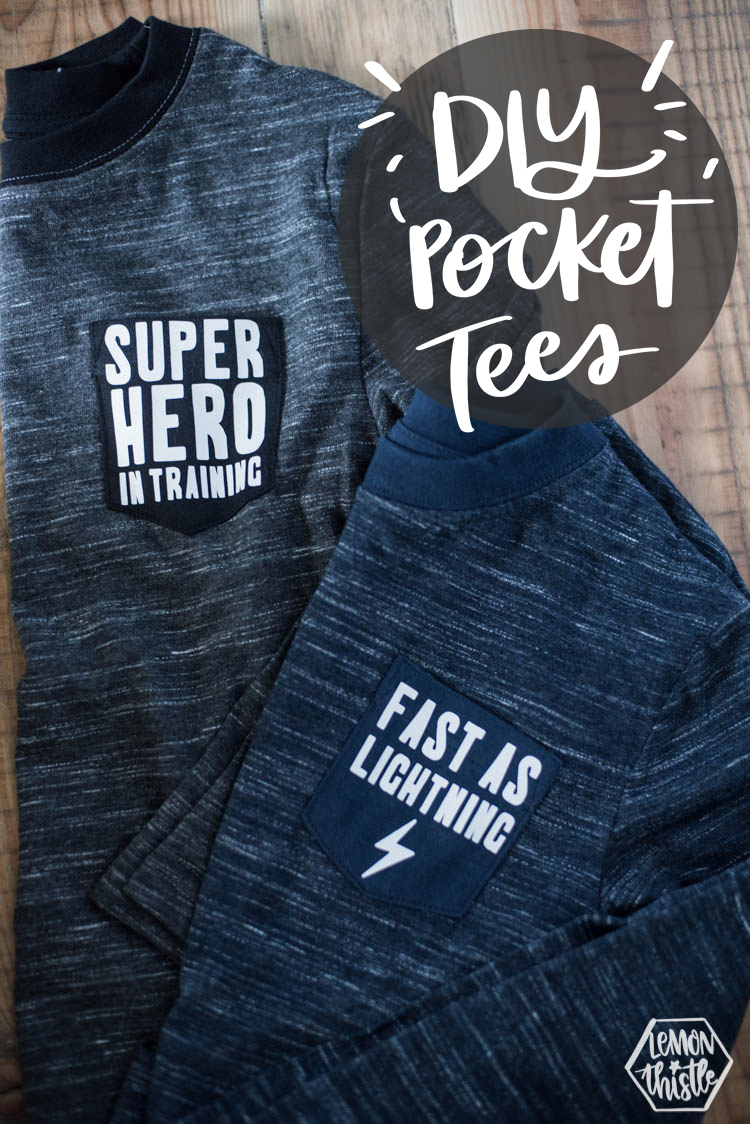
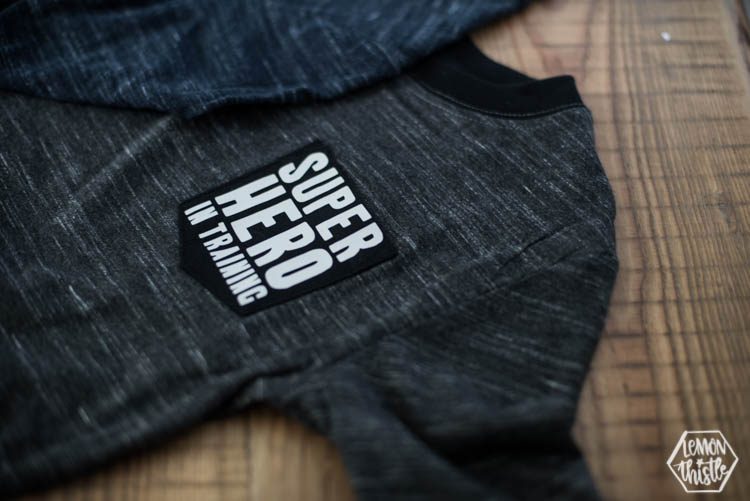
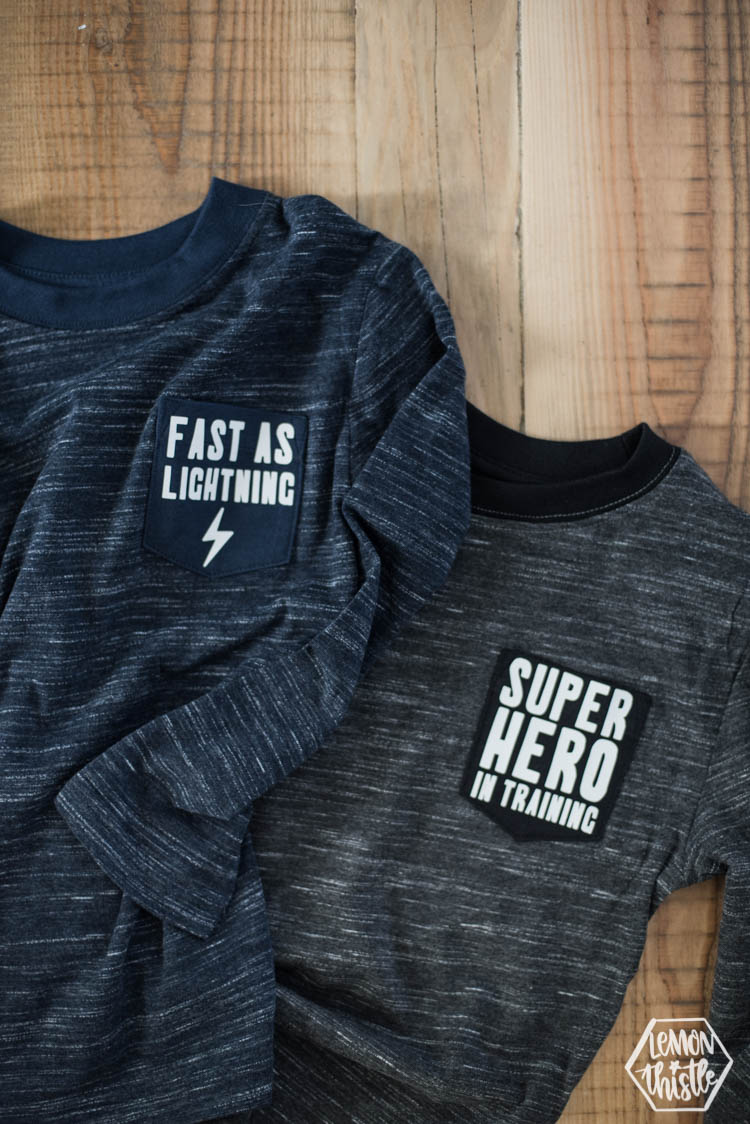
Can I make a confession? One that goes against all crafty mamas out there (I’m assuming). I don’t like shirts with sayings on them. Or at least… I’m pretty picky. The bright colours and glitter… that’s all for the kids and I know they love it, but I’m usually not. These ones however? Cramming the saying of their choice into 3 square inches? I actually LOVE these. And want to make one for myself. Who am I even?

DIY Pocket Tees with Cricut

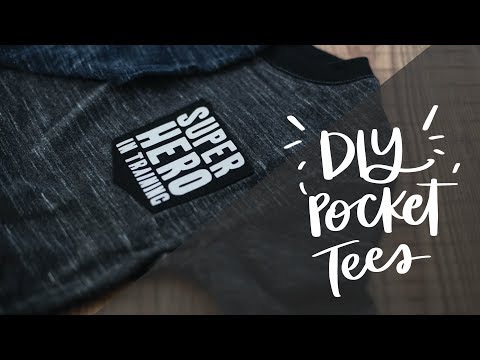
These shirts are so easy to make and they use of scraps of your iron on so they’re the perfect craft to use up your stash and customize some of your plain pocket tees! I share all the DIY instructions in this video below but if you’re more of a read it at work type of person, I’ve got you covered with photos/text below.

Supplies used for these DIY Pocket Tees:

  • Cricut Design Space Project (my designs)
  • Cricut Iron On Lite (I used White)
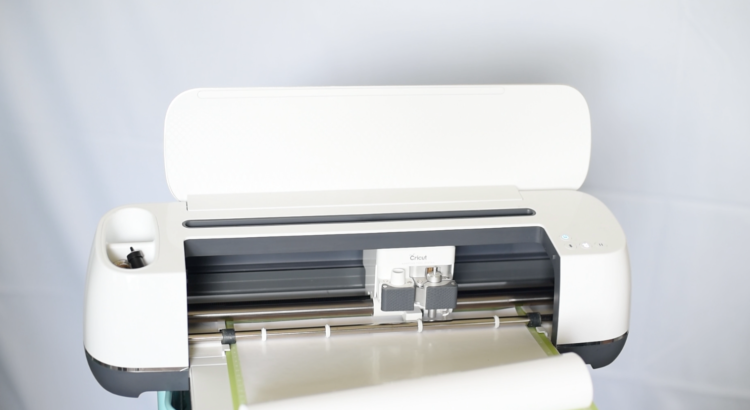
  • Cricut Maker with fine point blade (comes with)
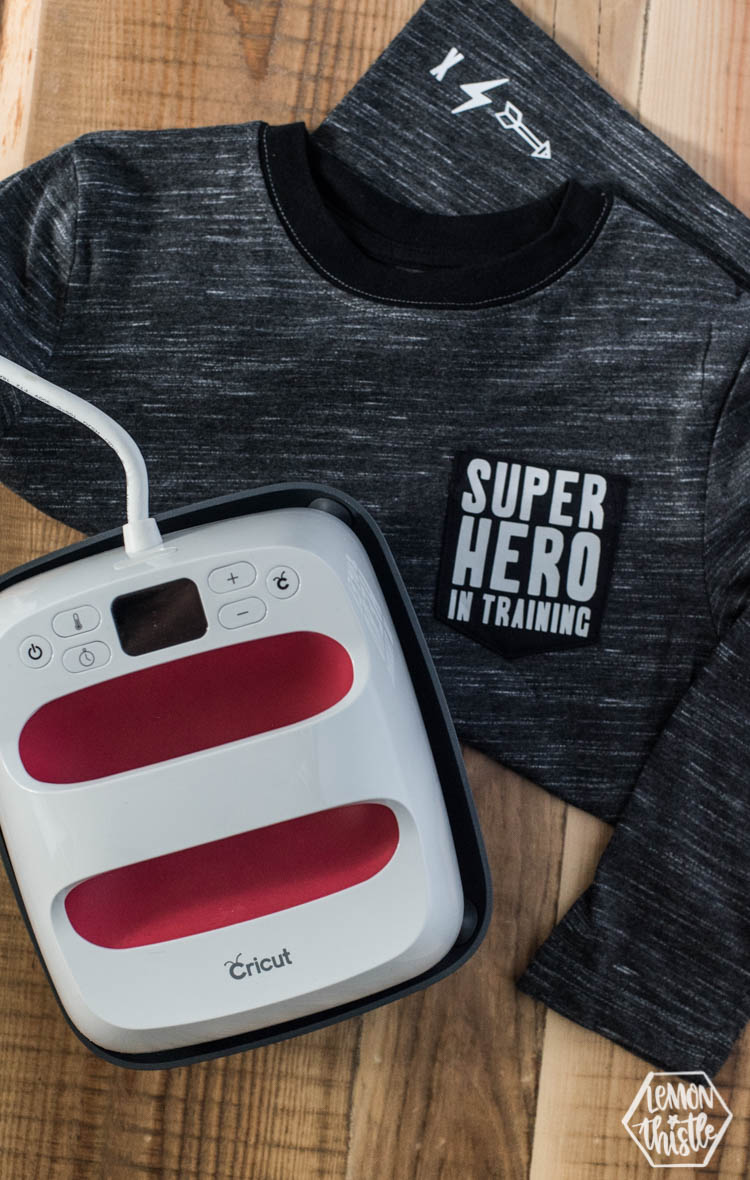
  • Cricut EasyPress 2 6×7 with Mat
  • Font (A Frightful Affair) included in Cricut Access

Screen Capture: Making text designs using the attach tool in Cricut Design Space

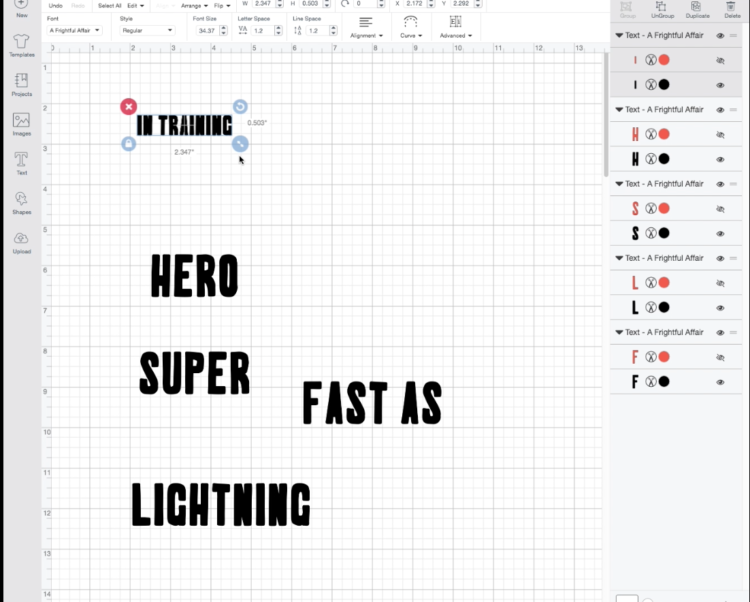
Alright, the first thing you’ll need to do is cut out your designs! You can totally use mine, but if you want to make your own- here’s the tips. Make each line of text it’s own text box so you can size it independently. I used a font called A Frightful Affair and turned off the top layer. This font is included in Cricut Access. Make sure to measure the pocket on your tees and size your text accordingly! when you’re happy with the size and layout, select all the layers in that one pocket design and click ‘Attach’ in your right side panel. This will keep them together when you go to cut them.

Cutting out Iron On Lite with Cricut Maker

Weeding Iron on Lite

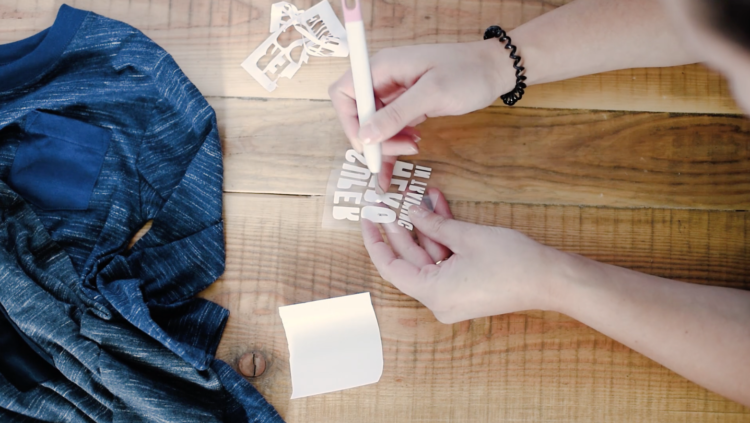
When you’re cutting any iron on designs, make sure to select ‘Mirror On’ and put the shiny side of your iron on material down on the mat! When it’s all cut out, go ahead and weed it while your EasyPress 2 or iron or whatever heats up.

Okay, can we just talk about how amazing this little EasyPress 2 is?! I loved my first EasyPress but now they come in different sizes, with software upgrades(!?), and perfectly even heat… I’m loving this thing! I used the 6×7″ EasyPress 2 for this project with the EasyPress Mat (helps hold the heat) and followed the instructions for a standard Iron on Lite Material on cotton (you can find all the guidelines here).

Using Iron on Lite with Cricut EasyPress 2

Using Iron on Lite with Cricut EasyPress 2

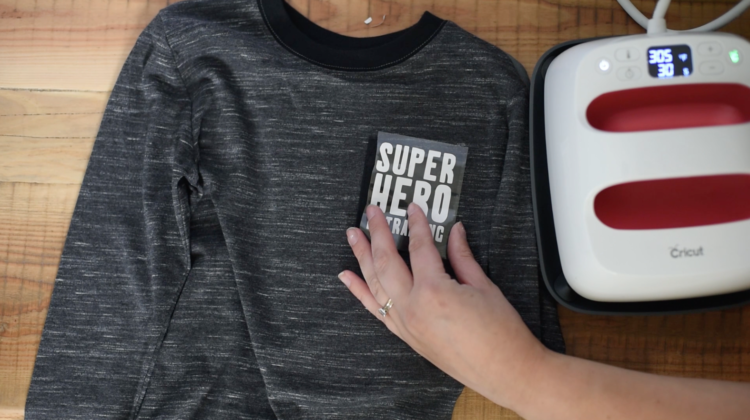
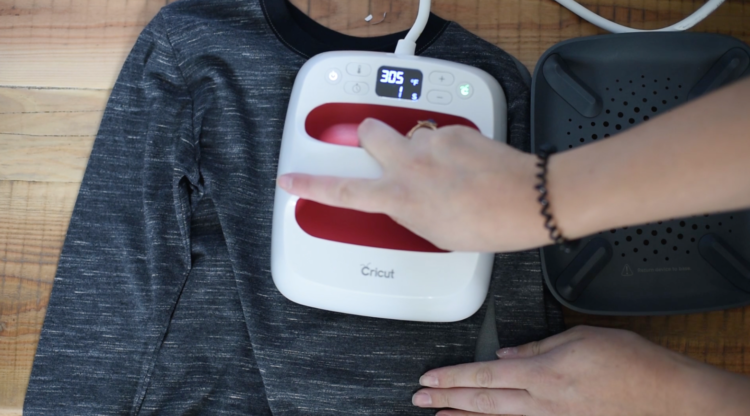
Make sure to heat up your fabric first, apply the iron on transfer according to your settings, then flip it over and add another 15 seconds or so of heat on the reverse. Then if you’re using iron on lite like me- warm peel! This makes a big big difference in how long the transfer lasts through washes I’ve realized (the hard way).

You’ll see in this next photo that I added a ‘tag’ kind of on the back bottom of Emmitt’s tee. He really wanted these symbols on there and there was no more room on the pocket so we came up with this idea. It’s very super hero-ish, he tells me.

DIY Pocket Tees with Cricut

DIY Pocket Tees with Cricut
Alright, that’s IT! That’s ALL. So. Freaking. Easy. You guys! I’m obsessed and already have designs to cut out for Aubrey and I. Tell me… what would you put on yours?!

This is a sponsored conversation written by me on behalf of Cricut. The opinions and text are all mine.

Category: DIYTag: Craft, Cricut, Kids DIY, Sponsored, Wearable
Facebook0Tweet0Pin0LinkedIn0
Previous Post: « Organic Modern Thanksgiving Tablescape
Next Post: DIY Handlettered Pumpkins- tips and tricks! hand lettering with paint marker on pumpkins »

Reader Interactions

Comments

  1. Gay Prewett

    Oct 14 at 2:20 pm

    Thanks for this idea! So cute, and will make nice gifts for birthdays or Christmas.

    Reply

Leave a Reply Cancel reply

Your email address will not be published. Required fields are marked *

Sidebar

WOOHOO!

Check your email to confirm!

(+ get your freebies + discounts)


Thanks for dropping by!
I’m Colleen: wife; mom to 4 wild ones; and DIY blogger behind Lemon Thistle. You can expect to see rad DIY, modern home decor, renovations, hand lettering and the occasional party on Lemon Thistle. Read More…

email facebook youtube instagram pinterest

Unless otherwise noted, all content and images are mine. Full posts may not be shared without express written consent. But I love when you share! Feel free to share, without altering, one image with proper credit and a link to the original post. All free printables are for personal use only.

Everyone loves proper credit- if you ever notice something improperly credited, please please shoot me an email and I’ll fix it lightning fast.

Find all my policies right here.
This includes my privacy policy, info on the GDRP compliance and information on affiliate links (Including Amazon Affiliates).

Visit Colleen Pastoor’s profile on Pinterest.

colleenpastoor

My house is never this clean
-
DIY + Home Decor Blogger
Mama of 4 👶🏼🧒🏼👦🏼👧🏼
Renovating our 🏠 the DIY way
🖤 Lettering & ☕️
-
✉️[email protected]

colleen pastoor/lemon thistle
What’s next on your project list? Spring is teas What’s next on your project list? Spring is teasing us so we’re starting on outdoor projects around here!
$100 play room makeover is DONE! This room has se $100 play room makeover is DONE! 
This room has seen so much change over the past year (swipe over to see it 2 weeks ago, 10 months ago and 1 year ago!). I took this last week to make over this space with mostly pieces we already had and I’m so so happy with the results! It’s a good reminder that some hard work, creativity and of course paint can work magic.
I’m sharing all the details (and that under stairs space!) on YouTube today (link in my stories!) and so is my friend @thediymommy (she made over her daughters bedroom for $100!).
Do you think dried grasses are only for fall decor Do you think dried grasses are only for fall decor? I used to think so, but these bunny tail grasses are too cute to put in a bin until next year. Plus the name sounds like spring decor to me ;) What do you think?

Ps. Today’s going to be a full day of playroom progress! I’ll share as much as I can in stories as I go :)
Paint is honestly magic.✨ I am so excited to sha Paint is honestly magic.✨
I am so excited to share this kitchen makeover with you guys! These are the same cabinets, just painted (countertops too!) And some updated finishes. I blogged the full before and after if you’d like to check it out!
Big thank you to @schaubhardware and @wagnerspraytech for partnering to make this space possible!
Ps. Most of the work done here was by the homeowners so if you’re thinking about taking on a makeover in your own home, maybe this is the encouragement you need 😘
As I’m sitting here staring at the dishes on the As I’m sitting here staring at the dishes on the counter while I try to focus on editing a video, I thought it’s as good of time as any to share this reminder 😘
I feel like I’ve lucked into the best job out th I feel like I’ve lucked into the best job out there, but then I’m also so aware of the amount of work it took to get here. Today I chatted with two of my blog friends in an Instagram live about DIY blogging as a job and answered some questions we get asked all the time about our work and the balance of it all! I saved it as an IGTV so you can watch it if you missed 🥰

Big thanks to @love_create_celebrate and @thediymommy for chatting with me today! One of the biggest perks of this job is all the talented ladies I’ve had the privilege of meeting and calling friends- these two are top of that list!
I’m having some fun in stories with a little giv I’m having some fun in stories with a little giveaway guessing game. I’d love if you played along!

I put up a question box and you can guess my next room makeover and the guesses are all over the place. Some are projects on my dream list, some are rooms I wish to even have in my house and some are spaces we’ve already tackled! Like our main bathroom ✨ these photos are from my spring home tour I shared over on the blog earlier this week. Hung up a pennant and called it decked for spring 🐣
Who is ready for spring?! I know we totally are- w Who is ready for spring?!
I know we totally are- we’ve been soaking up outside time this week with the kids home on spring break but over on the blog... it’s spring home tour time! I am sharing my home all ready for spring along with some amazing bloggers as part of the #seasonalsimplicity spring series!
You know I love a touch of DIY decor in every spac You know I love a touch of DIY decor in every space in my home, so I’m so excited to be partnering with @HGTVCanada to celebrate #$aveMyReno being back TONIGHT! #partner
 
My favourite thing about $ave My Reno is that they encourage home owners to get involved and DIY to maximize budget. They even help kids get involved- it’s everything Shane and I work towards in our own projects. You can catch it every Tuesday at 9/9:30PM EP on @HGTVCanada or catch up on episodes on STACKTV through @primevideoca!
 
PS. I made those tie dye pillows, similar to the ones featured in tonight’s episode! You can catch my stories to see the super speedy how-to :)
Load More... Follow on Instagram

Copyright © 2021 · Lemon Thistle · All Rights Reserved · Powered by Mai Theme