• Skip to main content
  • Skip to header left navigation
  • Skip to header right navigation
  • Skip to site footer
  • Shop
  • Get The Email
  • Work With Me
  • About
  • Search

  • DIY
    • DIY Home Decor
    • With Power Tools
    • Renovation
    • For Kids
    • For Parties
    • Wearable
    • Organization
    • Cricut Crafts
  • Home Decor
    • Room Reveals
    • Kid Friendly
    • DIY Home Decor
    • Renovation
  • Lettering
    • Hand Lettered Printables
    • Free Practice Sheets
    • Handlettered DIY
    • Free Brush Lettering Quickstart Guide
Lemon Thistle

Lemon Thistle

Rad DIY, Lettering and Design for Real People

  • Printables
    • For Cricut
    • Party Printables
    • Home Decor Printables
    • Bachelor Bingo
    • Handlettering Practice Sheets
    • All Free Printables
  • Entertain
    • Party Printables
    • Party DIY
    • Tablescapes
    • Kids Parties
  • Blog

DIY Metallic Mini Honeycomb Garland

Jan 22

DIY Metallic Mini Honeycomb Garland- so fun for a party or just home decor!

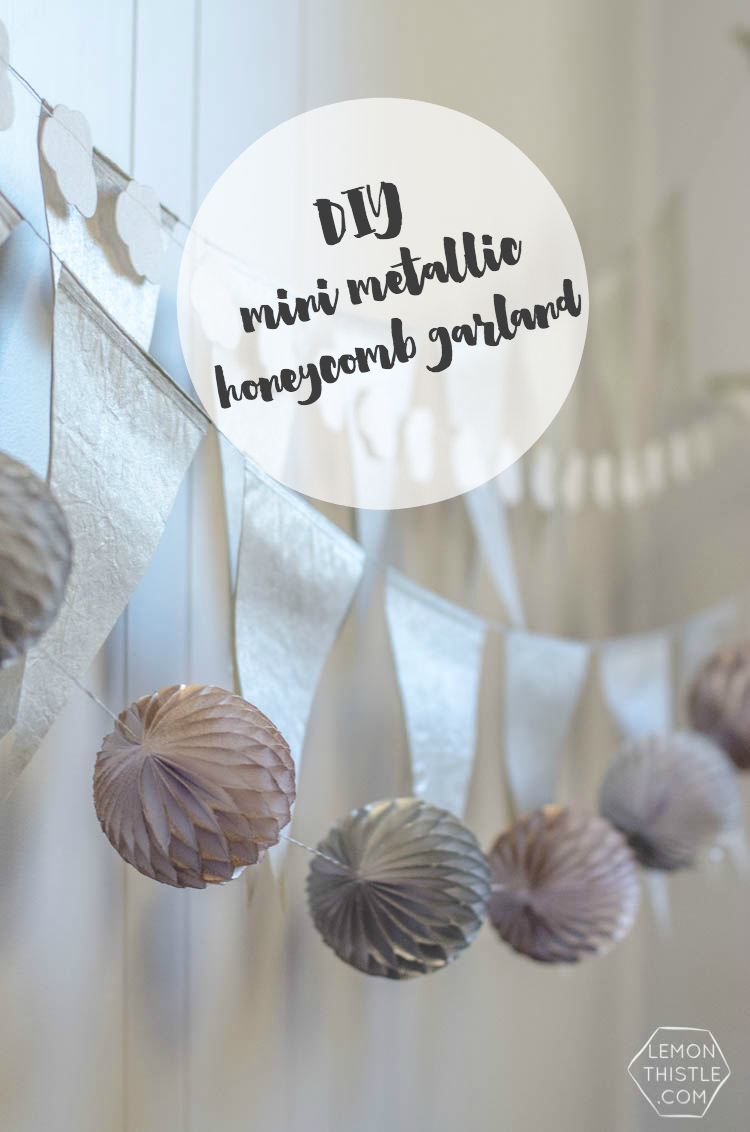
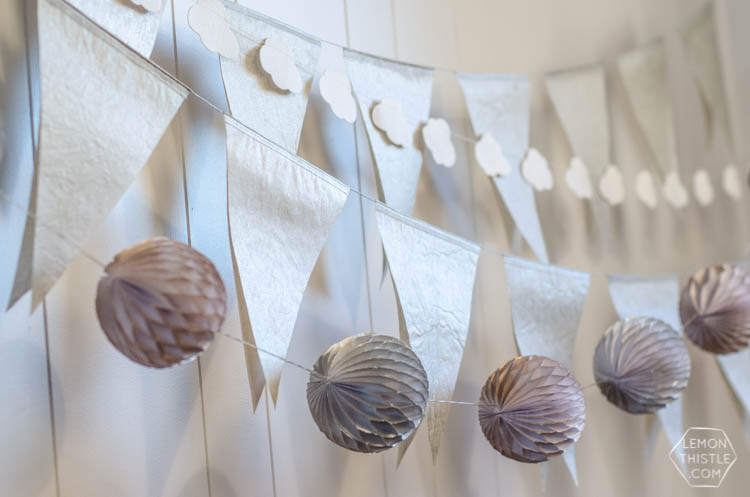
I’m excited to be sharing this DIY Metallic Mini Honeycomb Garland with you today! You may have spotted it in my bedroom update last week, but originally I’d crafted this baby for our kiddos room. We’ve been adding in mixed metals to our home decor and I wanted to create something that used the metallics without looking too grown-up. This fun garland more than fits the bill- I love decor that doesn’t take itself too seriously. And if you will be using it in a kid’s space- By using paper instead of the traditional tissue, this garland will stand up to a bit more love from little hands.

Moody Boho Bedroom Update (and chalk spraypainted dressers!)

DIY Metallic Mini Honeycomb Garland- so fun for a party or just home decor!

DIY Metallic Mini Honeycomb Garland- so fun for a party or just home decor!

Speaking of little hands… I photographed this garland when I first made it last year (I first shared it over at The Land of Nod). Aren’t the twins SO little!? My goodness I can’t believe how big they are now. And how less into photo shoots they are. *Sigh* I might have to start bribing them to participate in my photo shoots in the future now that these pics have reminded me how cute DIYs look next to little people!

To make your own Mini Honeycomb Garland, you’ll need:

  • White printer paper
  • 5mm Double sided tape (and heaps of it!)
  • Scissors
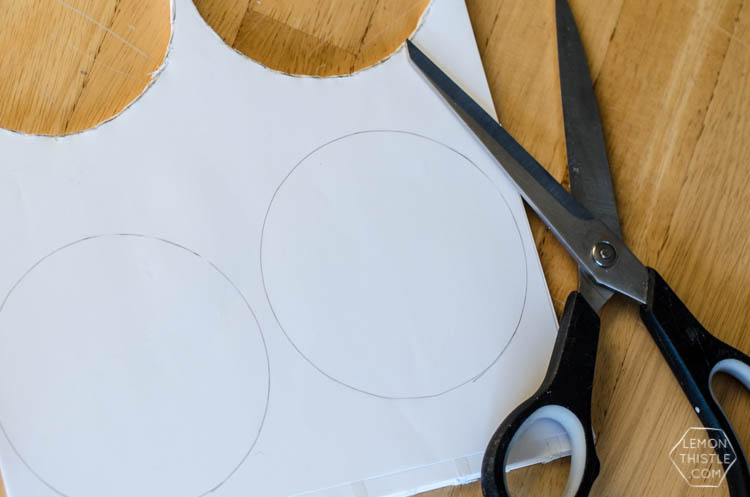
  • Pencil and round object to trace (mine was 4″)
  • String or embroidery floss
  • Spray paint if desired (I used Krylon Satin Nickel and Krylon Copper Metallic)

DIY Metallic Mini Honeycomb Garland- so fun for a party or just home decor!

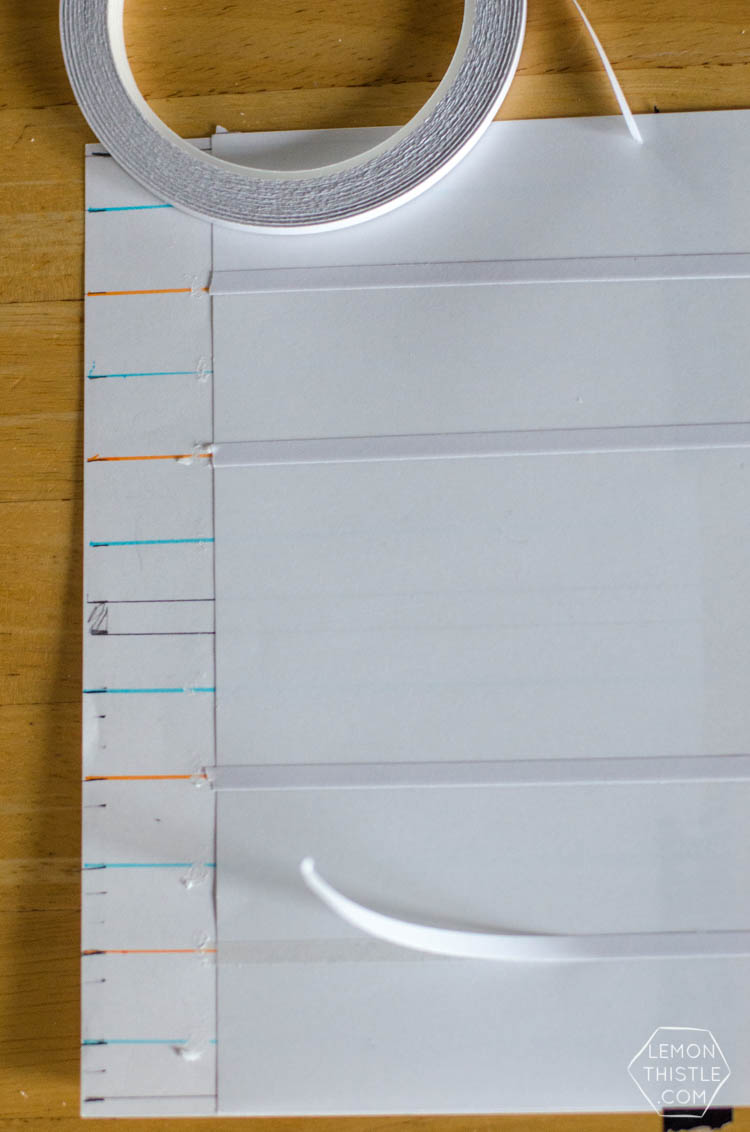
To make the mini honeycombs, you’ll need to create a template showing where you will need to tape. Taping first means you won’t be cutting 1000 circles. I may or may not have started cutting circles before I clued into this. My honeycomb shapes are 4″ round, so I marked four inches on a sheet of paper with pencil. This size allowed me to fit two across on a standard sheet of paper. Then, mark even spaces in alternating colours. I made mine .75″ apart and am happy with how that turned out. Tape your template to the table and lay your first sheet of paper on top. Use your double sided tape and run pieces across the paper, lining up with one of the colours. Peel back the tape backing before placing your next sheet of paper on top. Then, add tape on the alternate coloured lines. I used 25 sheets of paper per honeycomb ball. I tried more at first and it was so dense you couldn’t tell it was ‘honeycomb’. Those are the ones the kids ended up playing with like balls.

DIY Metallic Mini Honeycomb Garland- so fun for a party or just home decor!

DIY Metallic Mini Honeycomb Garland- so fun for a party or just home decor!

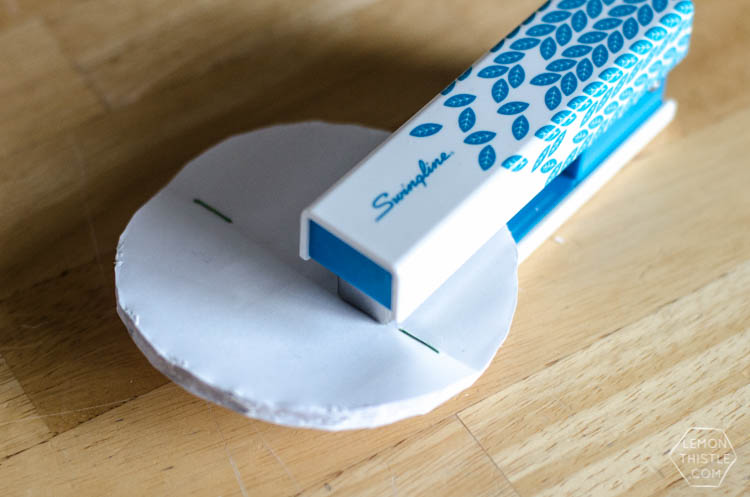
For your sanity, I’d turn on Netflix. Right now I’m really into Community… so you could give that a go and we can talk about it ;) This is super easy to do but it takes a bit of time and is repetitive- you can totally multi-task with some re-runs! When you’ve stuck together 25 sheets of paper, trace your circle on top and cut it out. Make sure to line up the circle with the top and bottom lines you first drew (my 4″ pencil lines). Mark the centre of the circle and staple it. Fold the circle in half a few times (harder than it sounds, that sucker is thick!) to create a crease in the centre where you stapled, then cut a section out of the middle. This cut will help it bend easier- trust me, don’t even try doing it without.

DIY Metallic Mini Honeycomb Garland- so fun for a party or just home decor!

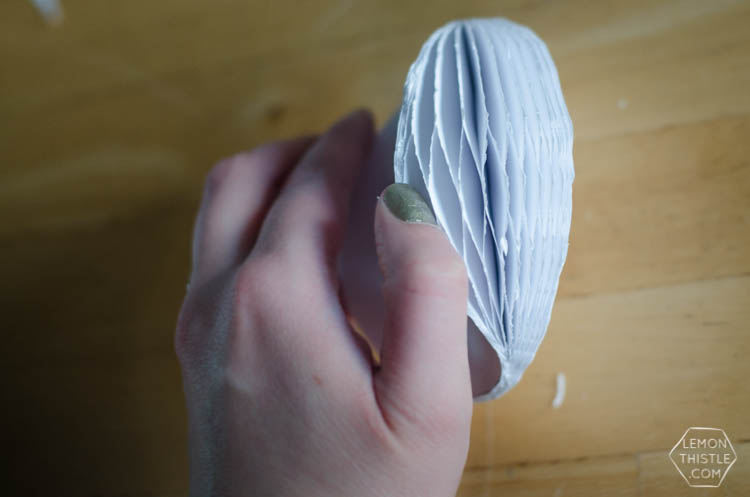
Now, apply double sided tape to each side of your circle and open it, sticking the faces together. Make sure to insert your string in one of the sides (as shown in the photo) before fully assembling! Again, from experience- it’s easiest to string them up this way. Can you tell that this was trial and error? I blame it on the TV watching while crafting… but hey, that’s my favourite way to craft.

DIY Metallic Mini Honeycomb Garland- so fun for a party or just home decor!

DIY Metallic Mini Honeycomb Garland- so fun for a party or just home decor!

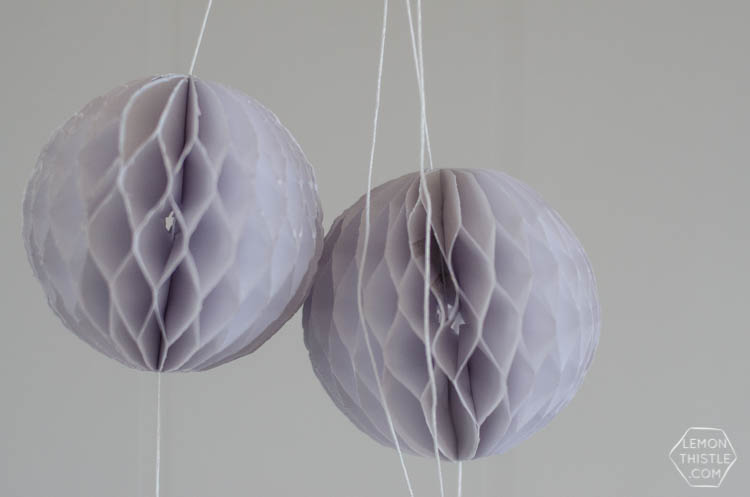
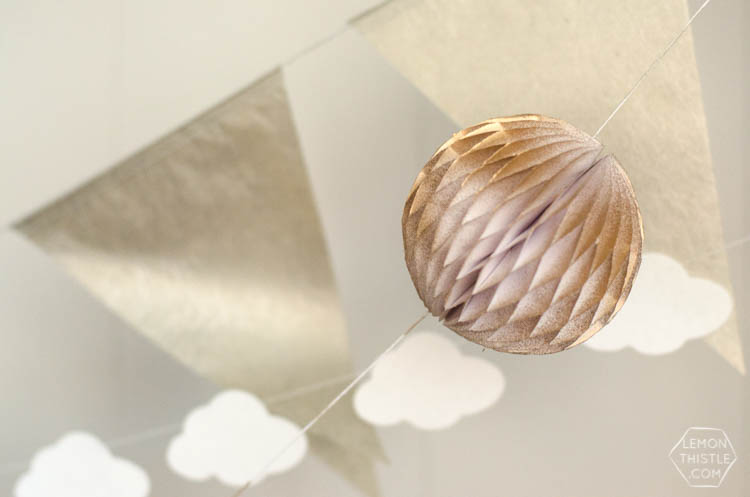
Ta-Da! Now you’ll have plain white honeycomb balls on a garland. I contemplated leaving mine this way- they were so cute and simple! But I stuck to my plan for mixed metallics and misted the balls with copper and nickel metallic spray paint. You could mist them with any colour you like really, I’d love to see a neon version.

DIY Metallic Mini Honeycomb Garland- so fun for a party or just home decor!

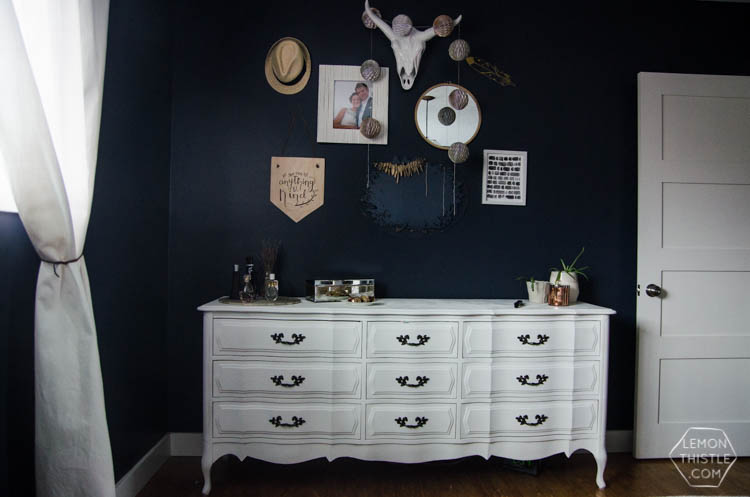
So tell me… what do you think? Perfect for a party? Would you hang a garland like this in your home for decor? I’m a total sucker for garlands as decor, I think I’ve said it before. We have one in *almost* every room of our house. And some rooms (like our master bedroom where this is hung) have more than one. They shouldn’t be kept on reserve for special occasions, they totally make every day more fun!

Category: DIY, EntertainTag: Craft, Decorations, DIY Home Decor, Garland, Kid Friendly Home, Kids DIY, Metallics, Party Decor, Party DIY
Facebook0Tweet0Pin0LinkedIn0
Previous Post: « DIY Faux Metal Letters- such a classy decoration! DIY Faux Metal Letters
Next Post: Red Velvet Whoopee Pies Red Velvet Whoopee Pies- perfect for valentines day!! »

Reader Interactions

Leave a Reply Cancel reply

Your email address will not be published. Required fields are marked *

Sidebar

WOOHOO!

Check your email to confirm!

(+ get your freebies + discounts)


Thanks for dropping by!
I’m Colleen: wife; mom to 4 wild ones; and DIY blogger behind Lemon Thistle. You can expect to see rad DIY, modern home decor, renovations, hand lettering and the occasional party on Lemon Thistle. Read More…

email facebook youtube instagram pinterest

Unless otherwise noted, all content and images are mine. Full posts may not be shared without express written consent. But I love when you share! Feel free to share, without altering, one image with proper credit and a link to the original post. All free printables are for personal use only.

Everyone loves proper credit- if you ever notice something improperly credited, please please shoot me an email and I’ll fix it lightning fast.

Find all my policies right here.
This includes my privacy policy, info on the GDRP compliance and information on affiliate links (Including Amazon Affiliates).

Visit Colleen Pastoor’s profile on Pinterest.

colleenpastoor

My house is never this clean
-
DIY + Home Decor Blogger
Mama of 4 👶🏼🧒🏼👦🏼👧🏼
Renovating our 🏠 the DIY way
🖤 Lettering & ☕️
-
✉️[email protected]

colleen pastoor/lemon thistle
What’s next on your project list? Spring is teas What’s next on your project list? Spring is teasing us so we’re starting on outdoor projects around here!
$100 play room makeover is DONE! This room has se $100 play room makeover is DONE! 
This room has seen so much change over the past year (swipe over to see it 2 weeks ago, 10 months ago and 1 year ago!). I took this last week to make over this space with mostly pieces we already had and I’m so so happy with the results! It’s a good reminder that some hard work, creativity and of course paint can work magic.
I’m sharing all the details (and that under stairs space!) on YouTube today (link in my stories!) and so is my friend @thediymommy (she made over her daughters bedroom for $100!).
Do you think dried grasses are only for fall decor Do you think dried grasses are only for fall decor? I used to think so, but these bunny tail grasses are too cute to put in a bin until next year. Plus the name sounds like spring decor to me ;) What do you think?

Ps. Today’s going to be a full day of playroom progress! I’ll share as much as I can in stories as I go :)
Paint is honestly magic.✨ I am so excited to sha Paint is honestly magic.✨
I am so excited to share this kitchen makeover with you guys! These are the same cabinets, just painted (countertops too!) And some updated finishes. I blogged the full before and after if you’d like to check it out!
Big thank you to @schaubhardware and @wagnerspraytech for partnering to make this space possible!
Ps. Most of the work done here was by the homeowners so if you’re thinking about taking on a makeover in your own home, maybe this is the encouragement you need 😘
As I’m sitting here staring at the dishes on the As I’m sitting here staring at the dishes on the counter while I try to focus on editing a video, I thought it’s as good of time as any to share this reminder 😘
I feel like I’ve lucked into the best job out th I feel like I’ve lucked into the best job out there, but then I’m also so aware of the amount of work it took to get here. Today I chatted with two of my blog friends in an Instagram live about DIY blogging as a job and answered some questions we get asked all the time about our work and the balance of it all! I saved it as an IGTV so you can watch it if you missed 🥰

Big thanks to @love_create_celebrate and @thediymommy for chatting with me today! One of the biggest perks of this job is all the talented ladies I’ve had the privilege of meeting and calling friends- these two are top of that list!
I’m having some fun in stories with a little giv I’m having some fun in stories with a little giveaway guessing game. I’d love if you played along!

I put up a question box and you can guess my next room makeover and the guesses are all over the place. Some are projects on my dream list, some are rooms I wish to even have in my house and some are spaces we’ve already tackled! Like our main bathroom ✨ these photos are from my spring home tour I shared over on the blog earlier this week. Hung up a pennant and called it decked for spring 🐣
Who is ready for spring?! I know we totally are- w Who is ready for spring?!
I know we totally are- we’ve been soaking up outside time this week with the kids home on spring break but over on the blog... it’s spring home tour time! I am sharing my home all ready for spring along with some amazing bloggers as part of the #seasonalsimplicity spring series!
You know I love a touch of DIY decor in every spac You know I love a touch of DIY decor in every space in my home, so I’m so excited to be partnering with @HGTVCanada to celebrate #$aveMyReno being back TONIGHT! #partner
 
My favourite thing about $ave My Reno is that they encourage home owners to get involved and DIY to maximize budget. They even help kids get involved- it’s everything Shane and I work towards in our own projects. You can catch it every Tuesday at 9/9:30PM EP on @HGTVCanada or catch up on episodes on STACKTV through @primevideoca!
 
PS. I made those tie dye pillows, similar to the ones featured in tonight’s episode! You can catch my stories to see the super speedy how-to :)
Load More... Follow on Instagram

Copyright © 2021 · Lemon Thistle · All Rights Reserved · Powered by Mai Theme