
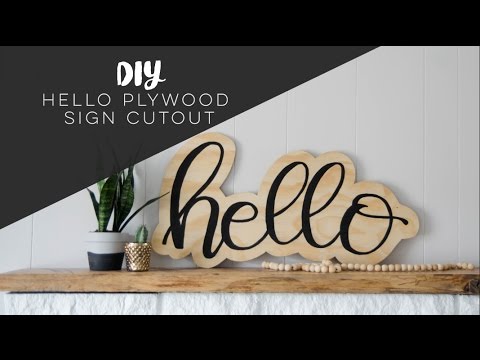
Today I’m excited to be joining up with Remodelaholic again on a challenge. Last time we tackled pallet projects and I made a rad hexagon side table for my deck and this time? We’re talking plywood! Here’s the thing about plywood- I think it got a bad rep for a while. I think we’ve all seen one or two plywood projects in our time that we immediately think of when someone says plywood. BUT I think I’m in the clear to say that plywood is getting cool again! There’s some really rad plywood projects in this challenge but the project that totally inspired this is this ‘YAY’ wall from Vintage Revivals– it’s 3D-esque and so cool. But I thought it would be fun to get the black on plywood cutout look with script lettering but was intimidated by having to map out 3D so this is where we landed!
I am so happy with how it turned out. Right now it’s sitting on my kid’s art table (also plywood!), leaning up against the wall and is so playful next to all their half colored pages and pencil crayons. But it photographed way better on my mantle. Shane told me that I needed to get more creative because I photograph everything here. But the light is just so great! But just to make him happy, I also snapped one in front of our dining room map.

I’ve gone ahead and made this DIY into a video tutorial and if you’ve seen my videos before, you’ll be impressed by this one BECAUSE I’ve actually recorded every step of the process in two different locations. That’s high tech for me ;) But if you happen to be reading this at work (you rebel, you), I’ve pulled some screenshots from the video to detail the instructions here for you. But let’s start with the video… shall we?!
See that… video from inside my house AND outside. Just imagine what I’ll be able to do next ;)
For this project, you’ll need a nice sanded plywood, a paint marker (these babies are my absolute fave!), a pencil and eraser, a jigsaw with fine blade, and sandpaper (I used 150 grit). You can get smaller sheets of the nice sanded plywood in the back corner of Home Depot. The first thing you’ll want to do is mockup your design. I just brush lettered ‘hello’ on paper using my Tombow Dual Brush Pen. You could totally imitate a font as well. Then, I freehanded the design onto the plywood using pencil. You can draw and erase as much as you need. If you wanted to transfer your design, you could follow along this tutorial.

When you’re happy with your pencil outline, go ahead and start lettering with paint! I shared my favourite way to letter wood signs before the holiday (lots of tips in this video!) and one of the biggest tips is to use a paint marker because it saves a lot of the uneven strokes. I really swear by the Montana Markers– they’re so nice and opaque without going over and over. You’ll see in the video that I darkened the down strokes AND the upstrokes- I really like the chunky lettering on the plywood, it helps balance the cutout.


When you’re happy with you’re lettering, use a pencil to trace around- I left about an inch and a half on every edge. Then, get set up with your jigsaw. I set up my plywood over two sawhorses and just kept moving the sign around as I cut. Make sure you have your blade on the fastest setting and use a fine blade for plywood- this will help reduce chipping and give you smooth cuts. My blade was a bit old so I still have a few chips- but sandpaper does wonders ;)
You can see in this screenshot- when I get to the tight turns/switch backs, I do a few cuts in the same direction to make room for the blade to turn before I head in the other direction. This is SO much better for your blade than just trying to force that tight turn. I’ve bent blades before and when I use this method I never do. Larger corners are fine to go straight around, I find that they’re way easier to do tight corners if you’re moving fast. The minute you slow the blade down, the harder it is to go around corners.

Now it’s time to finish it up! Sand those edges and erase all your pencil marks still showing. I used a 150 grit sandpaper and rolled it up so I could get into those little corners. Before I hung it, I gave it a wipe down with a damp cloth to clean the sawdust and eraser bits off. If you wanted to put hanging hardware on the back- I swear by sawtooth hangers- the teeth mean you don’t need to put it on perfectly level (which I never do!). If your plywood is too thin for the nails that come with it, you can use a construction adhesive instead of nails.


So there you have it! It really is pretty simple and a jigsaw is a fun tool to play with if you haven’t already. It’s one of the safer tools too if you are a bit of a power tool beginner.
I hope that you take the time to hop around and check out all the tutorials in the #plywoodpretty challenge! If you are a video fan, my video is part of the playlist so you can just hit play and watch them all ;)

outdoor sectional sofa | Remodelaholic
mini barn door for a crawl space | The Cofran Home
handlettered “hello” sign | Lemon Thistle
easy TV tray | Practical and Pretty
rolling storage drawers | Happy Go Lucky
mid-century modular lego table | The Created Home
entryway bench | Woodshop Diaries
farmhouse sign | Our Crafty Mom
mid-century daybed | Paper Daisy Design
produce bins | Anika’s DIY Life
plywood accent wall | Diva of DIY
kids chairs with storage | Our House Now a Home
LIKE IT? PIN IT!

 2 Watercolor Paintings in 20 Minutes (no skills required!)
Such a cool, creative sign! Love the shape and how original this is. #plywoodpretty
Thanks so much Michelle!
I love how you demonstrated how others can create this work of art! Great project!
Thanks so much Leslie!
I LOVE THIS!! I’ve been wanting to make something fun to put in my spring wreath and this is such a simple, (yet SO ADORABLE) idea to try (maybe on a little smaller scale for my wreath, though :) ). Great job, I loved your video!
That would look so lovely over a wreath! Good luck :)
What a fun sign and your handwriting is beautiful!
Thanks so much Kara!
This is SO cute. I feel like this is something I’d buy at TJMaxx!
Aw, thank you so much Anna!
I love this! I recently used a jigsaw for the first time at work and now I’m obsessed and want to do all kinds of projects with it. This is perfect!
They’re totally addictive, aren’t they!? You would love a scroll saw too :)