
I hope you enjoyed Windsor’s nursery earlier this week- we are loving having it all done! One of my favourite projects in that space (other than that rad dresser, of course) is this one! These brass and acrylic frames are so cool, but by changing up the hardware, they’re also affordable (win!). I really love how they look like they’re floating and don’t add too much visual bulk while still packing that graphic lettering. Also… brass! It’s just so good. I had been eying some fancy hardware to make your own acrylic frames on Etsy, but they ring in at $60 for a set… for one frame. And then you need to buy your acrylic on top of that. It just wasn’t in our budget.

But when I was at The Home Depot a while back, I was getting special bolts for something and spotted these massive brass screws and it clicked that I could make my own! I feel like most of my good ideas come from The Home Depot. Either that or I spend too much time there ;)
Here’s what you’ll need to make your own brass and acrylic frames:
- Acrylic sheets, 2 per frame (I used .8″ thick, 18×24)
- Brass connecter screws, 4 per frame (like these ones)
- Drill with bit that’s slightly larger than your screw and power drill
- Scrap wood
- Wood clamps (2)
- Drywall anchors (they don’t need to be strong, but BIG enough for thick, chunky screws)
- Anchor
- Paper template
- Paper artwork
- Double sided tape

The first thing you’ll need to do is go pick out your acrylic sheets. Depending on what size you want to make will determine what size of artwork you make/get. Originally, I had lettered these babies on smaller paper, but after looking into cutting acrylic (you can totally do it) and knowing how bummed I’d be if I had to go back and buy another sheet of acrylic ($18) if I got one off square, I decided to make my artwork to suit the size of sheet I bought. I bought the extra large art paper from the craft store, then cut it down to my preferred size using a square and craft knife. The art I made is just ink lettering using a brush pen.

When you have your artwork cut to size, mark on one corner where you would like the bolt to be on a piece of paper. use that as your template. I chose to drill all four sheets of acrylic at the same time. This worked great for me. I have read lots of tutorials that recommend using a hot poker (technical term, I’m sure) to pierce the acrylic to make the holes. That scares the crap out of me so I chose to use a drill based on some recommendations of fish tank builders. Clamp your acrylic to your scrap wood backing board with the template in between. make sure it’s tight and there’s no room for flexing. Then, drill straight down into the dot on your template. Use a high speed, but try not to apply much pressure as you’re drilling. This will take a little while, but you’ll end up with nice clean holes. We left the plastic coating on the frames until after we did this to avoid any marking of the acrylic from the clamps. When you’re done one corner, flip it, clamp it, and do it again!

You can peel back the clear coating and place your artwork in the frames now (sandwiched between two pieces of acrylic). This is when you’ll get really excited because they start to look finished. I used a small piece of double sided tape on the back of my artwork to keep it in place while we were mounting the frames.

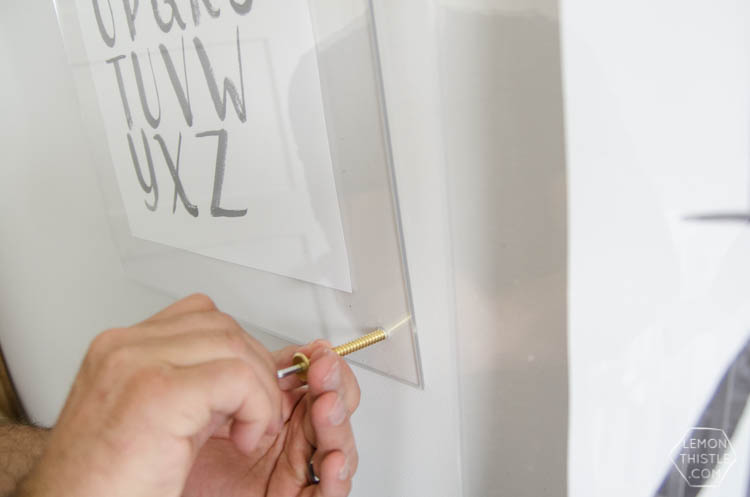
Now, take your frames and mark out where you want them on the wall. We used painters tape to do this, applying a level strip at the top edge, then marking the holes from there. Put your drywall anchors in by punching holes in the drywall (we just use a screwdriver for this #bruteforce). When all your drywall anchors are in place, you’ll need a second set of hands. Have one person hold the frames in place while the other starts screwing the connector screws into the wall, through the acrylic holes. You can do the first few twists with your hands until it gets into the drywall anchor and gets tough. Then switch to your allen key to finish it off. This takes some muscles, so I held a baby and asked my Dad to help. If you can do the same- I recommend it ;) There are screws you can get that have a bit of a smaller head that you could just drill in. That would save a bunch of effort, but I really wanted the impact of the larger brass.
That’s all there is to it! I should tell you that this produces some mad drywall dust that you’ll need to dust off the frames. Keep the frames clear while you start with your drywall anchors so you don’t have extra mess to deal with. A small cloth can be used to slip in between the frames to wipe them clean before you finish tightening the screws the last little way. I also should tell you that these frames aren’t really heavy. And they have no way to get a grip and pull on them, so the anchors are just to give your connector screws something to grip in to. You can use any length of screw you like- we actually used two different lengths as they didn’t have enough of the shorter ones in stock.


Last but not least- if you wanted to save some more dough, you could make these with ONE sheet of acrylic per frame. I know, I know, it’s a cheat. But I like cheats and this would save you about $20 per frame. Just use your double sided tape to tape your print to the wall and screw the acrylic sheet over that. It won’t have quite the same effect (not quite as thick, of course), but it’s worth it if you get to do that instead of nothing. You could also try a thinner acrylic. My husband was trying to tell me we should just use my fancy washi tape to make frames and tape the art to the wall, so I get the budget thing! I’m so thrilled that The Home Depot Canada could see my vision a bit better than Shane could on this one ;)


So what do you think? This is one of my favourite DIYs… ever. Honestly! I love them so much. They kind of make the room paired with that dresser and the brass hardware (which is also Home Depot, by the way). When I’m rocking Windsor to sleep, I just stare at these some times. Because I love them SO much. I’ll leave it at that weird tidbit.
*For more information about this dresser update and to see the whole nursery reveal with sources, hop over and check out Monday’s post!)

 Windsor’s Whales Nursery
The last line of the alphabet print should say XYZ, not YXZ. Otherwise it is cute.
Haha I know! It took about three days until I realized that. But until Windsor learns the alphabet, I’ve left it ;)