This post has been sponsored by Cricut… if you follow along, you know I love my Cricut- sponsored or not :) Find all my policies here.

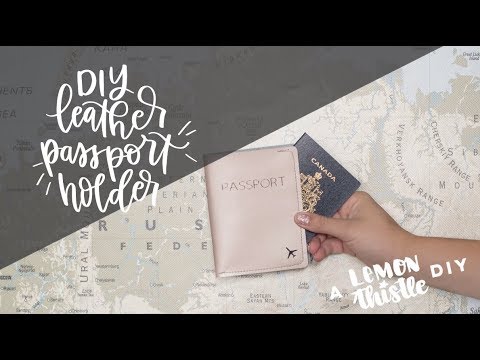
I’m so excited about this DIY, you guys! Even with my mediocre sewing skills, this baby turned out so pretty! Metallic leather, foil details… what’s not to love? Today I’m sharing the how-to for this sweet DIY leather passport holder in partnership with Cricut. If you have been following along for a while, you’ll know that I have a bit of an obsession with leather DIYs. I actually already have a couple more in the works- but who knows when I’ll be able to call those ‘finished’. This one is actually made with the most beautiful metallic leather. I made one in pink and one in gold and I really can’t get enough of this stuff.

Ready for the DIY? I made a video for this one today too! I’ve included that below then a full photo tutorial as well for those of you who are viewing this at work. I know you’re out there ;)
For this DIY leather passport holder, you’ll need:
affiliate links where possible
- The pattern! All files are from Cricut Access– check out the project here
- Cricut Maker or Explore (see notes below)
- Deep Cut Blade (the black one) & Fine Point Blade (the regular one that comes in your machine)
- Standard Grip Mat AND Strong Grip Mat
- Good Scissors (to cut the leather to size)
- Cricut Metallic Leather (I used the Pink and the Gold)
- Foil Iron On (I used Pewter for both)
- Scoring Tool
- Upholstery thread, leather needle, and sewing machine
- Binder Clips
- Cricut Easy Press 2 & Mat (or an iron and towel will work!)
- Parchment Paper
So I get that this is a pretty long list… but it’s really simple- I promise! The first thing you’ll need to do open up the design. All the files I used are from the Cricut Access program (it’s a monthly subscription). If you’d like to use my project mat, you can find it here! When you go to make it, you’ll need to select your materials. For the passport holder, I selected the Cricut Metallic Leather. One of the things that I like about using Cricut brand materials is that Cricut Design Space has the exact settings for those materials loaded into their software already- so it’s pretty fool proof. You’ll get a notification that you need to use a Deep Cut blade for this. The Deep Cut Blade is the one in the black housing. I used my Cricut Maker for this project- it cuts leather beautifully since it can use so much pressure, but you can definitely use the Cricut Explore machines (since you can swap blades on them too!) I wrote a post about the difference between the two cutting leather right here if you are interested.

Other than switching out the blade, you also need to move your star wheels over to the side of your machine.
Your WHAT?!
That’s what I thought when I read that the first time. But it’s really easy. They’re just those white bands around the bar that rolls your material through. Since this is a thicker material, they’ll leave indents in the material if you don’t move them to the side. They are tight and a bit tricky to move- especially if you’ve had your machine for a while and never moved them before, but don’t worry… you can do it! Then, you need to trim your material (leather) down to 11″ to allow for those star wheels at the side. I just did that with scissors but a rotary cutter is my favourite way to cut leather… it’s just packed somewhere still #movingproblems. Place your leather smooth side down on a strong grip mat and you’re good to go! I’m so impressed by how effortlessly the Cricut Maker cuts leather- it’s such a dream!


When you’ve cut out your leather, I recommend scoring it to make it easy to fold. I did this with my Cricut Scoring Stylus and a straight edge. When I was done I put them folded under a couple books to really set the fold.
Next, you can sew it together. I have a whole post on sewing leather tips but a few notes to keep in mind? Don’t use pins! Opt for binder clips instead. Go suuuuper slow- you can’t get rid of holes from the needle even if you seam rip AND this will help your regular machine make it through such a thick material. I also like to swap to a leather needle (a normal one works BUT if you will sew with leather on occasion, it’s worth the $4! It cuts the holes instead of just pushing with a blunt end like normal needles) and upholstery thread (less likely to break).

When it’s all sewed together… it’s time for the foil details! As with any iron on material, make sure that you mirror the design on this mat before you cut it out! I used the Cricut Foil Iron On in Pewter (I LOVE this colour against the metallic leathers!) and a regular grip mat. When it’s cut, weed it very carefully because these are some super thin lines.
Now it’s time to iron it on! I used my new Easy Press 2 on this. It’s little and so cute and the perfect size for this project. I’ll be sharing more about that one in a post when it gets released this fall. Since there are no recommended settings for using foil iron on (or any kind of HTV) on leather, I did some trial. I ended up using the settings for faux leather (235 degrees) and had to press it for 30 seconds about three times. You can check and see if it is adhering and if it’s not, just apply more heat. Once the backing peeled cleanly away from the foil transfer, I used parchment paper to protect it and gave it another 5-10 seconds to help set it. This really made it adhere to the leather- I don’t think it’s going anywhere!


That’s it! I’m so pleased with how these turned out… other than my wonky stitch lines. You’d think for someone who learned to sew when they were a kid that I’d be better at it. One of these days, I’ll put some real time into improving. Until then… just imagine the lines were straight, okay? I hope that you are inspired to try making something with leather! It’s one of my fave materials to play with. If you make this or are inspired to create something else because of this tutorial… I want to see! I’d love if you shared it with me over on social media @colleenpastoor or by email colleen@lemonthistle.com
LIKE IT? PIN IT!

This is a sponsored conversation written by me on behalf of Cricut. The opinions and text are all mine.
 How I Choose Paint Colours for The Whole Home
Really good job. this passport leather cover is really amazing…great work i really like this and your blog is really good…
Hi Colleen, I love your blog and your YouTube channel. Thanks for all the great stuff! I was wondering if you can tell me where in design space I can find to make this passport holder. I’m having a great deal of trouble locating it. Please help. Thanks in advance.
Thanks so much! Give this link a try :) https://design.cricut.com/#/profile/57ef28309601807658d5312e/user-project/100551097