• Skip to main content
  • Skip to header left navigation
  • Skip to header right navigation
  • Skip to site footer
  • Shop
  • Get The Email
  • Work With Me
  • About
  • Search

  • DIY
    • DIY Home Decor
    • With Power Tools
    • Renovation
    • For Kids
    • For Parties
    • Wearable
    • Organization
    • Cricut Crafts
  • Home Decor
    • Room Reveals
    • Kid Friendly
    • DIY Home Decor
    • Renovation
  • Lettering
    • Hand Lettered Printables
    • Free Practice Sheets
    • Handlettered DIY
    • Free Brush Lettering Quickstart Guide
Lemon Thistle

Lemon Thistle

Rad DIY, Lettering and Design for Real People

  • Printables
    • For Cricut
    • Party Printables
    • Home Decor Printables
    • Bachelor Bingo
    • Handlettering Practice Sheets
    • All Free Printables
  • Entertain
    • Party Printables
    • Party DIY
    • Tablescapes
    • Kids Parties
  • Blog

3 Fun Photo DIYs

Jun 24

These 3 photo DIYs are easy to recreate in an afternoon and will instantly upgrade your photos into art- ready to hang in your home!

fun ideas to get photos on your walls!

Having photos displayed in our home is a value I have, handed down from my dad. He took more photos than most parents I knew and displaying them in our home was always important to us. Now that I have kids of my own, I want them to value photographs as well. 

Today I’m excited to partner with Walmart Photo to share 3 different ways I’m displaying images that I’ve had printed with their same day print services. And because I love DIY- I’m adding a little something to each of them. 

Simple framed canvas DIY

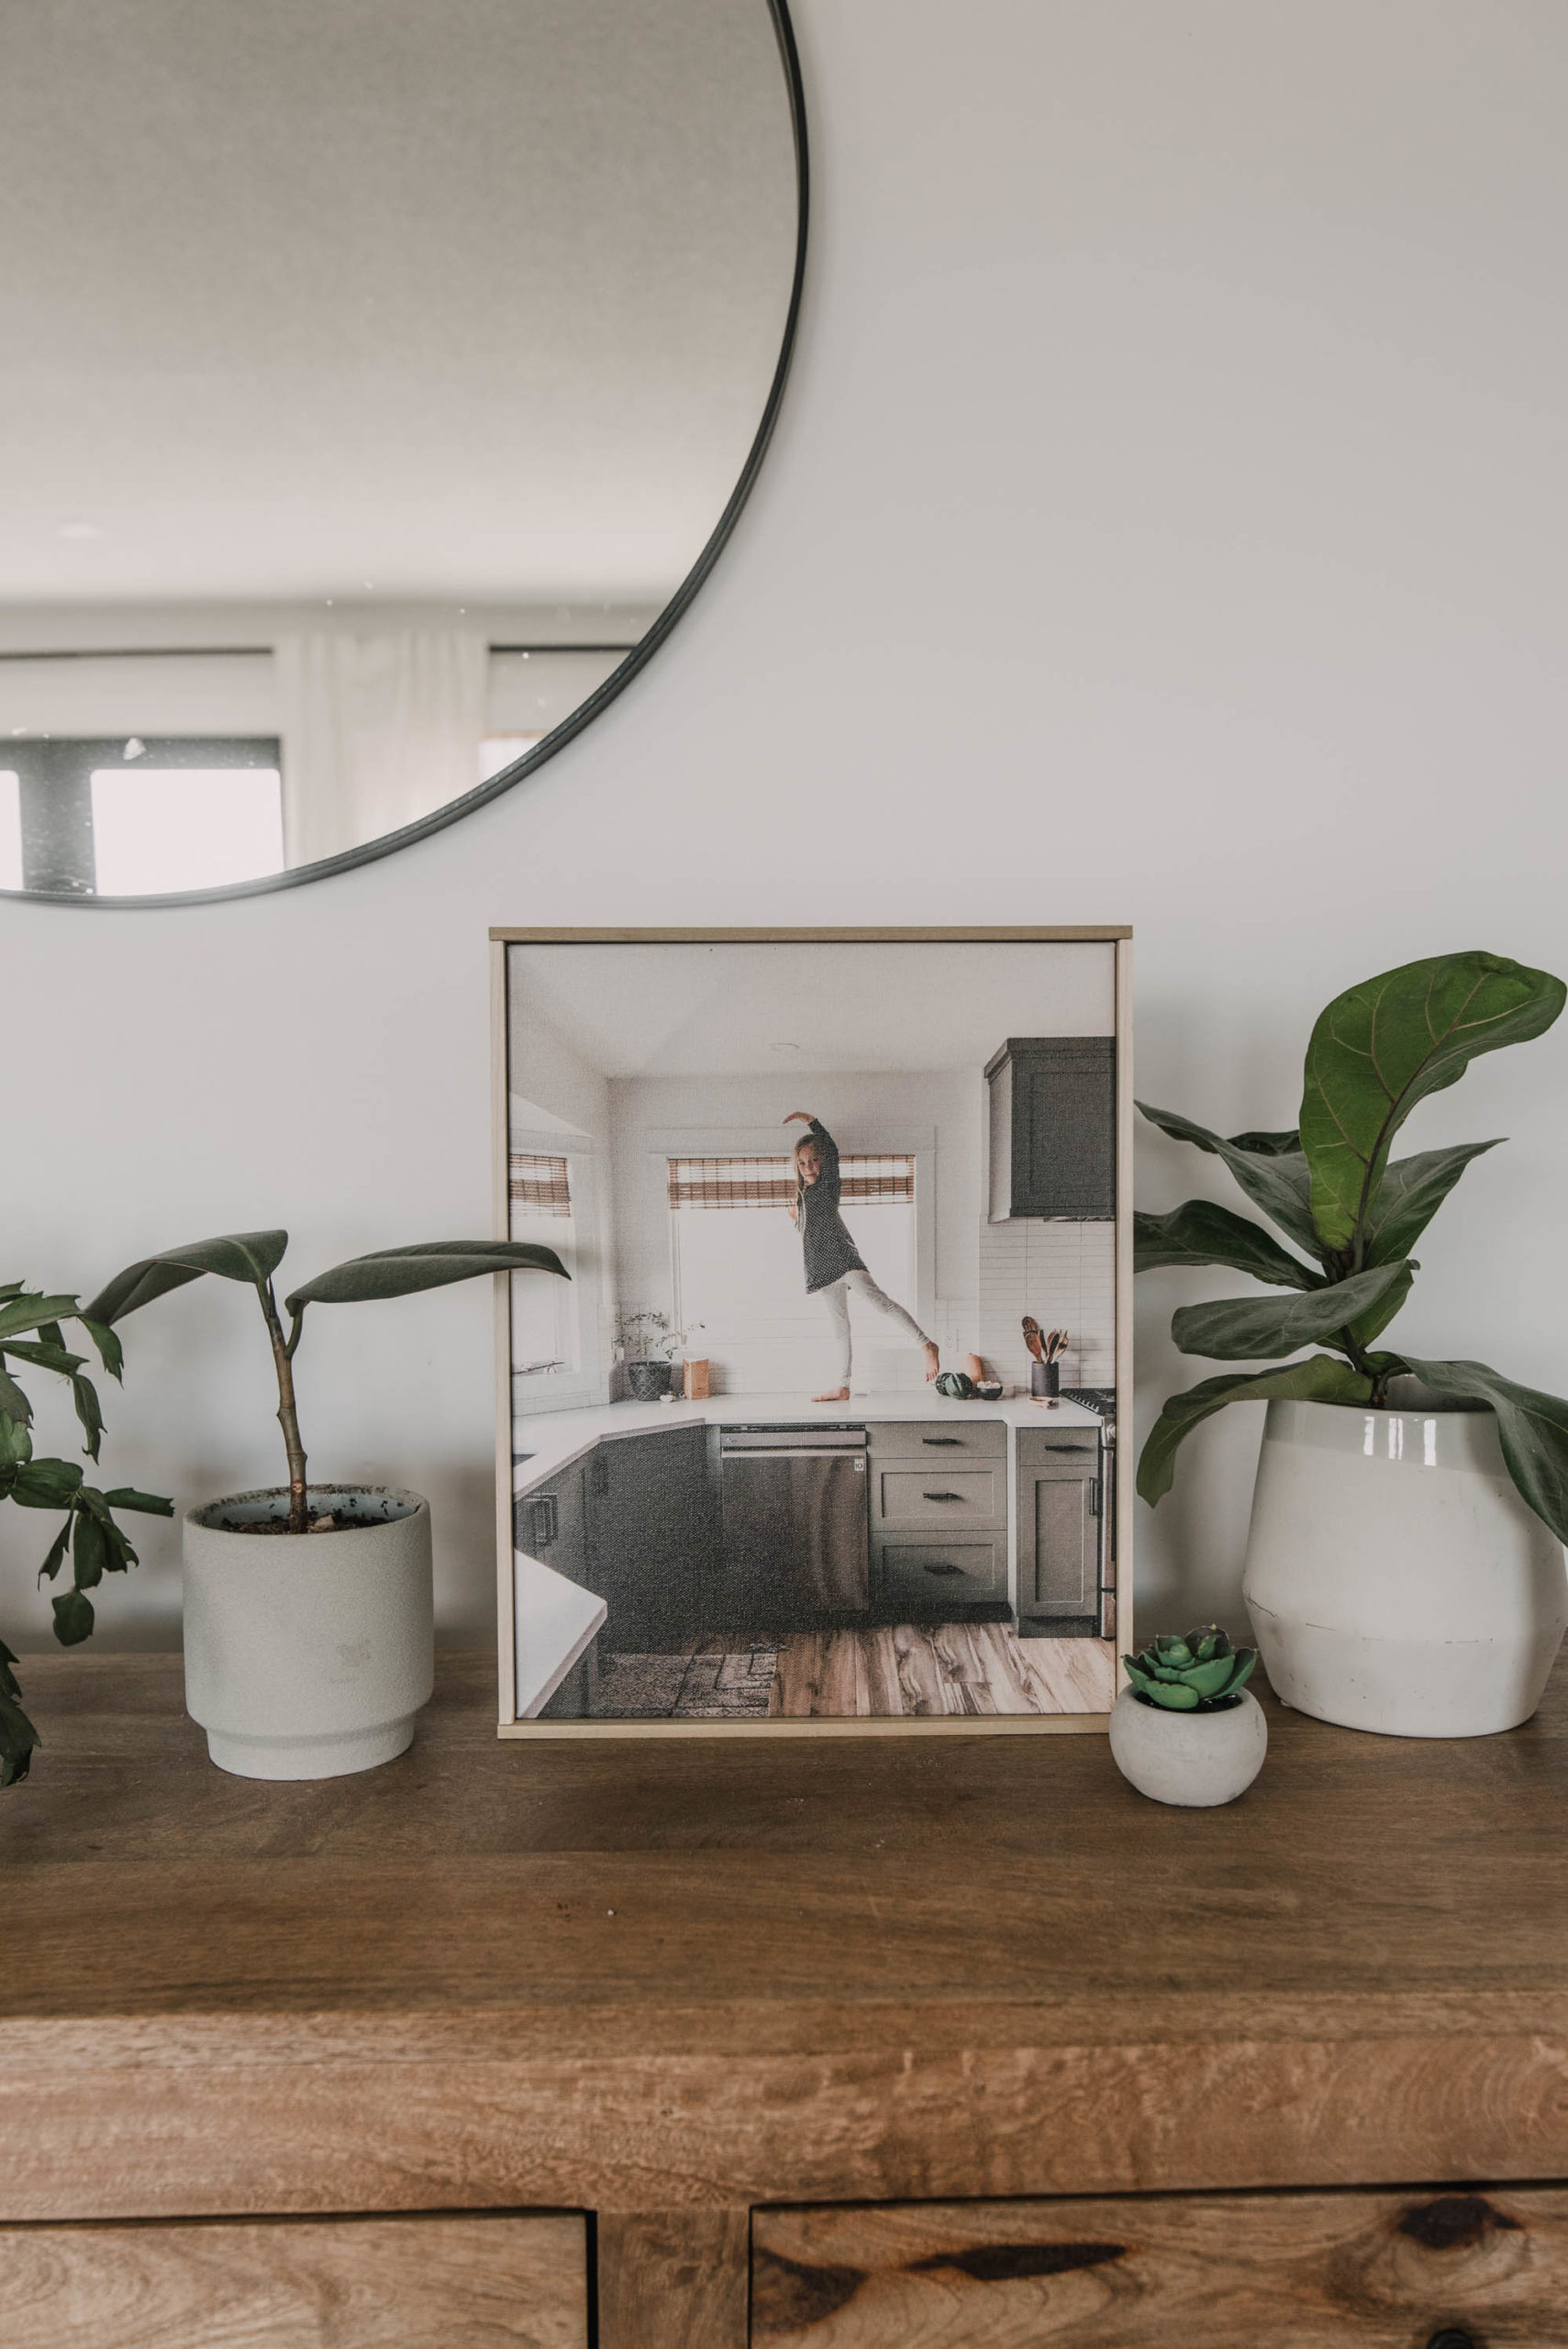
1. Easy Canvas Frame

I love the texture of printed canvas on photos. This photo was actually taken on my phone and every once in a while, you snap a photo and instantly know it’s one you’re going to hold on to forever. This is one of those. 

I’ve framed canvases like this a few times now, but never made a tutorial for it! It’s so easy, you will be able to pull it off in no time at all and for a canvas this size, for under $10. You can even do it without any tools at all. 

This canvas is from the Walmart Photo same day options- it’s an 11×14. 

The easiest way to frame a canvas

This is craft wood from the hardware store. It’s typically found in the trim section and comes in 3 or 4’ pieces. You can use the hardware store’s saw to cut to length if you don’t have tools at home. 

I don’t typically bother with miter cuts on this- just simple farmhouse style trim for this frame. You’ll want to cut the two edge frame pieces to the same length as your canvas. The top and bottom pieces will need to be a bit bigger- measure the depth of your wood and add that 2x. So for example, mine was 1/4” so I added 1/2” to my top and bottom pieces. 

You can attach your frame any number of ways. Hot glue, super glue, double sided tape, brad nails, normal nails… Whatever you have on hand should work- believe me, I’ve tried them all!

The easiest way to frame a canvas
Modern Canvas Frame for under $10

You can stain it if you like (I prefer the natural wood on this one) and then you’re ready to go! 

Simple DIY Poster Hanger

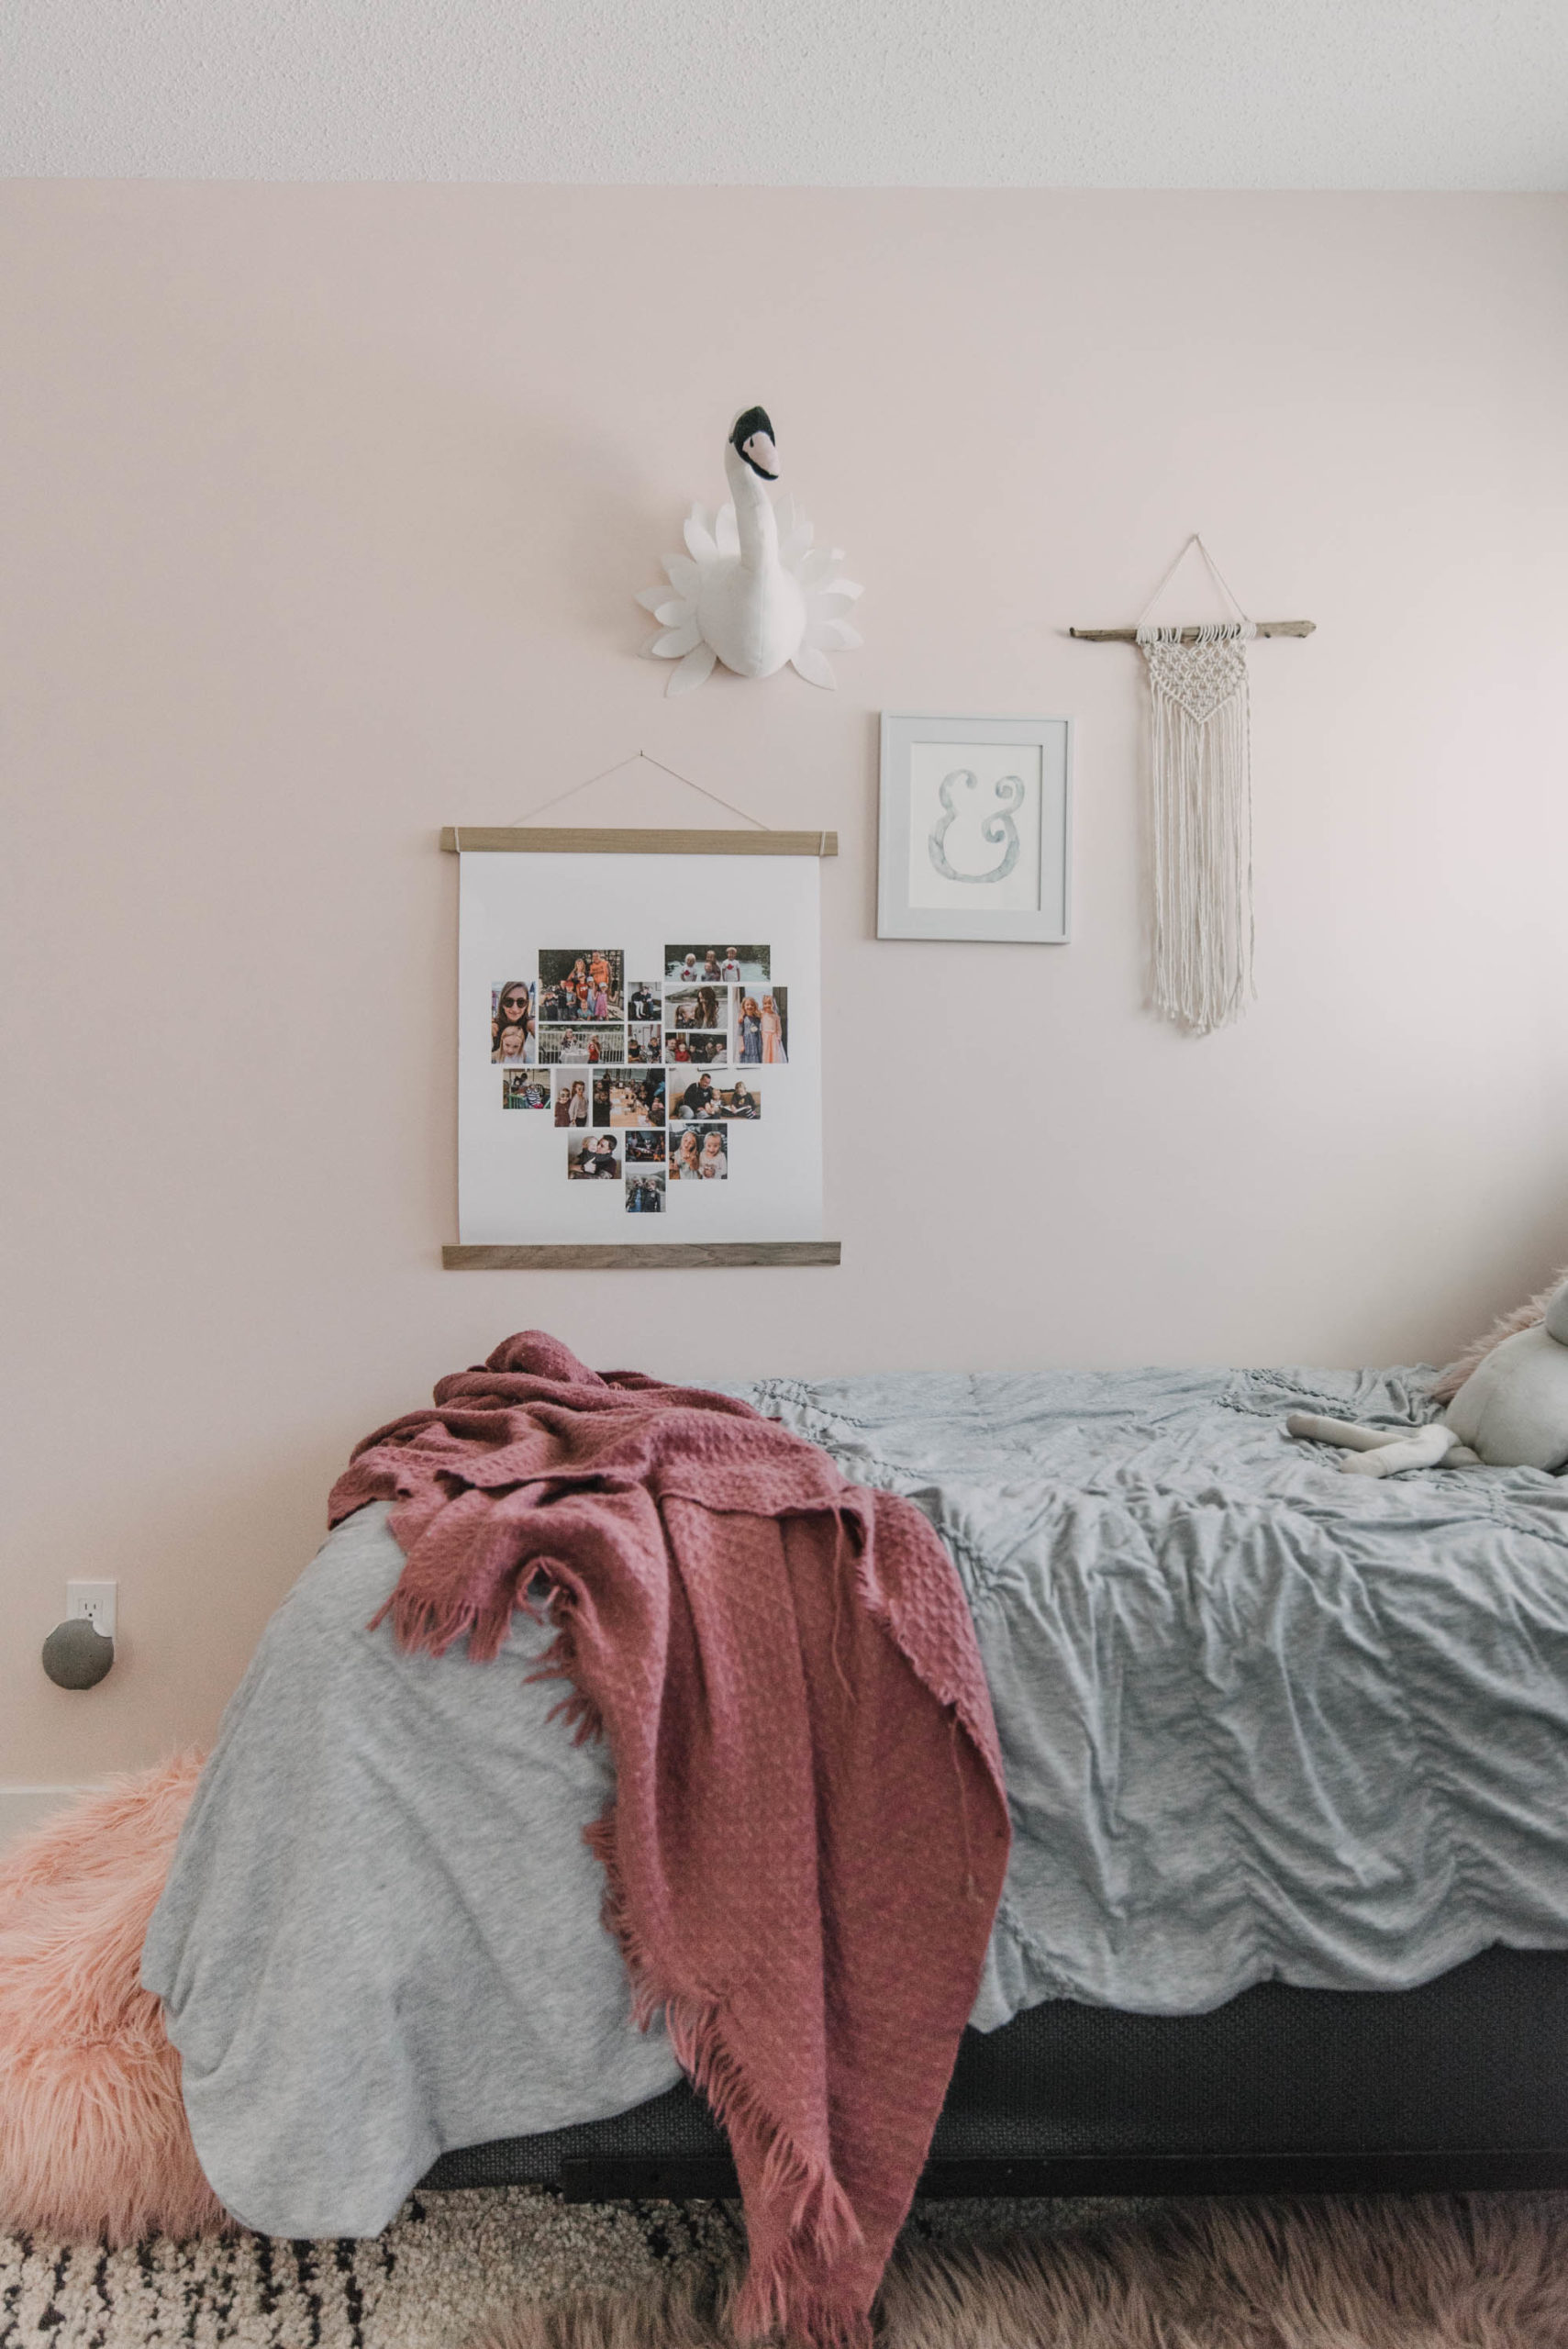
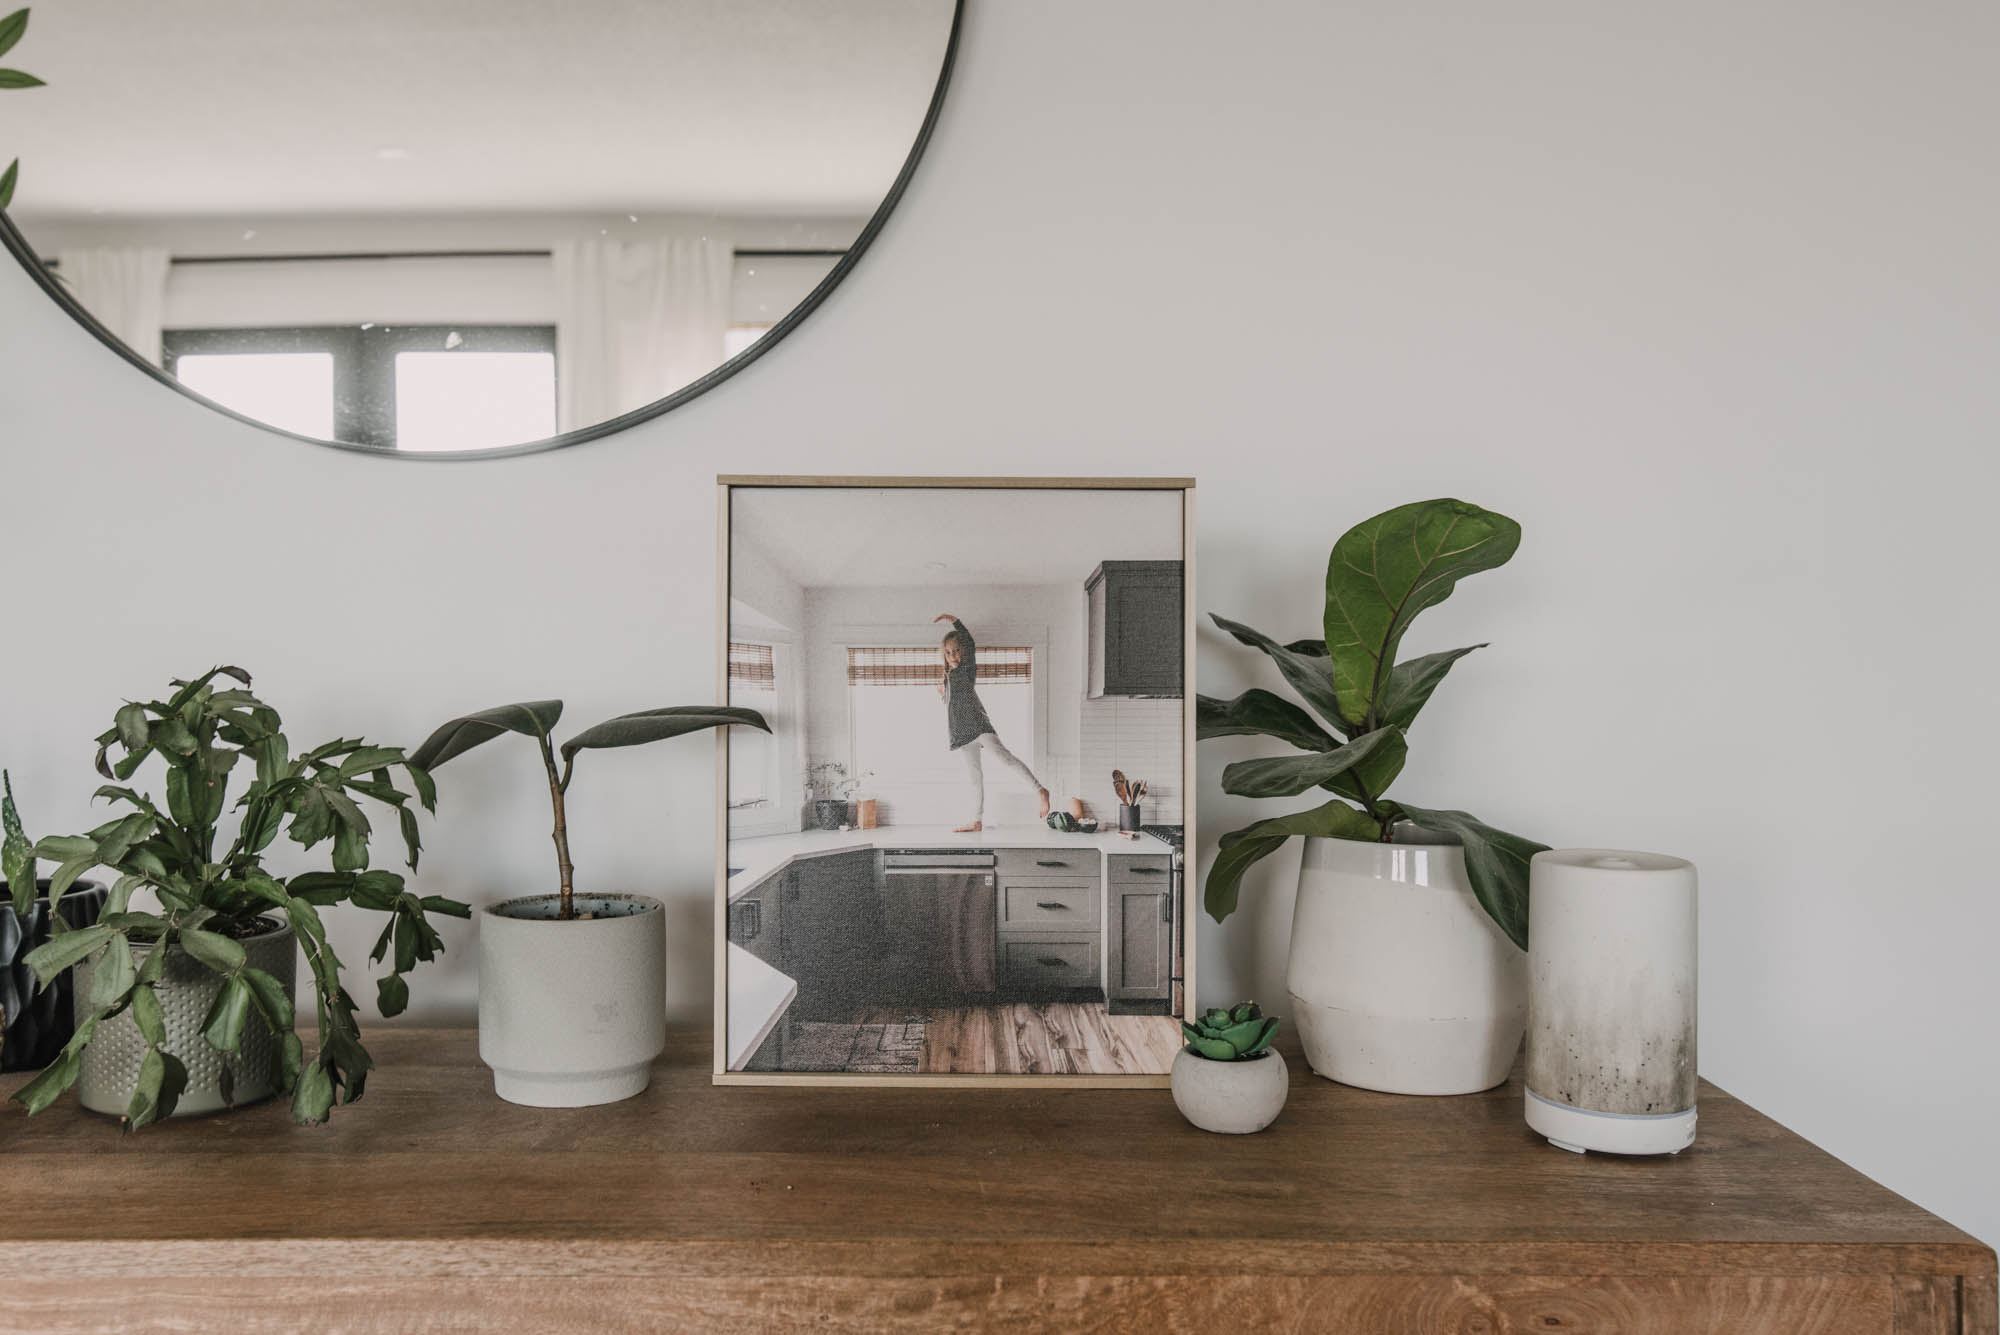
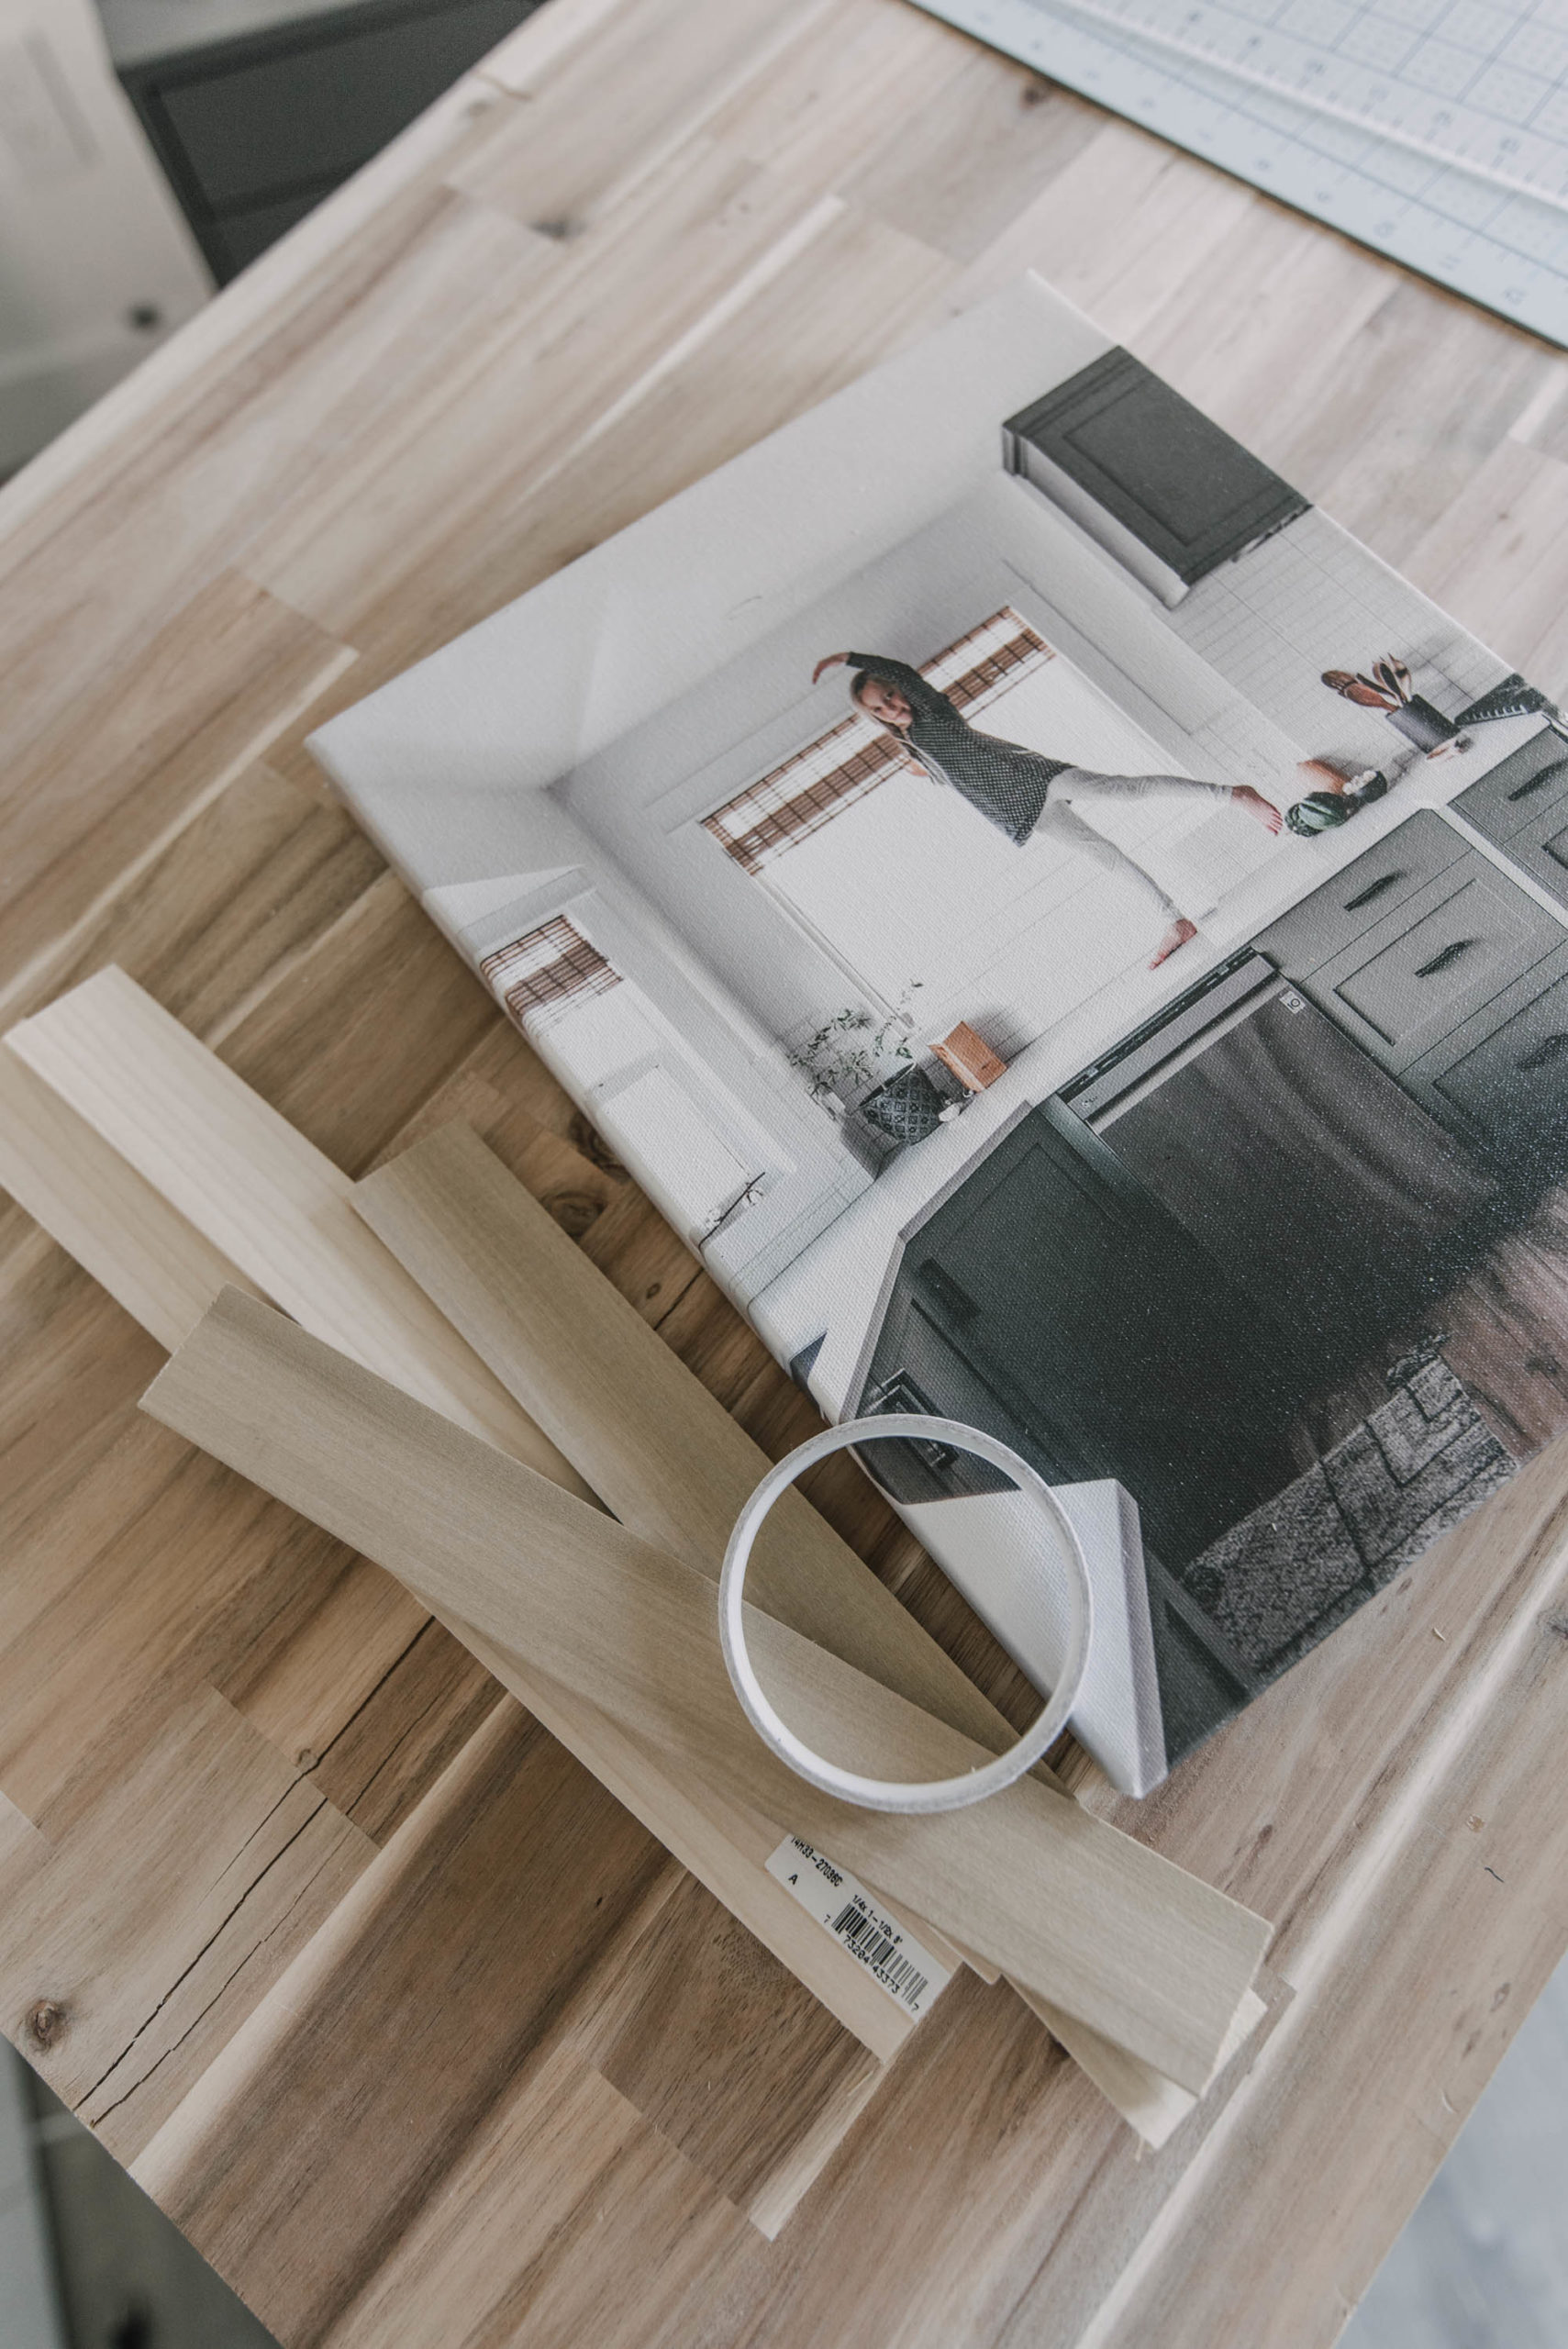
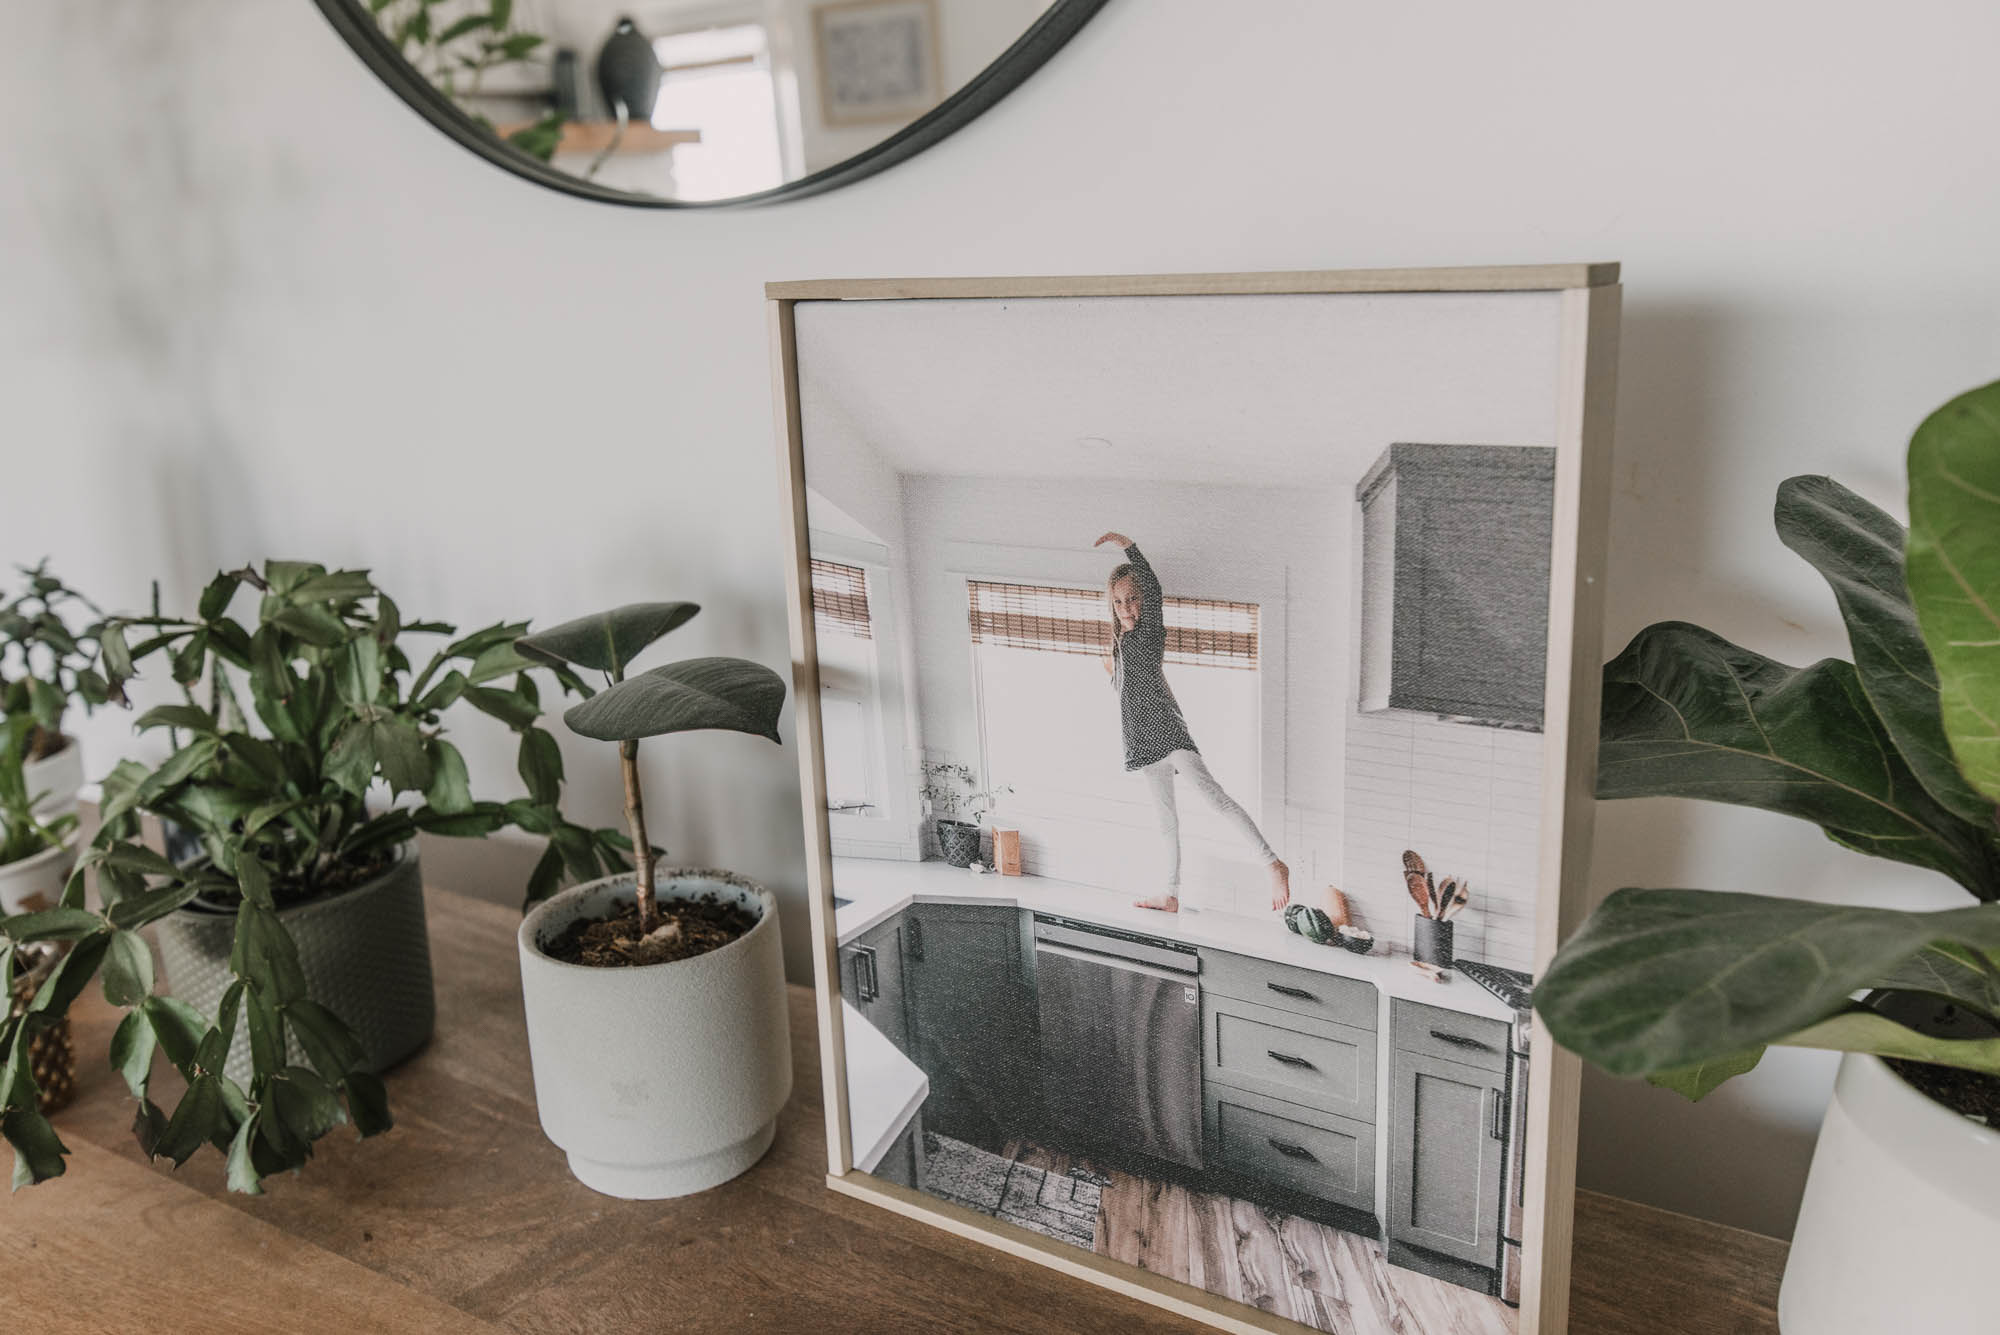
2. Simple Poster Hanger

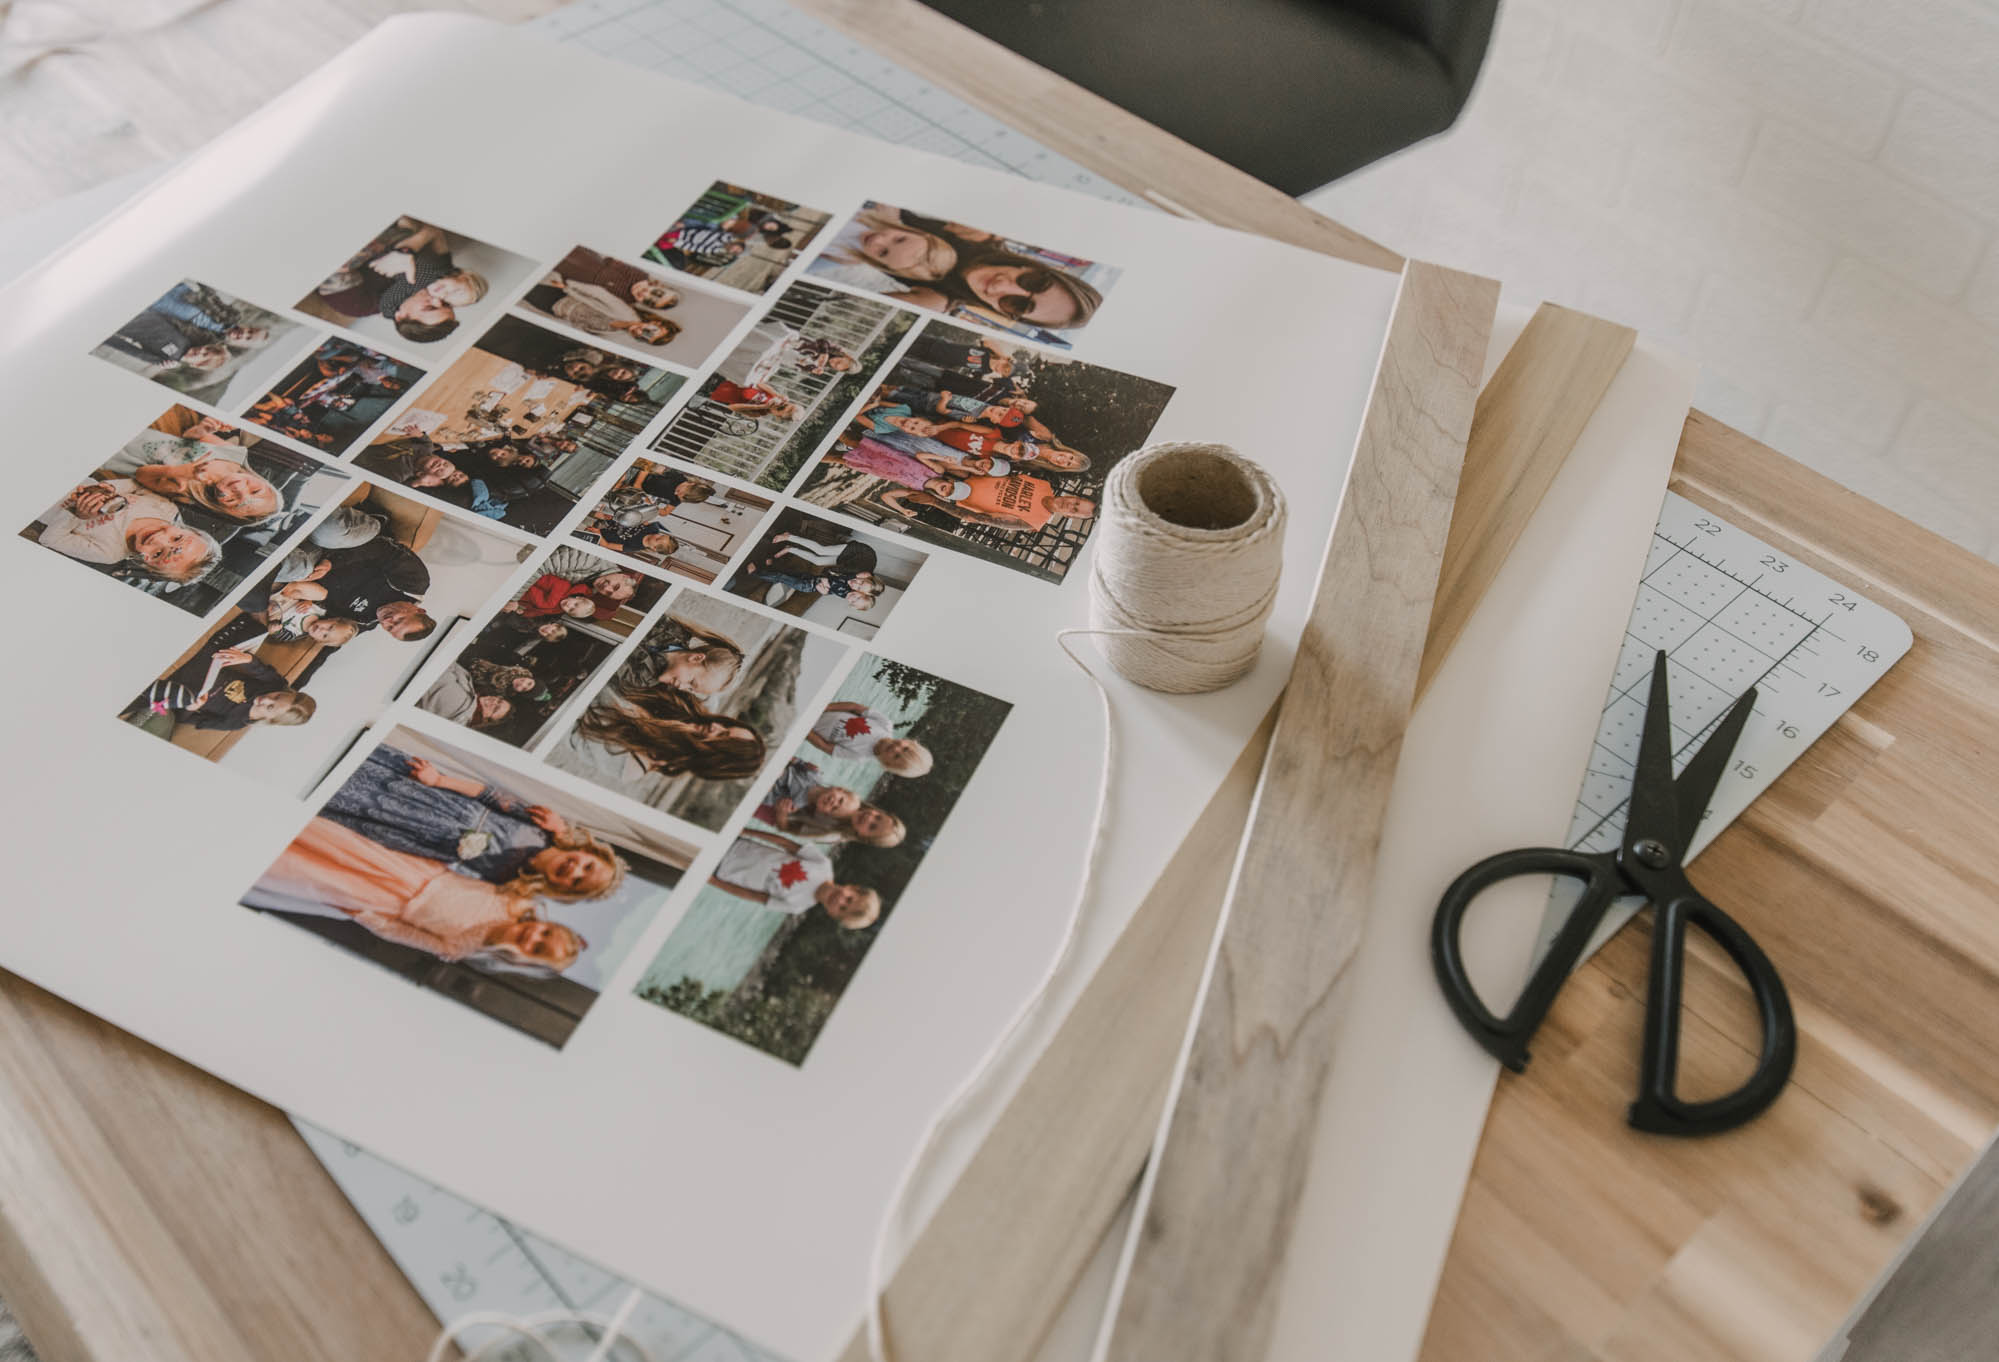
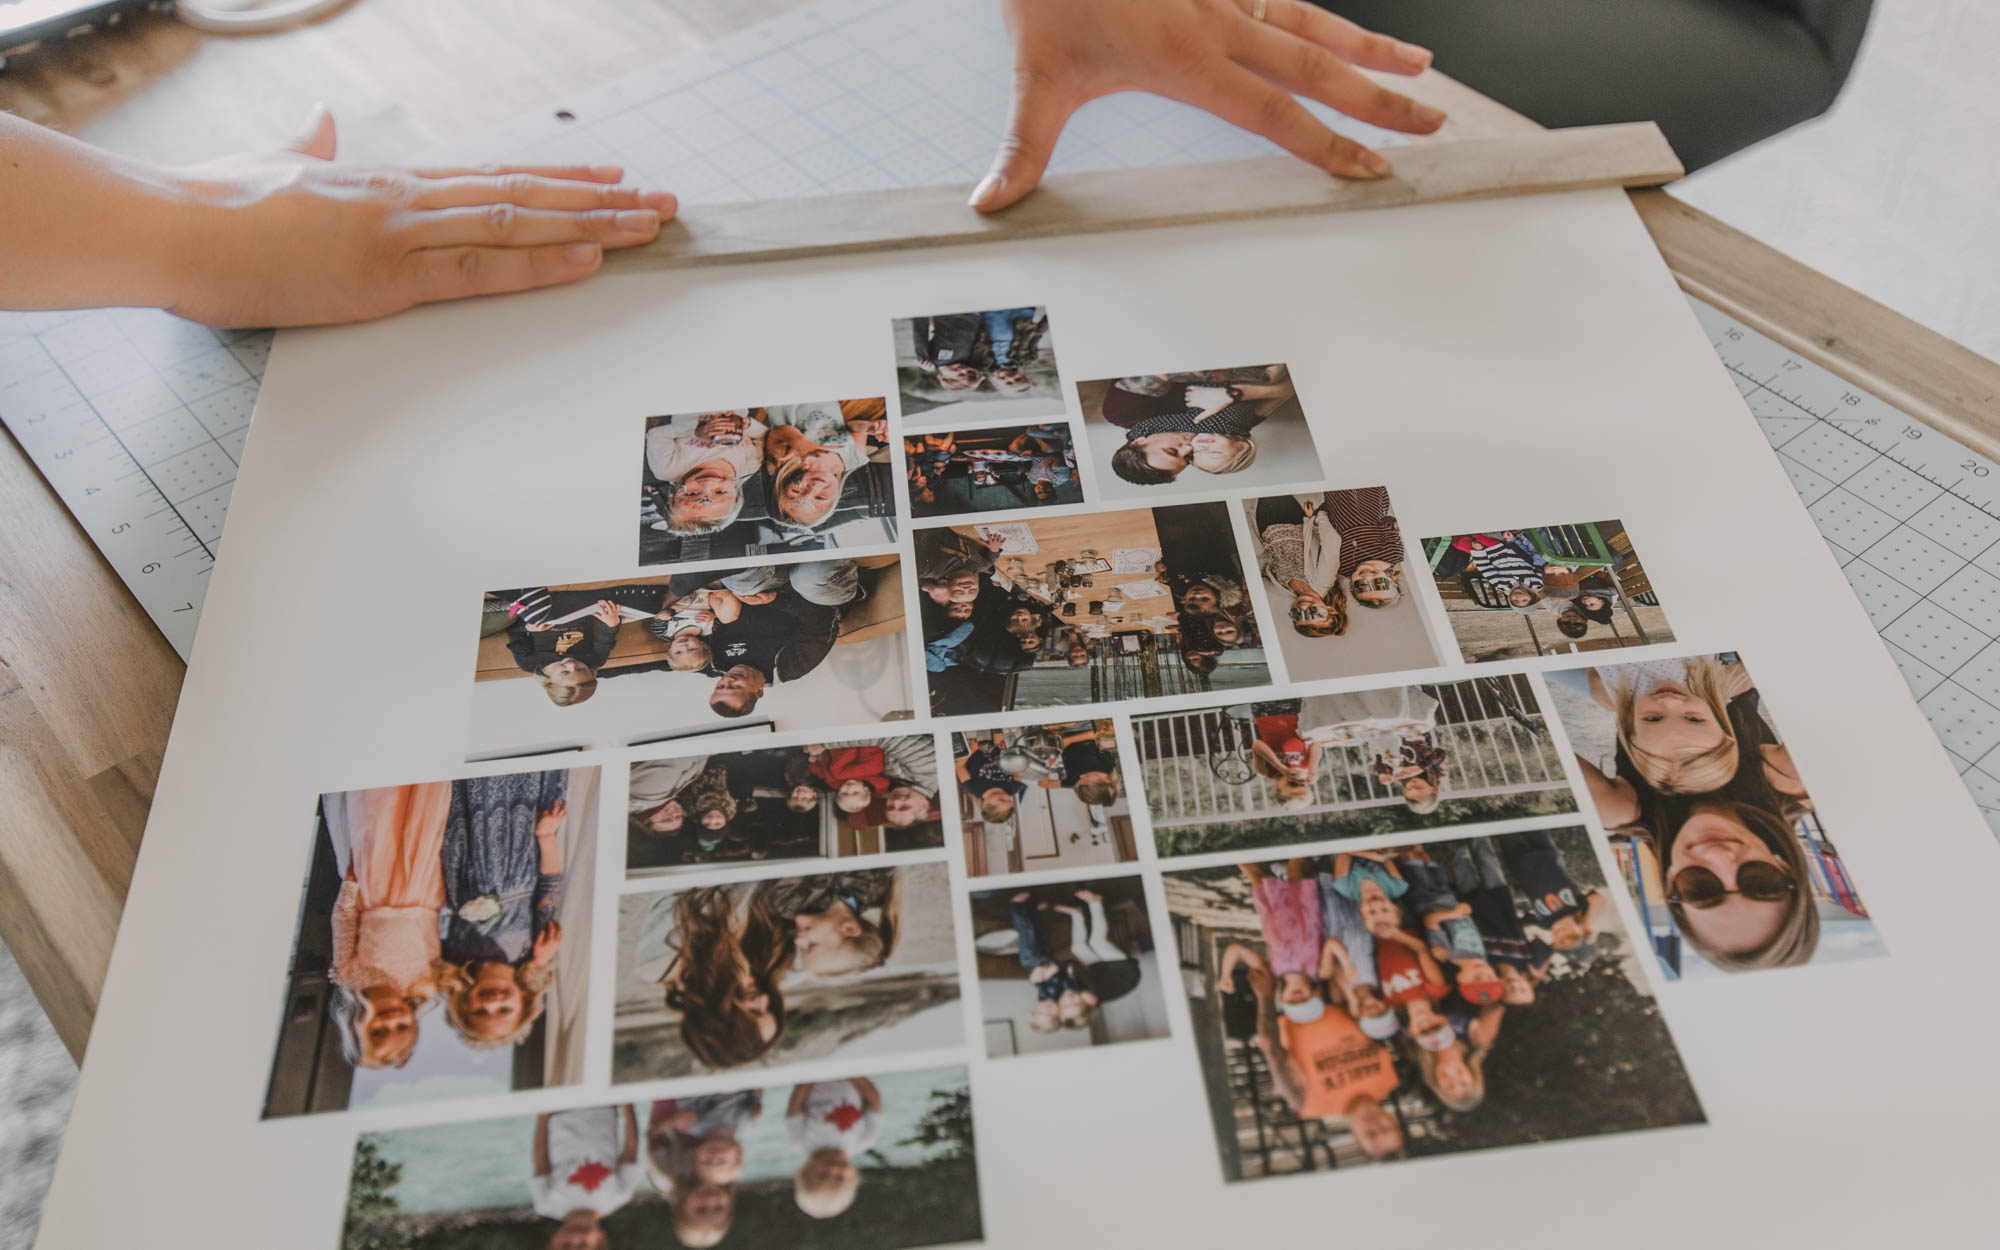
Okay, so we love that craft wood, right? So easy to work with and you know that means I’m going to use it again. This one is even easier. I designed this poster in my own design software, but you could also use one of Walmart Photo’s templates- they have so many great ones. I wanted to include photos of all the people Aubrey has been missing during this time at home. Most of them are snapshots from my phone and are some of her favourite people, places, and memories. I edited all these photos using the same process I shared in my ‘how I edit phone photos’ post. 

Simple DIY Poster Hanger

I got this one printed in the largest poster size Walmart Photo offers in their same day printing services. It turned out so, so well! 

Using that craft wood again, cut two pieces an inch or so longer than your poster is wide. You can do this at the hardware store or at home if you have the tools. You’ll also want to pick a string to hang it with. I just used basic string for this one but you could use anything you have on hand that you love the look of. Just tie it outside of your poster and you’re golden. 

Modern Poster Hanger
DIY Poster Frame

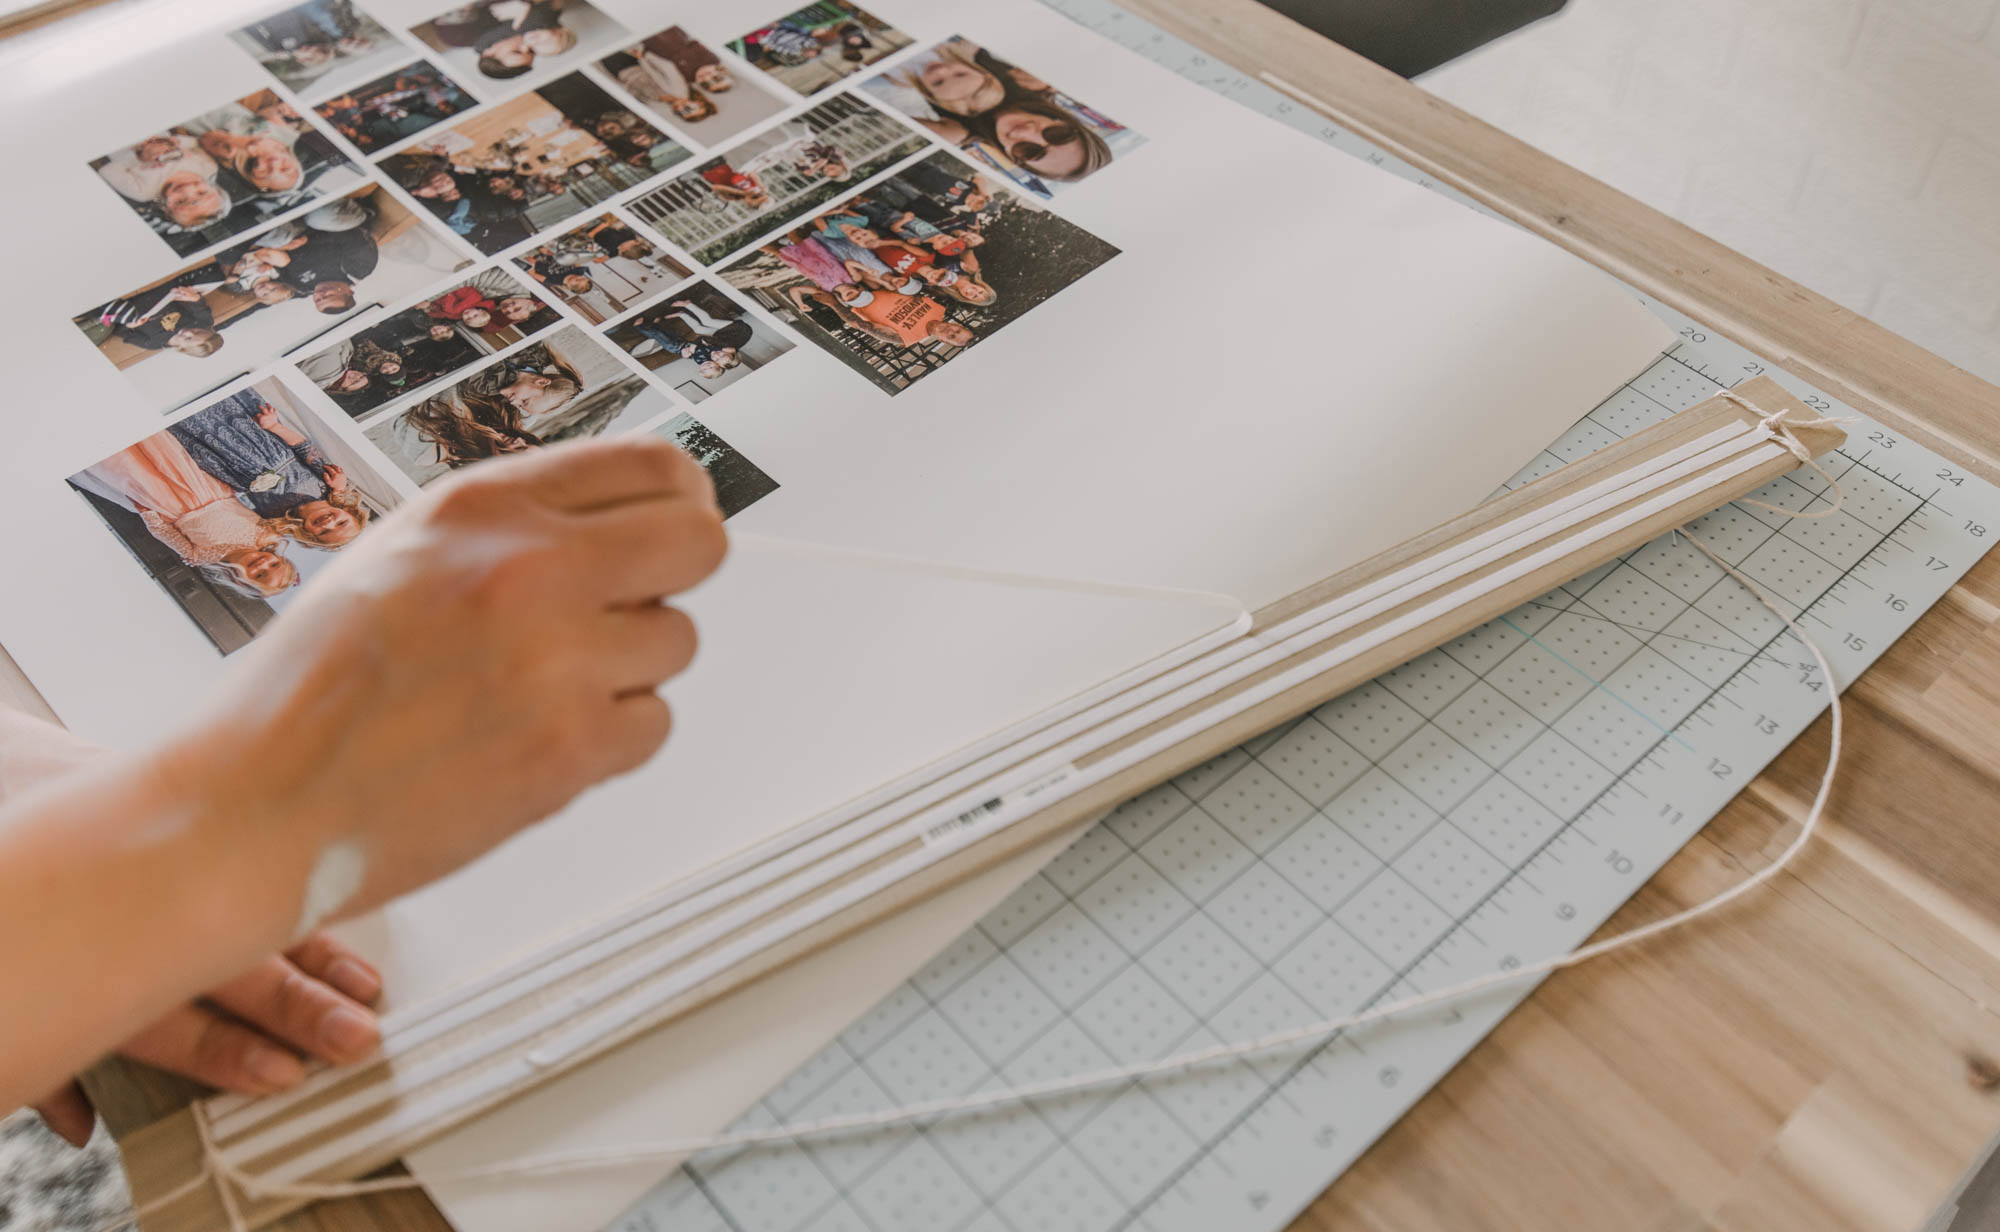
Next up, attach your poster to the ‘frame’. I just used one piece of wood at the top and at the bottom of the frame and used double sided tape (my crafty BFF) to attach the wood to the poster. This makes it easy enough to remove should you want to change your poster out down the road. And considering how easy it is to print them with Walmart Photo same day printing… I feel like we probably will!

DIY Poster Frame
DIY Poster Frame

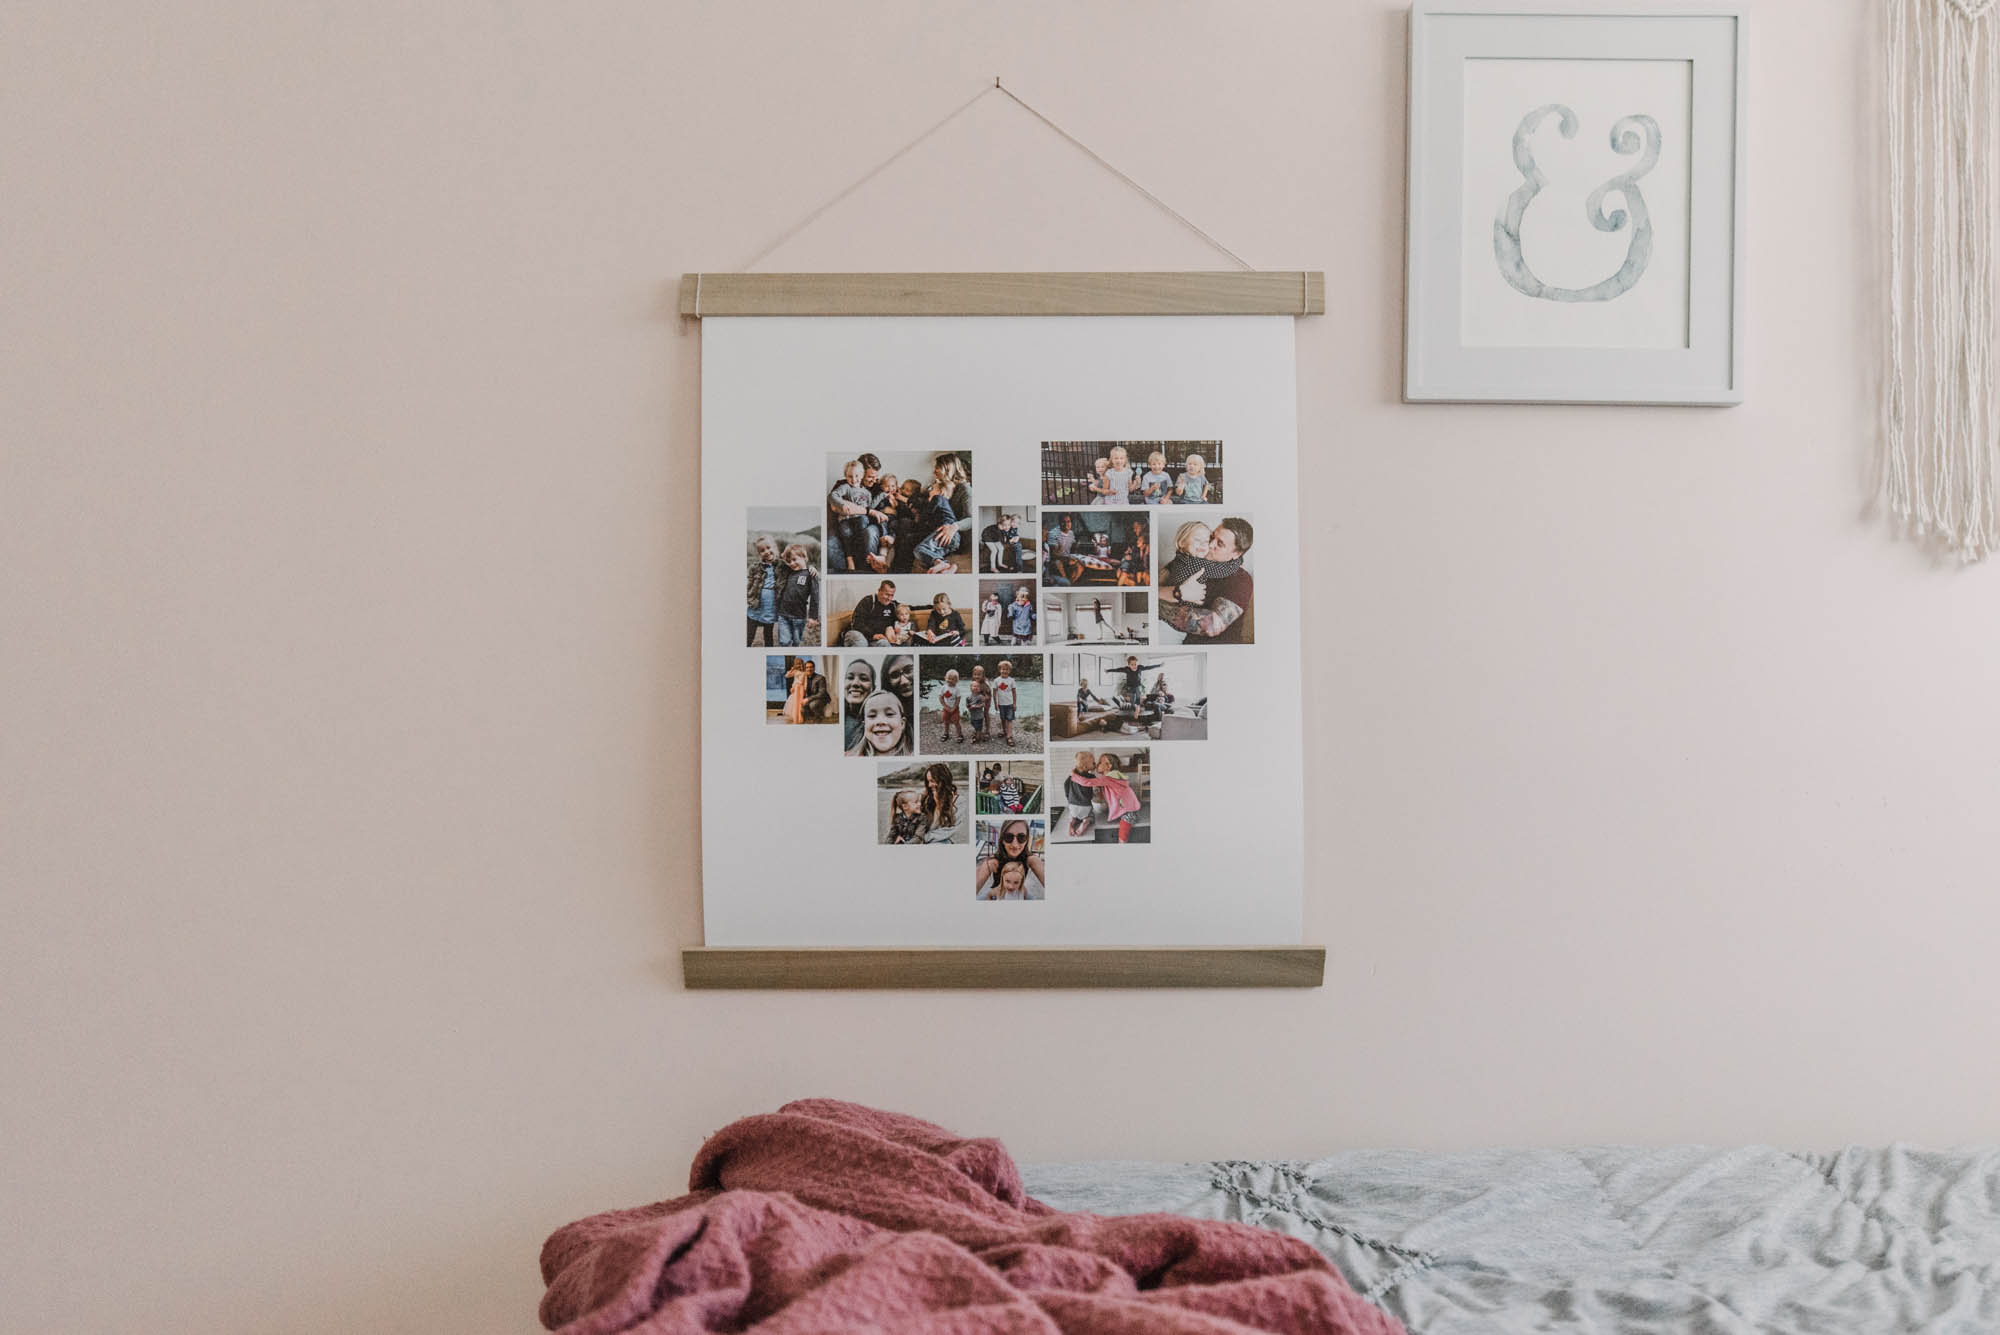
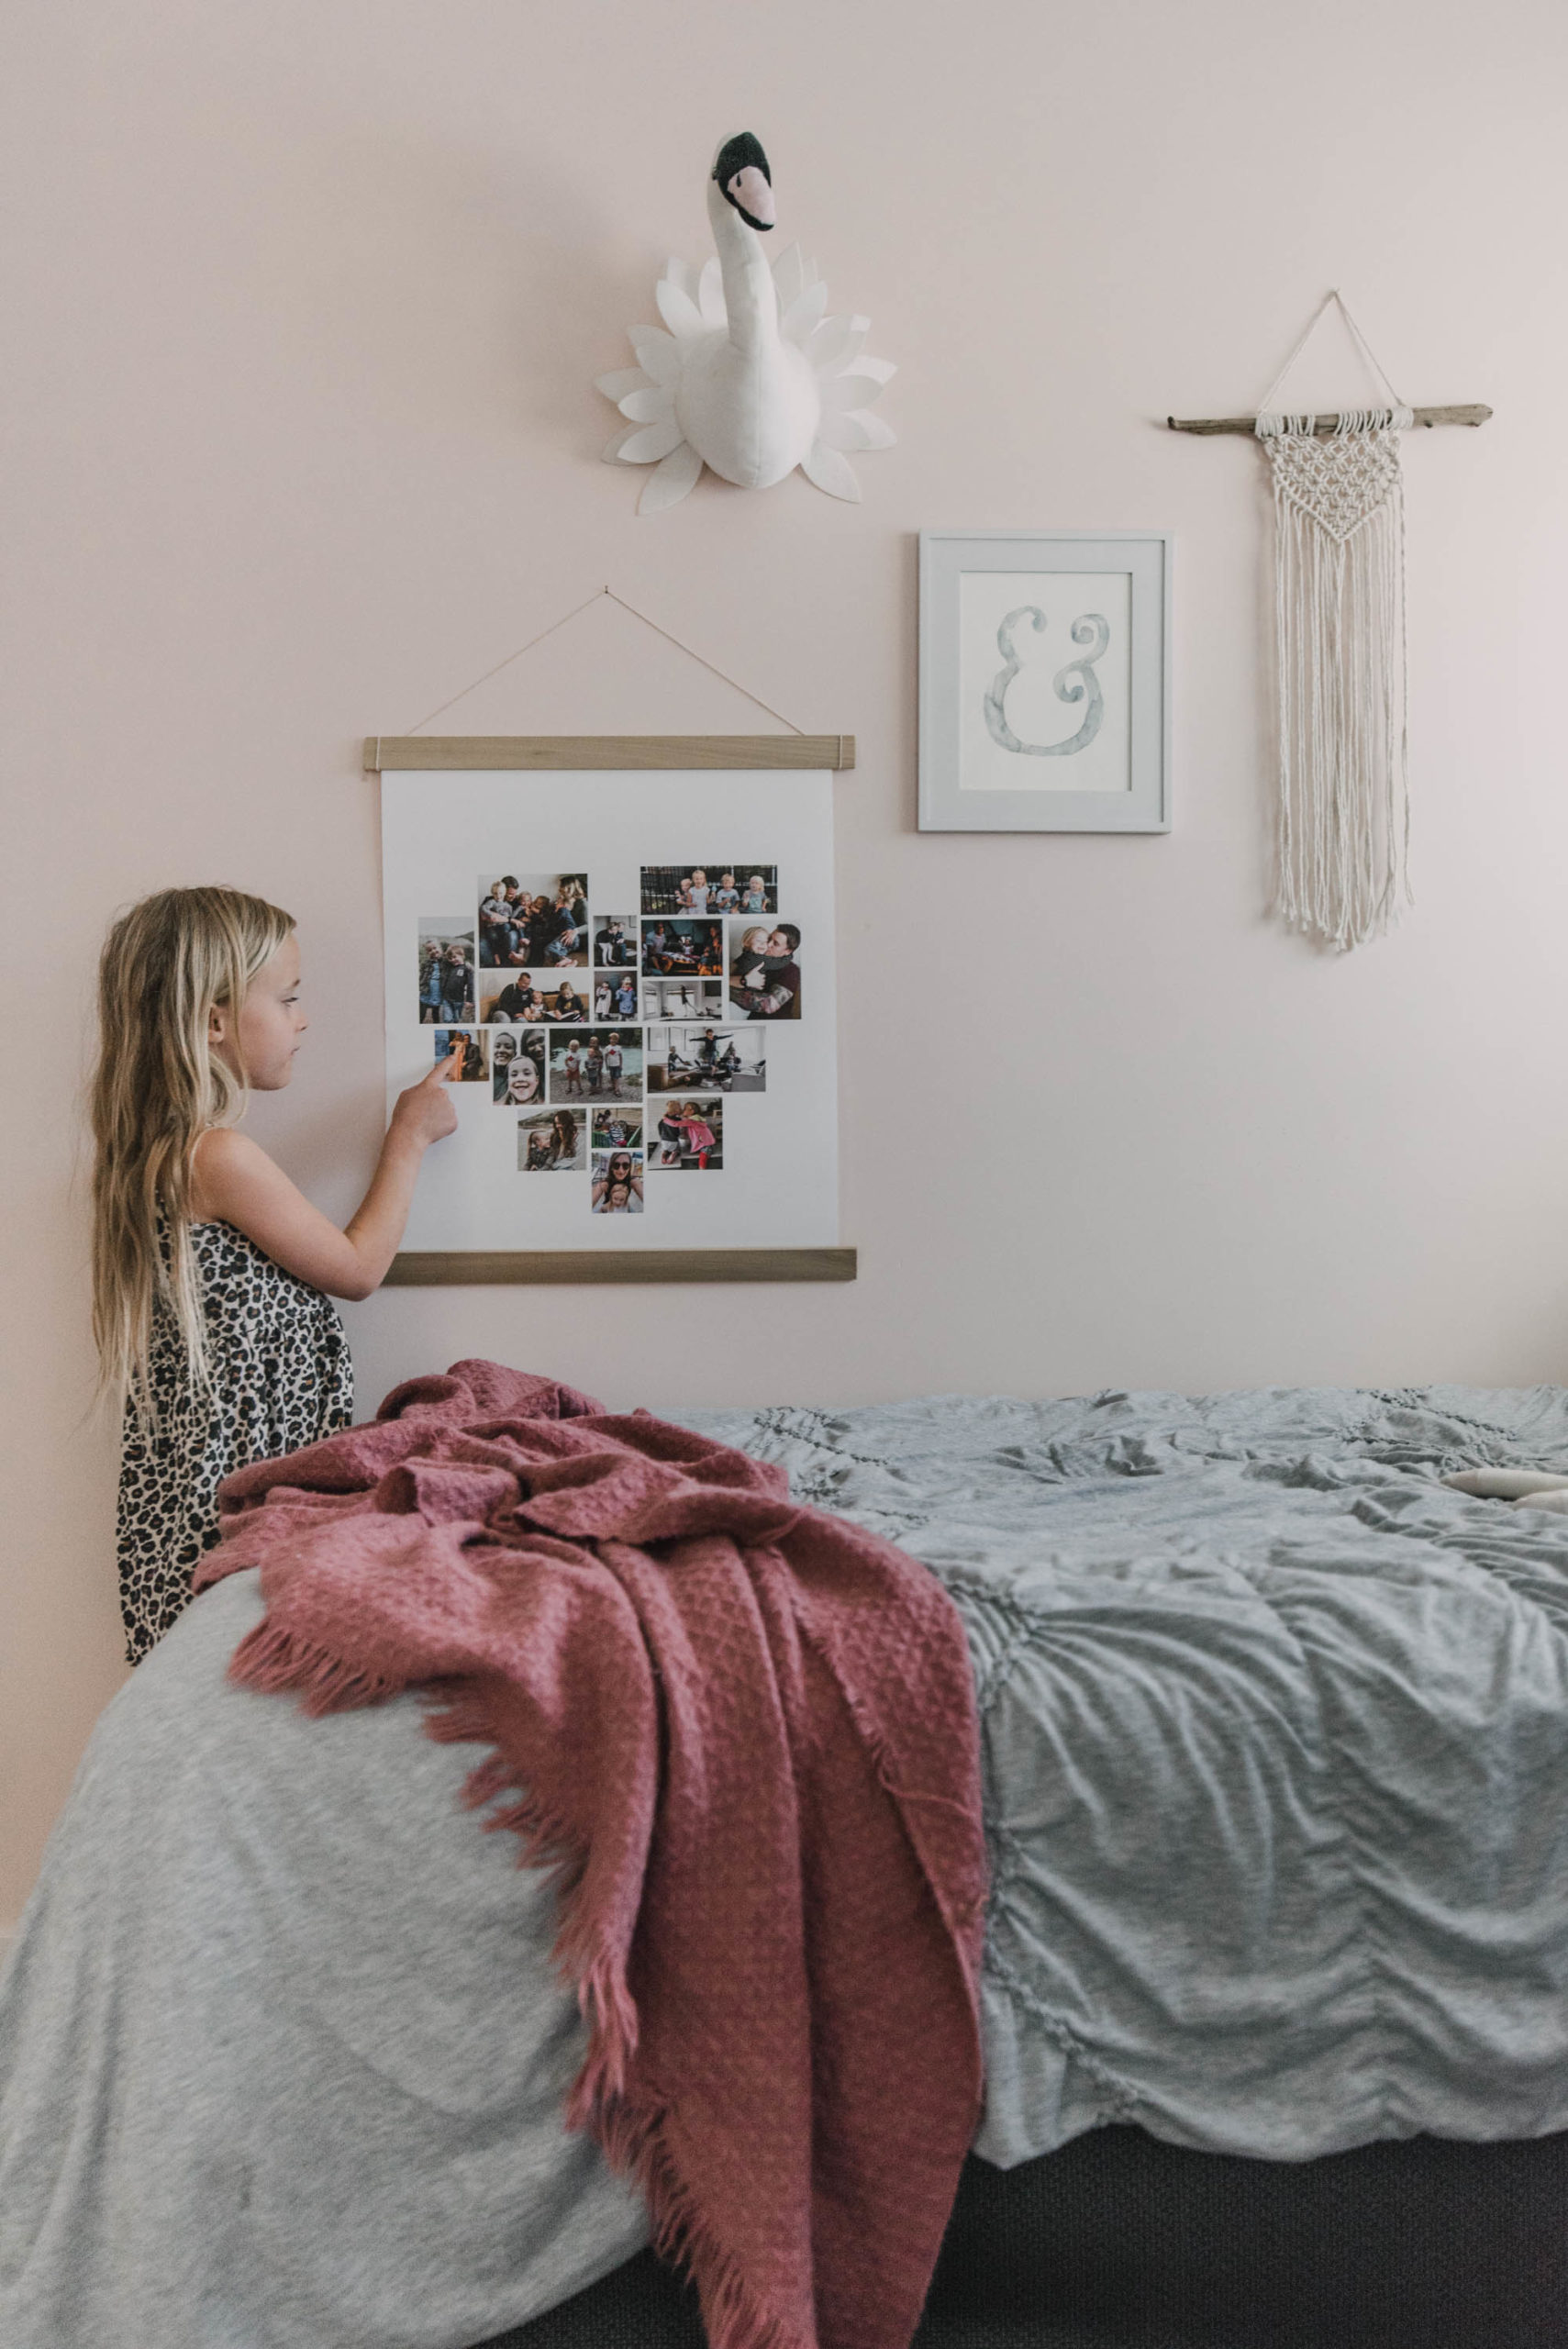
It’s important to do the bottom piece of the wood frame because this weighs down your poster a bit to keep it from curling up. If you really wanted your poster to lay flat on the wall you could use a piece of double sided tape or adhesive to keep the bottom to the wall. I added this to the growing gallery wall above Aubrey’s bed- and it’s her new favorite thing to show us… over and over. 

Adding fun color to black and white photos

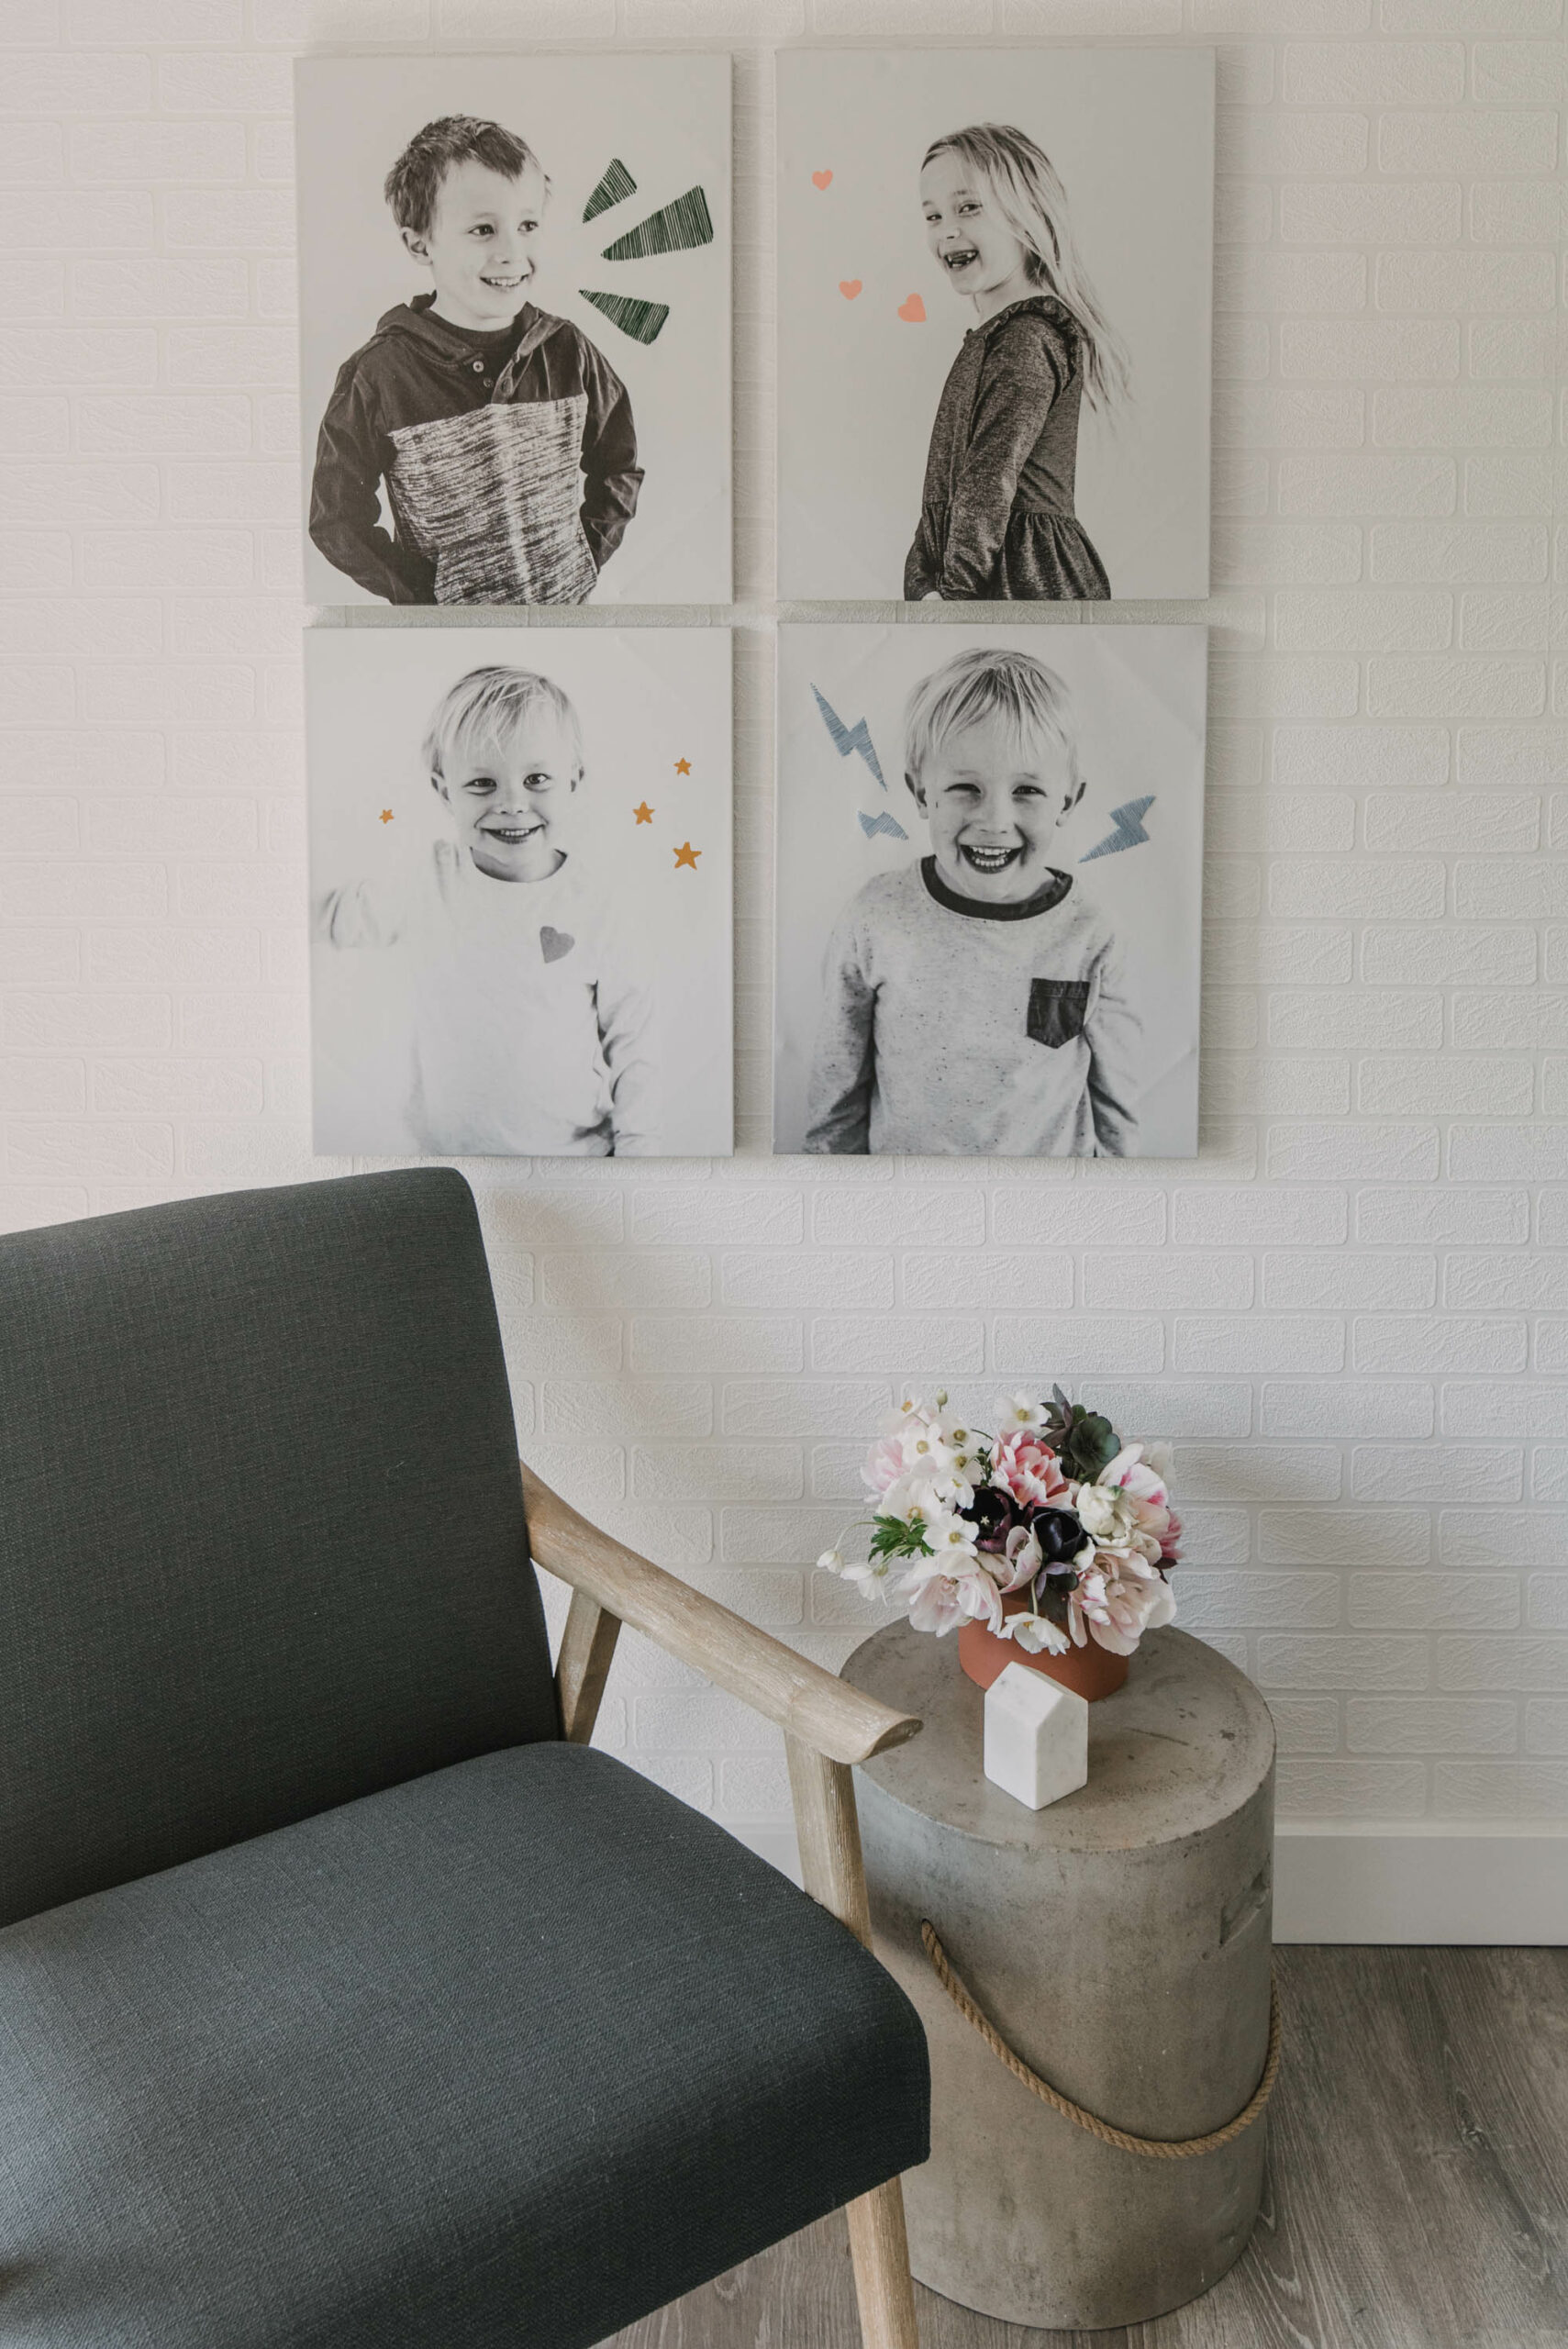
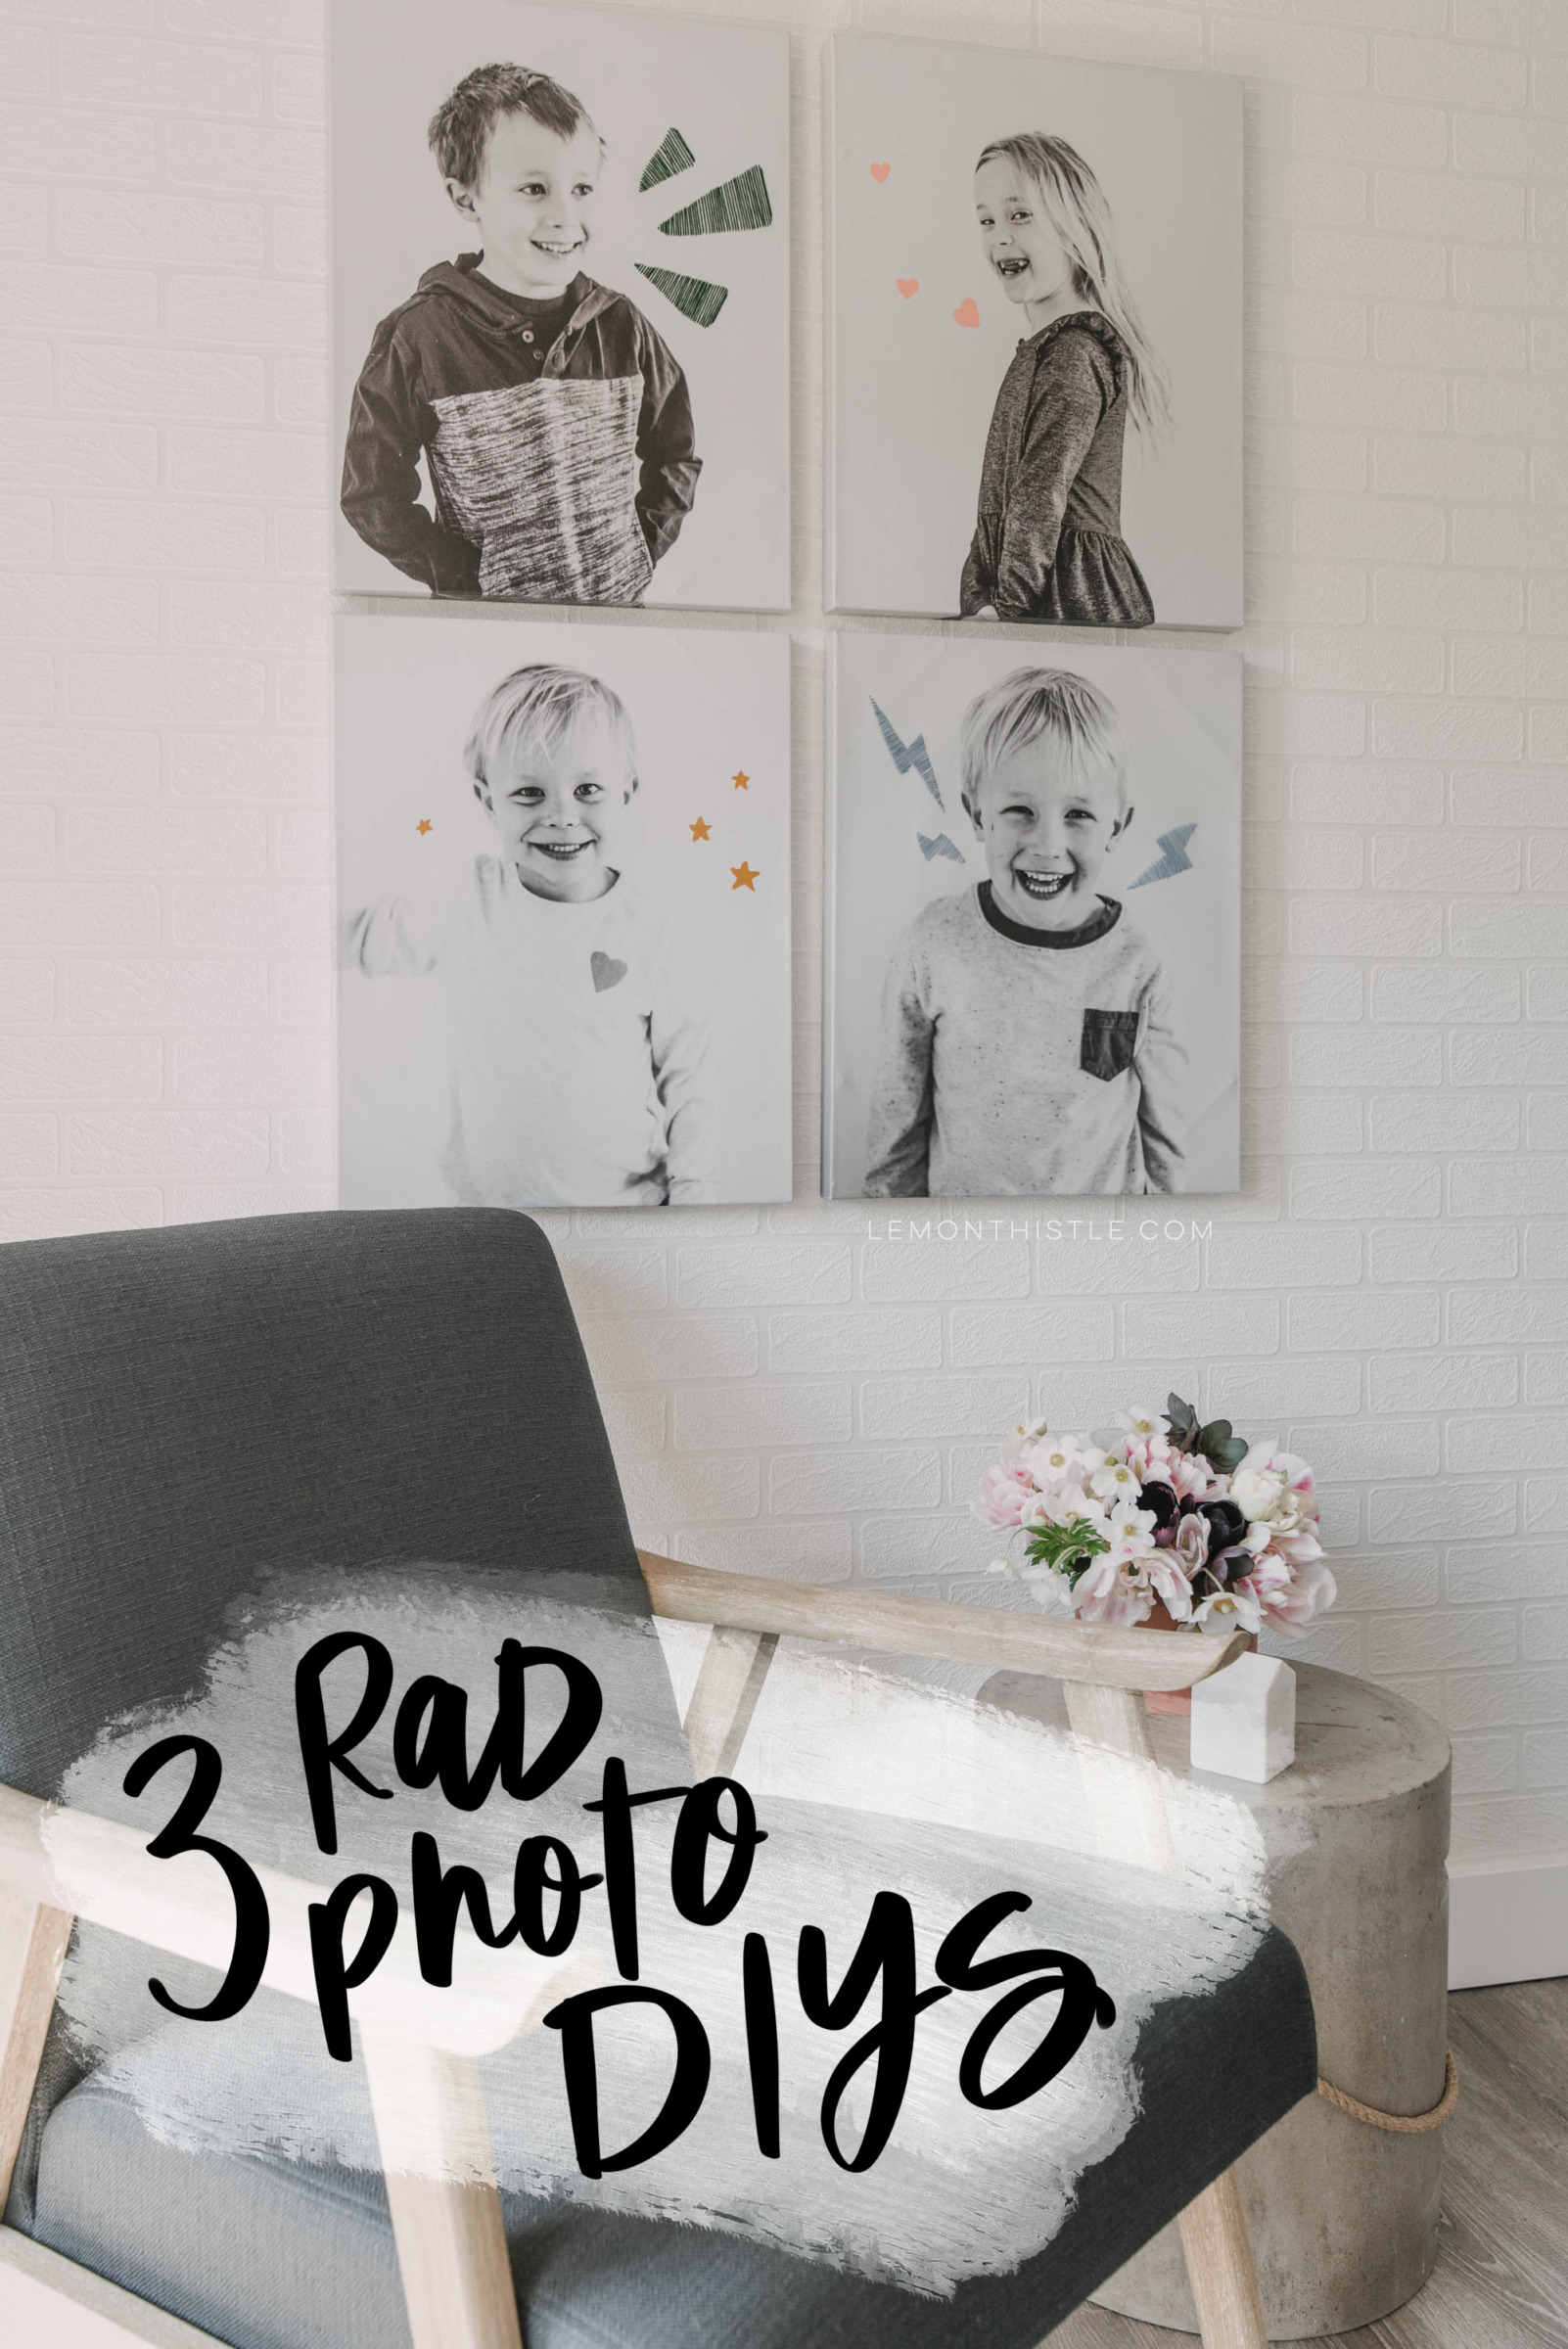
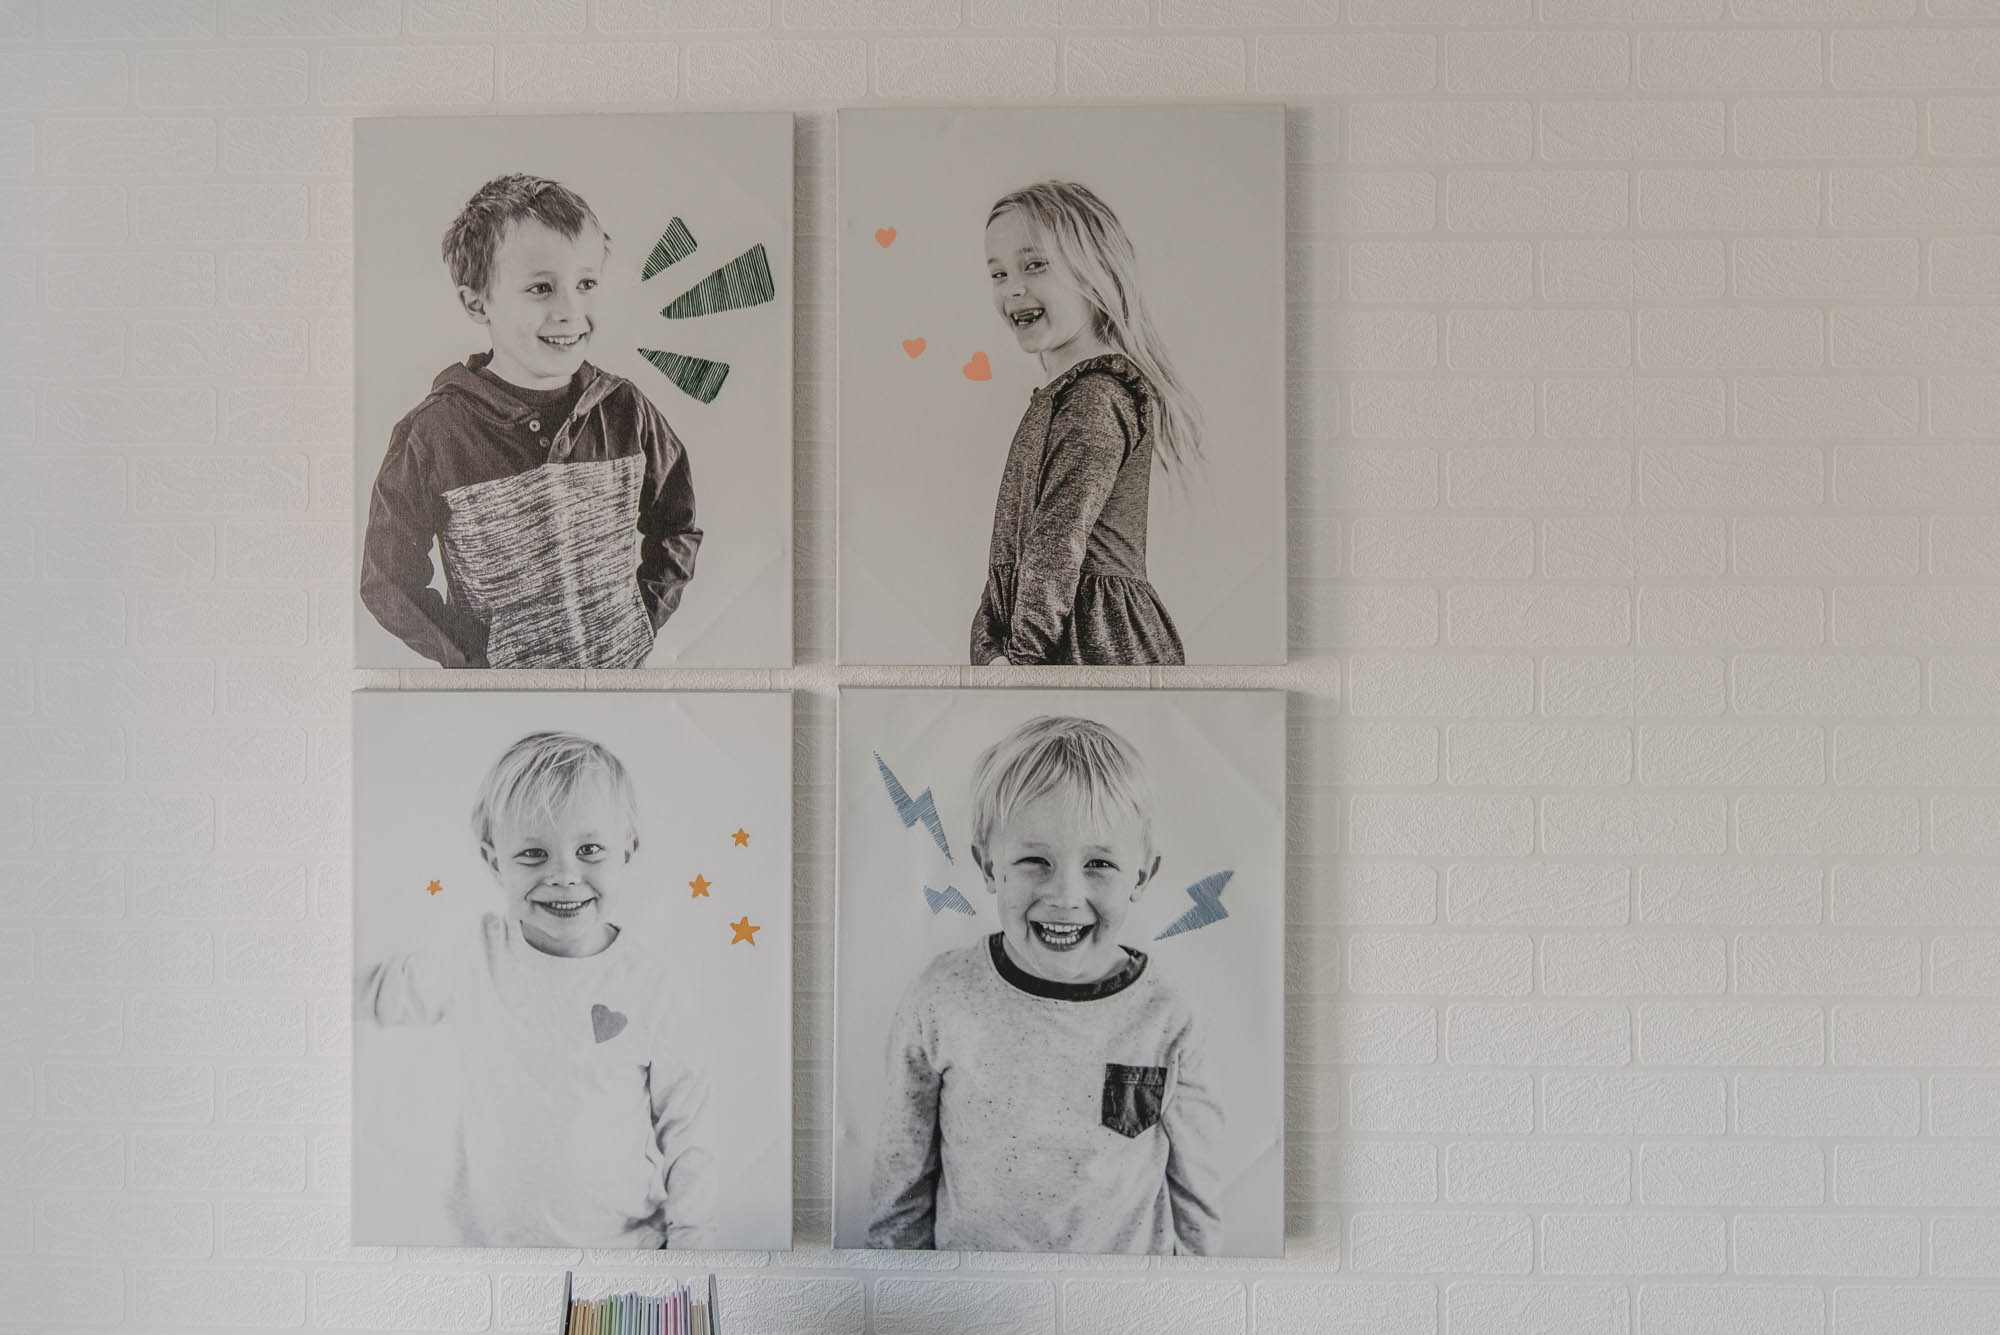
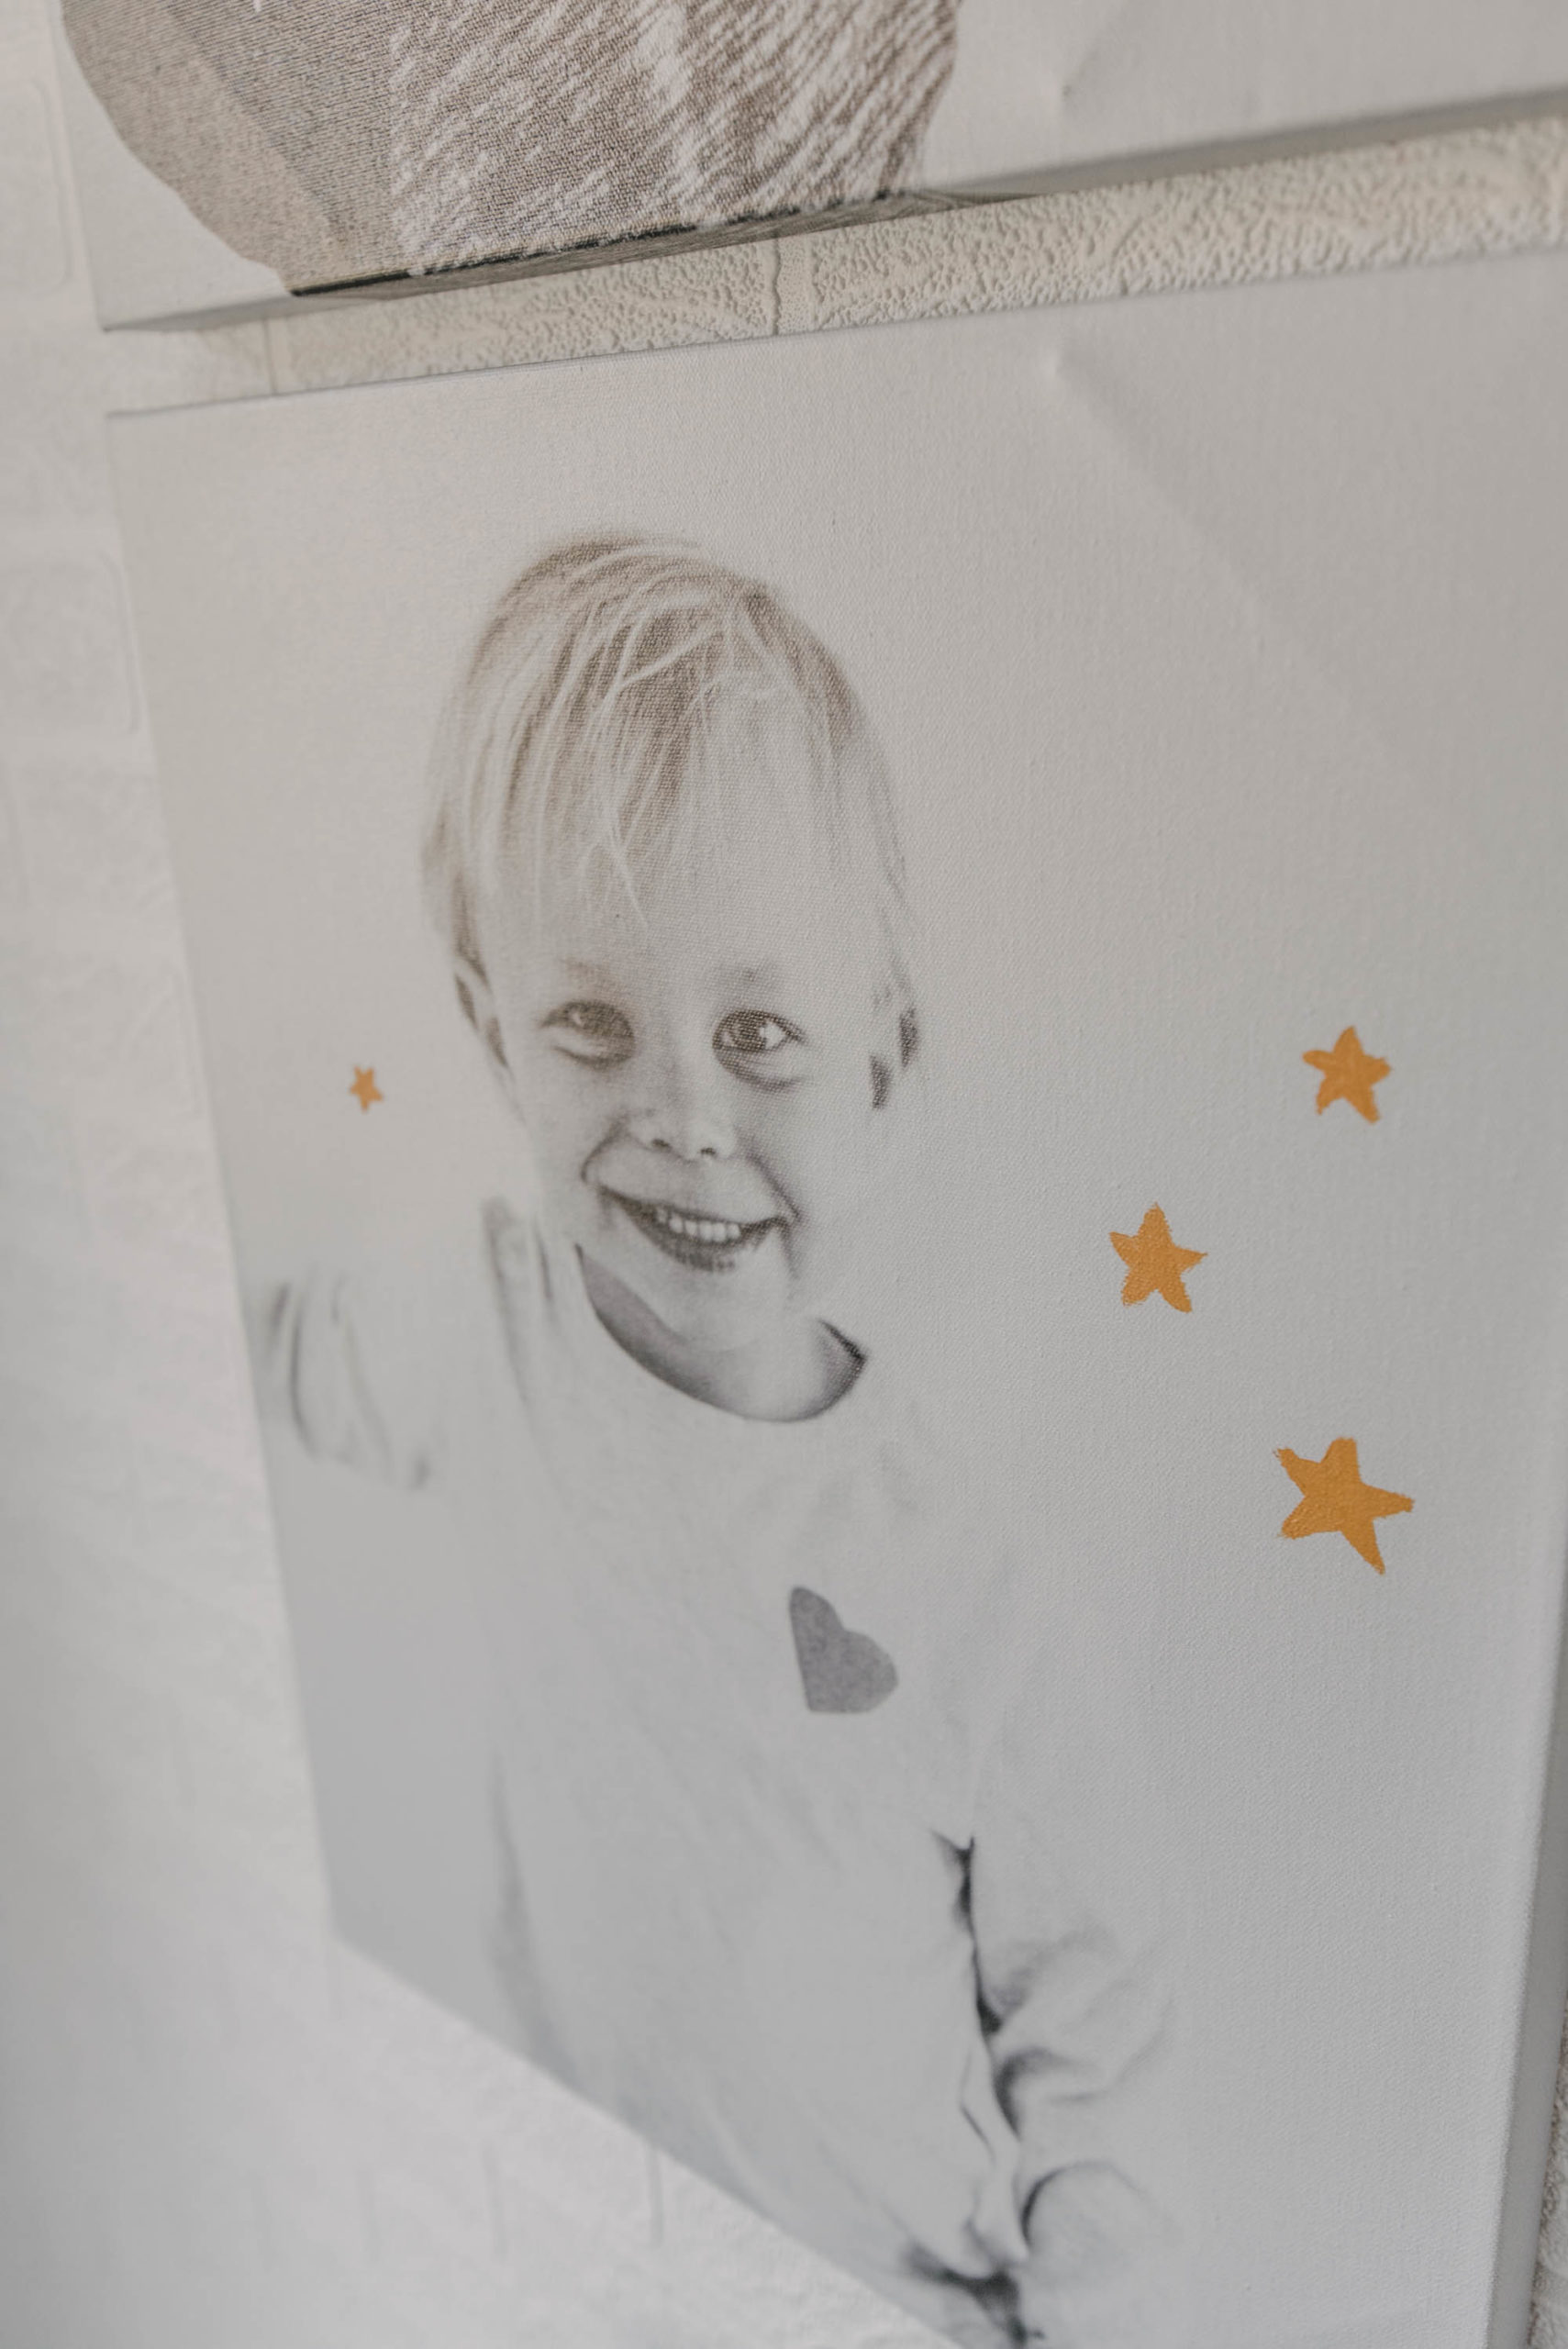
3. Add Color to Black and White Canvas

Okay, I saved my favorite one for last. I’ve spotted blown up black and white photos of kids in homes quite a few times. They’re so lovely, but we want to use these in our playroom and that felt a bit sophisticated for the playful feel we want down there. We’re currently moved out of our house due to our flood but when we move back in- these are the first things going up on the wall. I wanted to add some color and personality to the black and white photos to make them even more fun for the kids. 

These photos are ones I just took in our entry way. I took down our hanging plants and had the kids stand on the bench against the white wall one night after dinner. I edited them all with the same black and white filter and had them printed on the largest size of the Walmart Photo canvases with same day printing – 11×14. You can get larger sizes too, there’s just a wait time, so if you’re an impatient crafter like I am- this is the perfect size! 

As for adding color… I did this two different ways: Painted and embroidered. The painted one is the easiest- so let’s chat that first!

Paint on photo canvases
Paint on Kids Photos!

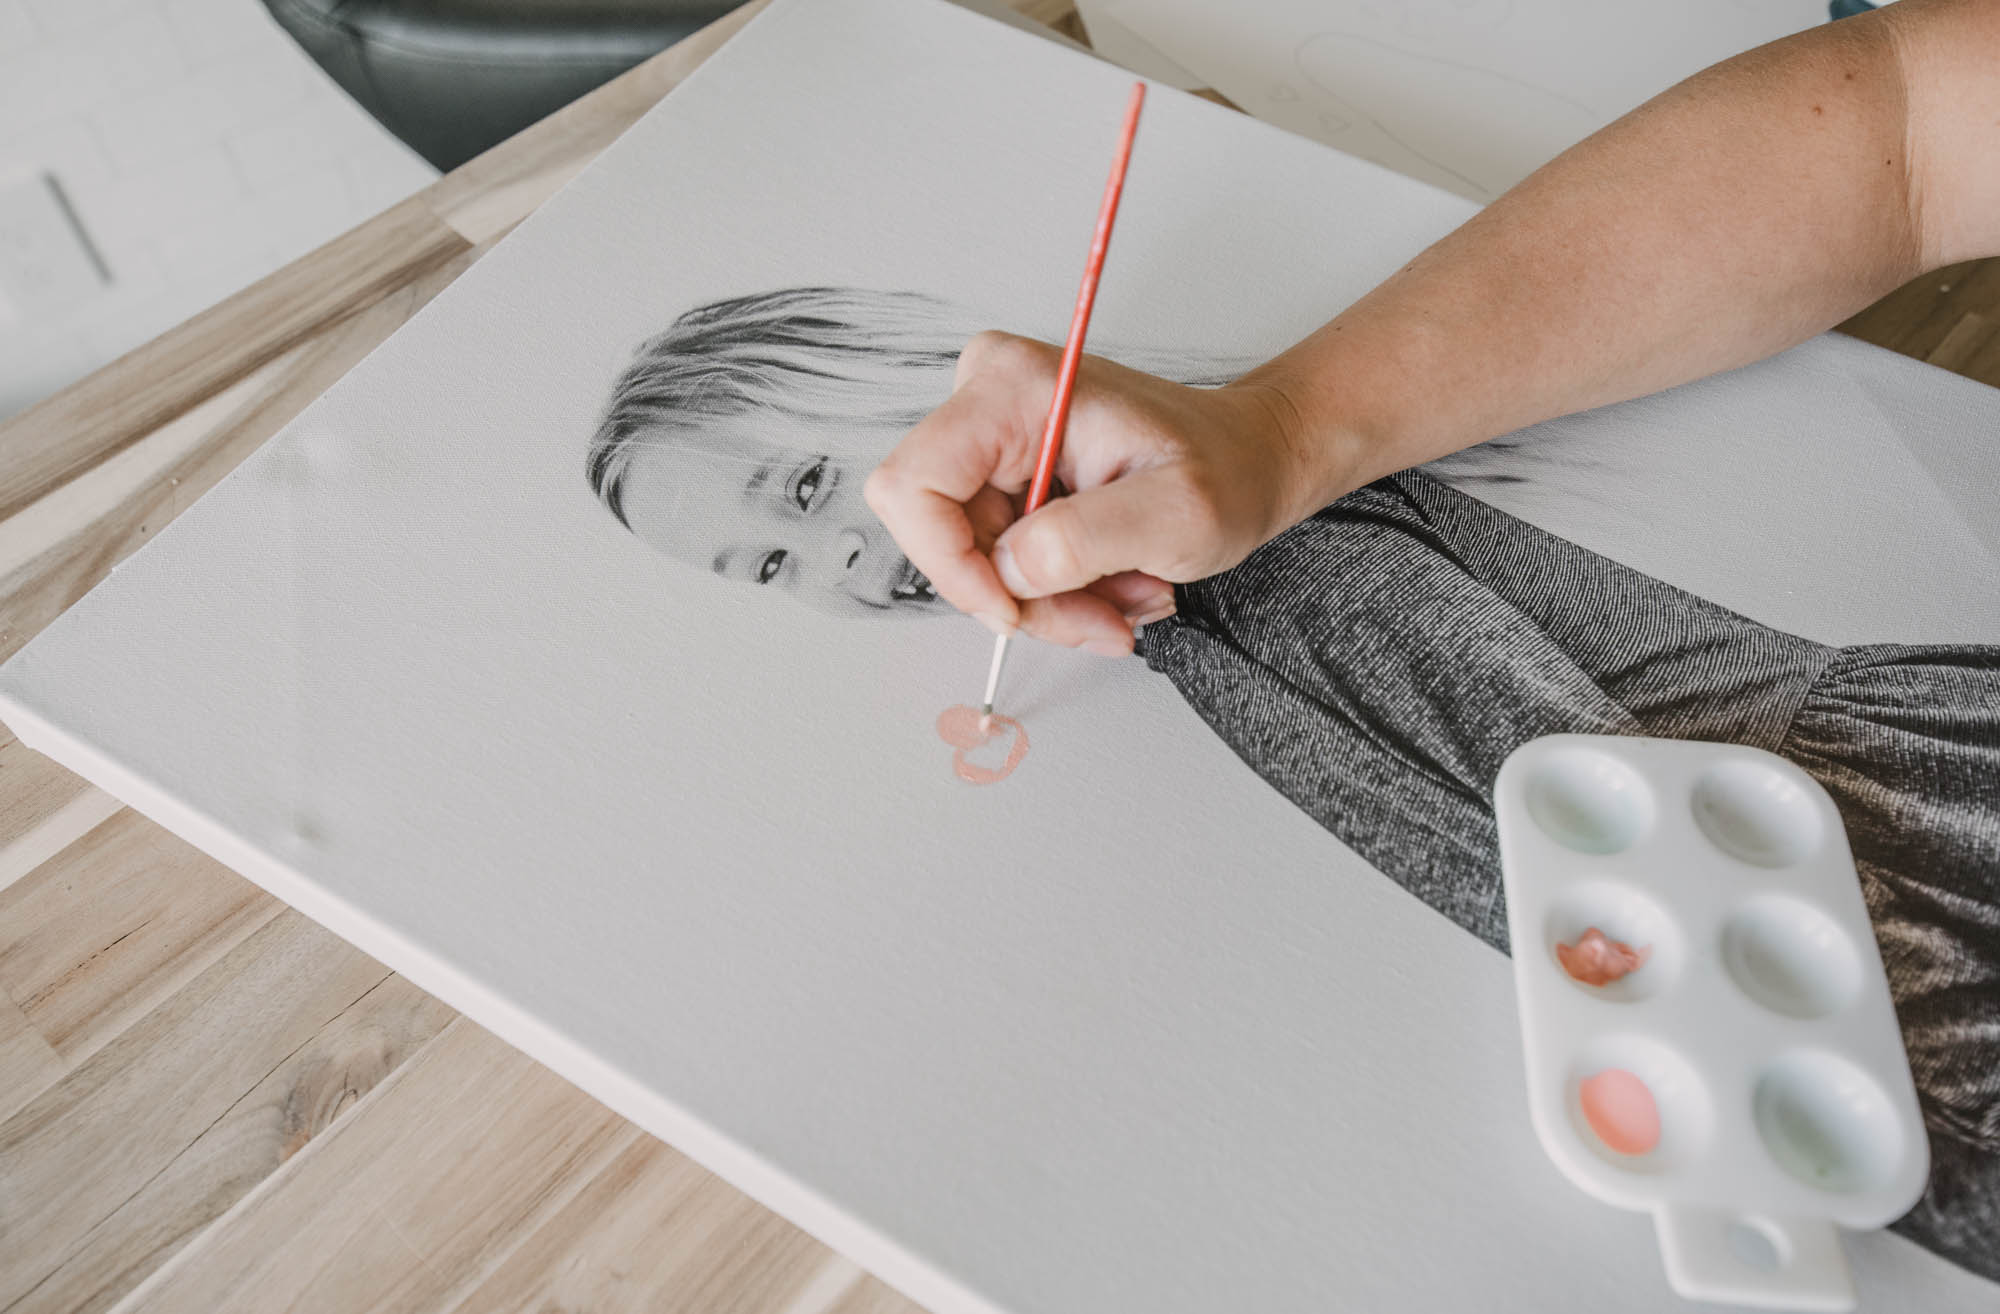
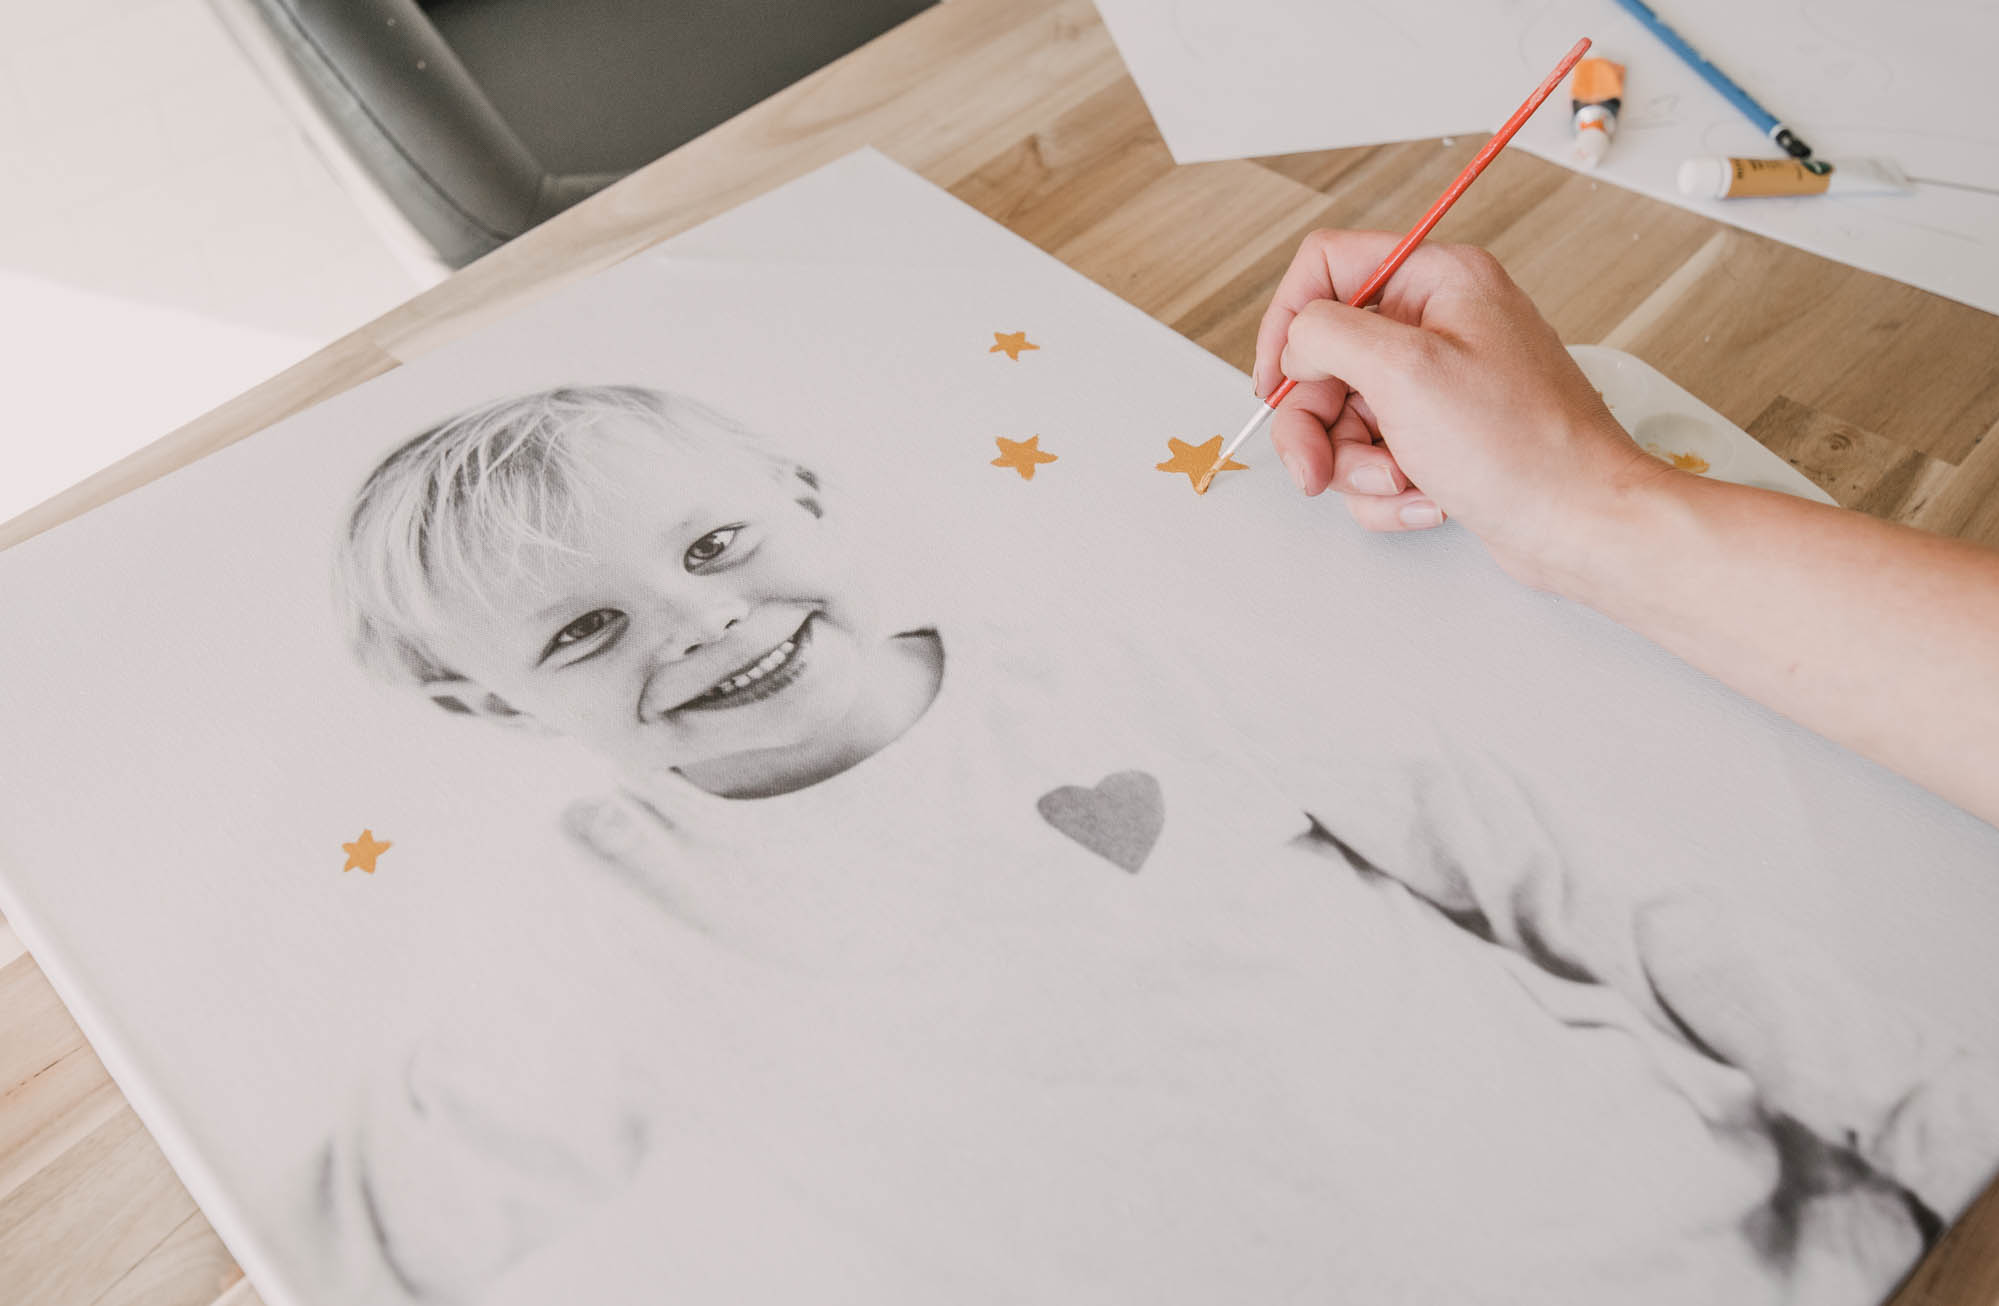
I just picked a color of paint the kids loved (they helped me choose their colors) and shapes for each, then I got painting. You could totally sketch out your shapes first, but I didn’t bother with that for painting the stars and hearts. I used thick acrylic paint so didn’t need to do two coats, but if you were using thinner craft paint, you might need to.

Embroidered on Canvas

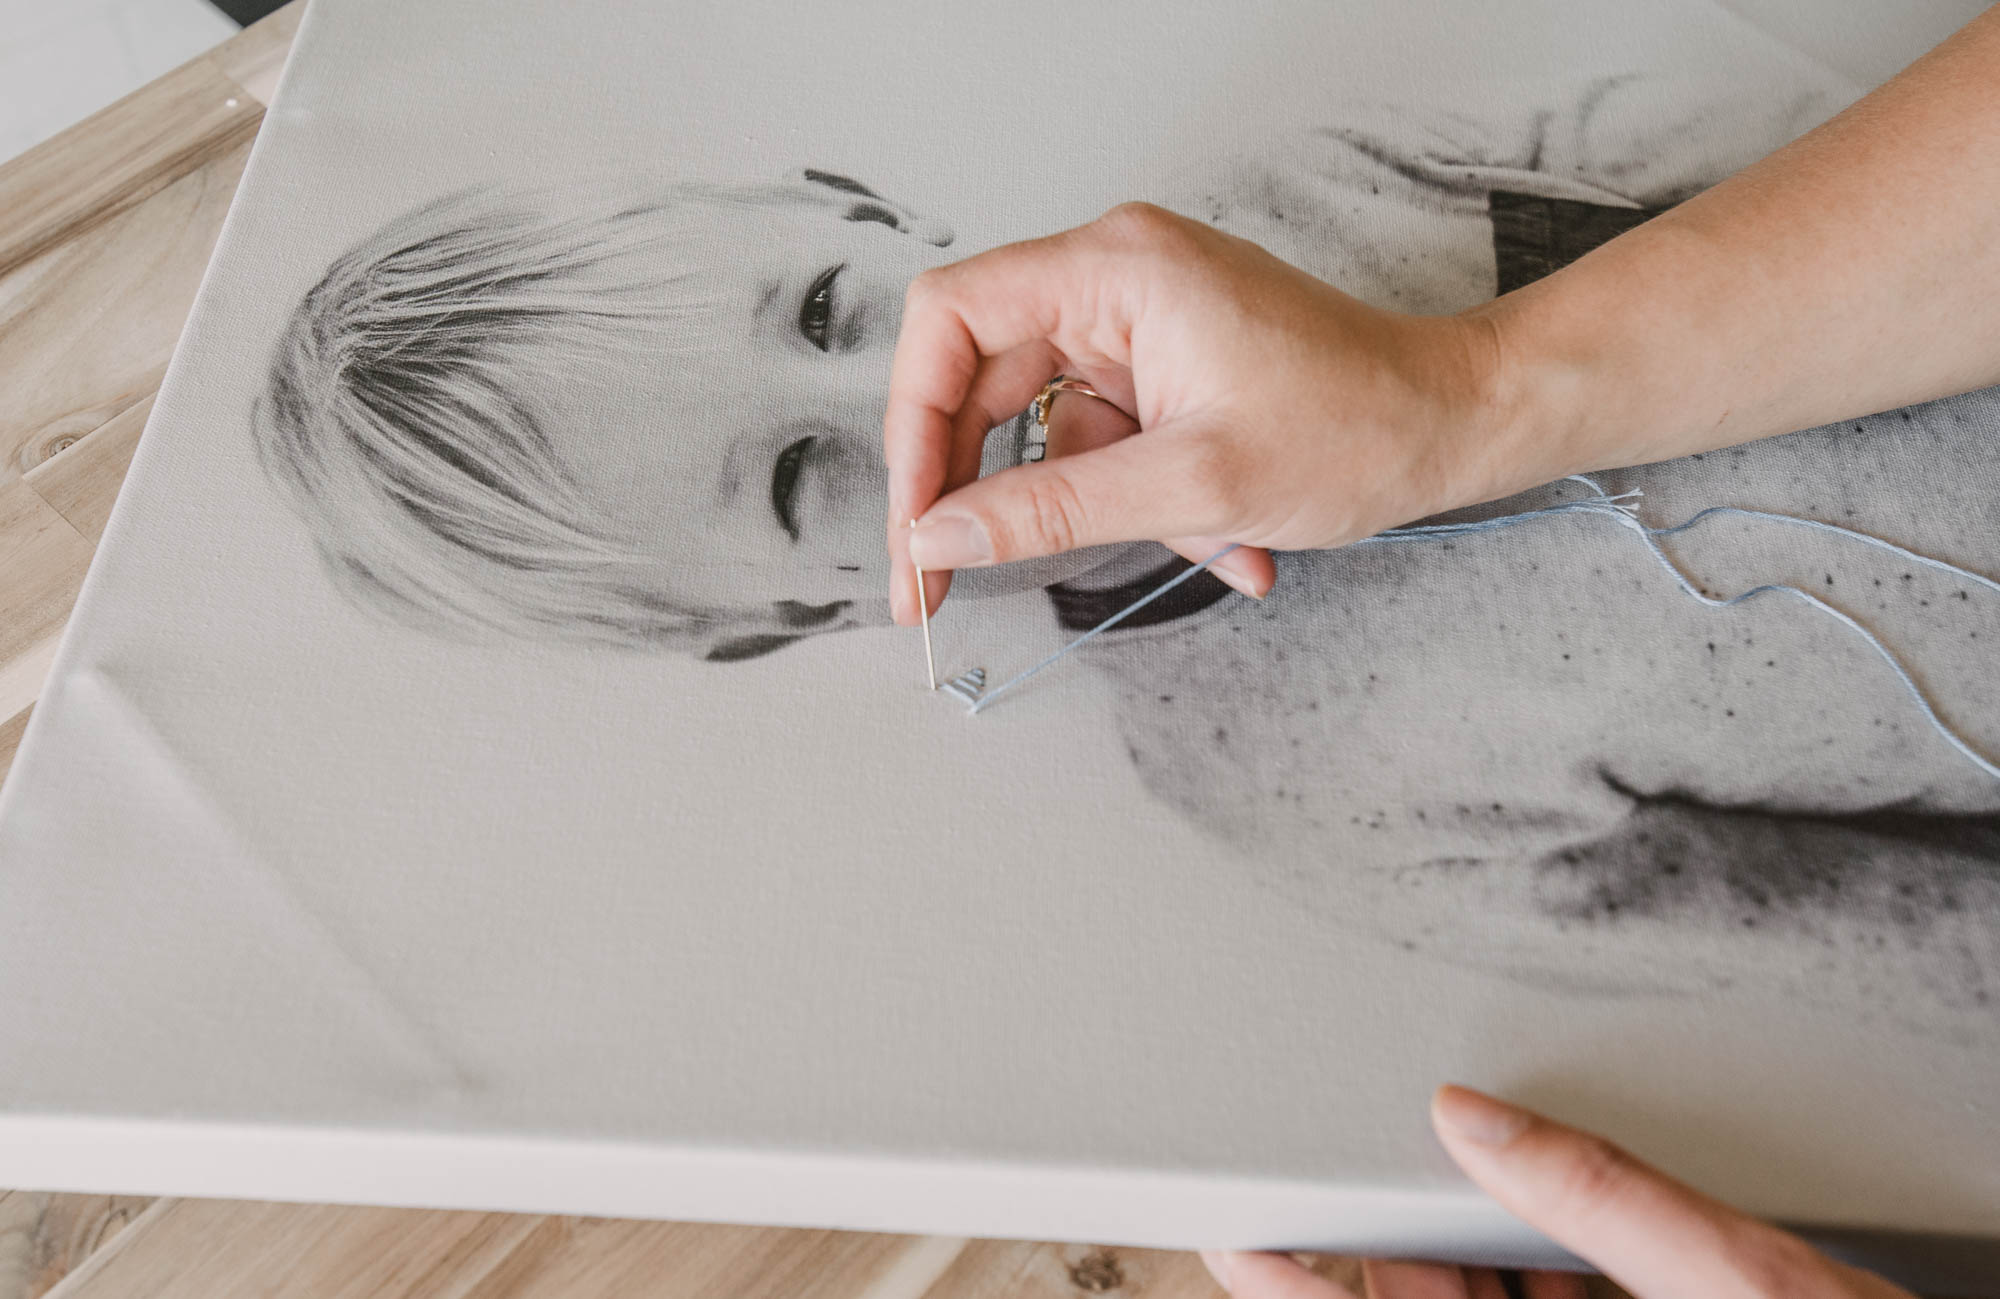
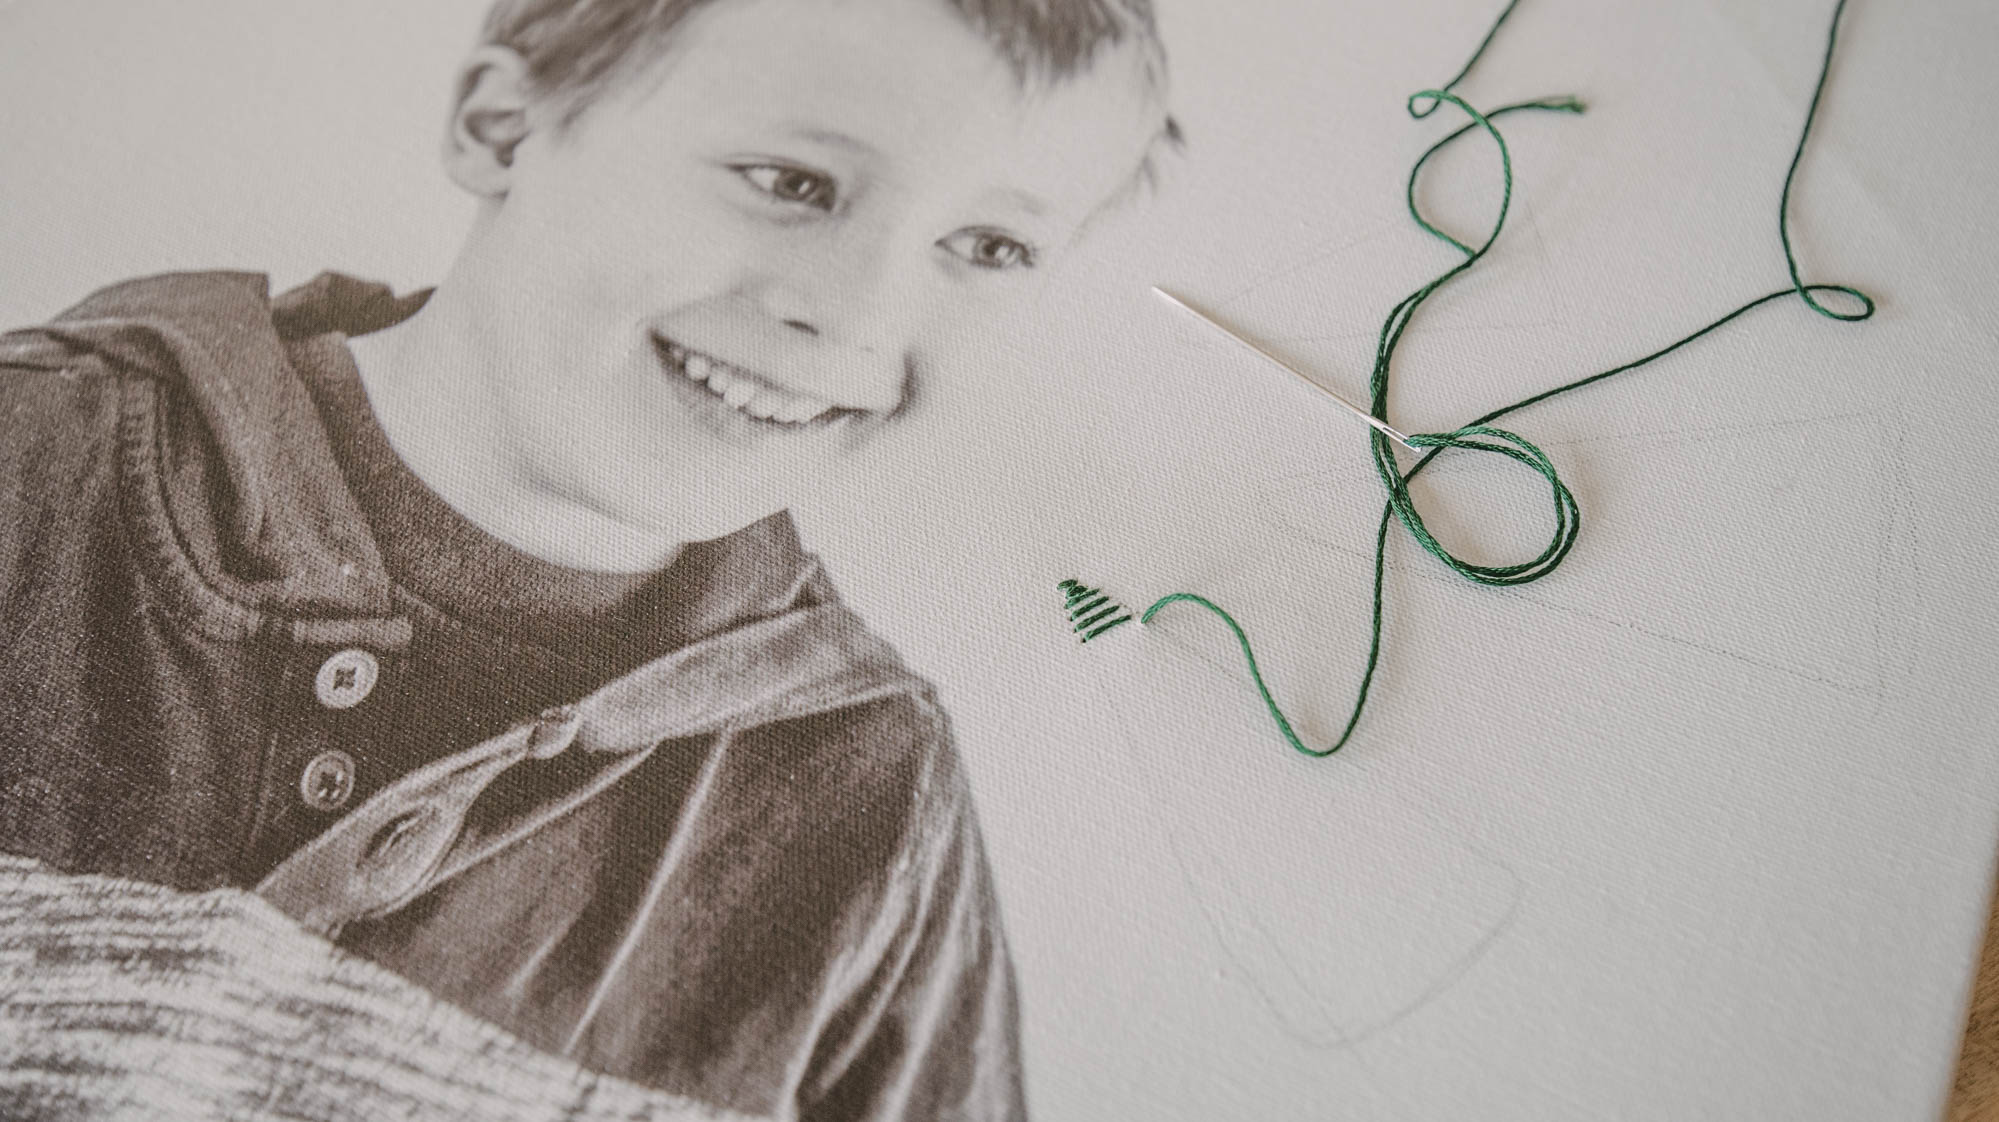
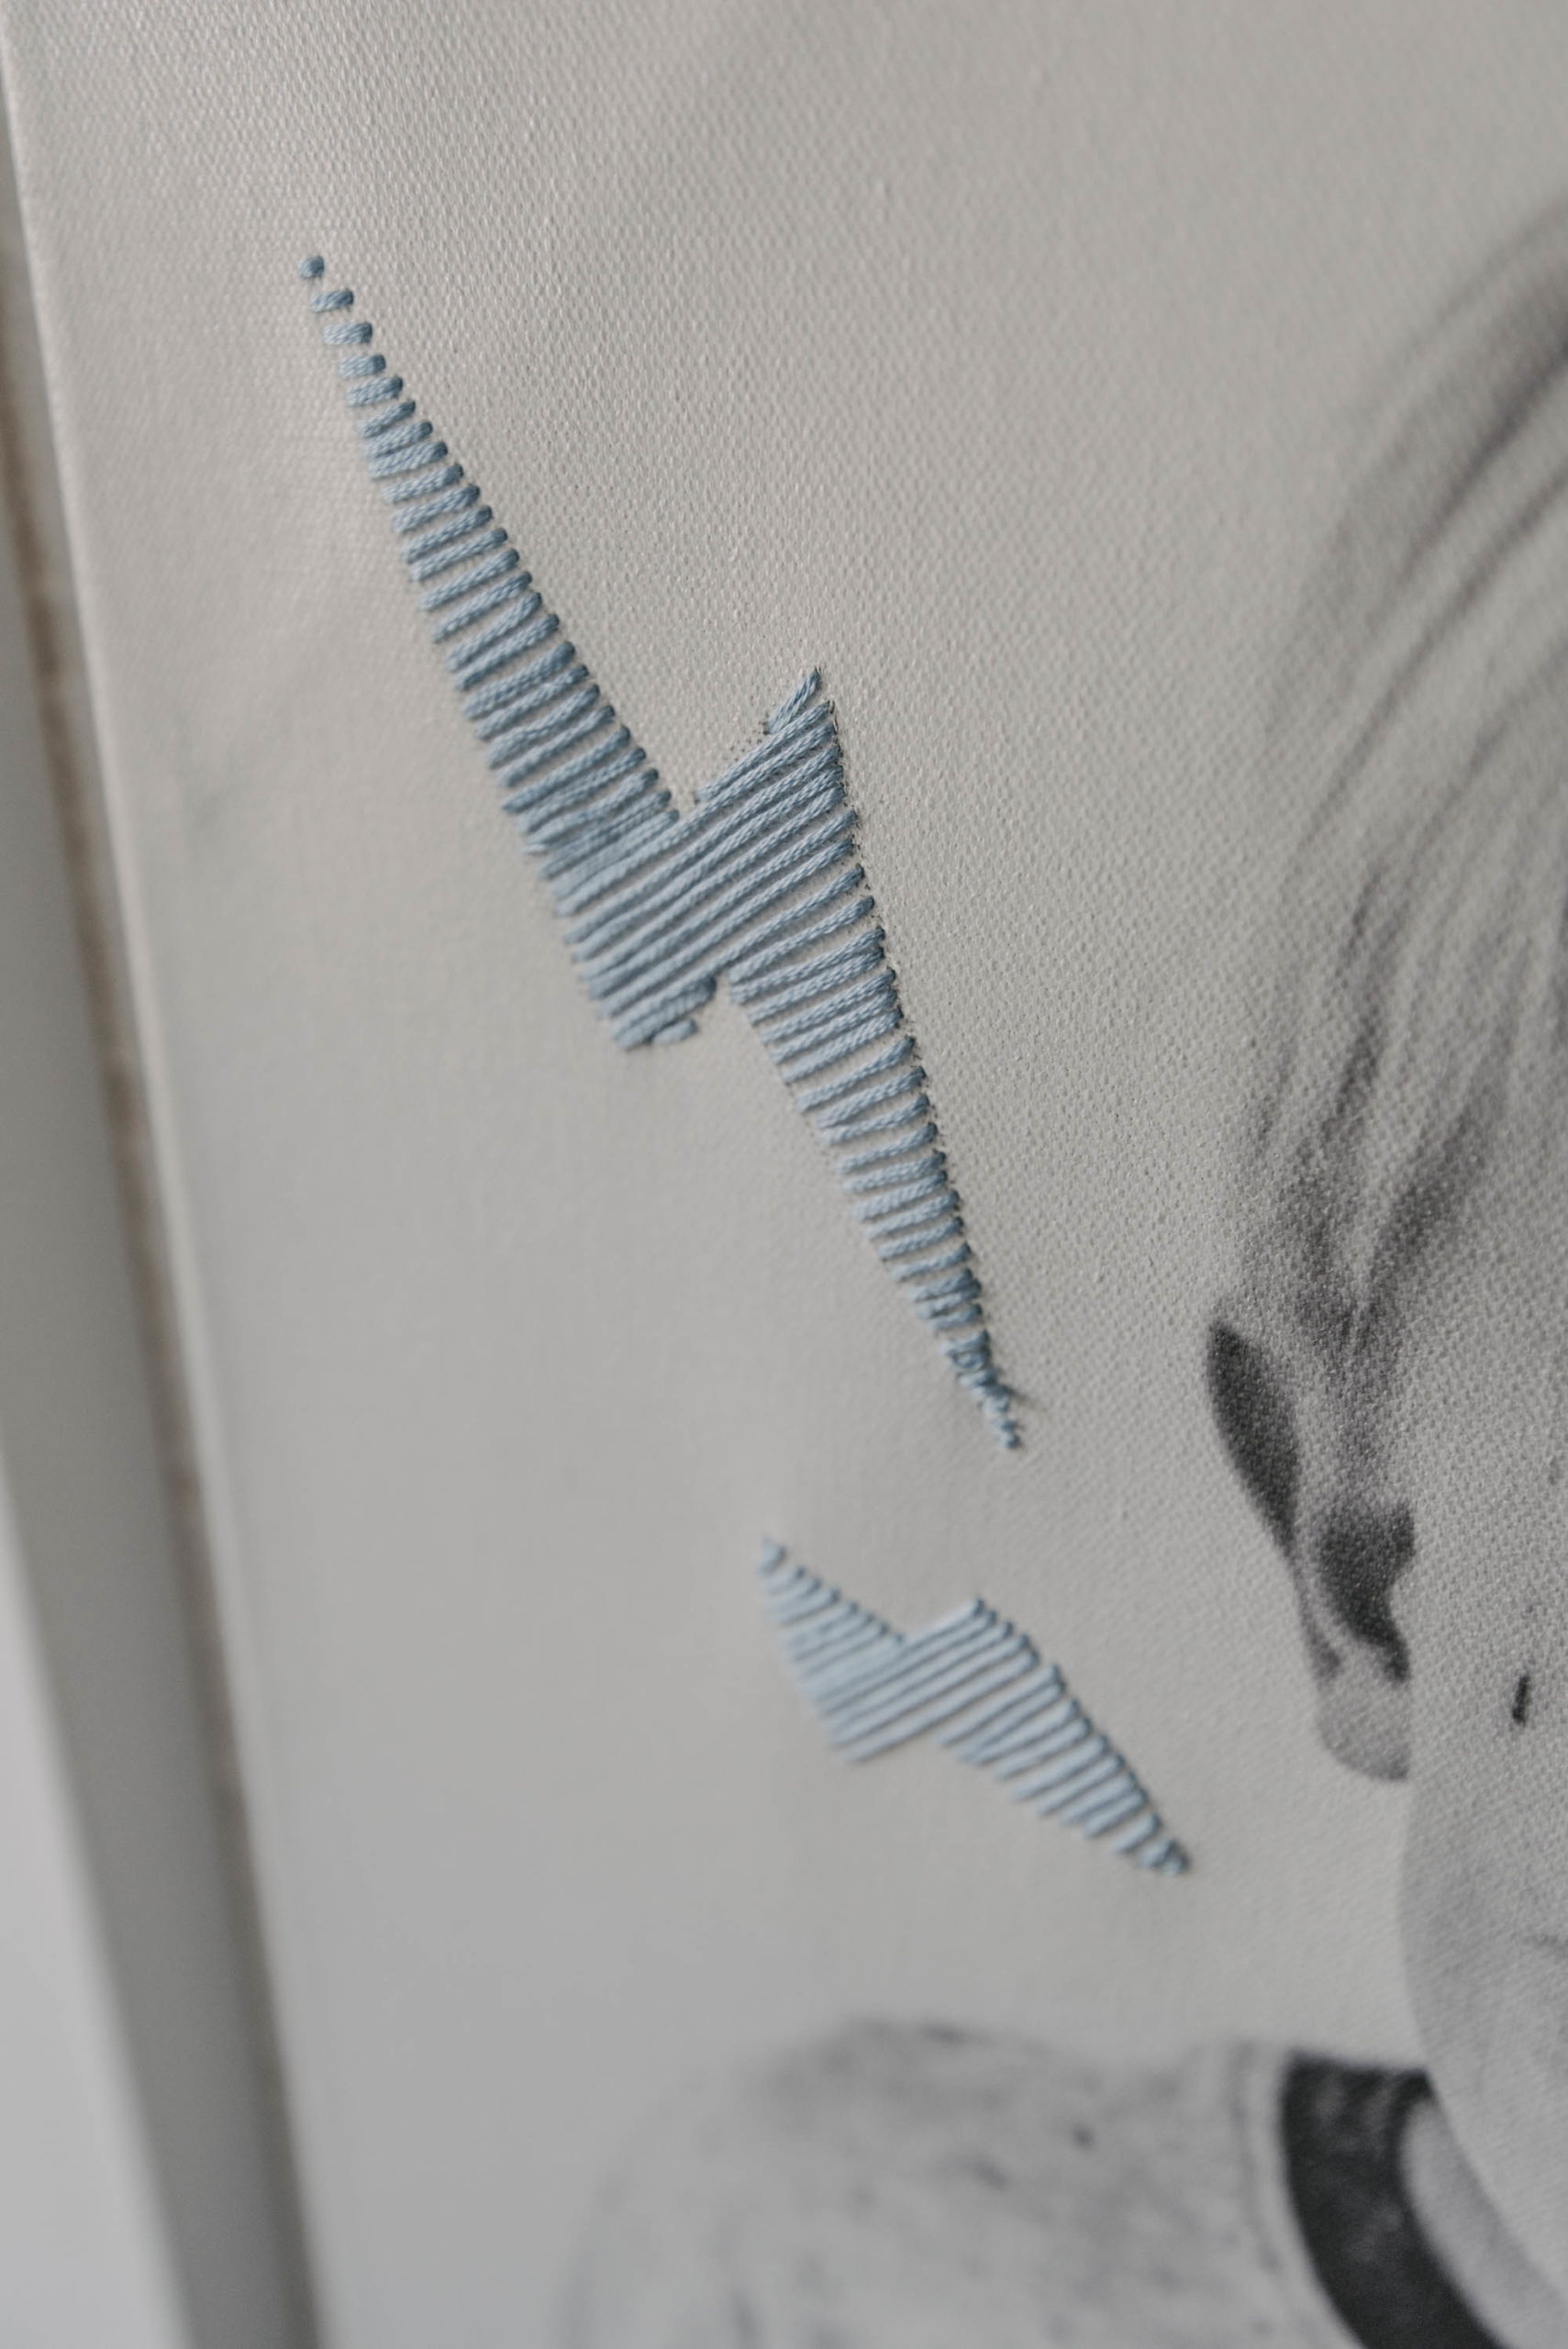
For the embroidery, I had picked up a couple colors of embroidery thread when I was in Walmart picking up my prints and groceries. I wanted the colors to really pop but not be SO bright. I did sketch my designs on these first. I started out free handing the embroidery and my lightning bolt looked… not like a lightning bolt. I sketched the shapes in pencil, then got to embroidering! I’ve embroidered photos before. I love that the canvas holds its shape and doesn’t buckle unlike fabric (I’ve never had luck with fabric!). Just tie a big knot in the end and start on one end of your shape, stitching your way up. I found poking two holes from the front before threading the stitch worked best for me. Then, when it was flipped over I could see where my needle should go through. I totally love the texture these ones have!

DIY Canvas art for a playroom
How to Embroider on canvas
Hand painted details on a canvas

That’s it! Aren’t they so fun? And I love that these DIYs allow us to add more photos into our home decor without sacrificing style. If you’re loving these photo DIYs, I have another one coming right up for you! I’ll be talking about how to add overlays to your photos before printing… including some free ones I’ve made for you! Keep your eye out for that!

If you try any of these DIYs- you know I’d love to see! Tag me on social @colleenpastoor and show them off!

Category: DIY, Home DecorTag: Craft, DIY, DIY Home Decor, Kids DIY, Photography, Sponsored, Wall Art, Wall Decor
Facebook0Tweet0Pin0LinkedIn0
Previous Post: « How to stain a pressure treated wood deck Can You Use Stain with a Paint Sprayer?
Next Post: 6 Free Hand-lettered Photo Overlays 6 Free Photo Overlays and How to Use Them »

Reader Interactions

Leave a Reply Cancel reply

Your email address will not be published. Required fields are marked *

Sidebar

WOOHOO!

Check your email to confirm!

(+ get your freebies + discounts)


Thanks for dropping by!
I’m Colleen: wife; mom to 4 wild ones; and DIY blogger behind Lemon Thistle. You can expect to see rad DIY, modern home decor, renovations, hand lettering and the occasional party on Lemon Thistle. Read More…

email facebook youtube instagram pinterest

Unless otherwise noted, all content and images are mine. Full posts may not be shared without express written consent. But I love when you share! Feel free to share, without altering, one image with proper credit and a link to the original post. All free printables are for personal use only.

Everyone loves proper credit- if you ever notice something improperly credited, please please shoot me an email and I’ll fix it lightning fast.

Find all my policies right here.
This includes my privacy policy, info on the GDRP compliance and information on affiliate links (Including Amazon Affiliates).

Visit Colleen Pastoor’s profile on Pinterest.

colleenpastoor

My house is never this clean
-
DIY + Home Decor Blogger
Mama of 4 👶🏼🧒🏼👦🏼👧🏼
Renovating our 🏠 the DIY way
🖤 Lettering & ☕️
-
✉️[email protected]

colleen pastoor/lemon thistle
Which do you like best? Even though it didn’t wi Which do you like best?
Even though it didn’t win the vote, I still decided to make this free printable a set instead of just the one!
You can find them plus so many other gorgeous spring printables from some friends of mine over on the blog today!
I’ve been doing some polls in my stories (thank I’ve been doing some polls in my stories (thank you for your responses!) and one that totally surprised me? 
Almost half of you don’t know I blog! That’s my job, guys 😂 IG is just a fun little part of that! So tell me... is this new information to you or are you team ‘knew that!’? 

Also... Should I do a blogging Q&A? 🤷🏼‍♀️
Happy Valentine’s Day, friends 🥰 Happy Valentine’s Day, friends 🥰
Anyone else feeling the balance between work and f Anyone else feeling the balance between work and family and rest and keeping your house liveable has all just toppled this year? I keep seeing articles about pandemic fatigue and long term stress and burnout and while it’s totally relatable, I really just want tips on how to actually deal with that. I thought I’d share some things that are helping me if you’re in the same boat... and I’d love if you shared your tips in the comments! We could all use them 🥰
-I’ve been going for a walk every day by myself. Even when it’s freaking cold like today, I just bundle. It’s the only time I get truly to myself with no kiddo asking for something and that I don’t have to try squeeze in an email or something else.
-I’ve been putting the instant pot to work and leaning on cheater meals (local soup mixes are amazing), Costco dinners... whatever
- I’m prioritizing friendships with phone calls, zoom games nights and group chats about the bachelor (with matching snacks!)
- I’ve given myself a schedule that has downtime to play with the kids and to read... even when there’s things I feel like I ‘should be’ doing
- I’ve realized exactly how much time I’ve been spending on my phone and that it’s become my response to stress. Have you ever looked up your screen time analytics? 🥴 look at how many times you pick it up in your day. I’m setting app limits for myself and trying to break this habit, but I’d really love tips!
Can you believe that address sign is a DIY?! I'm s Can you believe that address sign is a DIY?! I'm sharing the whole tutorial in partnership with @OfficialCricut today over on my blog! I'd originally made it as a place holder for a metal one but after having it up for 4 months... we totally love it long term! What do you think? Would you try it? #cricut #cricutmade #ad
What are your Sunday plans? Mine are to sit right What are your Sunday plans? Mine are to sit right here for the first half of the day drinking coffee, then the second half of the day it’s to clean this house so it looks like my Instagram feed again 😂
Who has DIY projects on their mind this year?! 

👏🏻CLOSED 👏🏻 congrats @kelseycford ✨
@ryobi_canada and I want to help you start knocking those projects off your list by giving away a new nailer and battery set! #ad 
This tool is what we used for this accent wall and all the trim in our home. It’s the one I used to trim out my built in shelving and add the decorative moulding to my geometric barn door. What I’m saying is this thing is a workhorse and I want you to have one too 😉
To enter:
✨Follow me @colleenpastoor and @ryobi_canada 
✨like and save this photo 
✨ tag some friends who’d love to win in the comments! One tag per comment, each is an entry. 
✨ share to your stories for a bonus 5 entries!

Open to Canadians only this time (sorry US friends!) and not associated with Instagram. Closes Friday Jan 22 at noon PST!
Let’s talk about coffee! This is my coffee ‘st Let’s talk about coffee! This is my coffee ‘station’ and the second photo is my dads! I’m talking aaaall about them over on YT today!
Also... see how nice that fresh silicone looks?! 😉 IYKYK
The hallway is finally finished and I’m so stink The hallway is finally finished and I’m so stinking happy! 

It’s felt like such a long time coming for such a small space. Since we moved in 2.5 years ago, this space has seen new doors and hardware, new trim, new floors... twice😅, we changed the boob light to a pot light and I hated it and now it’s got the most beautiful flush mount fixture I’m in love with (thanks @mymitzi!). It finally got some fresh paint and now frames on walls and last but not least... After this weekend, the new floors look like they were here all along (no door jamb gaps!) which was the last thing really bugging me since our flood last year. 

All this to say that home takes time and sometimes getting it right might take a couple tries. Also- the spaces we don’t really think about (hallways) can totally help a house feel like home with some love (and family photos 🥰)
ps. I partnered with #mymitzi to create a tiktok for This makeover... are you following me over there yet?! I’d love if you popped over and said hi!
Load More... Follow on Instagram

Copyright © 2021 · Lemon Thistle · All Rights Reserved · Powered by Mai Theme