• Skip to main content
  • Skip to header left navigation
  • Skip to header right navigation
  • Skip to site footer
  • Shop
  • Get The Email
  • Work With Me
  • About
  • Search

  • DIY
    • DIY Home Decor
    • With Power Tools
    • Renovation
    • For Kids
    • For Parties
    • Wearable
    • Organization
    • Cricut Crafts
  • Home Decor
    • Room Reveals
    • Kid Friendly
    • DIY Home Decor
    • Renovation
  • Lettering
    • Hand Lettered Printables
    • Free Practice Sheets
    • Handlettered DIY
    • Free Brush Lettering Quickstart Guide
    • Learn Brush Lettering E-Course SALE
Lemon Thistle

Lemon Thistle

Rad DIY, Lettering and Design for Real People

  • Printables
    • For Cricut
    • Party Printables
    • Home Decor Printables
    • Bachelor Bingos
    • Free Monthly Wallpapers
    • Handlettering Practice Sheets
    • All Free Printables
  • Entertain
    • Party Printables
    • Party DIY
    • Tablescapes
    • Dinner Party
    • Kids Parties
    • Party Eats
    • Baby Showers
    • Wedding + Showers
  • Blog

Simple Gingham Picnic Party

Oct 05

A simple gingham picnic party backdrop- for under $5!

Fall is the time of parties around this house. Between birthdays and holidays, it seems like there’s always an event going on. Today I’m sharing one of my favourite each year- the twins’ birthday. They’re three years old already (somehow #saideverymomever) and this year all they wanted was a picnic party. And when I say that’s all they wanted, I mean they come up with that and wouldn’t let it go. I suggested maybe a camping party or they could have a pancake party or anything else that they usually love, but nope! Picnics. They needed picnics.

Which ended up being totally awesome because 1) it looks pretty rad 2) it’s cost effective and 3) so darn easy. Seriously. This backdrop cost less than $5 to make and the rest of the decorations pretty much made themselves (actually, they took no ‘making’). The only other thing that was made, my Dad’s wife took on for me- sweet little lunch bag goody bags (with the cutest wooden buttons!).
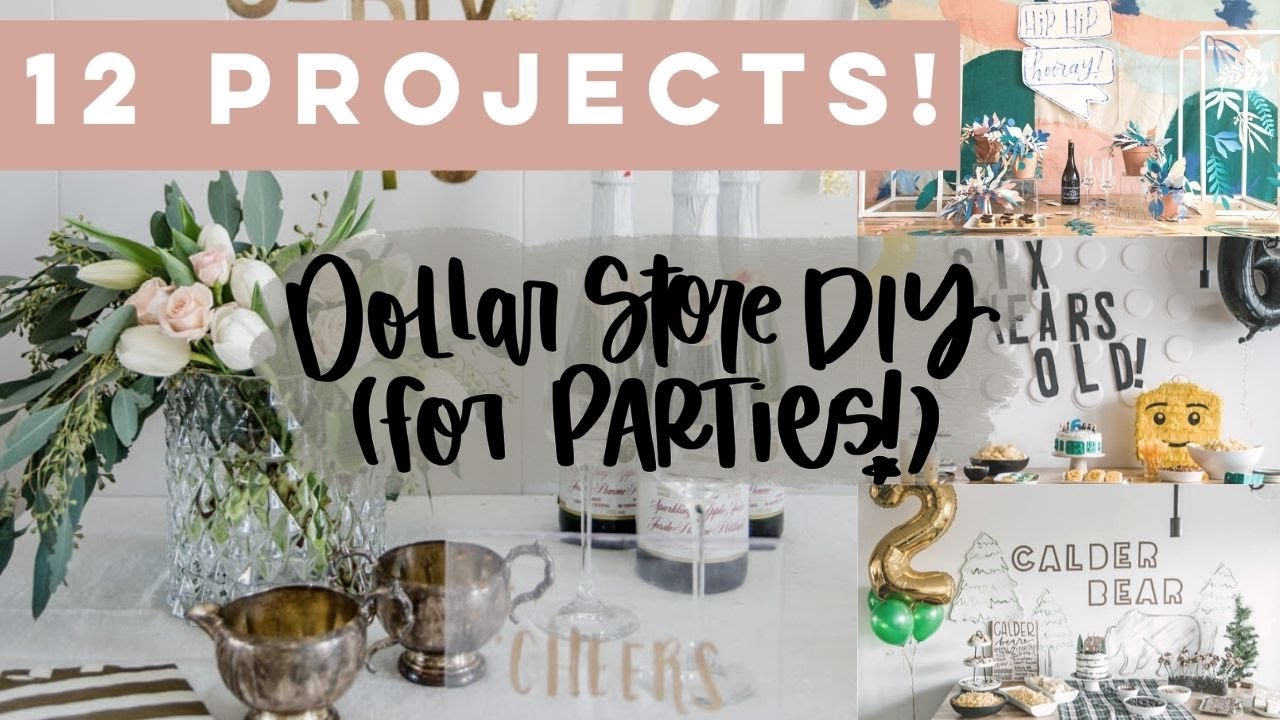
A simple gingham picnic party backdrop- for under $5!

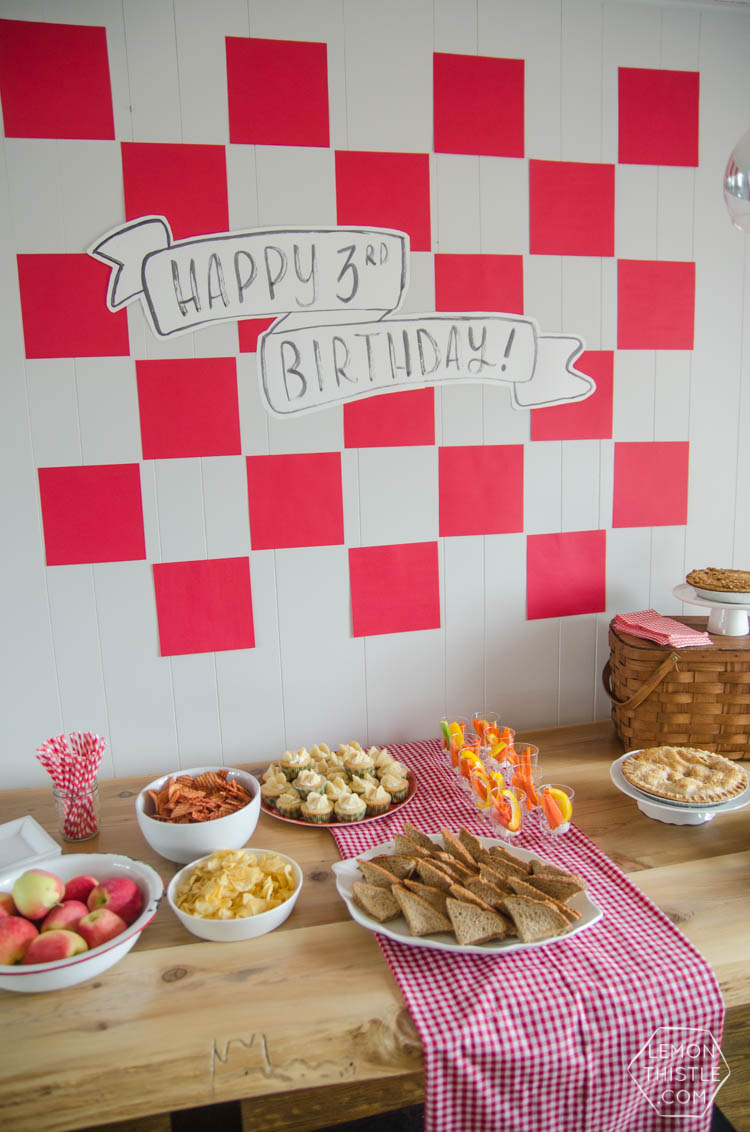
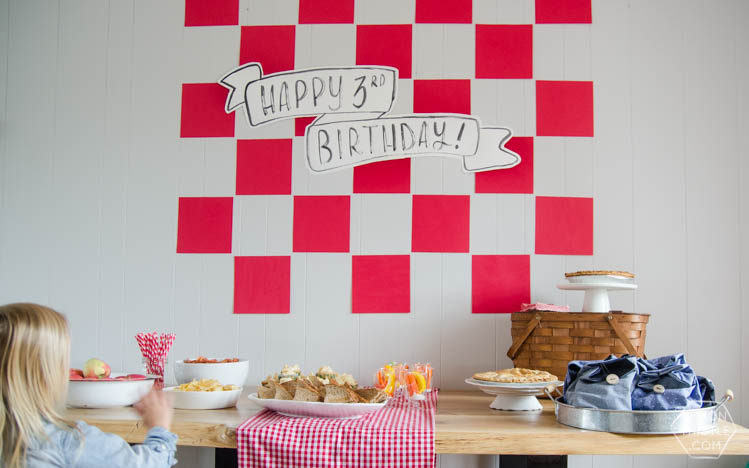
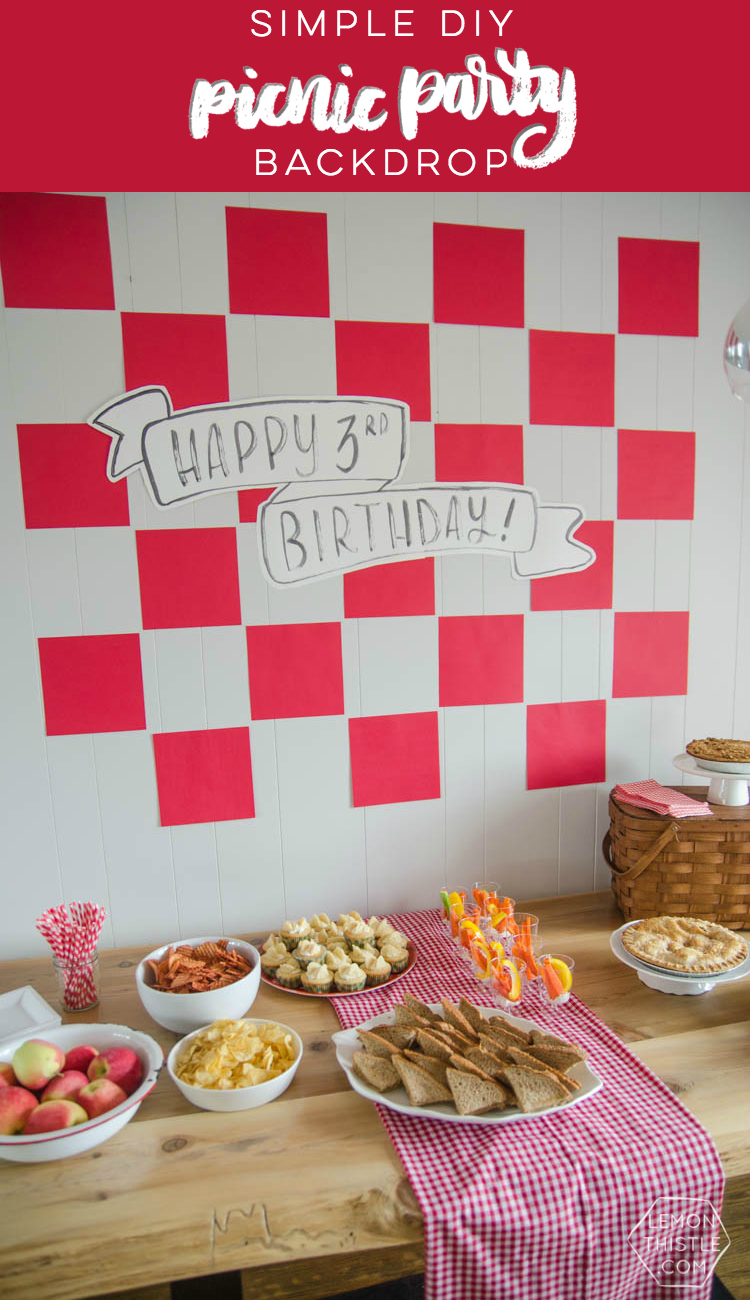
Let’s talk about that backdrop. It looks pretty rad, but it’s totally affordable and easy to set up. In fact. I had the supplies but hadn’t done anything to prepare it until half an hour before the party.  All you need for this backdrop is red paper (I got a pack of red card stock from the dollar store- it’s meant for certificates) cut down to square size. Use double sided tape or rolls of tape to put them up on the wall in a checkered pattern. If you have a darker wall, you could do the same with white paper for in the ‘white space’.

The banner is actually just two poster boards. I laid them side by side and taped them together on the back. I used my Pentel Aquash filled with ink (you could use a thick marker, a paintbrush with ink or black watercolor alternately) to draw a banner and write Happy 3rd Birthday. I found this pin that tells you all about how to draw a banner if that’s something you haven’t done before. Then I just taped that up overtop the gingham! SO simple, you guys.

A simple gingham picnic party backdrop- for under $5!

A simple gingham picnic party backdrop- for under $5!

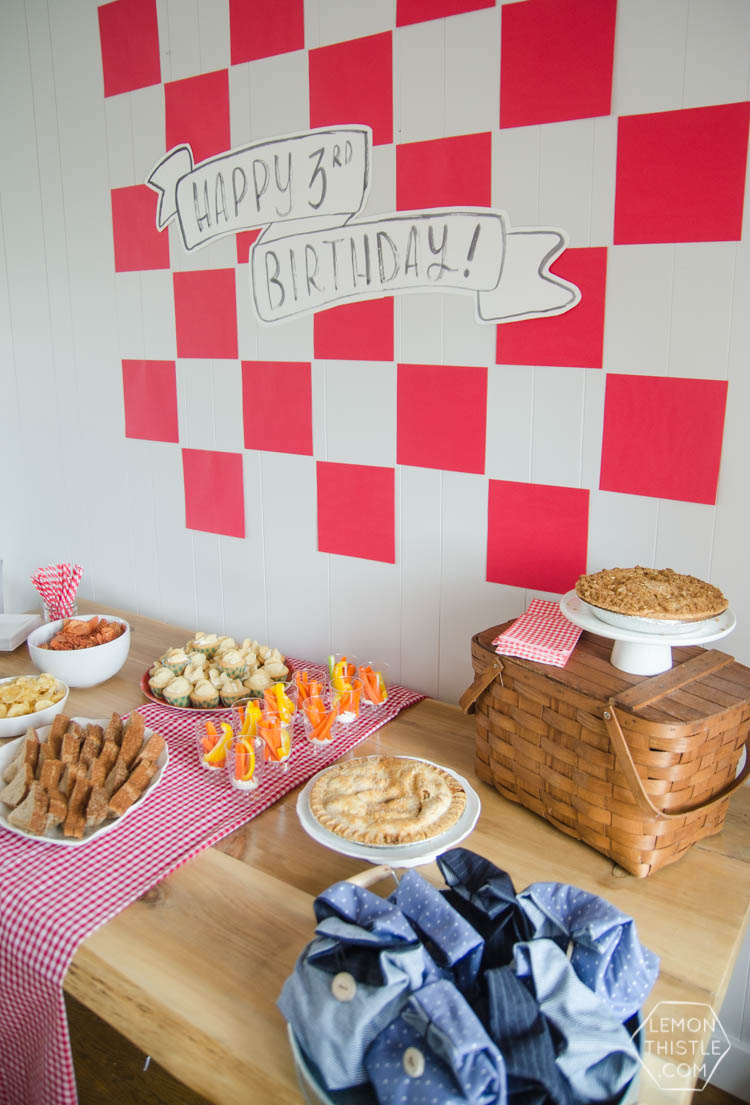
Other than that, I used a piece of gingham fabric for a table runner, some vintage pieces that I borrowed from my sister-in-law. She has some amaaazing stuff and those few pieces pulled the table together. I also chose all picnic type food so it was easy to throw together at the eleventh hour. That’s the saying right? I mean in the last half hour before the party, with all those sweet friends you suckered into helping you ;)

These goody bags are SO cute for a kids party. I love that the bag itself can be reused

These goody bags are SO cute for a kids party. I love that the bag itself can be reused

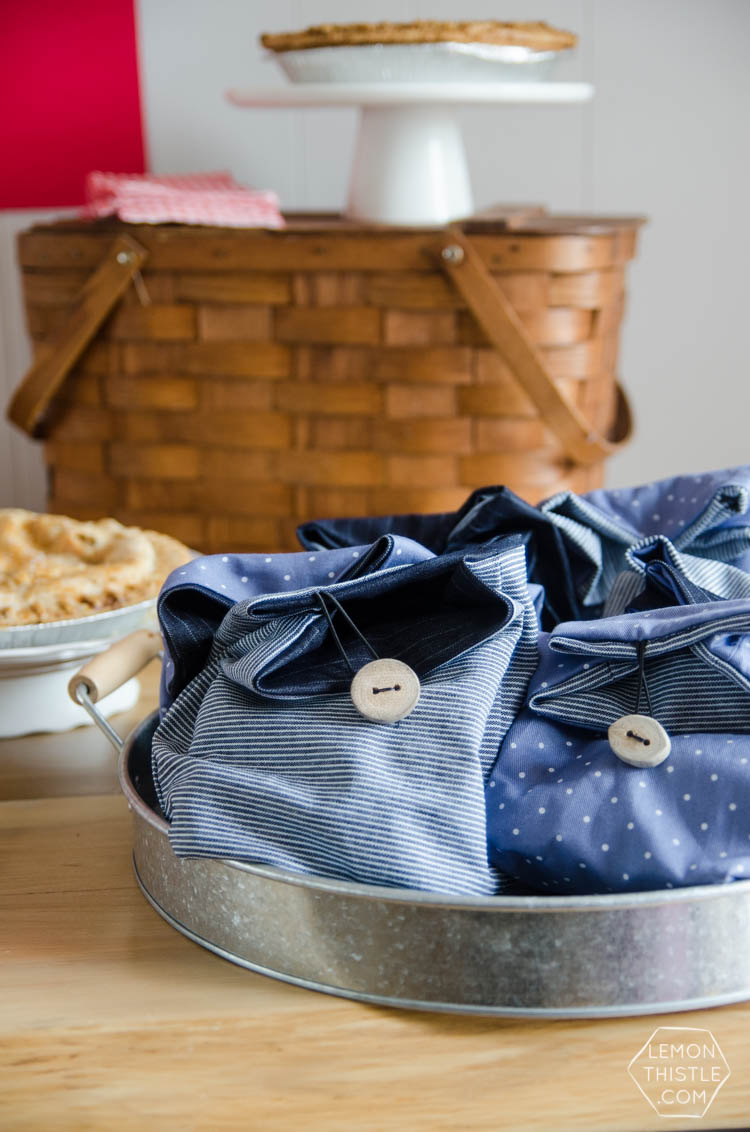
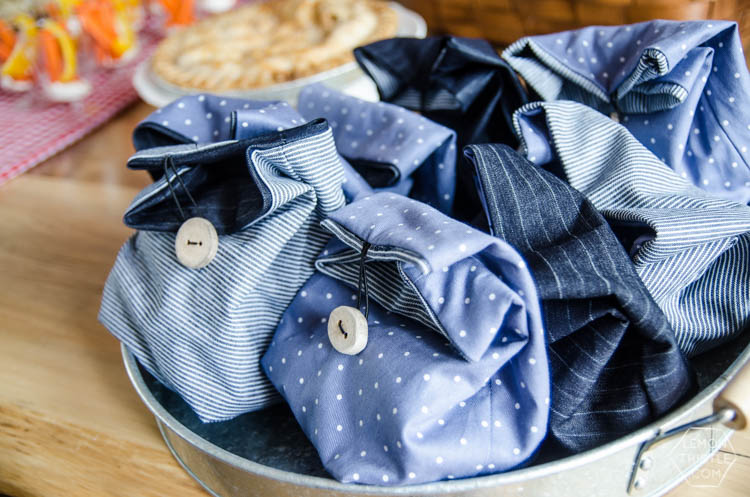
Now can we chat about those sweet goody bags? My Dad’s wife rocked these out for me and I didn’t even need to plug in my sewing machine. Then my mom came over and sewed all the driftwood buttons on for me. So for me, that was an easy project ;) But I had SO much fun picking out some denim fabrics for them and my sweet friends from Sustain My Craft Habit sent over those driftwood buttons for me to use on them. I feel like they MAKE the goody bags. Thank you Jane and Sonya! I should probably tell you that their store has SO much more than buttons. It’s like a driftwood/all things beachy dream.

I’d originally thought these bags would make great little lunch kits but they’re pretty small. We followed this tutorial (without the corner studs). What they are perfect for is snack bags inside my kids backpacks. They do half days and just need one snack. And they’re supposed to have it in a bag so the pieces aren’t hard to get to the table. But a real lunch kit is too giant for this (and takes up the whole backpack. So that’s a win. I also saved a couple for on their dresser and rolled the tops down (kind of like my bathroom storage baskets!) to use for ballet shoes and bracelets.

That’s it, that’s all! It really was so simple- the most simple party I’ve thrown in a long time and I loved it. We threw a blanket on the floor for the kids to eat their treats on and the twins were SO excited to be having a picnic. It’s the simple things for three year olds, I guess ;)

A simple gingham picnic party backdrop- for under $5!


Category: EntertainTag: Birthday, Handlettering, Kids, Kids Parties, Party Decor, Party DIY
Facebook0Tweet0Pin0LinkedIn0
Previous Post: ← Give Thanks Card- Free printable hand lettered card for Thanksgiving- great activity for kids too! Give Thanks: Thanksgiving Cards and Activity
Next Post: Over Here! Arrow Overlays Happy Thanksgiving! →

Reader Interactions

Comments

  1. Rachel

    Oct 13 at 6:50 am

    Aww, happy birthday to your twins! I think I posted a similar comment last year but my boy-girl twins shortly turn 3 too! Let’s hope 3 is easier than 2, but I hear they turn into three-be here…

    Reply
    • Rachel

      Oct 13 at 6:51 am

      Oops, silly auto correct! That was supposed to say, I hear they turn into three-nagers…

      Reply
    • Colleen Pastoor

      Oct 13 at 11:17 pm

      Haha! Threenagers is the perfect word for mine right now :’) <--- consider that the crying laughing face!

      Reply

Leave a Reply Cancel reply

Your email address will not be published. Required fields are marked *

Sidebar

WOOHOO!

Check your email to confirm!

(+ get your freebies + discounts)


Thanks for dropping by!
I’m Colleen: wife; mom to 4 wild ones; and DIY blogger behind Lemon Thistle. You can expect to see rad DIY, modern home decor, renovations, hand lettering and the occasional party on Lemon Thistle. Read More…

email facebook youtube instagram pinterest

Unless otherwise noted, all content and images are mine. Full posts may not be shared without express written consent. But I love when you share! Feel free to share, without altering, one image with proper credit and a link to the original post. All free printables are for personal use only.

Everyone loves proper credit- if you ever notice something improperly credited, please please shoot me an email and I’ll fix it lightning fast.

Find all my policies right here.
This includes my privacy policy, info on the GDRP compliance and information on affiliate links (Including Amazon Affiliates).

Visit Colleen Pastoor’s profile on Pinterest.

colleenpastoor

My house is never this clean
-
DIY + Home Decor Blogger
Mama of 4 👶🏼🧒🏼👦🏼👧🏼
Renovating our 🏠 the DIY way
🖤 Lettering & ☕️
-
✉️[email protected]

colleen pastoor/lemon thistle
Who has DIY projects on their mind this year?! @ry Who has DIY projects on their mind this year?! @ryobi_canada and I want to help you start knocking those projects off your list by giving away a new nailer and battery set! #ad 
This tool is what we used for this accent wall and all the trim in our home. It’s the one I used to trim out my built in shelving and add the decorative moulding to my geometric barn door. What I’m saying is this thing is a workhorse and I want you to have one too 😉
To enter:
✨Follow me @colleenpastoor and @ryobi_canada 
✨like and save this photo 
✨ tag some friends who’d love to win in the comments! One tag per comment, each is an entry. 
✨ share to your stories for a bonus 5 entries!

Open to Canadians only this time (sorry US friends!) and not associated with Instagram. Closes Friday Jan 22 at noon PST!
Let’s talk about coffee! This is my coffee ‘st Let’s talk about coffee! This is my coffee ‘station’ and the second photo is my dads! I’m talking aaaall about them over on YT today!
Also... see how nice that fresh silicone looks?! 😉 IYKYK
The hallway is finally finished and I’m so stink The hallway is finally finished and I’m so stinking happy! 

It’s felt like such a long time coming for such a small space. Since we moved in 2.5 years ago, this space has seen new doors and hardware, new trim, new floors... twice😅, we changed the boob light to a pot light and I hated it and now it’s got the most beautiful flush mount fixture I’m in love with (thanks @mymitzi!). It finally got some fresh paint and now frames on walls and last but not least... After this weekend, the new floors look like they were here all along (no door jamb gaps!) which was the last thing really bugging me since our flood last year. 

All this to say that home takes time and sometimes getting it right might take a couple tries. Also- the spaces we don’t really think about (hallways) can totally help a house feel like home with some love (and family photos 🥰)
ps. I partnered with #mymitzi to create a tiktok for This makeover... are you following me over there yet?! I’d love if you popped over and said hi!
It’s done! It works! And I’m calling it a grea It’s done! It works! And I’m calling it a great use of my afternoon the other day. Did you catch the stories? These projects both cost me under $10 by using pieces I already had in my home (yay for scraps!) and one package of drawer slides).
You can find the full video about these two kitchen organization projects over on YouTube in collaboration with my friend @love_create_celebrate and her #scrapsmademodern challenge! But for now... I’m rejoicing this coffee maker is off my counter for good 🎉
How’s your January going? Full speed or are you How’s your January going? Full speed or are you taking it a bit slow too? 

I’m not going to lie, I’m easing into this new year thing pretty slowly. All my decorations are still up (we always leave them up til Ukrainian Christmas which is later this week) and I I’ve yet to respond to my emails since before Christmas 😅
I’m enjoying the slowness of it all.
Happy Christmas Eve from our fam to yours 🥰 Happy Christmas Eve from our fam to yours 🥰
Yes, I made the paper bag snowflakes too. Have you Yes, I made the paper bag snowflakes too. Have you? 😅
This year has been one of a kind and I know so man This year has been one of a kind and I know so many people who are taking this year as the push they’ve been waiting for to start a side hustle, start an new career altogether or to just get creative about how they’re making money. So today I’m excited to partner with @kregjig to share some rad projects to make and sell this year! 
Like this rolling storage system I made for my office, that rad dollhouse and the gorgeous bath toy storage. All of these projects are things that I’d personally love to buy for our family and look like they’d be a great return on your time making them! And yes, all of them use #Kreg tools to make them easy to assemble and quick to make! Plus, they’re having a great sale on right now with deals on their K4 and K5 jigs, Rip-Cut and even a hardware jig bundle! There’s never been a better time to get your workshop set up!  #sponsored
Just a peaceful moment and then a real life moment Just a peaceful moment and then a real life moment for ya 🙃 
My #holidayhometour is on the blog and YouTube (I’ll put links in my stories) as part of the #seasonalsimplicity holiday home tour series. I’ll share those too so you don’t miss any!
Load More... Follow on Instagram

Copyright © 2021 · Lemon Thistle · All Rights Reserved · Powered by Mai Theme