• Skip to main content
  • Skip to header left navigation
  • Skip to header right navigation
  • Skip to site footer
  • Shop
  • Get The Email
  • Work With Me
  • About
  • Search

  • DIY
    • DIY Home Decor
    • With Power Tools
    • Renovation
    • For Kids
    • For Parties
    • Wearable
    • Organization
    • Cricut Crafts
  • Home Decor
    • Room Reveals
    • Kid Friendly
    • DIY Home Decor
    • Renovation
  • Lettering
    • Hand Lettered Printables
    • Free Practice Sheets
    • Handlettered DIY
    • Free Brush Lettering Quickstart Guide
Lemon Thistle

Lemon Thistle

Rad DIY, Lettering and Design for Real People

  • Printables
    • For Cricut
    • Party Printables
    • Home Decor Printables
    • Bachelor Bingo
    • Handlettering Practice Sheets
    • All Free Printables
  • Entertain
    • Party Printables
    • Party DIY
    • Tablescapes
    • Kids Parties
  • Blog

DIY Ruffled Tissue Garland

Aug 17


DIY Ruffled Tissue Paper Garland- so simple and costs pennies!

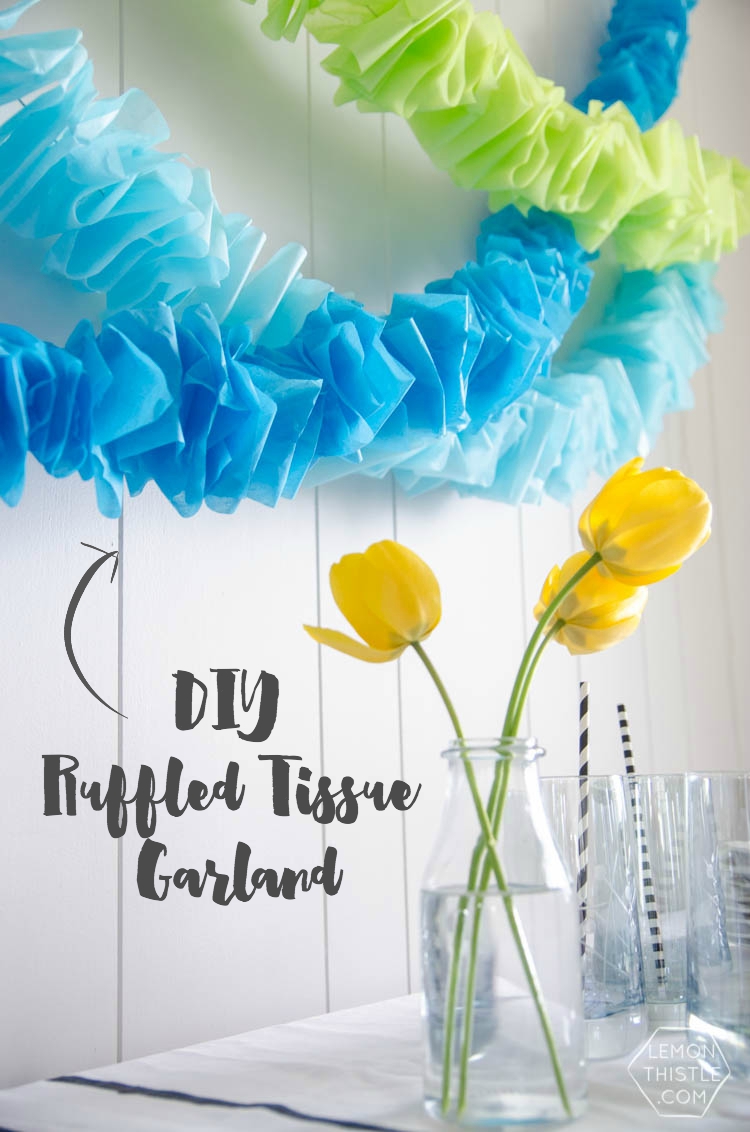
Today I’m bringing back a super easy and affordable party DIY that I shared with Pretty Providence a few months back. This DIY Ruffled Tissue Garland is seriously simple and costs next to nothing. You won’t even use a pack of tissue paper to make all three strands of garland, I just dug in my wrapping paper collection to find the colours I was looking for and stole a couple pieces of each. If you had nothing in your stash but scissors, this garland would cost you $3, one for the string, one for the needle and one for the tissue. If you wanted to have more than one color- add a dollar for another pack of tissue. Awesome, right?

DIY Ruffled Tissue Paper Garland- so simple and costs pennies!

Here’s what you’ll need to make your own:

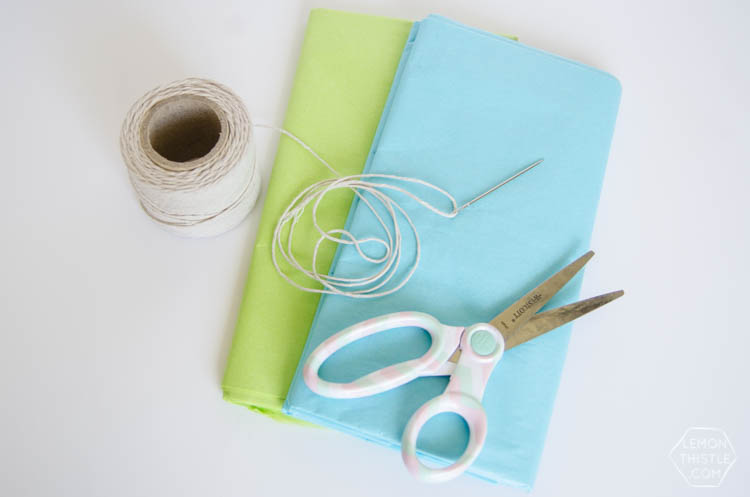
  • Tissue in colors of your choice
  • String
  • Large needle (Embroidery needles work great as the eye is large)
  • Scissors
  • Tape to adhere to wall

DIY Ruffled Tissue Paper Garland- so simple and costs pennies!

DIY Ruffled Tissue Paper Garland- so simple and costs pennies!

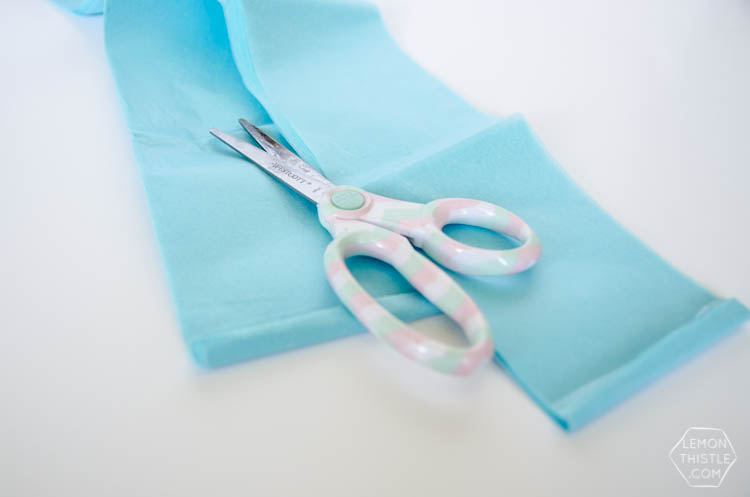
The instructions are pretty short: Start by cutting a three or four inch strip off your tissue paper. The wider the strip, the thicker your garland will be. Take one piece of the tissue at a time and fold it onto the needle as shown for a ruffled effect. Keep adding pieces until you are out of tissue. Then, spread out the ruffles and fluff them up.

DIY Ruffled Tissue Paper Garland- so simple and costs pennies!

DIY Ruffled Tissue Paper Garland- so simple and costs pennies!

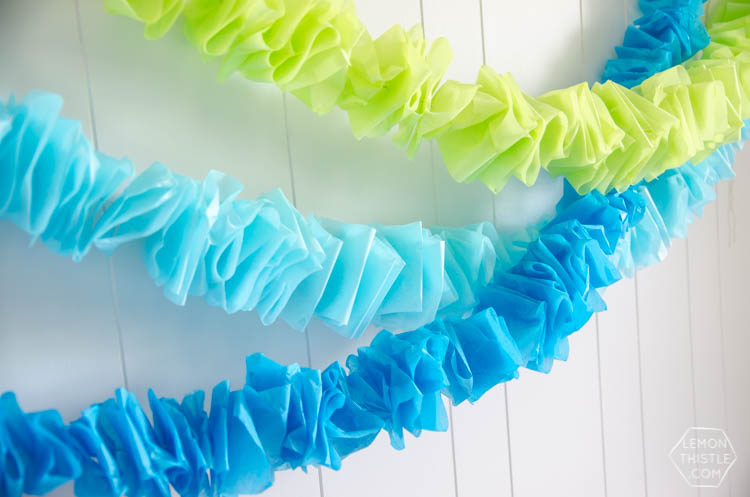
Ta-da! This is the perfect last minute decoration, all three took me only about half an hour (or one episode of Friends) start to finish. Since they’re made of tissue, you could do them aaaaanny colour you like- for every party on the planet (depending how much Netflix you watch!).

Looking for more garlands?

Category: DIY, EntertainTag: Baby Shower, Craft, Decorations, Garland, Party, Party Decor, Party DIY, Showers, Wedding Shower
Facebook0Tweet0Pin0LinkedIn0
Previous Post: « DIY Dip Dye cloth baskets made from drop cloth- soo affordable! DIY Dip Dye Cloth Baskets: Bathroom Organization!
Next Post: The Plan: A Big Kids’ Room in the Making Big Kids Bedroom Moodboard! Gender neutral for boy girl twin toddlers »

Reader Interactions

Comments

  1. Carlee

    Aug 25 at 6:34 pm

    What a great idea. I am definitely doing this! Pinning to remember!

    Reply
    • Colleen Pastoor

      Aug 26 at 1:32 pm

      Thanks so much Carlee!

      Reply
  2. Valerie

    Aug 25 at 10:05 pm

    How clever and it looks so pretty!

    Reply
    • Colleen Pastoor

      Aug 26 at 1:34 pm

      Thanks so much Valerie! It definitely makes a statement :)

      Reply
  3. Lisa Harlow

    Aug 27 at 1:43 pm

    So beautiful Colleen! I have never seen a garland like this and it’s adorable! I’ll definitely be giving it a try:)

    Reply
    • Colleen Pastoor

      Sep 02 at 11:25 am

      Thank you Lisa! I’d spotted one made of burlap for a christmas tree, and thought… this would work for parties!

      Reply
  4. lana

    Aug 28 at 12:48 am

    I’m making something similar for a speakers event. Wish I had seen this earlier! cheers

    Reply
    • Colleen Pastoor

      Sep 02 at 11:25 am

      So fun! The timing is always the kicker, isn’t it ;)

      Reply
  5. Julie

    Aug 29 at 3:34 am

    Simple, cheap, easy – that is just my kind of party decoration idea!

    Reply
    • Colleen Pastoor

      Sep 02 at 11:33 am

      Simple cheap and easy is my jam too!

      Reply
  6. The Happy Creations

    Aug 29 at 5:00 am

    Beautiful garland.I’m so impressed with how good it looks and how simple it is to make.Love it.Thanks for sharing with Turn It Up Tuesday. Will be featured as my favorite.

    Reply
    • Colleen Pastoor

      Sep 02 at 11:34 am

      Thanks so much! I was thrilled with how it looked for such little effort :)

      Reply
  7. Shellie Bowdoin

    Aug 30 at 11:03 pm

    This is such a cute idea and you ended up with such a classy look compared to the crepe paper standard. Thanks for joining us on Oh My Heartsie Girl Wordless Wednesday!

    Shellie
    http://www.thefabjourney.com

    Reply
    • Colleen Pastoor

      Sep 02 at 11:36 am

      Thanks so much Shellie! I’ve vowed to never use the standard streamers again… unless I’m throwing a circus party ;)

      Reply
  8. Mandee Thomas

    Sep 01 at 11:58 am

    Such a cute way to make a garland! I’ve got to try this for the next party I host—thanks for the idea. I wanted to let you know that I’m featuring this post tonight at the Create & Share Link Party (7:00 PM MST)! Congratulations!!! Can’t wait to see what you share with us this week. :)

    Reply
    • Colleen Pastoor

      Sep 02 at 11:38 am

      Thanks so much Mandee! I really appreciate the feature :)

      Reply
  9. Kelli

    Sep 03 at 5:02 pm

    I still have tissue paper from our wedding left over. I just can’t part with it. And, now we are two children into life, and we have tissue paper from our baby showers as well. It’s just in too good of condition to toss. Your garland is a GREAT way to use up all our paper. This is perfect for throwing together for decorations for the kids’ birthday parties. So glad I found this!

    Reply
    • Colleen Pastoor

      Sep 19 at 12:51 pm

      It is a great way to use it up! We stock it pretty regularly here too from birthdays and such, it comes in handy!

      Reply
  10. Megan

    Dec 13 at 11:23 pm

    I’m really curious how long the string is for these garlands. I’m not super great at estimating length.

    Reply
    • Colleen Pastoor

      Dec 15 at 9:25 pm

      I can’t remember exactly how long these ones were BUT I can tell you that it depends how much you space out the ruffles or squish them together.

      Reply
  11. Ishbelle

    May 22 at 12:21 pm

    Hi I was wondering how at the bit were u put the needle through the tissue paper It wasn’t very clear to me what to do next, like at the bit where u put the need.e in but then how do u take it out and what’s the string to do with it ma7br u coy,d upload a video ? Anyways thank u so much could you please explain!
    Thanks again

    Reply
    • Colleen Pastoor

      May 26 at 7:05 pm

      Hi Ishbelle, I’ll keep in mind a video but haven’t made one yet! You just push it all the way through so you can take the needle off the string :)

      Reply

Leave a Reply Cancel reply

Your email address will not be published. Required fields are marked *

Sidebar

WOOHOO!

Check your email to confirm!

(+ get your freebies + discounts)


Thanks for dropping by!
I’m Colleen: wife; mom to 4 wild ones; and DIY blogger behind Lemon Thistle. You can expect to see rad DIY, modern home decor, renovations, hand lettering and the occasional party on Lemon Thistle. Read More…

email facebook youtube instagram pinterest

Unless otherwise noted, all content and images are mine. Full posts may not be shared without express written consent. But I love when you share! Feel free to share, without altering, one image with proper credit and a link to the original post. All free printables are for personal use only.

Everyone loves proper credit- if you ever notice something improperly credited, please please shoot me an email and I’ll fix it lightning fast.

Find all my policies right here.
This includes my privacy policy, info on the GDRP compliance and information on affiliate links (Including Amazon Affiliates).

Visit Colleen Pastoor’s profile on Pinterest.

colleenpastoor

My house is never this clean
-
DIY + Home Decor Blogger
Mama of 4 👶🏼🧒🏼👦🏼👧🏼
Renovating our 🏠 the DIY way
🖤 Lettering & ☕️
-
✉️[email protected]

colleen pastoor/lemon thistle
Spot the DIYs in these photos! I rounded up 10+ aw Spot the DIYs in these photos!
I rounded up 10+ awesome DIY home decor projects in partnership with @officialCricut #ad over on the blog yesterday, there's some really fun ones from my friends too!
#CricutMade #Cricut
Which do you like best? Even though it didn’t wi Which do you like best?
Even though it didn’t win the vote, I still decided to make this free printable a set instead of just the one!
You can find them plus so many other gorgeous spring printables from some friends of mine over on the blog today!
I’ve been doing some polls in my stories (thank I’ve been doing some polls in my stories (thank you for your responses!) and one that totally surprised me? 
Almost half of you don’t know I blog! That’s my job, guys 😂 IG is just a fun little part of that! So tell me... is this new information to you or are you team ‘knew that!’? 

Also... Should I do a blogging Q&A? 🤷🏼‍♀️
Happy Valentine’s Day, friends 🥰 Happy Valentine’s Day, friends 🥰
Anyone else feeling the balance between work and f Anyone else feeling the balance between work and family and rest and keeping your house liveable has all just toppled this year? I keep seeing articles about pandemic fatigue and long term stress and burnout and while it’s totally relatable, I really just want tips on how to actually deal with that. I thought I’d share some things that are helping me if you’re in the same boat... and I’d love if you shared your tips in the comments! We could all use them 🥰
-I’ve been going for a walk every day by myself. Even when it’s freaking cold like today, I just bundle. It’s the only time I get truly to myself with no kiddo asking for something and that I don’t have to try squeeze in an email or something else.
-I’ve been putting the instant pot to work and leaning on cheater meals (local soup mixes are amazing), Costco dinners... whatever
- I’m prioritizing friendships with phone calls, zoom games nights and group chats about the bachelor (with matching snacks!)
- I’ve given myself a schedule that has downtime to play with the kids and to read... even when there’s things I feel like I ‘should be’ doing
- I’ve realized exactly how much time I’ve been spending on my phone and that it’s become my response to stress. Have you ever looked up your screen time analytics? 🥴 look at how many times you pick it up in your day. I’m setting app limits for myself and trying to break this habit, but I’d really love tips!
Can you believe that address sign is a DIY?! I'm s Can you believe that address sign is a DIY?! I'm sharing the whole tutorial in partnership with @OfficialCricut today over on my blog! I'd originally made it as a place holder for a metal one but after having it up for 4 months... we totally love it long term! What do you think? Would you try it? #cricut #cricutmade #ad
What are your Sunday plans? Mine are to sit right What are your Sunday plans? Mine are to sit right here for the first half of the day drinking coffee, then the second half of the day it’s to clean this house so it looks like my Instagram feed again 😂
Who has DIY projects on their mind this year?! 

👏🏻CLOSED 👏🏻 congrats @kelseycford ✨
@ryobi_canada and I want to help you start knocking those projects off your list by giving away a new nailer and battery set! #ad 
This tool is what we used for this accent wall and all the trim in our home. It’s the one I used to trim out my built in shelving and add the decorative moulding to my geometric barn door. What I’m saying is this thing is a workhorse and I want you to have one too 😉
To enter:
✨Follow me @colleenpastoor and @ryobi_canada 
✨like and save this photo 
✨ tag some friends who’d love to win in the comments! One tag per comment, each is an entry. 
✨ share to your stories for a bonus 5 entries!

Open to Canadians only this time (sorry US friends!) and not associated with Instagram. Closes Friday Jan 22 at noon PST!
Let’s talk about coffee! This is my coffee ‘st Let’s talk about coffee! This is my coffee ‘station’ and the second photo is my dads! I’m talking aaaall about them over on YT today!
Also... see how nice that fresh silicone looks?! 😉 IYKYK
Load More... Follow on Instagram

Copyright © 2021 · Lemon Thistle · All Rights Reserved · Powered by Mai Theme