• Skip to main content
  • Skip to header left navigation
  • Skip to header right navigation
  • Skip to site footer
  • Shop
  • Get The Email
  • Work With Me
  • About
  • Search

  • DIY
    • DIY Home Decor
    • With Power Tools
    • Renovation
    • For Kids
    • For Parties
    • Wearable
    • Organization
    • Cricut Crafts
  • Home Decor
    • Room Reveals
    • Kid Friendly
    • DIY Home Decor
    • Renovation
  • Lettering
    • Hand Lettered Printables
    • Free Practice Sheets
    • Handlettered DIY
    • Free Brush Lettering Quickstart Guide
    • Learn Brush Lettering E-Course SALE
Lemon Thistle

Lemon Thistle

Rad DIY, Lettering and Design for Real People

  • Printables
    • For Cricut
    • Party Printables
    • Home Decor Printables
    • Bachelor Bingos
    • Free Monthly Wallpapers
    • Handlettering Practice Sheets
    • All Free Printables
  • Entertain
    • Party Printables
    • Party DIY
    • Tablescapes
    • Dinner Party
    • Kids Parties
    • Party Eats
    • Baby Showers
    • Wedding + Showers
  • Blog

DIY Colour Edged Honeycomb Party Balls

Feb 23

DIY Colour Edged Honeycomb Party Balls- So fun!

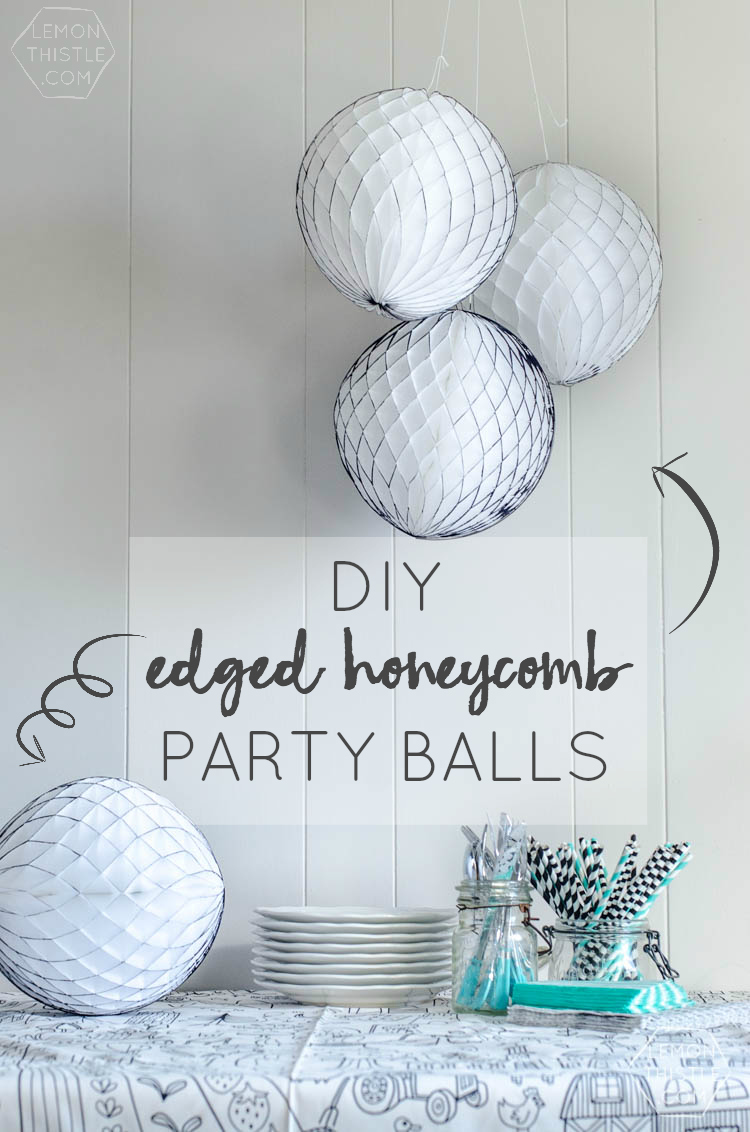
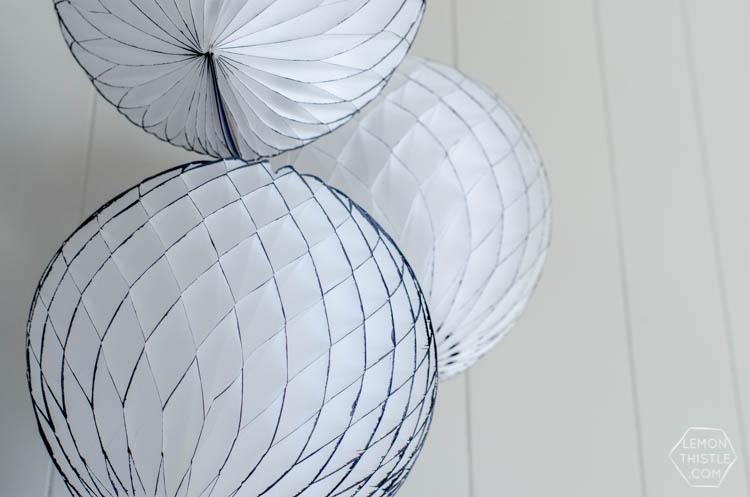
It’s been a while since I’ve posted a party DIY here on Lemon Thistle- and that’s one of my favourite things to post about! I figured I should remedy that lickety split and these Colour Edged Honeycomb Party Balls seemed like the perfect way to do that! This DIY is about as simple as they come and can be made to match any colour of decorations. I chose to edge the white honeycomb party balls in black for a monochromatic party with pops of blue, but they would look ah-mazing edged with hot pink… could someone give that a try and send me the photos? I’d love you forever.

DIY Colour Edged Honeycomb Party Balls- So fun!

DIY Colour Edged Honeycomb Party Balls- So fun!

Here’s what you’ll need to make your own:

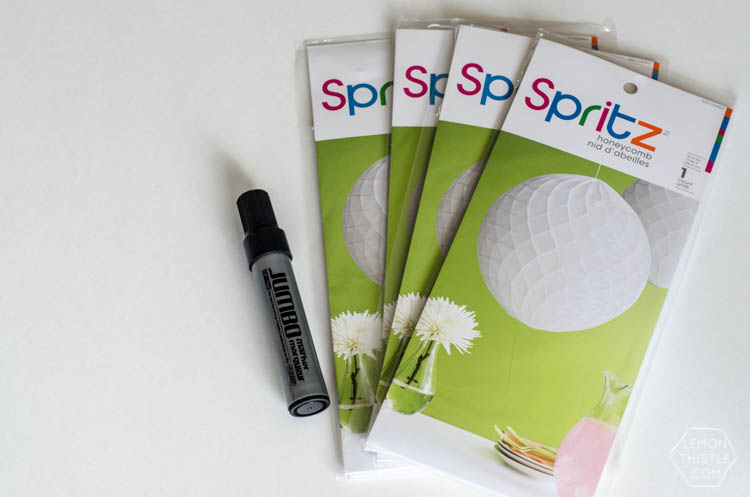
  • Ready to assemble honeycomb party balls in white
  • Chunky black marker (or whichever colour you choose to edge them!)
  • That’s it… but I felt like there needed to be more than two things on the list

DIY Colour Edged Honeycomb Party Balls- So fun!

DIY Colour Edged Honeycomb Party Balls- So fun!

DIY Colour Edged Honeycomb Party Balls- So fun!

DIY Colour Edged Honeycomb Party Balls- So fun!

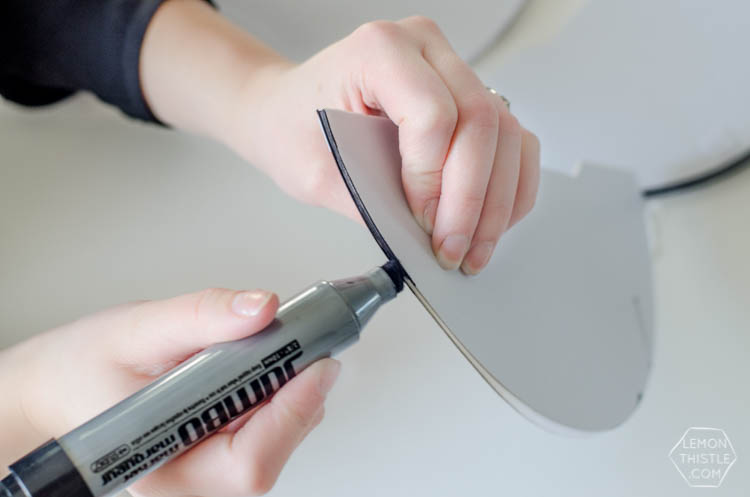
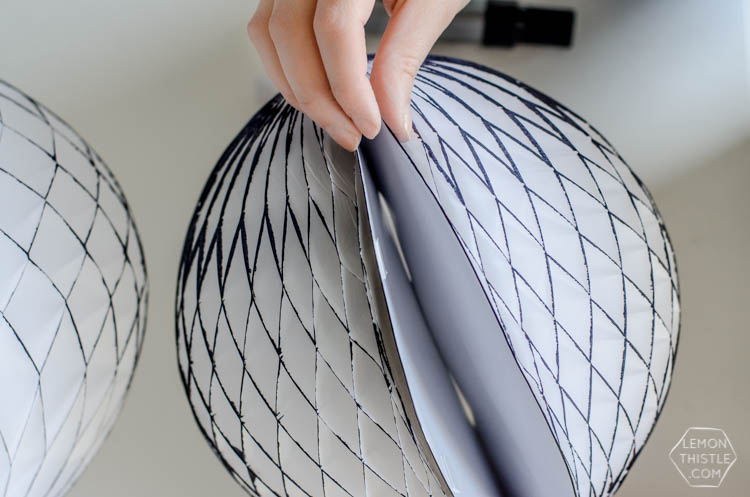
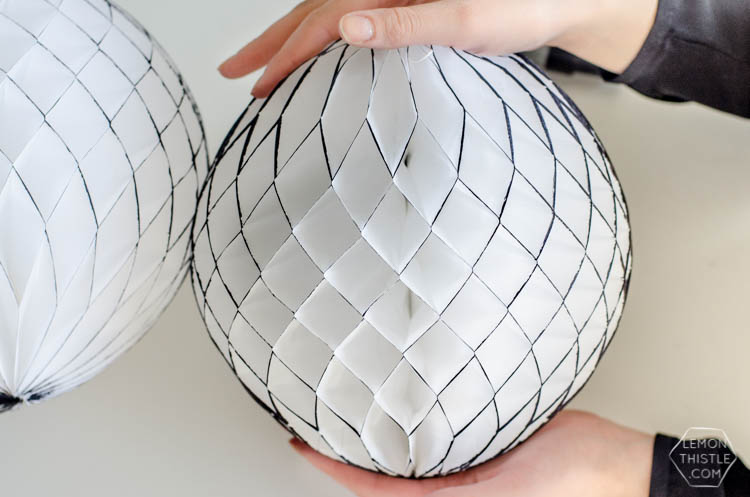
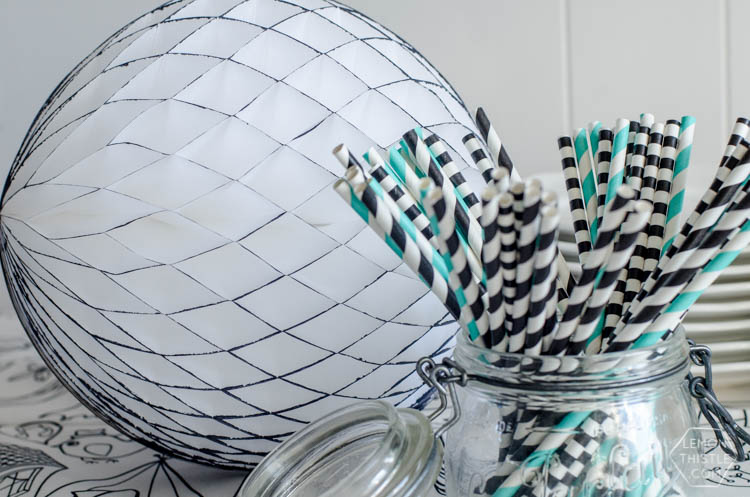
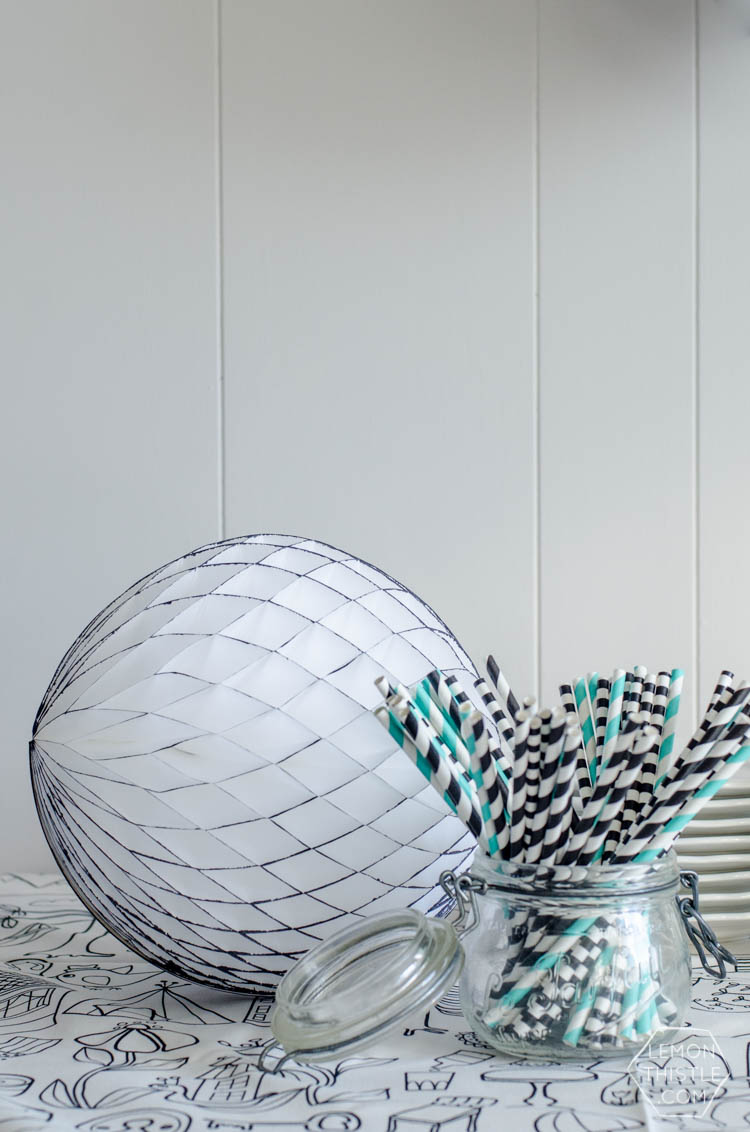
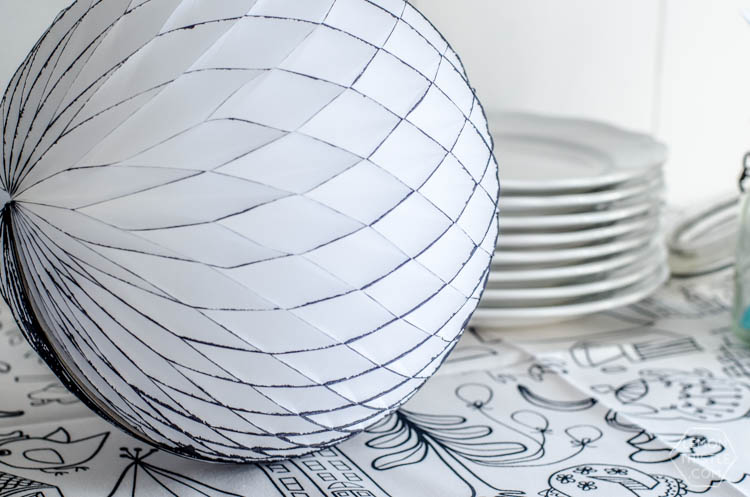
Ready for the shortest post ever? Before assembling the honeycomb balls, colour the edges with your marker. You may need to space out the papers a bit to get a darker colour on the edges. Then… assemble them and hang! Seriously easy, right? The fun thing about them is from straight on, you don’t see the edging, but as the ball moves or as you do, you get the flashes of edging.

DIY Colour Edged Honeycomb Party Balls- So fun!

DIY Colour Edged Honeycomb Party Balls- So fun!

DIY Colour Edged Honeycomb Party Balls- So fun!

DIY Colour Edged Honeycomb Party Balls- So fun!


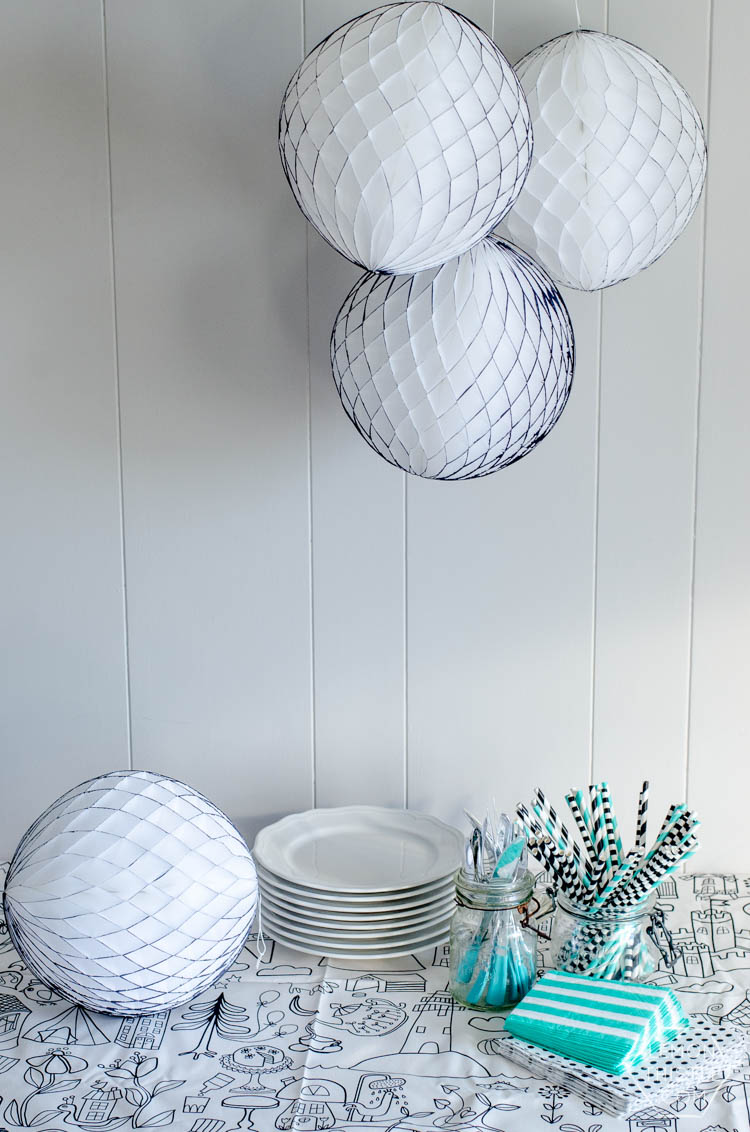
I think these honeycombs are going to migrate to my office because I don’t want to take them down! What do you think? Will you try this DIY… and what colour would you choose? I’d love to hear from you in the comments!

Category: DIY, EntertainTag: Birthday, Craft, Decorations, Party, Party Decor, Party DIY
Facebook0Tweet0Pin0LinkedIn0
Previous Post: ← DIY Watercolour Wooden Star Mobile for The Little Umbrella DIY Watercolor Wooden Star Mobile
Next Post: DIY Square Pouff & Sneaky Storage for Kiddos Plush Toys DIY Square Pouff with Sneaky Storage for Kids Plush Toys- what a great idea! Would work for extra pillows or blankets too →

Reader Interactions

Comments

  1. Nicole

    Feb 24 at 2:22 pm

    Love this!! I think it’d be super cute in gold or pink but the black is pretty awesome too.

    Reply
    • Colleen Pastoor

      Feb 27 at 9:44 am

      Thanks so much Nicole! Gold would be amazing, I actually just created a honeycomb project for The Land of Nod using metallics, I think you’ll like it :)

      Reply
  2. Christine

    Mar 06 at 7:58 am

    Those are gorgeous! I love the dimension it gives! So much nicer than just one color!

    Reply
    • Colleen Pastoor

      Mar 09 at 7:49 pm

      Thanks so much Christine! It kind of reminds me of driving by an orchard or something… that’s a thing right?

      Reply
      • Christine

        Mar 10 at 3:54 pm

        lol. I don’t know if that’s a thing, but it works :) I’m never in the know.

        Reply
        • Colleen Pastoor

          Mar 15 at 2:54 pm

          Haha, What I said made no sense I’m realizing… I meant when you drive and go by rows and rows of an orchard or trees and only the part right beside you has gaps, and the rest looks tighter together… but it’s really not important!

          Reply
  3. Veronika | Tickled Pink Confetti

    Aug 02 at 7:28 am

    How clever! This is indeed a short post, indeed! I love how the black marker defined the honeycomb pattern. So simple and pretty! :D

    Reply
    • Colleen Pastoor

      Aug 05 at 9:09 pm

      Haha sometimes short and sweet is the way to go, right? I’d love to try it with neon one day!

      Reply

Leave a Reply Cancel reply

Your email address will not be published. Required fields are marked *

Sidebar

WOOHOO!

Check your email to confirm!

(+ get your freebies + discounts)


Thanks for dropping by!
I’m Colleen: wife; mom to 4 wild ones; and DIY blogger behind Lemon Thistle. You can expect to see rad DIY, modern home decor, renovations, hand lettering and the occasional party on Lemon Thistle. Read More…

email facebook youtube instagram pinterest

Unless otherwise noted, all content and images are mine. Full posts may not be shared without express written consent. But I love when you share! Feel free to share, without altering, one image with proper credit and a link to the original post. All free printables are for personal use only.

Everyone loves proper credit- if you ever notice something improperly credited, please please shoot me an email and I’ll fix it lightning fast.

Find all my policies right here.
This includes my privacy policy, info on the GDRP compliance and information on affiliate links (Including Amazon Affiliates).

Visit Colleen Pastoor’s profile on Pinterest.

colleenpastoor

My house is never this clean
-
DIY + Home Decor Blogger
Mama of 4 👶🏼🧒🏼👦🏼👧🏼
Renovating our 🏠 the DIY way
🖤 Lettering & ☕️
-
✉️[email protected]

colleen pastoor/lemon thistle
Who has DIY projects on their mind this year?! @ry Who has DIY projects on their mind this year?! @ryobi_canada and I want to help you start knocking those projects off your list by giving away a new nailer and battery set! #ad 
This tool is what we used for this accent wall and all the trim in our home. It’s the one I used to trim out my built in shelving and add the decorative moulding to my geometric barn door. What I’m saying is this thing is a workhorse and I want you to have one too 😉
To enter:
✨Follow me @colleenpastoor and @ryobi_canada 
✨like and save this photo 
✨ tag some friends who’d love to win in the comments! One tag per comment, each is an entry. 
✨ share to your stories for a bonus 5 entries!

Open to Canadians only this time (sorry US friends!) and not associated with Instagram. Closes Friday Jan 22 at noon PST!
Let’s talk about coffee! This is my coffee ‘st Let’s talk about coffee! This is my coffee ‘station’ and the second photo is my dads! I’m talking aaaall about them over on YT today!
Also... see how nice that fresh silicone looks?! 😉 IYKYK
The hallway is finally finished and I’m so stink The hallway is finally finished and I’m so stinking happy! 

It’s felt like such a long time coming for such a small space. Since we moved in 2.5 years ago, this space has seen new doors and hardware, new trim, new floors... twice😅, we changed the boob light to a pot light and I hated it and now it’s got the most beautiful flush mount fixture I’m in love with (thanks @mymitzi!). It finally got some fresh paint and now frames on walls and last but not least... After this weekend, the new floors look like they were here all along (no door jamb gaps!) which was the last thing really bugging me since our flood last year. 

All this to say that home takes time and sometimes getting it right might take a couple tries. Also- the spaces we don’t really think about (hallways) can totally help a house feel like home with some love (and family photos 🥰)
ps. I partnered with #mymitzi to create a tiktok for This makeover... are you following me over there yet?! I’d love if you popped over and said hi!
It’s done! It works! And I’m calling it a grea It’s done! It works! And I’m calling it a great use of my afternoon the other day. Did you catch the stories? These projects both cost me under $10 by using pieces I already had in my home (yay for scraps!) and one package of drawer slides).
You can find the full video about these two kitchen organization projects over on YouTube in collaboration with my friend @love_create_celebrate and her #scrapsmademodern challenge! But for now... I’m rejoicing this coffee maker is off my counter for good 🎉
How’s your January going? Full speed or are you How’s your January going? Full speed or are you taking it a bit slow too? 

I’m not going to lie, I’m easing into this new year thing pretty slowly. All my decorations are still up (we always leave them up til Ukrainian Christmas which is later this week) and I I’ve yet to respond to my emails since before Christmas 😅
I’m enjoying the slowness of it all.
Happy Christmas Eve from our fam to yours 🥰 Happy Christmas Eve from our fam to yours 🥰
Yes, I made the paper bag snowflakes too. Have you Yes, I made the paper bag snowflakes too. Have you? 😅
This year has been one of a kind and I know so man This year has been one of a kind and I know so many people who are taking this year as the push they’ve been waiting for to start a side hustle, start an new career altogether or to just get creative about how they’re making money. So today I’m excited to partner with @kregjig to share some rad projects to make and sell this year! 
Like this rolling storage system I made for my office, that rad dollhouse and the gorgeous bath toy storage. All of these projects are things that I’d personally love to buy for our family and look like they’d be a great return on your time making them! And yes, all of them use #Kreg tools to make them easy to assemble and quick to make! Plus, they’re having a great sale on right now with deals on their K4 and K5 jigs, Rip-Cut and even a hardware jig bundle! There’s never been a better time to get your workshop set up!  #sponsored
Just a peaceful moment and then a real life moment Just a peaceful moment and then a real life moment for ya 🙃 
My #holidayhometour is on the blog and YouTube (I’ll put links in my stories) as part of the #seasonalsimplicity holiday home tour series. I’ll share those too so you don’t miss any!
Load More... Follow on Instagram

Copyright © 2021 · Lemon Thistle · All Rights Reserved · Powered by Mai Theme