• Skip to main content
  • Skip to header left navigation
  • Skip to header right navigation
  • Skip to site footer
  • Shop
  • Get The Email
  • Work With Me
  • About
  • Search

  • DIY
    • DIY Home Decor
    • With Power Tools
    • Renovation
    • For Kids
    • For Parties
    • Wearable
    • Organization
    • Cricut Crafts
  • Home Decor
    • Room Reveals
    • Kid Friendly
    • DIY Home Decor
    • Renovation
  • Lettering
    • Hand Lettered Printables
    • Free Practice Sheets
    • Handlettered DIY
    • Free Brush Lettering Quickstart Guide
Lemon Thistle

Lemon Thistle

Rad DIY, Lettering and Design for Real People

  • Printables
    • For Cricut
    • Party Printables
    • Home Decor Printables
    • Bachelor Bingo
    • Handlettering Practice Sheets
    • All Free Printables
  • Entertain
    • Party Printables
    • Party DIY
    • Tablescapes
    • Kids Parties
  • Blog

Build a Modern Barn Door

Nov 26

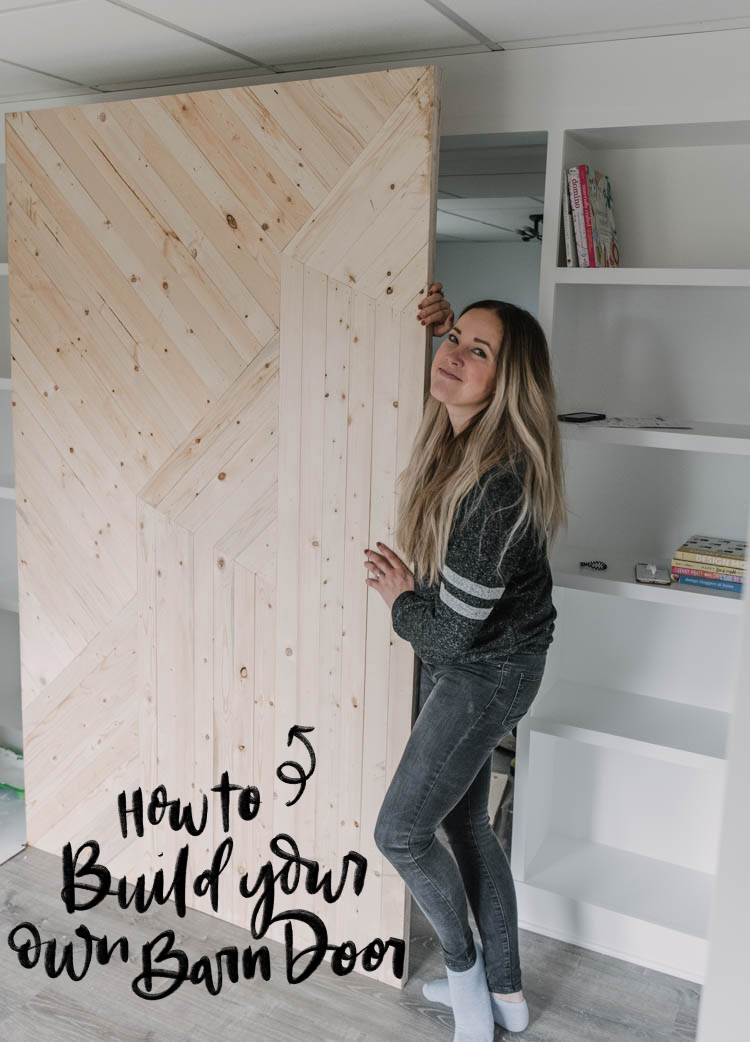
This modern barn door is such a great way to add texture and pattern into a space. The simple DIY tutorial takes only two angles to learn in the abstract design.

How to build your own modern barn door (in any size!)

Psst! I’ll tell you a secret… my office is done but there’s a few more tutorials I want to get out to you before I share the finished space! This barn door is one of them!

This modern barn door is so full of texture and pattern but also such a neutral backdrop in my new studio office space. It’s a fairly simple DIY and you can make it in any size to suit your doorway. This one is extra wide to cover my built in shelving when I’m filming tutorials, but the pattern would translate really well to a smaller door too.

If you’re looking at this DIY barn door and are thinking that it’s a lot of angles… guess what?! There’s only two that you’ll need to cut. I built this boor myself (I had Shane’s help lifting it up though!) so I’m sure that you can pull it off too!

Before I get to the tutorial for this modern barn door… I should tell you that the door isn’t *quite* done in these photos. Besides needing to be hung, I’m also painting this baby! I can hear the IG story replies already, ‘Noooooo!’ but YES and I can’t wait to show you how it all comes together!

Alright… on to the tutorial!

This project and this whole office makeover is in partnership with The Home Depot Canada- you can see all the plans for the space right here!

Supplies Needed to Build Your Own Modern Barn Door:

  • Measuring tape and pencil
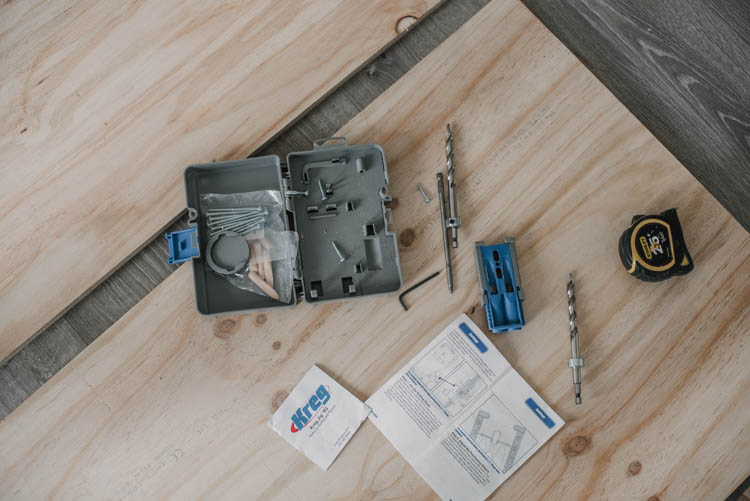
  • 3/4″ Plywood sheet, the size of your door
    • If your doorway is wider than one sheet of plywood, you could build two doors or make yours wider by attaching two pieces with pocket holes like I did- in this case, you’d also need a pocket Kreg Jig and pocket hole screws
  • 1×3 boards– the amount will depend on the size of your door. My door was 7 feet long so I calculated material to buy by dividing the width of my door by 2.5″ (the actual width of a 1×3)
  • Brad Nailer with 1 1/4″ nails (I have this little cordless nailer and it was a dream to work with!)
  • Miter Saw (this is the one we have, but this one would work perfect for most projects like this one!)
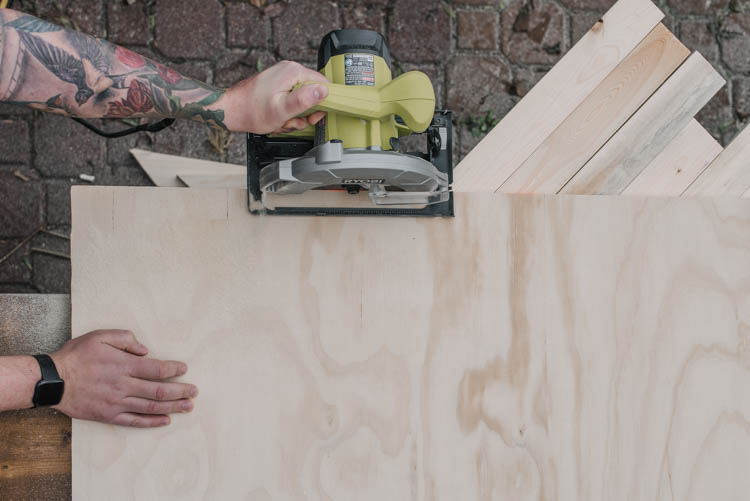
  • Circular Saw (for trimming to length)
  • Finishing materials (sandpaper, paint, wood fill… hardware!)
  • Hanging hardware (not shown here, I’ll be writing a post about using a barn door extender later this week!)
Attaching two pieces of plywood for extra wide barn doors

Okay, before I get on to the fun part of this- if you want to make a door that is wider than a standard sheet of plywood (4 ft), you’ll want to attach two pieces of plywood together. I had these cut to size at Home Depot so I didn’t need to run these through my table saw. Since I knew the door would be heavy, I didn’t want all the weight of the door on the screws connecting the pieces of plywood. I chose to connect two vertical boards for this reason- the barn door rail would attach one to each of them to split the weight.

Attaching two pieces of plywood for extra wide barn doors

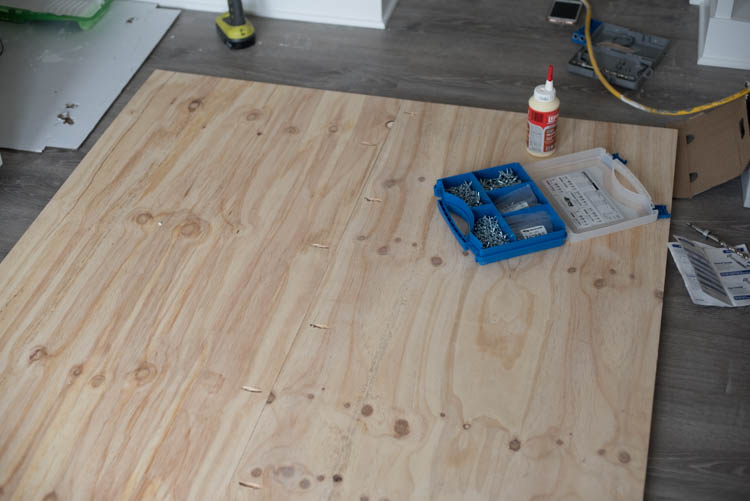
I attached the two pieces of plywood using pocket holes, wood glue and screws. I used my Kreg Pocket Jig for this and alternated sides to have the holes drilled. Then I set out on the design!

Drawing out your barn door design before building it

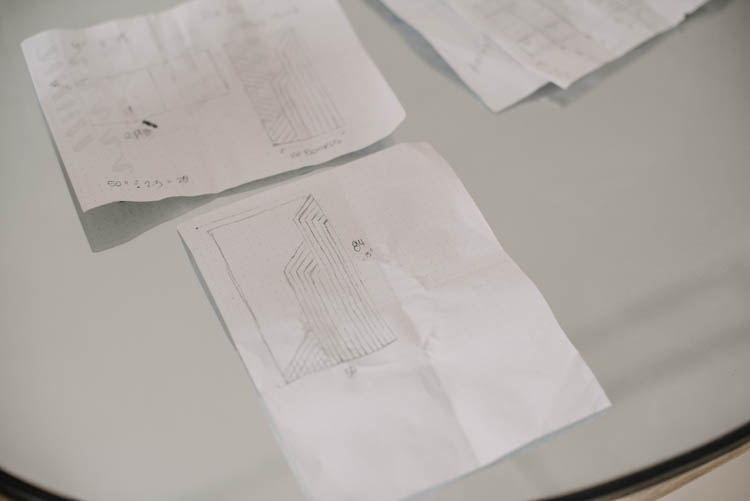
The first thing I always find helpful is to draw out my design on grid paper. This is approximate but it helps me check in with my design and what I want it to look like as I go.

How to make a modern barn door- the angles you need to know

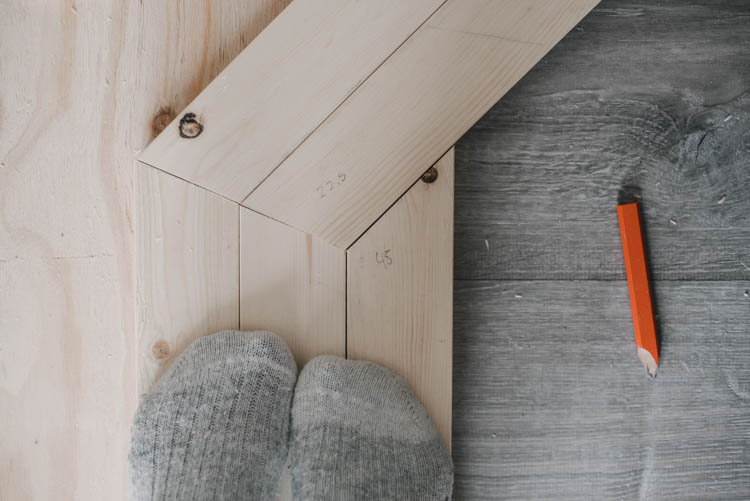
Cut your first boards! I worked from right to left on this design. This first board will be cut at a 45˚ angle. The next boards will be cut at a 22.5˚ angle. These are the ONLY TWO angles you’re going to need to remember for this project.

You’ll want to cut one whole section of boards before attaching them with the nail gun, just to ensure your spacing is what you’d like. The top pieces of wood have the 22.5˚ cut to match the 22˚ cut on the vertical piece, and then a 45˚ cut along the side edge of the door.

I opted to make all my cuts along the edges long (and in some cases skipped them!), trimming them off with a skill saw after the fact. This is great in theory but was a total pain to carry outside after I was done building it to cut- I would try cut closer to the edge of the door, leaving just a little bit to trim down if I were to do this again.

How to make a modern barn door- the angles you need to know

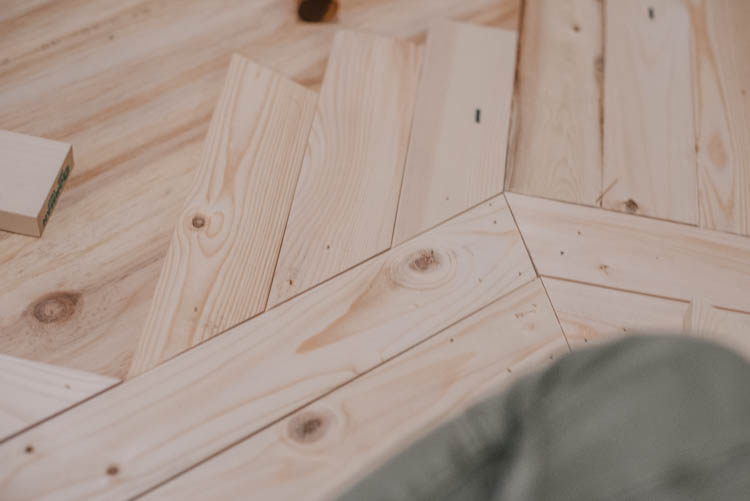
When you are laying out your design, you’ll want the top edge of the last board in your first section to line up with the corner of your door. This is why you’ll want to cut that whole section first, you may need to move it up or down according to how many boards you decide to go wide. I did 6 including that first board cut at the 45˚. At this time, you can mark the bottom of the board and cut those to length (leaving a little overhang to trim after the door is assembled). Then nail them on! Opt for less nails in case you need to pull up your design to adjust. You can add more when you’re done :)

Now measure where you’d like that next section to start! Everything is designed using the width of the 1×3 boards. You’ll need some boards cut at 45˚ angles to space this out. I used scraps as shown in the photo. When you have a spacing you like, start cutting your next section of boards, again starting with one 45˚ cut before switching to the two pieces of wood cut at 22.5˚, and the other end of the shorter (top) board cut at 45˚. At this point, you should be able to cut a handful of boards at a time now that you have the hang of the pattern.

How to build your own modern barn door

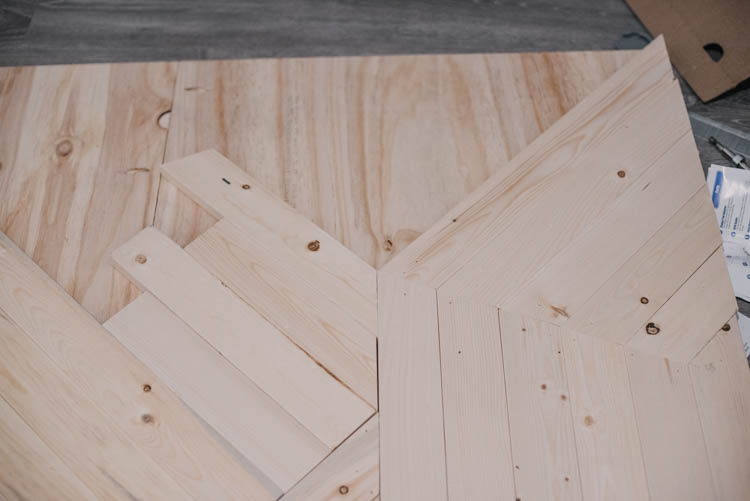
The third and last section on the door is essentially just the top half of the other sections. These pieces will run on an angle with no verticals. They are cut at 45˚ on both ends. Before you tack these on, make sure to measure out how far down they start using your scraps of 45˚ pieces!

Next, fill in the whole top left side! I started from the bottom using straight cuts against the bottom section (45˚). When you hit the verticals of the next section, you will use 45˚ cuts. And so on.

How to build your own modern barn door

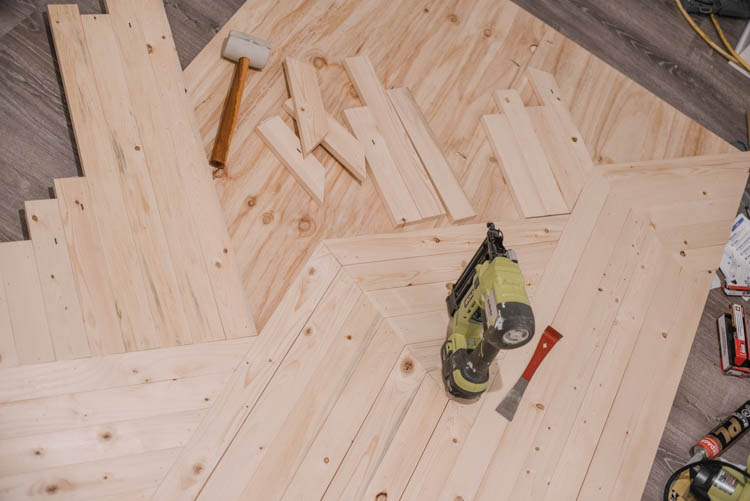
When it’s fully assembled, pat yourself on the back and then get a hand to bring it where you can trim off the edges!

How to build your own modern barn door

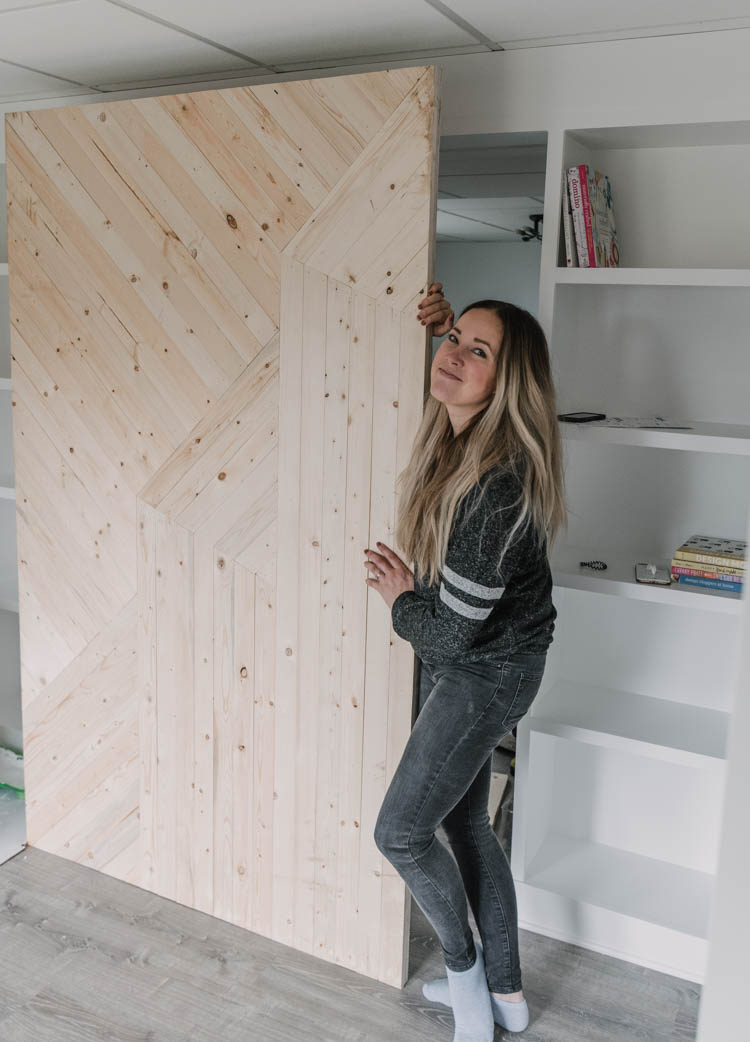
I had to throw this last photo in here for you guys- it cracked me up! I asked Shane to take the photo of me with the door and while I was getting my settings all set up for him, I snapped this of him modelling the door for you. Ha!

After we finished this- I filled the nail holes with paintable wood fill and then we sanded it and painted it. This was the perfect finish for this modern barn door! I can’t wait to show you the whole space put together, it turned out SO GORGEOUS!

Category: DIYTag: Building, DIY Furniture, DIY Home Decor, Office, Power Tools, Sponsored, Wood
Facebook0Tweet0Pin0LinkedIn0
Previous Post: « DIY Built in Shelving
Next Post: DIY Gift for the Dog Lover | Pup + Me PJs Matching pyjamas for your pup and you- with eachothers face »

Reader Interactions

Leave a Reply Cancel reply

Your email address will not be published. Required fields are marked *

Sidebar

WOOHOO!

Check your email to confirm!

(+ get your freebies + discounts)


Thanks for dropping by!
I’m Colleen: wife; mom to 4 wild ones; and DIY blogger behind Lemon Thistle. You can expect to see rad DIY, modern home decor, renovations, hand lettering and the occasional party on Lemon Thistle. Read More…

email facebook youtube instagram pinterest

Unless otherwise noted, all content and images are mine. Full posts may not be shared without express written consent. But I love when you share! Feel free to share, without altering, one image with proper credit and a link to the original post. All free printables are for personal use only.

Everyone loves proper credit- if you ever notice something improperly credited, please please shoot me an email and I’ll fix it lightning fast.

Find all my policies right here.
This includes my privacy policy, info on the GDRP compliance and information on affiliate links (Including Amazon Affiliates).

Visit Colleen Pastoor’s profile on Pinterest.

colleenpastoor

My house is never this clean
-
DIY + Home Decor Blogger
Mama of 4 👶🏼🧒🏼👦🏼👧🏼
Renovating our 🏠 the DIY way
🖤 Lettering & ☕️
-
✉️[email protected]

colleen pastoor/lemon thistle
What’s next on your project list? Spring is teas What’s next on your project list? Spring is teasing us so we’re starting on outdoor projects around here!
$100 play room makeover is DONE! This room has se $100 play room makeover is DONE! 
This room has seen so much change over the past year (swipe over to see it 2 weeks ago, 10 months ago and 1 year ago!). I took this last week to make over this space with mostly pieces we already had and I’m so so happy with the results! It’s a good reminder that some hard work, creativity and of course paint can work magic.
I’m sharing all the details (and that under stairs space!) on YouTube today (link in my stories!) and so is my friend @thediymommy (she made over her daughters bedroom for $100!).
Do you think dried grasses are only for fall decor Do you think dried grasses are only for fall decor? I used to think so, but these bunny tail grasses are too cute to put in a bin until next year. Plus the name sounds like spring decor to me ;) What do you think?

Ps. Today’s going to be a full day of playroom progress! I’ll share as much as I can in stories as I go :)
Paint is honestly magic.✨ I am so excited to sha Paint is honestly magic.✨
I am so excited to share this kitchen makeover with you guys! These are the same cabinets, just painted (countertops too!) And some updated finishes. I blogged the full before and after if you’d like to check it out!
Big thank you to @schaubhardware and @wagnerspraytech for partnering to make this space possible!
Ps. Most of the work done here was by the homeowners so if you’re thinking about taking on a makeover in your own home, maybe this is the encouragement you need 😘
As I’m sitting here staring at the dishes on the As I’m sitting here staring at the dishes on the counter while I try to focus on editing a video, I thought it’s as good of time as any to share this reminder 😘
I feel like I’ve lucked into the best job out th I feel like I’ve lucked into the best job out there, but then I’m also so aware of the amount of work it took to get here. Today I chatted with two of my blog friends in an Instagram live about DIY blogging as a job and answered some questions we get asked all the time about our work and the balance of it all! I saved it as an IGTV so you can watch it if you missed 🥰

Big thanks to @love_create_celebrate and @thediymommy for chatting with me today! One of the biggest perks of this job is all the talented ladies I’ve had the privilege of meeting and calling friends- these two are top of that list!
I’m having some fun in stories with a little giv I’m having some fun in stories with a little giveaway guessing game. I’d love if you played along!

I put up a question box and you can guess my next room makeover and the guesses are all over the place. Some are projects on my dream list, some are rooms I wish to even have in my house and some are spaces we’ve already tackled! Like our main bathroom ✨ these photos are from my spring home tour I shared over on the blog earlier this week. Hung up a pennant and called it decked for spring 🐣
Who is ready for spring?! I know we totally are- w Who is ready for spring?!
I know we totally are- we’ve been soaking up outside time this week with the kids home on spring break but over on the blog... it’s spring home tour time! I am sharing my home all ready for spring along with some amazing bloggers as part of the #seasonalsimplicity spring series!
You know I love a touch of DIY decor in every spac You know I love a touch of DIY decor in every space in my home, so I’m so excited to be partnering with @HGTVCanada to celebrate #$aveMyReno being back TONIGHT! #partner
 
My favourite thing about $ave My Reno is that they encourage home owners to get involved and DIY to maximize budget. They even help kids get involved- it’s everything Shane and I work towards in our own projects. You can catch it every Tuesday at 9/9:30PM EP on @HGTVCanada or catch up on episodes on STACKTV through @primevideoca!
 
PS. I made those tie dye pillows, similar to the ones featured in tonight’s episode! You can catch my stories to see the super speedy how-to :)
Load More... Follow on Instagram

Copyright © 2021 · Lemon Thistle · All Rights Reserved · Powered by Mai Theme