This is a sponsored conversation written by me on behalf of Cricut. The opinions and text are all mine.

Do you have something that you just keep on crafting? Time and time again, I find myself whipping up shirts for my kiddos. I can’t help it. It’s so easy with my Cricut and iron on and they get ridiculously excited. So I’ll keep sharing them here, okay? And today’s is a fun one because it’s with a material I have never tried before… Patterned Iron-On!
I thought that since the iron on itself was already patterned, I’d keep my design fairly simple. So I decided on giant letters on the kids’ tees. And then the packs of patterned iron-on showed up and they each have three patterns in the roll that mix and match so nicely together that I decided to pair two patterns per shirt. I am so happy with how the two patterned iron on designs sliced together to make the one letter… isn’t that rad? I want to use this technique on more projects now… I could see this working really well with simple shapes as well.

I was originally going to do all four of my kiddos with that black and white patterned iron on and save the pink and blue for another project, but when I went to pick out plain tees from the store, this grey shirt with the lace bottom was too cute and I thought it would play with the lace pattern in the pink and blue designs perfectly. So the boys all match and Aubrey has a coordinating (but not matching) shirt.
Want to know how to make your own? Oh, I know that’s why you’re here ;) These babies were really simple to make using fonts and shapes that are already in Cricut Design Space- so you don’t need to upload a thing.

To make your own patterned iron on shirts, you’ll need:
- Patterned Iron On (I used the Nature Walk Basics Sampler Pack and the Chantilly Sampler Pack)
- Cricut Maker or other cutting machine with fine point (the regular one) blade loaded
- Standard Grip Mat
- Basic weeding tool (mine is from this kit)
- Cricut EasyPress and EasyPress Mat (or an iron if you prefer!)
- Material trimmer (I use this one)
- Cricut BrightPad (totally optional, but it made weeding a lot easier!)
- T-Shirt
- Your design… You can start from my project RIGHT HERE!
for any screenshots, you can click them and it will take you to a larger image of the same

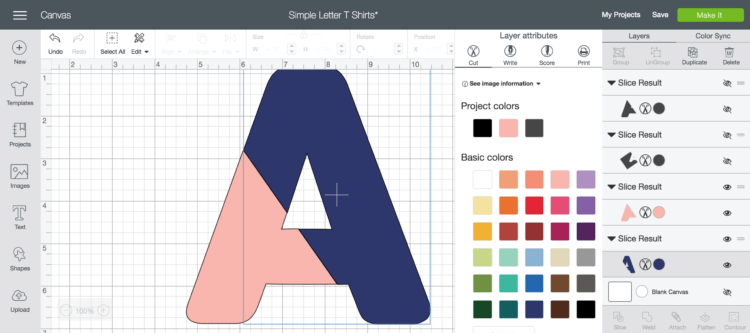
Alright, so the first thing you’ll want to do is open up my project. I’ve got the A in there as an example and a text box with the font I used (Cachet Pro Heavy, included in Cricut Access). Choose your letter and then we can get to slicing it into two colours/patterns!


To slice it, make a shape (I used a square) and overlay it on an angle over your letter. Pay attention to where the corners of the shape land. When you’re happy with how that’s overlayed, select both the shape and the letter and click ‘slice’. This will make four layers. Turn off the layers of the shape that’s been sliced and just leave the letter sliced in half.

From here I changed the colors of my layers so they would automatically group on the mats. This was really handy when I made all three of the boys shirts at once. They automatically grouped because I’d chosen the same two colors for the four of their designs.


As with any iron on material, make sure to select ‘mirror on’ and place the shiny side of the material (also the patterned side) down on your mat. I found the patterned iron on a bit more difficult to weed than the regular iron on light just because the pattern lines made it hard to see where the cut lines were. It was the perfect material to pull my Cricut BrightPad out for. The BrightPad shines light through the material so you can see the cut lines better as you weed (shown in that picture).
Before you apply the vinyl, cut down one of your pieces right up against the patterned iron on. Right where the materials connect, just use your trimmer. This way you can line them both up (the trimmed one first) and transfer them at one time. This makes it easy to get them perfectly aligned while ensuring you don’t iron the material ON to the other backing. Which I have done in other projects… I’m not too proud to admit ;)


This was my first time using the material and other than being patterned, the biggest difference is that it was so textured on the back- it’s like it had a ton more adhesive which is rad. It adhered really, really well. I didn’t have a single spot where it came up and I had to apply more heat. That never happens, you guys! Oh- I also wanted to point out that mini ironing board I’m using right there. Isn’t she cute? Cricut sent me one of their new EasyPress Mats to try out with this post and it’s such a little gem. I’ve been using a towel folded to protect my surface since that is what was recommended, but even with four layers of bath towel, the towel still gets hot right through to the table. This little mat is thinner than that but it didn’t let my table get hot which is amazing!


Alright, for applying the patterned iron on, the settings are 340 degrees for 50 seconds on the front, then flip and an additional 10 seconds on the back. Make sure to let it cool COMPLETELY before peeling your backing off. That’s the hardest part of this whole thing… if you’re like me and have no patience ;)
That’s it, that’s all! Isn’t this such a fun project? I loved trying out the patterned vinyl and my kids are SO excited about their new shirts. They may have eaten leftovers every meal yesterday so I could make them… but they got new shirts out of the deal- ha! Tell me- what do you think of the patterned vinyl? What would you use it for?

Also… I had one kiddo volunteer to model. He doesn’t stay still for a second hand had a paw patrol tattoo on his face and hand. But he’s darned cute, so here ya go ;)
This is a sponsored conversation written by me on behalf of Cricut. The opinions and text are all mine.
LIKE IT? PIN IT!


 Mermaid DIY Mugs | Can you use vinyl on mugs?
Thanks for sharing the amazing idea with us. The post is very beautiful and helpful to create unique shirts and I love the designs. Must give it a try.
Just wanted to say, I love your tutorials! We all learn differently and your posts & videos may make me dig into Cricut crafts. Let’s just say I have always done things the hard way or start off with the hardest projects 1st. I have had the maker since November and didn’t use it until February for a project for my daughter. It was a logo with 3 different colors. First off it took forever to figure out how to cut what where and after hours uploading a logo. I even have PSE but never learned to use it (haha) Her project turned out amazing but its been 6 months and my husband wants his logo done. I hope after watching your tutorials I can do this! Must say you are the first one to show how to change advanced in uploads as my images are professional photoshop ones. Maybe I should watch your other video on digitizing too!