This modern classic bathroom makeover keeps the character clawfoot tub and wood doors and brings back the charm to the once renovated space. With black and white tile, an open shower and wood vanity.

Today I’m excited to share the Tux House bathroom makeover with you all! Of all the rooms in the house, this one was definitely the biggest undertaking. We took it down to the bones and kept only the clawfoot tub when we renovated this room.
Even though this 1940’s house had plenty of character, the bathroom had seen some updates in the past that stripped a lot of that character away. We were working with a super limited budget, but the clawfoot tub and the wooden door were a great starting point as we worked to restore some of that classic character to the bathroom. (here’s a reminder of the before!)

*Affiliate links used in this post where applicable, see all my policies here
You can see more of the before photos from the house right here. You can also see our plans for the bathroom along with all of our other Tux House Design plans right here.
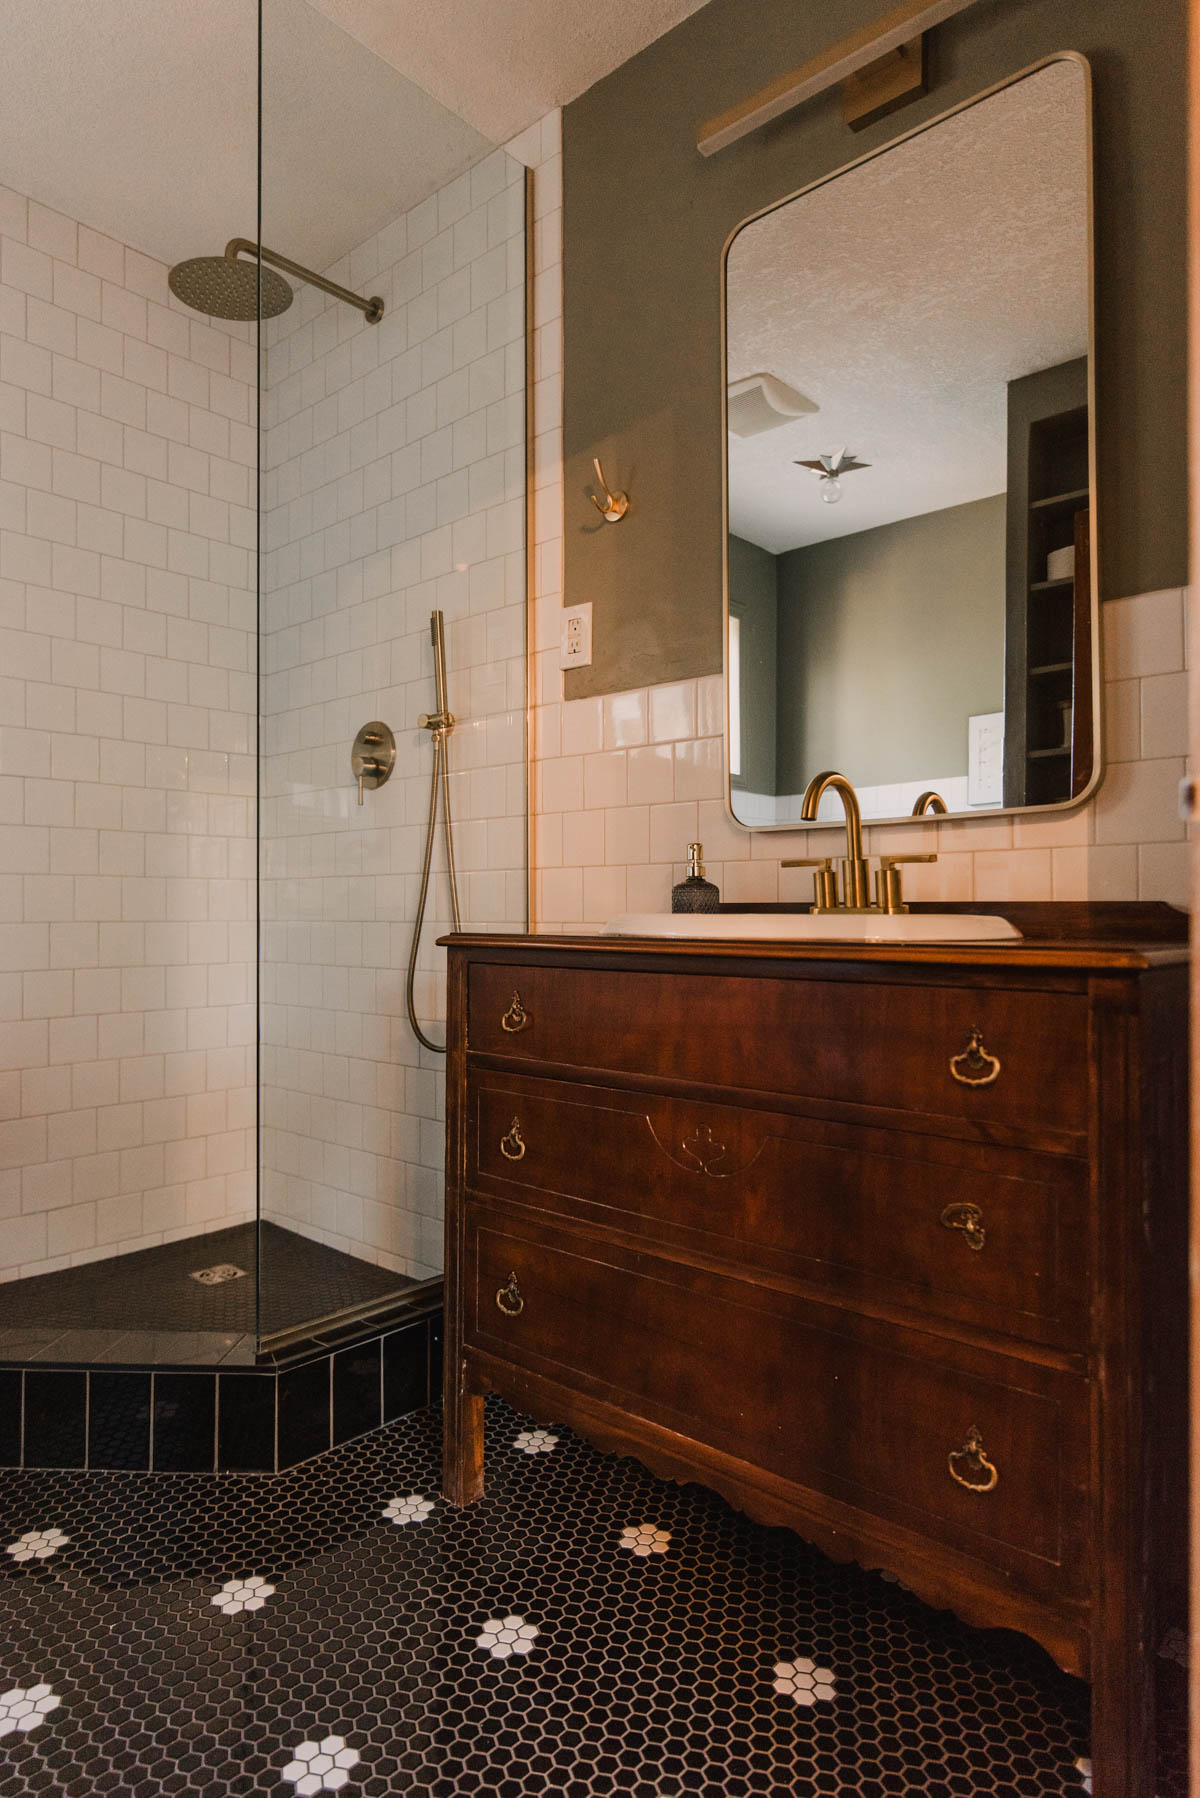
For this room, I really wanted to keep things classic and charming with tile instead of linoleum (it was peeling and discolouring due to leaks and such). We were on a budget for this space (and the whole home!) so I met with my favourite local flooring store, Complete Floors to give them an idea of what I’m looking for and ask for cost effective but beautiful options.


We ended up going with small hexagon tiles like my own bathroom except in a gloss tile. I was originally aiming for a penny tile but that was more expensive- I’m so happy with how this turned out instead. It was a little bit of a splurge for our budget but we saved in other areas of the home on flooring. I’ve mentioned before that I wanted to use this house to stretch myself a bit in terms of design and try new things. I chose to go with black as the base colour and add white patterns. I did this by ordering a few sheets of white and cutting the sheets into patterns. I love how this is a little different than expected- I could only really find photos of this in the reverse colours.


We ordered classic square white tiles and laid them in a brick lay pattern on the walls I really love how this looks- it’s like a classic version of subway tile. We did this full height in the shower and wrapped it around the room about 2/3 height. Above the tile we painted a muddy green colour called Creekside Green from Benjamin Moore. I love how this warms up the space and adds some colour into the black and white room.
We built the shower ourselves but hired out all the tiling due to our super tight timeline. I shared more about this in our basement suite reveal, but we renovated the entire house in less than two months while living 8 hours away. We had to be super strategic with our time and cut a lot of DIYs and bonuses we’d planned to fit in with this timeline- laying the tile ourselves is one of them! The tiler was absolutely incredible. He worked with my pattern beautifully and with our tight timeline.

I made the last minute decision to painting the bottom side of the claw foot tub to match the flooring. I used an enamel paint for this in my favourite shade of black and looove how this turned out. The bottom of the tub was a bit discoloured due to the age and this cleans it right up. It also helped those gold legs stand out!
*I feel like I should admit that the drywall finishing in here is pretty bad. We didn’t realize it was left this way until after the tile was finished and we were ready to paint with less than 3 days left to finish the whole house. It was a miscommunication but we’re rolling with it ;)


We chose a kind of a european design for the shower, leaving it open to the rest of the space like a wet room. We had a piece of glass installed between the shower and the vanity and with the tiled walls, there was no risk to the water damaging drywall. I love how open this feels with the rain shower head and bright daylight from the frosted window.
We chose to go with gold fixtures to run with the classic design in this space. We found affordable fixtures on Amazon to save and balance the cost of having the tile professionally installed. See the shower head here and the sink tap here.

The vanity was a DIY and one that I’m so proud we were able to pull off. I’d actually bought this tallboy dresser off facebook marketplace for one of the bedrooms. I was out of town so sent my dad and sister to pick it up and they told me that it had broken legs and the bottom drawer was pretty busted too. I was really disappointed until I was again looking for a dresser on marketplace to use for a vanity and my dad suggested we cut down the one we had.
We shortened the legs to remove the broken pieces and took out the bottom drawer, bringing the trim piece from the bottom up to below the third drawer. I say ‘we’ but my dad did this for us- we just dropped it off broken and picked it up all pretty! Doesn’t it look like it was made for this space?! Especially that back little ledge.


We used a drop in sink. I chose this sink with detailing and it was so affordable. The dresser was originally $60 on marketplace and the sink was under $40 making it SUCH an affordable vanity. The gold tap finishes it off! I did have my heart set on a classic one with X knobs like this or even something totally funky like this, but our budget pointed us towards a more basic option. It looks totally beautiful too.
The vanity light was another compromise. I’d bought a beautiful picture frame style light and when I was about to install it, it didn’t even cover the lightbox. Sometimes Amazon finds are a total deal and other times they’re just a flop. Because Calgary is much bigger than Kamloops where we live, we found a light that could do next day delivery and had it installed next day. I think it still looks totally beautiful even though it’s a bit different than what we’d had in mind! You can see that here.
The star light over the tub I’m planning to rub and buff to gold when I get back there. I bought a few of them for the hallways of the house too- they really are so simple but pretty! When we ordered them, the nickel was 50% off so it was worth the hassle. They’re the same price as gold now.
The mirror was a Homesense find (of course), it’s honestly the only place I like to buy mirrors, they’re always more affordable there and there’s some great options!


The DIY art is definitely temporary It’s a small walmart frame and some dollar store craft paints made at 11pm. I wish I was kidding but I can’t explain to you how quickly we had to pull this together. I’m excited to head back one day when we have some time to play and I’ll DIY some art with a wooden frame for the space. I’d love to see it much bigger. But it works for now! It definitely needed some art there. And I’m proud of what we created with the time crunch.
I think that’s it! I’m so so happy with how it turned out. It definitely feels luxurious to shower and get ready in here. I think my favourite part is the floor. I had such a hard time getting our whole team (my dad, husband, and my dad’s wife) on board with it since I couldn’t find example images to show. I’m so glad they trusted me :)
Tux House is our rental property in Calgary, Alberta. Located in the inner city neighbourhood of Tuxedo, this 1940’s charmer has a main floor & basement suite that we’ve shared the transformation of here on Lemon Thistle!
You can shop this classic home right here.
MORE TUX HOUSE:


LIKE IT? PIN IT!

 2 Dark and Moody Bedrooms
I love the black with white flower floor tile! Usually you do see it the opposite colour way. Despite their trendiness in the past few years, I think that the tiny hexagons are a great classic choice for an older house.
Thank you so much Nicole! I agree! They’re classic but also it’s fun that they’re on trend right now :)
Hello, very interesting project. I’m wonder what’s the measurement of your bathroom. Do you think it’s possible to install bathtub and shower in 4.30 m2 space? Your looks great! Thank you for feedback 😊
It would totally depend on your door placement! I’d map it out with painters tape on the floor :)