A simple DIY shelf/ box to store saw blades in- perfect for organizing the workshop. Acrylic dividers make it easy to find the blade you’re looking for in this DIY saw blade storage box.

Today I’m excited to be partnering with Kreg Tools to share a simple DIY to help get your shop or garage or wherever you work a little more organized! They’re celebrating September with a ‘Back to Shop’ campaign while kids are going back to school and I love this idea! After a busy summer, getting into your shop and getting organized and getting creative building something again. This DIY is really basic and uses only three power tools- a circular saw, a drill, and a sander (which is totally optional).
We had been storing our saw blades on our slat wall which worked really well for us for a while. But then we got more saw blades for more types of materials… saw blades for masonry, saw blades for hardie board, sawblades for the circular saw and for the table saw and for the miter saw… and you had to take them all off the peg to find the one you were looking for. I love that now, we can easily find what we’re looking for. We might label the sections which will help too!

Alright… ready for the DIY instructions and free plans?
To build this saw blade storage box, you will need:
- 3/4″ Thick, Half Sheet, Plywood
- 1 Sheet of acrylic
- 3/4″ soft wood Kreg Screws
- Kreg Jig (I used the K4)
- Circular saw with Kreg Rip Cut OR Table Saw
- Drill
- Tape measure
- Utility Knife with straight edge like level or square


First things first, figure out how big you need to cut your plywood and cut it to size! I used my Kreg Rip Cut to cut the 3/4″ plywood to size. I sized mine for the largest type of saw blade we needed which meant 11 1/2″ interior for us. I made it a perfect square, so had the top and bottom cut 1 1/2″ longer.


If you haven’t used a Rip Cut before, it’s a track guide for cutting with a circular saw. The blue runs along the edge of your material (plywood here) so that your saw cuts perfectly straight. It’s easy to use and perfect if you don’t have room or budget for a table saw. I do have a tablesaw but it’s out at a job site we’re working at right now, so I was glad I have the Rip Cut as well!


Sand if needed. I used a palm sander, but you could skip this all together or just use sandpaper and no sander.
Next, I drilled my pocket holes using the Kreg Jig. Make sure to adjust all the settings on the Kreg Jig to the proper material depth, then get drilling! I drilled two pocket holes on each end of the side pieces.

Now it’s time to cut your grooves for the acrylic dividers! I had originally thought I’d use hardboard for the dividers. But that would mean buying a plunge router to get the right size grooves. In the spirit of getting creative and finding solutions using the tools you have… I set my saw to 1/4″ depth (the track on the Rip Cut means it’s actually shallower!) and cut grooves into the plywood top and bottom. I used the acrylic because it’s thinner and fit perfectly in the grooves and I totally love how it easily lets you see your saw blades. I cut four grooves, the first is the closest the rip cut can cut to the guide. I flipped the material around to cut the other two. Cut these on the top and the bottom before assembling.


Now you can assemble the four sides using your Kreg screws. Be sure to line up your grooves front to back so you will be able to slide in your dividers. IF you want a back to your box (I had originally put one in then took it back it out), then use your Rip Cut with the circular saw blade on a shallow setting to cut grooves into the back of both sides before assembling. Slide your backing down into those grooves before screwing the top of the box on.


Once the box has been assembled, cut your acrylic dividers to size. Again, you could choose to route thicker grooves and use hardboard for your dividers. I used acrylic I had on hand. Cut acrylic by scoring with a utility knife and a straight edge (score it quite a few times), then snapping it over the edge of a table. My first one broke off the line because I hadn’t scored enough. This is one of those times where pure force for scoring the grooves really is helpful. I did two dividers on my own before I went and asked Shane to do the last two (he’s cut acrylic before and is just so much more efficient at scoring deep lines than I am).

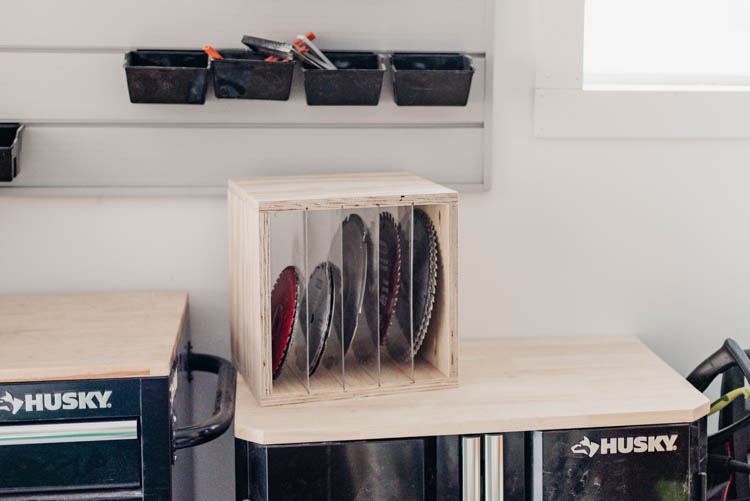
Slide your dividers into your DIY saw blade storage box and you’re good to go! You could mount this box to the wall if you like or leave it on a worktop like I did. Sort away and if you like… label the sections of saw blades! I’m so happy with how this cleans up our space and makes it easier to find what I’m looking for.
If you want to save these DIY saw blade storage box plans without the chatter- you can find the full plans over on BuildSomething.com RIGHT HERE!
 Modern Neutrals Fall Home Tour
Beautiful – and now I have another reason to buy a rip cut. I have a router, but no table and had never thought long enough on this problem to solve it this way! If I could just get my pile of emergency projects complete I could build with wood again!