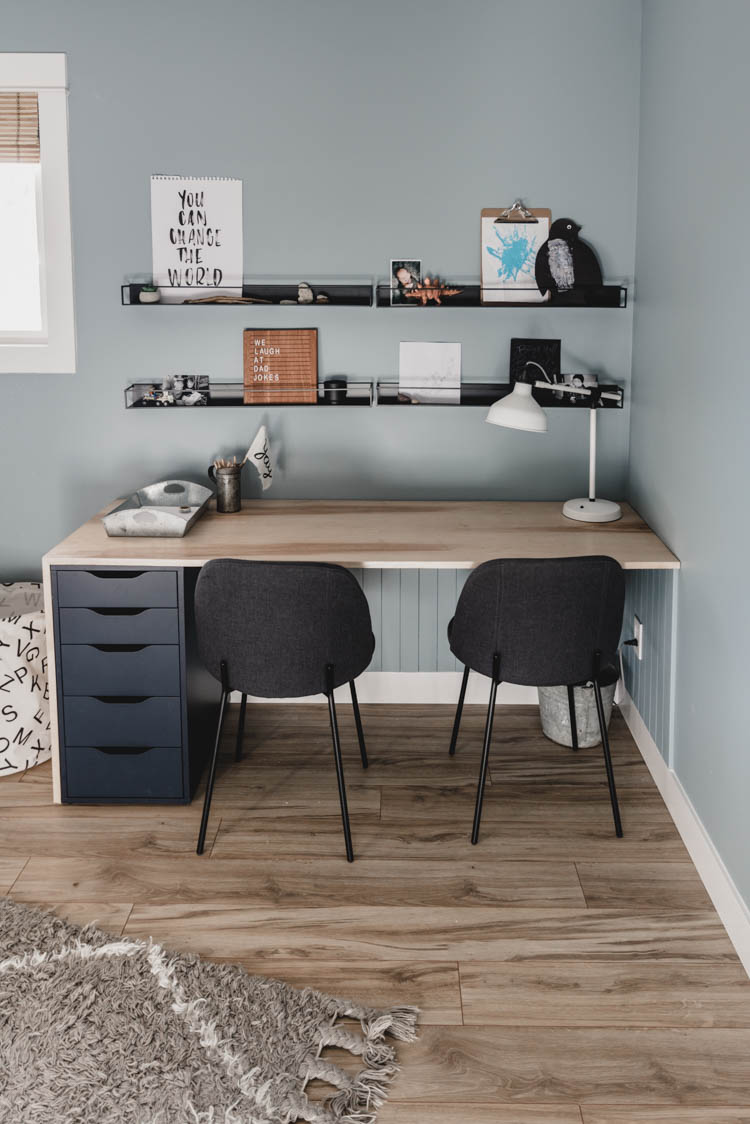
This plywood DIY double desk is the perfect solution for a shared kids space- plus it’s an IKEA hack! Using scandi inspired maple plywood with a waterfall edge and vertical shiplap under the desk top, this desk isn’t just practical but a modern design element.

When we made over our boys’ bedroom for the One Room Challenge, this was the one biggest request… a desk. But not just any desk… a desk with drawers. But the challenge was that I wanted a desk big enough to sit both of the boys. And that really meant building a desk or paying a price that we just weren’t up for. But building drawers? We’ve done it before, but it’s definitely not something I was eager to take on as one little part of a 6 week room makeover. So IKEA it was!
I was half excited about this and half feeling like it was a compromise. But the more planning and the closer we got to finishing this baby, the more I felt like it was the perfect piece for our boys’ space. Especially once we decided on the skinny shiplap under the desk to match the feature wall in their room. It’s seriously such a perfect piece in here! And simple to make to boot.

One of my goals with this space was to keep the it quiet. Does that sound crazy? Probably. What I mean is that it’s a LOT of things to fit into a bedroom. THREE kids beds, a toy chest, a desk… NO a double desk. It’s a lot. I didn’t want it to look cluttered and busy but I wanted there to be design and texture. So keeping with the muted blues of the walls and the same light wood tones as the floor made it feel like a part of the room, not another thing thrown in there. The waterfall desk top looks so nice and clean compared to the boards we were going to put together or the live edge we were considering but it’s still so interesting. I’m in love with it, you guys.
Ready for the DIY?
To Hack these IKEA Alex Drawers into a double desk, you’ll need:
- IKEA Alex Drawers (we used the blue)
- 3/4″ Plywood (we used this maple one)
- Wood Veneer Edging (if you don’t like the plywood edge- I usually do but like how clean this is. We used birch since there was no maple) + Iron
- Baseboard OR plywood cut to strips. We had this leftover from our wall. + paint to match your wall color
- Clear Poly (we always use satin, like this one) + brush
- Circular Saw
- Table Saw with Mitre option
- Chop Saw
- Brad Nailer with nails
- Wood Glue
- Fine grit sandpaper
- 1″ L Brackets
- 1 1/4″ Screws + Drill
- Dowel, max 3/4″ for legs optional
Phew! That’s a long list for a pretty simple build, isn’t it? Okay before you look at these photos, know that we were working on a super tight deadline and were working in the middle of the night. Crappy iPhone photos it is for this tutorial, but it’s a great outcome, so you don’t mind… right?! ;)

The first thing you’ll want to do is put your IKEA cabinet together. Then double check your measurements (height) and length to the outside edge of the cabinet from the wall (corner). When you’ve decided your exact measurements, you can get cutting your plywood and your baseboards.

Let’s talk about the baseboards. Those not only look rad but act as a kick so you don’t end up with damaged drywall from kicking feet (three boys share this space! it was bound to happen!). They also act as the support for the desk top. You want to cut them to sit on top of your current baseboard to the top edge of the drawer unit. You can install these by nailing them in place using your brad nailer. We started from the corner and worked our way out.

Cutting the plywood with the miter edge is a bit of a trick. We tried a few ways and failed… ugh. But we’ve found a way that was SO MUCH easier than anything else we tried and did a great job too. Start by cutting your plywood to depth of the desk. This is the depth of your IKEA drawer unit plus YOUR current baseboards. We do this on the table saw.
Next, use your circular saw to cut your plywood to length, leaving an inch or two extra. Then, it’s time to miter! Set your table saw to a miter and using two sets of hands (don’t try balance that board yourself!), run your board through the table saw again, paying attention to which side of your plywood is the good side. Now that you have your miter, go and make an exact measurement and run through a straight cut on the other end. Having the inch or two extra is great if you need a practice run on your miter.
Do this for both pieces and then bring it in to your space to dry fit. This is where you will make note of how to notch your vertical piece for your baseboard and decide if you need legs (we did, this was the first piece we cut and it took us a couple tries… whoops!). You’ll also see if your corner of the wall is square… ours wasn’t! We put the desk top in place and there was a significant gap at the back corner. We used a piece of baseboard (anything thick enough to cover the gap) to trace the wall angle onto the plywood. We went back and cut that with the table saw. We notched the baseboard with a jigsaw but you could do it carefully with a circular saw.

Bring those back into your space and let’s get them installed! If you DO need feet or like the look of this (I really do!), you can cut dowel to length and just attach those with wood glue and a couple brad nails as well. We first installed this vertical piece. We took the drawers out of our IKEA unit and used screws to attach the vertical panel. Then, we added the wood glue to the miter cut, laid the desk top in place and used screws to secure it to the IKEA drawers as well. This sucked the miter cut together. Then, we chose to use small 1″ x 1″ L brackets to reinforce the desk. We attached a couple to the back wall (the baseboard) and to the desktop. This sucked down the desktop to keep it from making noise with use and to reinforce it for all the little people we knew would be climbing on it.

Now it’s time for finishing! The first thing you’ll want to do is apply the edge tape / wood veneer. You can skip this if you like the look of the plywood edge. My biggest motivation for using the edge tape was to quiet the room. I felt like there was a lot going on in a small space and didn’t want it to seem too busy. This is one of the things that I did to quiet it a bit. To use wood veneer edging, you just use an iron and adhere it according to the package directions. I cut the angle of the miter using scissors. When that’s done, you can trim it to width. I did this with a sharp knife and then sanded with a fine grit sandpaper to smooth edges (also sanded the miter).
Then… painting and clear coat! I used a satin clear coat on the top and waterfall edge (the vertical plywood) and did about 4 coats. I probably could have done more but was rushing to get this space put back together for the One Room Challenge deadline! I painted two coats of blue under the desk to match the wall color.

Alright… that’s it! We’re so in love with how this desk turns out and it functions so perfectly for our kids to colour at. We’re looking forward to putting it to work for years to come! If you want to see the full bedroom makeover and find sources for ALL the things in this room, you can check that out RIGHT HERE!
 Summer Home Tour!
Hello! Can you explain a little more how you attached the wood to the drawers? Have you experienced any bowing? I just finished my piece of plywood to attach to two Alex drawers because for some reason IKEA’s next size up is too wide for the drawers- so I made it myself. It’s not as thick as the ikea table too and I worry that with a 6 year old always pushing down on it, it will eventually now in the middle. Anyway, we need to secure it to the desk so he can’t lift it up. Just screw holes in the Alex drawers- from inside the cabinet, into the bottom of the desk? Thanks!
Yes that’s what we did! Our 6 year olds (we have 2) climb on it from time to time and it flexes but hasn’t bowed once they climb down :)
What color is on your walls?
Hi! It’s Nor’Wester from Behr ;)
Hello! Fantastic job on the room. Curious where you got the black wall ledges? With thanks.
They’re from the IKEA Sammanhang line :)
Love this idea and plan on duplicating it in my daughter’s room. How sturdy is the plywood top? We are going to build a double desk with drawers between the 2. One side will be used for art and the other side for gaming. Is it sturdy enough to hold a monitor without buckling in the middle?
It’s very sturdy! I’ve stood on it to paint the ceiling :)
did you stain the wood tabletop or was it just clear coat?
I used 4 coats of clear poly in a satin finish.
This is my preferred poly https://www.homedepot.ca/product/varathane-triple-thick-clear-sat-946ml/1000833064
These are great ideas. I love your post so much! Thank you for sharing great posts!
What length is the desk?
This desk is 67 inches long.