*This post is sponsored by Cricut (who I love!). Find all my policies here*

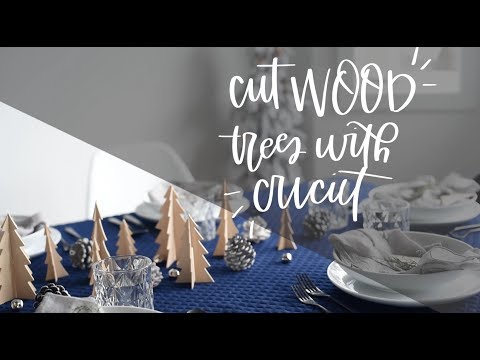
So I finally did it, you guys! I CUT WOOD with my Cricut Maker. And I’m obsessed. I learned a few things along the way but out of all the random materials that I’ve tried cutting with the Maker… this went flawlessly. I’m really so impressed and ended up not only cutting the 3D wood trees for the centrepiece as I’d planned but also some little wooden tree place cards to coordinate!


Before I get to the DIY tutorial and some tips (and a video!)… let’s talk about the tablescape!
I really wanted the wooden trees to pop and be the focus. Our table is a natural wood colour so I opted for a dark navy table cloth. This quilted looking fabric I bought for my birthday party tablecloth a few years ago and while I’ve still never hemmed it, I’ve used it several times. I love how it’s dark and lovely and has so much texture. I used my every day dish ware (which I’m totally in love with since upgrading!) with some pretty cloth napkins I got this fall (you can see them in this tablescape too!).
To add a little more holiday bling to the centrepiece, I added some jingle bells as well as some glittery pinecones. Other than making the wooden trees… this was SO SIMPLE to pull together. I will definitely be pulling all of this back out for Christmas dinner.
Alright… on to the DIY!
You can find that video and so many other rad ones on my YouTube channel… are you following along over there yet? I’d love you to join me!
For these wood 3D trees, you’ll need:
- 1/16 Craft Basswood (I could only get these 3″ and 4″ pieces from my craft store)
- Cricut Maker
- Cricut Knife Blade
- Strong Grip Mat (don’t plan to use it after if you cut this many trees!)
- Cricut Access for Designs (get my Project HERE)
- Painters Tape
- Permanent Marker for Place Cards
Before you do anything else- if you’d like to use my project design- you can grab that RIGHT HERE. All of the elements I used for this project are included with Cricut Access. I used a standard 3d tree design but thickened the lines that you hook them together with since the wood is thicker. This gives them a loose fit but I’d rather that than too tight and risking breaking them when putting them together! This also makes them easy to take apart and store.

Once you open up the project, choose the trees you want to make and duplicate as need be. When you hit MAKE IT, you’ll be shown your mats that are laid out how Cricut Design Space thinks is the best use of space. If you’re like me and your wood is in strips of 3 or 4″, you’ll want to rearrange these designs to fit on that. You can hide any designs that don’t fit on your strip of wood.
From there, you’ll want to search for basswood and choose 1/6″ in your materials. This will automatically populate the knife blade as the tool you need to cut it with. If you’ve never used the knife blade before (which I hadn’t!), you’ll need to calibrate it. This just cuts a few lines in a sheet of printer paper and then you pick which one did the best job. It helps make sure the multiple passes on your cuts (the wood takes several passes to cut cleanly) are exactly where they should be.
Now it’s time to prep your mat! Use a Strong Grip mat for this and line up your strip of basswood exactly where you want it to cut. I chose to line mine up along the same 1″ markers on the mat to make it easy. Tape down the top and bottom of your wood onto the mat using a painters tape.


Once you have your mat ready and your design ready… get your machine ready! Move your star wheels (the little white tracking wheels) over to the sides of your machine. If you forget this, it will give you a mega imprint in your wood. You move the star wheels out of the way with any thicker material (like leather!). Then you can load your mat up and hit GO!
This cut takes a freaking long time. But it’s worth it because it does a perfect job. Walk away. Go get a coffee or make lunch. Check back in a bit. What I do love about this is that it times how long the first pass (the first time it cuts out your shapes) takes and then gives you an estimated time for your project based on that. When I was making the tiny trees (lots of cuts on one strip of wood!), the cut took almost 45 minutes. But when it was done… those little wooden trees popped out. So that’s worth it, I think! I really want to try cutting my own lettering out with this knife blade. Maybe for a wreath?


Alright! That’s it, that’s all. It really is so easy to pull together once they’re cut. I had absolutely no problems cutting the wood (and I’m not going to lie… I am an impatient crafter so getting things right the first time is pretty unusual for me!).
This is a sponsored conversation written by me on behalf of Cricut. The opinions and text are all mine.

I wish you had given a pattern. I cut wooden crafts.
They’re from Cricut Design Space :)